Blueberry Cheesecake Ice Cream: A Deliciously Creamy Summer Treat
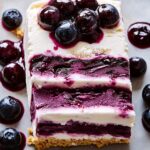
Enjoy the delightful combination of creamy cheesecake and fresh blueberries in this homemade Blueberry Cheesecake Ice Cream. With a rich cream cheese base and a swirl of luscious blueberry sauce, it’s the perfect treat for any occasion!
- Prep Time: 20 minutes
- Cook Time: 15 minutes
- Total Time: 360 minutes
- Yield: 1.5 quarts 1x
Ingredients
Scale
- 2 cups fresh blueberries (or frozen, if fresh are unavailable)
- 1 cup granulated sugar, divided
- 1 tablespoon lemon juice
- 1 teaspoon vanilla extract
- 1 cup cream cheese, softened
- 1 cup heavy cream
- 1 cup whole milk
- 1 teaspoon vanilla bean paste (or an additional teaspoon of vanilla extract)
- 1/4 teaspoon salt
- 1/2 cup crushed graham crackers (for garnish)
Instructions
- In a medium saucepan, combine the fresh blueberries, 1/2 cup of granulated sugar, and lemon juice.
- Cook over medium heat, stirring occasionally, until the blueberries start to break down and release their juices, about 5-7 minutes.
- Once the mixture is bubbling, reduce the heat to low and let it simmer for another 5 minutes.
- Remove from heat and let it cool slightly.
- For a smoother sauce, blend the mixture using an immersion blender or transfer it to a blender and pulse until smooth.
- Set the blueberry sauce aside to cool completely while you prepare the ice cream base.
- In a large mixing bowl, beat the softened cream cheese with the remaining 1/2 cup of granulated sugar until smooth and creamy.
- Add the heavy cream, whole milk, vanilla extract, vanilla bean paste, and salt to the bowl.
- Using an electric mixer, beat the mixture on medium speed until it is well combined and slightly thickened, about 2-3 minutes.
- Taste the mixture and adjust the sweetness if necessary by adding more sugar, a tablespoon at a time, until it reaches your desired sweetness.
- Once the blueberry sauce has cooled completely, gently fold it into the ice cream base.
- Use a spatula to swirl the blueberry sauce into the mixture, creating a marbled effect. Be careful not to overmix; you want to see ribbons of blueberry throughout the ice cream base.
- Cover the bowl with plastic wrap or a lid and refrigerate the ice cream base for at least 2 hours, or until it is thoroughly chilled.
- Once the mixture is chilled, pour it into your ice cream maker.
- Churn according to the manufacturers instructions, usually about 20-25 minutes, until it reaches a soft-serve consistency.
- If you dont have an ice cream maker, pour the mixture into a shallow dish and place it in the freezer. Stir it every 30 minutes for about 3-4 hours until it reaches a creamy consistency.
- If you like a bit of crunch, fold in the crushed graham crackers into the ice cream during the last few minutes of churning.
- Transfer the churned ice cream to an airtight container.
- Smooth the top with a spatula and drizzle any remaining blueberry sauce on top, swirling it gently with a knife for a beautiful presentation.
- Seal the container with a lid and place it in the freezer for at least 4 hours, or until it is firm.
- If youre planning to serve it later, let it sit at room temperature for about 10-15 minutes before scooping to make it easier to serve.
- Scoop the ice cream into bowls or cones, and if desired, top with additional blueberry sauce and a sprinkle of crushed graham crackers for that cheesecake effect.
- Enjoy your homemade blueberry cheesecake ice cream with friends and family, and watch as they rave about the delicious flavors and creamy texture!
Notes
- Store any leftover ice cream in an airtight container in the freezer. Its best enjoyed within 2-3 weeks for optimal flavor and texture.
- If the ice cream becomes too hard, let it sit at room temperature for a few minutes before scooping.
Find it online: https://anasrecipes.com/blueberry-cheesecake-ice-cream/