
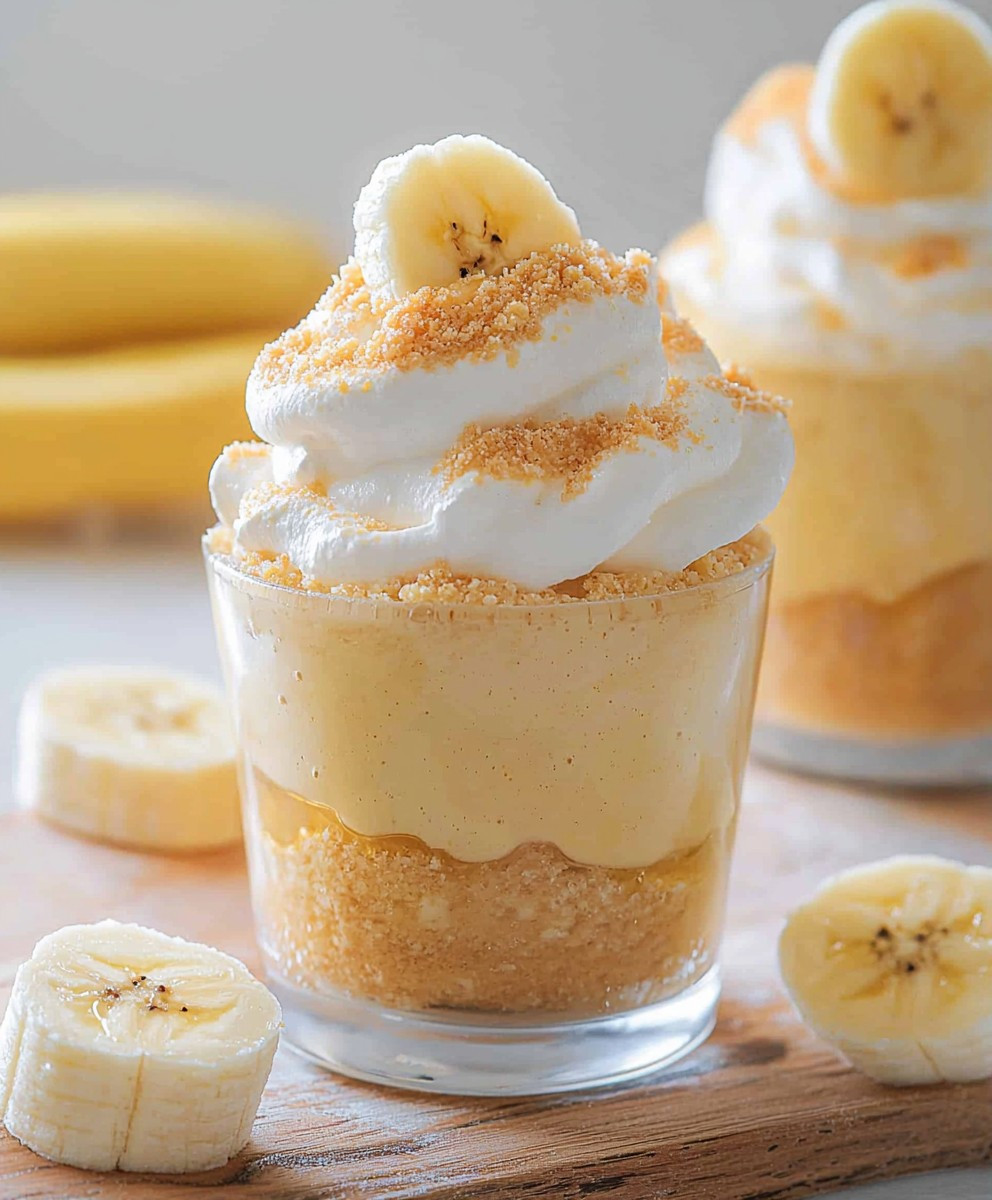
Banana Pudding Cups are a delightful treat that never fails to bring a smile to my face. This classic dessert has roots deeply embedded in Southern cuisine, where it has been cherished for generations. The creamy layers of vanilla pudding, fresh bananas, and crunchy Nilla wafers create a harmonious blend of flavors and textures that is simply irresistible. I love how Banana Pudding Cups are not only delicious but also incredibly convenient to prepare, making them a perfect choice for gatherings or a sweet indulgence at home.
What truly captivates people about Banana Pudding Cups is their nostalgic charm and the way they evoke memories of family gatherings and warm summer days. The combination of smooth, velvety pudding and the slight crunch of cookies creates a satisfying experience that keeps everyone coming back for more. Whether youre serving them at a picnic or enjoying them as a late-night snack, these cups are sure to become a favorite in your household, just as they have in mine.

Ingredients:
- 4 ripe bananas, sliced
- 1 box (3.4 oz) instant vanilla pudding mix
- 2 cups cold milk
- 1 cup heavy whipping cream
- 1/2 cup powdered sugar
- 1 teaspoon vanilla extract
- 1 box (11 oz) vanilla wafers
- Optional: additional banana slices and crushed vanilla wafers for garnish
Preparing the Pudding
- In a medium-sized mixing bowl, combine the instant vanilla pudding mix and cold milk. Whisk them together until the mixture is smooth and well combined. This should take about 2 minutes.
- Once the pudding is thickened, cover the bowl with plastic wrap and place it in the refrigerator to chill for about 15 minutes. This will help the flavors meld together and ensure a creamy texture.
Making the Whipped Cream
- While the pudding is chilling, its time to whip the cream. In a large mixing bowl, pour in the heavy whipping cream.
- Add the powdered sugar and vanilla extract to the bowl. The powdered sugar not only sweetens the cream but also helps stabilize it.
- Using an electric mixer, beat the cream on medium-high speed until soft peaks form. This usually takes about 3-5 minutes. Be careful not to overbeat, as you want a light and fluffy texture.
Combining the Pudding and Whipped Cream
- Once the pudding has chilled, remove it from the refrigerator. Gently fold the whipped cream into the pudding mixture using a spatula. Start by adding about a third of the whipped cream to the pudding and mix it in to lighten the pudding.
- Then, carefully fold in the remaining whipped cream until fully combined. The goal is to keep the mixture light and airy, so be gentle during this process.
Assembling the Banana Pudding Cups
- Now that we have our pudding and whipped cream mixture ready, its time to assemble the cups. Grab your serving cups or bowls. You can use clear plastic cups, mason jars, or any dessert cups you have on hand.
- Start by placing a layer of vanilla wafers at the bottom of each cup. You can break them into smaller pieces if you prefer a more even layer.
- Next, add a layer of the pudding mixture on top of the wafers. Use a spoon or a piping bag for a cleaner look.
- Now, add a layer of sliced bananas on top of the pudding. Make sure to distribute them evenly across all cups.
- Repeat the layers: add another layer of vanilla wafers, followed by more pudding, and then more banana slices. You can create as many layers as you like, but I usually aim for three layers for a nice balance.
- Finish off with a dollop of the remaining whipped cream on top of each cup. This is where you can get creative with your presentation!
Garnishing the Cups
- If you want to take your banana pudding cups to the next level, consider garnishing them. You can add a few extra banana slices on top of the whipped cream for a fresh look.
- For an added crunch, sprinkle some crushed vanilla wafers over the whipped cream. This not only looks appealing but also adds a delightful texture.
- For a touch of elegance, you can also drizzle a little caramel sauce or chocolate syrup over the top. Just a small drizzle will do!
Chilling and Serving
- Once your cups are assembled and garnished, cover them with plastic wrap or lids if youre using jars. Place them in the refrigerator for at least 2 hours before serving. This chilling time allows the flavors to meld and the wafers to soften slightly, creating a deliciously creamy texture.
- When youre ready to serve, remove the cups from the refrigerator. If youve used plastic wrap, be careful when removing it to avoid disturbing the whipped cream topping.
- Serve the banana pudding cups chilled. You can provide spoons
Conclusion:
In summary, these Banana Pudding Cups are an absolute must-try for anyone looking to indulge in a delightful dessert that combines creamy textures with the sweet, comforting flavor of bananas. The layers of velvety pudding, crunchy vanilla wafers, and fresh banana slices create a harmonious balance that is sure to please both kids and adults alike. Plus, they are incredibly easy to prepare, making them a perfect choice for gatherings, potlucks, or simply a sweet treat at home. For serving suggestions, consider topping your Banana Pudding Cups with a dollop of whipped cream or a sprinkle of crushed nuts for added texture. You can also experiment with variations by incorporating different flavors, such as chocolate pudding or adding a hint of peanut butter for a unique twist. If you’re feeling adventurous, try layering in some fresh berries or even a drizzle of caramel sauce to elevate the experience. I wholeheartedly encourage you to give this recipe a try! I would love to hear about your experience and any creative twists you put on it. Dont forget to share your Banana Pudding Cups on social media and tag your friends to spread the joy of this delicious dessert. Happy cooking! PrintBanana Pudding Cups: Easy and Delicious Dessert Recipe for Any Occasion
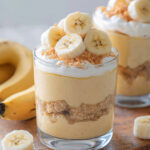
Enjoy these easy-to-make Banana Pudding Cups, featuring layers of creamy vanilla pudding, fresh banana slices, and crunchy vanilla wafers. Perfect for any gathering, these delightful cups are sure to impress with their delicious flavor and appealing presentation.
- Prep Time: 30 minutes
- Cook Time: 0 minutes
- Total Time: 150 minutes
- Yield: 6–8 servings 1x
Ingredients
- 4 ripe bananas, sliced
- 1 box (3.4 oz) instant vanilla pudding mix
- 2 cups cold milk
- 1 cup heavy whipping cream
- 1/2 cup powdered sugar
- 1 teaspoon vanilla extract
- 1 box (11 oz) vanilla wafers
- Optional: additional banana slices and crushed vanilla wafers for garnish
Instructions
- In a medium-sized mixing bowl, combine the instant vanilla pudding mix and cold milk. Whisk until smooth, about 2 minutes.
- Cover the bowl with plastic wrap and refrigerate for 15 minutes to chill.
- In a large mixing bowl, pour in the heavy whipping cream.
- Add the powdered sugar and vanilla extract.
- Using an electric mixer, beat on medium-high speed until soft peaks form, about 3-5 minutes. Be careful not to overbeat.
- Remove the chilled pudding from the refrigerator.
- Gently fold one-third of the whipped cream into the pudding to lighten it.
- Carefully fold in the remaining whipped cream until fully combined, keeping the mixture light and airy.
- Grab your serving cups or bowls.
- Place a layer of vanilla wafers at the bottom of each cup.
- Add a layer of the pudding mixture on top of the wafers.
- Distribute sliced bananas evenly on top of the pudding.
- Repeat the layers: vanilla wafers, pudding, and banana slices, aiming for three layers.
- Finish with a dollop of the remaining whipped cream on top.
- Garnish with extra banana slices on top of the whipped cream.
- Sprinkle crushed vanilla wafers for added crunch.
- Drizzle with caramel sauce or chocolate syrup for an elegant touch.
- Cover the assembled cups with plastic wrap or lids and refrigerate for at least 2 hours.
- Serve chilled, and enjoy your delicious Banana Pudding Cups!
Notes
- For best results, use ripe bananas for optimal sweetness and flavor.
- Feel free to customize the layers based on your preference.

Leave a Comment