
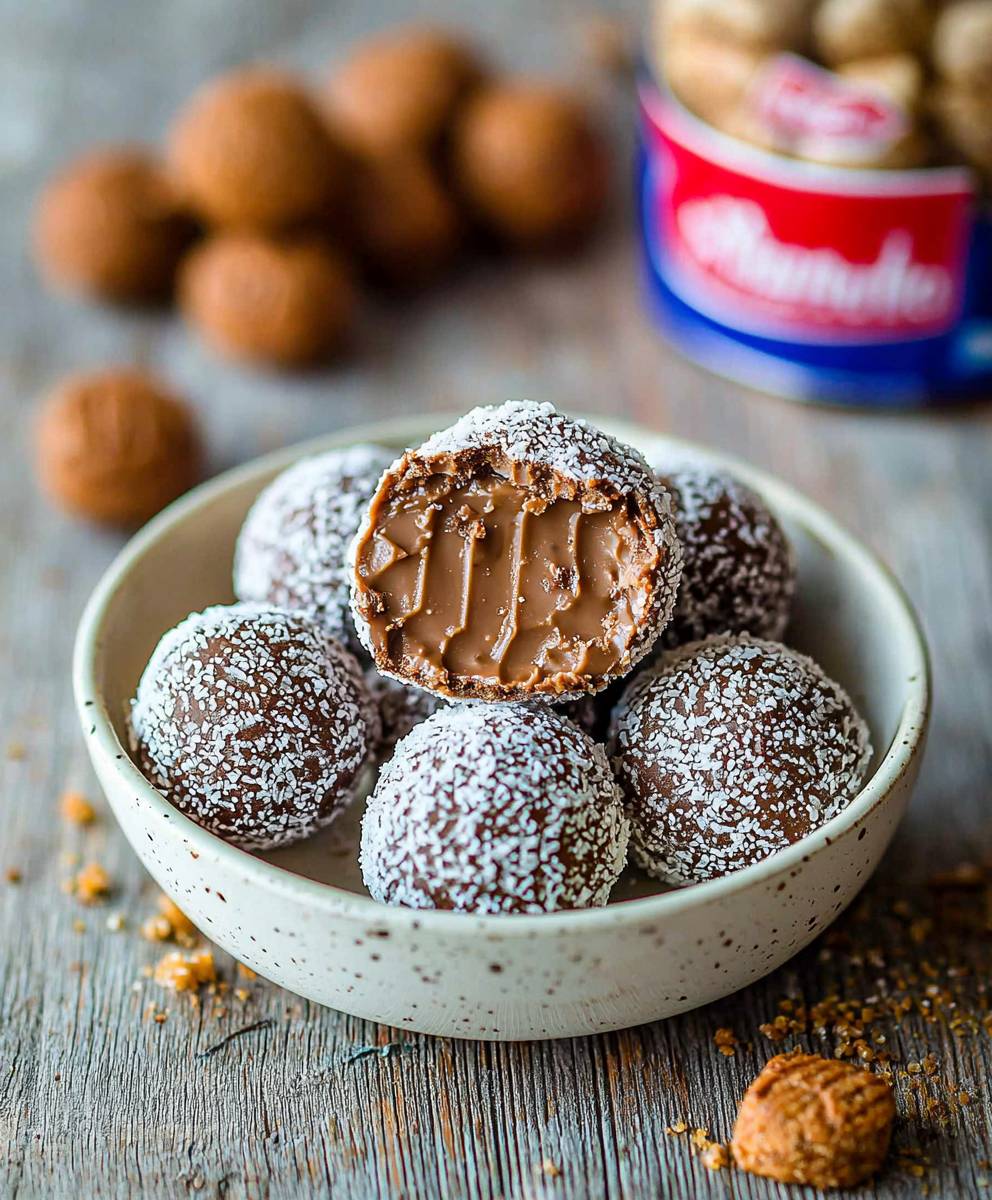
Chocolate Biscoff Truffles are a delightful treat that combines the rich, velvety taste of chocolate with the unique, spiced flavor of Biscoff cookies. As a lover of all things sweet, I can confidently say that these truffles are not just a dessert; they are an experience. The history of Biscoff cookies dates back to the early 1900s in Belgium, where they were originally served with coffee. Today, they have become a beloved ingredient in various desserts, and these truffles are a perfect example of their versatility.
People adore Chocolate Biscoff Truffles for their indulgent taste and creamy texture, making them a perfect bite-sized treat for any occasion. Whether youre hosting a gathering or simply treating yourself, these truffles are incredibly easy to make and require minimal ingredients. The combination of chocolate and Biscoff creates a harmonious blend that is both comforting and exciting. Join me as we dive into this delicious recipe that is sure to impress your friends and family!

Ingredients:
- 1 cup Biscoff cookies, crushed into fine crumbs
- 1/2 cup cream cheese, softened
- 1/2 cup semi-sweet chocolate chips
- 1/4 cup Biscoff spread
- 1 teaspoon vanilla extract
- 1/2 cup chocolate chips (for coating)
- 1/4 cup crushed Biscoff cookies (for garnish)
Preparing the Truffle Mixture
- In a large mixing bowl, combine the crushed Biscoff cookies and softened cream cheese. Using a spatula or your hands, mix them together until well combined. The mixture should be thick and slightly sticky.
- Add the Biscoff spread and vanilla extract to the bowl. Continue mixing until everything is evenly incorporated. The mixture should be smooth and have a rich, caramel-like flavor.
- Next, melt the semi-sweet chocolate chips. You can do this in a microwave-safe bowl in 30-second intervals, stirring in between, until fully melted and smooth. Alternatively, you can use a double boiler on the stove. Once melted, let it cool slightly before adding it to the cookie mixture.
- Pour the melted chocolate into the Biscoff mixture. Stir well until the chocolate is fully integrated, and the mixture is uniform in color and texture. This will give your truffles a deliciously rich chocolate flavor.
- Cover the bowl with plastic wrap and refrigerate the mixture for about 30 minutes. This will help it firm up, making it easier to roll into balls.
Rolling the Truffles
- Once the mixture is chilled and firm, take it out of the refrigerator. Using a small cookie scoop or your hands, scoop out about a tablespoon of the mixture and roll it into a ball. Place the rolled truffles on a parchment-lined baking sheet.
- Repeat this process until all the mixture is rolled into balls. You should have about 20-25 truffles, depending on the size you make them.
- After rolling all the truffles, place the baking sheet back in the refrigerator for another 15-20 minutes to firm them up further. This step is crucial for achieving the perfect texture.
Coating the Truffles
- While the truffles are chilling, melt the additional 1/2 cup of chocolate chips for coating. Again, you can use the microwave or a double boiler method. Make sure the chocolate is smooth and fully melted.
- Once the truffles are firm, take them out of the refrigerator. Using a fork or a toothpick, dip each truffle into the melted chocolate, ensuring it is fully coated. Allow any excess chocolate to drip off before placing the truffle back on the parchment-lined baking sheet.
- Before the chocolate coating sets, sprinkle a little crushed Biscoff cookies on top of each truffle for garnish. This adds a nice crunch and enhances the Biscoff flavor.
- Repeat the dipping and garnishing process for all the truffles. If the chocolate starts to harden, you can reheat it gently to keep it smooth.
Setting the Truffles
- Once all the truffles are coated and garnished, place the baking sheet in the refrigerator for about 30 minutes to allow the chocolate coating to set completely. This will give your truffles a beautiful finish and make them easier to handle.
- After the chocolate has set, you can transfer the truffles to an airtight container. They can be stored in the refrigerator for up to two weeks, but I doubt theyll last that long!
Serving Suggestions
- When youre ready to serve, take the truffles out of the refrigerator and let them sit at room temperature for about 10 minutes. This will enhance the flavor and texture.
- Arrange the truffles on a decorative plate or in a gift box if youre sharing them with friends or family. They make a fantastic homemade gift!
- For an extra touch, you can drizzle some melted white chocolate over the truffles for a beautiful contrast and added sweetness.
Tips and Variations
Conclusion:
In conclusion, these Chocolate Biscoff Truffles are an absolute must-try for anyone who loves a delightful combination of rich chocolate and the unique, spiced flavor of Biscoff cookies. The creamy texture and indulgent taste make them the perfect treat for any occasion, whether you’re celebrating a special event or simply indulging in a sweet craving. I highly recommend serving these truffles alongside a cup of coffee or tea for a delightful afternoon pick-me-up. You can also get creative with variations by rolling them in crushed nuts, coconut flakes, or even drizzling them with white chocolate for an extra touch of elegance. I encourage you to give this recipe a go and experience the joy of making these delectable Chocolate Biscoff Truffles yourself. Once you do, I would love to hear about your experience! Share your thoughts, any variations you tried, or even a picture of your truffles. Let’s spread the love for this delicious treat together! PrintChocolate Biscoff Truffles: Indulge in a Decadent Treat Today!

These Biscoff Truffles are a delightful treat made with crushed Biscoff cookies, cream cheese, and semi-sweet chocolate, all coated in a rich chocolate shell and topped with more Biscoff crumbs. Perfect for any occasion, these creamy, indulgent bites are sure to satisfy your sweet tooth!
- Prep Time: 30 minutes
- Cook Time: 10 minutes
- Total Time: 70 minutes
- Yield: 20–25 truffles 1x
Ingredients
- 1 cup Biscoff cookies, crushed into fine crumbs
- 1/2 cup cream cheese, softened
- 1/2 cup semi-sweet chocolate chips
- 1/4 cup Biscoff spread
- 1 teaspoon vanilla extract
- 1/2 cup chocolate chips (for coating)
- 1/4 cup crushed Biscoff cookies (for garnish)
Instructions
- In a large mixing bowl, combine the crushed Biscoff cookies and softened cream cheese. Mix until well combined; the mixture should be thick and slightly sticky.
- Add the Biscoff spread and vanilla extract. Mix until smooth and evenly incorporated.
- Melt the semi-sweet chocolate chips in a microwave-safe bowl in 30-second intervals, stirring in between, or use a double boiler. Let it cool slightly before adding to the cookie mixture.
- Pour the melted chocolate into the Biscoff mixture and stir until fully integrated.
- Cover the bowl with plastic wrap and refrigerate for about 30 minutes to firm up.
- Once chilled, scoop out about a tablespoon of the mixture and roll it into a ball. Place on a parchment-lined baking sheet.
- Repeat until all the mixture is rolled into balls (about 20-25 truffles).
- Refrigerate the rolled truffles for another 15-20 minutes to firm them up further.
- Melt the additional 1/2 cup of chocolate chips for coating.
- Dip each truffle into the melted chocolate using a fork or toothpick, allowing excess chocolate to drip off before placing back on the baking sheet.
- Sprinkle crushed Biscoff cookies on top of each truffle before the chocolate sets.
- Repeat for all truffles, reheating chocolate if necessary.
- Refrigerate the coated truffles for about 30 minutes to set the chocolate.
- Transfer to an airtight container for storage; they can be kept in the refrigerator for up to two weeks.
- Let truffles sit at room temperature for about 10 minutes before serving to enhance flavor and texture.
- Arrange on a decorative plate or in a gift box for sharing.
- Drizzle melted white chocolate over the truffles for an extra touch.
Notes
- Ensure the cream cheese is softened for easy mixing.
- You can adjust the size of the truffles based on your preference.
- For a different flavor, consider adding a pinch of sea salt to the chocolate coating.
Leave a Comment