
Strawberry Banana Popsicles are the perfect treat to cool down on a hot summer day. As a child, I remember eagerly waiting for the ice cream truck to arrive, but little did I know that making my own popsicles at home could be just as delightful. These vibrant, fruity popsicles not only bring back fond memories but also offer a healthier alternative to store-bought frozen treats. The combination of sweet strawberries and creamy bananas creates a deliciously refreshing flavor that is hard to resist.
People love Strawberry Banana Popsicles for their delightful taste and smooth texture, making them a favorite among both kids and adults. They are incredibly easy to prepare, requiring just a few simple ingredients, which makes them a convenient option for busy families. Plus, you can customize them to your liking by adding yogurt or a splash of coconut milk for an extra creamy twist. Whether youre hosting a summer gathering or simply looking for a quick snack, these popsicles are sure to impress and satisfy your cravings!

Ingredients:
- 2 cups fresh strawberries, hulled and sliced
- 2 ripe bananas, peeled and sliced
- 1 cup Greek yogurt (plain or vanilla)
- 1/4 cup honey or maple syrup (adjust based on sweetness preference)
- 1 tablespoon lemon juice (to enhance flavor and prevent browning)
- 1/2 teaspoon vanilla extract (optional, for extra flavor)
Preparing the Fruit
1. Start by washing the strawberries thoroughly under cold water. Remove the green tops (hulling) and slice them into halves or quarters, depending on their size. This will help them blend more easily. 2. Next, peel the bananas and slice them into rounds. If you want to speed up the process, you can also break them into smaller chunks. 3. Once you have your strawberries and bananas ready, place them in a medium-sized mixing bowl.Making the Mixture
4. Add the Greek yogurt to the bowl with the fruit. Greek yogurt adds a creamy texture and a good dose of protein, making these popsicles a healthier treat. 5. Pour in the honey or maple syrup. If you prefer a less sweet popsicle, you can start with less and adjust to your taste later. 6. Squeeze in the lemon juice. This not only brightens the flavor but also helps to keep the bananas from browning too quickly. 7. If youre using vanilla extract, add it to the mixture now. It adds a lovely depth of flavor that complements the fruit beautifully. 8. Using a fork or a potato masher, gently mash the strawberries and bananas into the yogurt mixture. You want to create a chunky texture, so dont over-mash. A few small pieces of fruit will add to the popsicle’s appeal. 9. Once everything is combined, taste the mixture. If you feel it needs more sweetness, add a little more honey or maple syrup and mix again.Filling the Molds
10. Now its time to fill your popsicle molds. If you dont have popsicle molds, you can use small paper cups and wooden sticks as an alternative. 11. Spoon the mixture into the molds, leaving a little space at the top for expansion as they freeze. If youre using paper cups, fill them about three-quarters full. 12. If you want to get creative, you can layer the mixture. For example, fill half the mold with the strawberry-banana mixture, freeze for about 30 minutes, then add another layer of just yogurt or a different fruit puree.Freezing the Popsicles
13. Once the molds are filled, insert the popsicle sticks. If youre using paper cups, place the sticks in the center of each cup. 14. Carefully place the molds in the freezer. Make sure they are upright to prevent any spills. 15. Freeze the popsicles for at least 4-6 hours, or until they are completely solid. If youre in a hurry, you can check them after 3 hours, but they may not be fully set.Removing the Popsicles from the Molds
16. When youre ready to enjoy your popsicles, remove them from the freezer. If theyre difficult to release, run warm water over the outside of the molds for a few seconds. This will help loosen them. 17. Gently pull on the popsicle sticks to remove the popsicles. If youre using paper cups, you can tear the cup away from the popsicle.Serving Suggestions
18. Serve the popsicles immediately for a refreshing treat. You can also dip them in melted chocolate or roll them in crushed nuts for an extra special touch. 19. If you have leftovers, wrap them individually in plastic wrap or store them in an airtight container in the freezer. They should last for up to 2 weeks, but I doubt theyll last that long!Variations and Tips
20. Feel free to experiment with different fruits! You can substitute the strawberries with blueberries, raspberries, or even mangoes. Just keep the same proportions for the yogurt and sweetener. 21. For a tropical twist, add a splash of coconut milk or a handful of shredded coconut to the mixture. 22. If you want to sneak in some greens, consider adding a handful of spinach or kale. The flavor will be masked by the fruit, and youll get an extra nutrient boost! 23. If youre looking for a dairy-free option, substitute the Greek yogurt with coconut yogurt or almond yogurt. 24. For a fun twist, try adding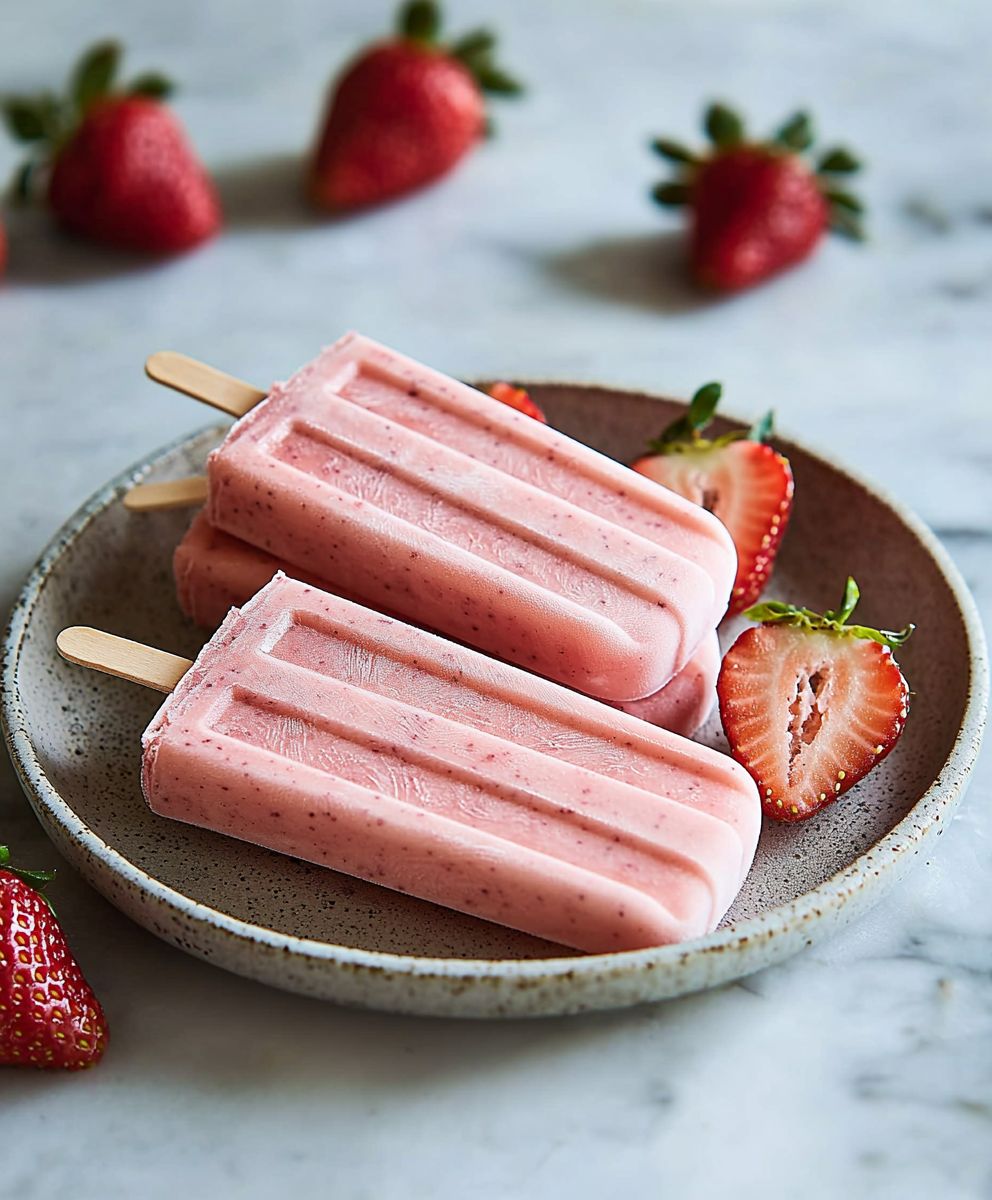
Conclusion:
In summary, these Strawberry Banana Popsicles are an absolute must-try for anyone looking to enjoy a refreshing and healthy treat. The combination of sweet strawberries and creamy bananas creates a delightful flavor that is not only delicious but also packed with nutrients. Whether you’re cooling off on a hot summer day or simply craving a guilt-free dessert, these popsicles are the perfect solution. For serving suggestions, consider pairing these popsicles with a dollop of whipped cream or a sprinkle of granola for added texture. You can also experiment with variations by adding other fruits like mango or pineapple, or even a splash of coconut milk for a tropical twist. The possibilities are endless, and I encourage you to get creative! I truly believe that once you try making these Strawberry Banana Popsicles, you’ll be hooked. They are easy to prepare, fun to customize, and a hit with both kids and adults alike. So, grab your ingredients, whip up a batch, and dont forget to share your experience with friends and family. Id love to hear how your popsicles turn out and any unique variations you come up with! Happy blending! PrintStrawberry Banana Popsicles: A Refreshing Summer Treat Recipe

These Strawberry Banana Yogurt Popsicles are a healthy and refreshing treat made with fresh fruit and creamy Greek yogurt. Easy to prepare and customizable, they are perfect for warm days and can be enjoyed by the whole family!
- Prep Time: 15 minutes
- Cook Time: 240 minutes
- Total Time: 255 minutes
- Yield: 6–8 popsicles 1x
Ingredients
- 2 cups fresh strawberries, hulled and sliced
- 2 ripe bananas, peeled and sliced
- 1 cup Greek yogurt (plain or vanilla)
- 1/4 cup honey or maple syrup
- 1 tablespoon lemon juice
- 1/2 teaspoon vanilla extract (optional)
Instructions
- Wash the strawberries thoroughly under cold water. Remove the green tops (hulling) and slice them into halves or quarters. Peel the bananas and slice them into rounds. Place both fruits in a medium-sized mixing bowl.
- Add the Greek yogurt to the bowl with the fruit. Pour in the honey or maple syrup, and squeeze in the lemon juice. If using, add the vanilla extract. Gently mash the strawberries and bananas into the yogurt mixture with a fork or potato masher, creating a chunky texture.
- Spoon the mixture into popsicle molds, leaving a little space at the top for expansion. If using paper cups, fill them about three-quarters full. For a layered effect, freeze half the mold for 30 minutes before adding another layer.
- Insert popsicle sticks into the molds and place them upright in the freezer. Freeze for at least 4-6 hours, or until completely solid.
- To release the popsicles, run warm water over the outside of the molds for a few seconds. Gently pull on the sticks to remove the popsicles.
- Serve immediately for a refreshing treat. Optionally, dip in melted chocolate or roll in crushed nuts. Store leftovers wrapped in plastic wrap or in an airtight container in the freezer for up to 2 weeks.
Notes
- Feel free to experiment with different fruits like blueberries, raspberries, or mangoes.
- For a tropical twist, add coconut milk or shredded coconut.
- For a dairy-free option, substitute Greek yogurt with coconut or almond yogurt.
- Adding a handful of spinach or kale can boost nutrients without altering the flavor.


Leave a Comment