
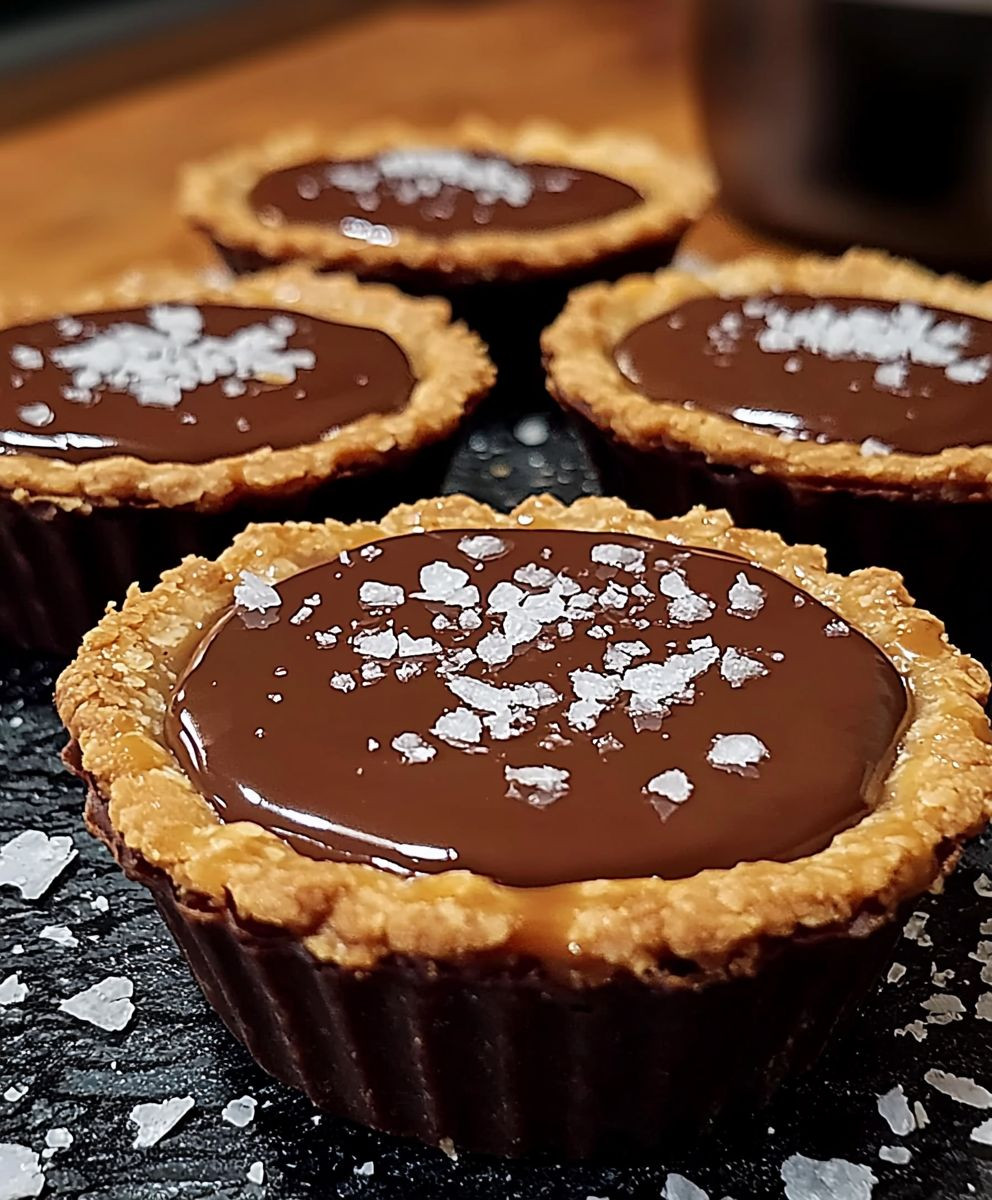
Chocolate Salted Caramel Tarts prepare to be utterly seduced! Imagine biting into a crisp, buttery shortbread crust, yielding to a river of luscious, homemade salted caramel, all crowned with a rich, dark chocolate ganache. It’s a symphony of sweet and salty, smooth and crunchy, that will leave you craving more. These aren’t just desserts; they’re an experience.
The allure of salted caramel, in particular, has swept the culinary world in recent years, but the combination of chocolate and caramel has a long and storied history. Think of classic candies and desserts that have brought joy for generations. The addition of salt, however, elevates this pairing to a whole new level, enhancing the sweetness and adding a delightful complexity that tantalizes the taste buds.
What makes these Chocolate Salted Caramel Tarts so irresistible? It’s the perfect balance of flavors and textures. The sweetness of the caramel is perfectly offset by the salt and the slight bitterness of the dark chocolate. The crispness of the tart shell contrasts beautifully with the smooth, creamy fillings. Plus, they’re surprisingly easy to make at home! While they look impressive, each component is straightforward, making them perfect for both experienced bakers and those just starting their dessert journey. Get ready to impress your friends and family with these decadent treats!

Ingredients:
- For the Chocolate Tart Crust:
- 1 1/4 cups (150g) all-purpose flour
- 1/2 cup (50g) unsweetened cocoa powder
- 1/2 cup (100g) granulated sugar
- 1/4 teaspoon salt
- 1/2 cup (113g) cold unsalted butter, cut into cubes
- 1 large egg yolk
- 2-4 tablespoons ice water
- For the Salted Caramel Filling:
- 1 cup (200g) granulated sugar
- 1/4 cup (60ml) water
- 1/2 cup (120ml) heavy cream, warmed
- 4 tablespoons (57g) unsalted butter, cut into cubes
- 1 teaspoon vanilla extract
- 1/2 – 1 teaspoon sea salt, or to taste (I prefer Maldon sea salt flakes)
- For the Chocolate Ganache Topping:
- 8 ounces (225g) semi-sweet chocolate, finely chopped
- 1 cup (240ml) heavy cream
- 2 tablespoons (28g) unsalted butter, softened
- Optional Garnish:
- Sea salt flakes
- Cocoa powder
Preparing the Chocolate Tart Crust:
- Combine Dry Ingredients: In a large bowl, whisk together the flour, cocoa powder, sugar, and salt. This ensures the cocoa powder is evenly distributed and prevents any clumps.
- Cut in the Butter: Add the cold, cubed butter to the dry ingredients. Using a pastry blender or your fingertips, cut the butter into the flour mixture until it resembles coarse crumbs. The key here is to work quickly so the butter stays cold. Cold butter is crucial for a flaky crust!
- Add Egg Yolk and Water: In a small bowl, whisk together the egg yolk and 2 tablespoons of ice water. Pour this mixture over the flour mixture.
- Combine the Dough: Use a fork to gently combine the wet and dry ingredients. Add more ice water, 1 tablespoon at a time, until the dough just comes together. Be careful not to overmix, as this will develop the gluten and result in a tough crust.
- Form a Disc and Chill: Turn the dough out onto a lightly floured surface and gently form it into a disc. Wrap the disc tightly in plastic wrap and refrigerate for at least 30 minutes, or up to 2 hours. This chilling time allows the gluten to relax, making the dough easier to roll out.
- Roll Out the Dough: On a lightly floured surface, roll out the chilled dough to about 1/8 inch thickness. Make sure to rotate the dough as you roll to prevent it from sticking to the surface.
- Transfer to Tart Pans: Gently transfer the rolled-out dough to your tart pans (I use individual 4-inch tart pans, but you can use one large tart pan if you prefer). Press the dough into the bottom and up the sides of the pans. Trim any excess dough from the edges.
- Dock the Crust: Use a fork to prick the bottom of the crust several times. This prevents the crust from puffing up during baking.
- Chill Again: Place the tart pans in the freezer for 15 minutes. This helps the crust hold its shape during baking and prevents it from shrinking.
- Pre-bake the Crust: Preheat your oven to 375°F (190°C). Line the tart crusts with parchment paper and fill with pie weights or dried beans. Bake for 15 minutes.
- Remove Weights and Bake Further: Remove the parchment paper and pie weights. Bake for another 5-10 minutes, or until the crust is golden brown. Watch carefully to prevent burning.
- Cool Completely: Let the tart crusts cool completely in the pans before filling.
Making the Salted Caramel Filling:
- Combine Sugar and Water: In a medium saucepan, combine the sugar and water. Stir to moisten the sugar.
- Cook the Caramel: Cook over medium heat, without stirring, until the sugar dissolves and turns into a deep amber color. This process requires patience and close attention. Do not stir the mixture, as this can cause the sugar to crystallize. If crystals form on the sides of the pan, you can brush them down with a wet pastry brush.
- Add Warm Cream: Once the caramel is a deep amber color, carefully pour in the warm heavy cream. Be careful, as the mixture will bubble vigorously.
- Stir and Cook: Stir constantly with a whisk until the caramel is smooth and the cream is fully incorporated.
- Add Butter: Remove the saucepan from the heat and stir in the butter until it is melted and smooth.
- Add Vanilla and Salt: Stir in the vanilla extract and sea salt. Adjust the amount of salt to your taste. I like a generous amount of sea salt to balance the sweetness of the caramel.
- Cool Slightly: Let the caramel cool slightly before pouring it into the prepared tart crusts. This will prevent the crust from becoming soggy.
- Pour into Crusts: Pour the salted caramel filling into the cooled tart crusts, filling them almost to the top.
- Chill: Refrigerate the tarts for at least 1 hour, or until the caramel is set. This allows the caramel to firm up and makes the tarts easier to handle.
Preparing the Chocolate Ganache Topping:
- Chop the Chocolate: Finely chop the semi-sweet chocolate and place it in a heatproof bowl. The finer the chocolate is chopped, the smoother the ganache will be.
- Heat the Cream: In a small saucepan, heat the heavy cream over medium heat until it just begins to simmer. Do not boil the cream.
- Pour Cream over Chocolate: Pour the hot cream over the chopped chocolate. Let it sit for 1 minute to allow the heat to melt the chocolate.
- Whisk Until Smooth: Gently whisk the mixture until the chocolate is completely melted and the ganache is smooth and glossy.
- Add Butter: Stir in the softened butter until it is fully incorporated and the ganache is even more smooth and shiny.
- Cool Slightly: Let the ganache cool slightly before pouring it over the caramel-filled tarts. This will prevent the caramel from melting.
- Pour over Tarts: Pour the chocolate ganache over the chilled caramel-filled tarts, spreading it evenly to cover the caramel.
- Chill Again: Refrigerate the tarts for at least 30 minutes, or until the ganache is set. This allows the ganache to firm up and makes the tarts easier to slice and serve.
Final Touches and Serving:
- Garnish (Optional): Before serving, garnish the tarts with a sprinkle of sea salt flakes or a dusting of cocoa powder. This adds a touch of elegance and enhances the flavor.
- Serving: Carefully remove the tarts from the tart pans. You can use a small offset spatula to help release them.
- Enjoy: Serve the chocolate salted caramel tarts chilled or at room temperature. They are best enjoyed within a few days of making them.
Conclusion:
And there you have it! These Chocolate Salted Caramel Tarts are more than just a dessert; they’re an experience. From the satisfying snap of the chocolate shell to the gooey, decadent salted caramel center, every bite is a symphony of textures and flavors that will leave you craving more. I truly believe this recipe is a must-try for any baking enthusiast, whether you’re a seasoned pro or just starting your culinary journey. The combination of rich chocolate, buttery shortbread, and that perfect balance of sweet and salty caramel is simply irresistible. Why is this recipe a must-try? Because it’s surprisingly achievable! While it might look impressive, the steps are straightforward and the results are absolutely worth the effort. Forget store-bought tarts that are often bland and overly sweet; these homemade beauties are bursting with fresh, intense flavors that you just can’t replicate. Plus, the satisfaction of creating something so delicious from scratch is incredibly rewarding. Trust me, your friends and family will be blown away! But the fun doesn’t stop there! These tarts are incredibly versatile. Looking for serving suggestions? A dollop of freshly whipped cream or a scoop of vanilla bean ice cream elevates them to another level of indulgence. A sprinkle of flaky sea salt on top just before serving enhances the salted caramel flavor and adds a touch of elegance. And if you’re feeling adventurous, why not try some variations? For a mocha twist, add a teaspoon of instant espresso powder to the chocolate dough. Or, for a nutty crunch, incorporate chopped pecans or walnuts into the caramel filling. You could even experiment with different types of chocolate dark chocolate for a more intense flavor, or milk chocolate for a sweeter treat. A hint of orange zest in the chocolate shell would also be a delightful addition, complementing the richness of the caramel beautifully. Consider adding a layer of ganache between the shortbread crust and the caramel for an extra layer of chocolatey goodness. The possibilities are endless! I’m so excited for you to try this recipe and create your own batch of these delectable Chocolate Salted Caramel Tarts. Don’t be intimidated by the multiple steps; each one is simple and manageable. Remember to take your time, follow the instructions carefully, and most importantly, have fun! Baking should be an enjoyable experience, and I’m confident that you’ll find this recipe both rewarding and delicious. Once you’ve made your tarts, I’d love to hear about your experience! Did you try any variations? What did your friends and family think? Share your photos and stories in the comments below. I can’t wait to see your creations and hear about your baking adventures. Happy baking, and enjoy every single bite of these heavenly tarts! I know you’ll love them as much as I do. So go ahead, preheat that oven, and get ready to create some magic in your kitchen! You won’t regret it. PrintChocolate Salted Caramel Tarts: A Decadent Dessert Recipe

Decadent chocolate tart with a flaky cocoa crust, gooey salted caramel filling, and rich chocolate ganache topping. A perfect balance of sweet and salty!
- Prep Time: 45 minutes
- Cook Time: 30 minutes
- Total Time: 135 minutes
- Yield: 6 individual 4-inch tarts or 1 large tart 1x
Ingredients
- 1 1/4 cups (150g) all-purpose flour
- 1/2 cup (50g) unsweetened cocoa powder
- 1/2 cup (100g) granulated sugar
- 1/4 teaspoon salt
- 1/2 cup (113g) cold unsalted butter, cut into cubes
- 1 large egg yolk
- 2–4 tablespoons ice water
- 1 cup (200g) granulated sugar
- 1/4 cup (60ml) water
- 1/2 cup (120ml) heavy cream, warmed
- 4 tablespoons (57g) unsalted butter, cut into cubes
- 1 teaspoon vanilla extract
- 1/2 – 1 teaspoon sea salt, or to taste (I prefer Maldon sea salt flakes)
- 8 ounces (225g) semi-sweet chocolate, finely chopped
- 1 cup (240ml) heavy cream
- 2 tablespoons (28g) unsalted butter, softened
- Sea salt flakes
- Cocoa powder
Instructions
- Combine Dry Ingredients: In a large bowl, whisk together the flour, cocoa powder, sugar, and salt.
- Cut in the Butter: Add the cold, cubed butter to the dry ingredients. Using a pastry blender or your fingertips, cut the butter into the flour mixture until it resembles coarse crumbs.
- Add Egg Yolk and Water: In a small bowl, whisk together the egg yolk and 2 tablespoons of ice water. Pour this mixture over the flour mixture.
- Combine the Dough: Use a fork to gently combine the wet and dry ingredients. Add more ice water, 1 tablespoon at a time, until the dough just comes together.
- Form a Disc and Chill: Turn the dough out onto a lightly floured surface and gently form it into a disc. Wrap the disc tightly in plastic wrap and refrigerate for at least 30 minutes, or up to 2 hours.
- Roll Out the Dough: On a lightly floured surface, roll out the chilled dough to about 1/8 inch thickness.
- Transfer to Tart Pans: Gently transfer the rolled-out dough to your tart pans (I use individual 4-inch tart pans, but you can use one large tart pan if you prefer). Press the dough into the bottom and up the sides of the pans. Trim any excess dough from the edges.
- Dock the Crust: Use a fork to prick the bottom of the crust several times.
- Chill Again: Place the tart pans in the freezer for 15 minutes.
- Pre-bake the Crust: Preheat your oven to 375°F (190°C). Line the tart crusts with parchment paper and fill with pie weights or dried beans. Bake for 15 minutes.
- Remove Weights and Bake Further: Remove the parchment paper and pie weights. Bake for another 5-10 minutes, or until the crust is golden brown.
- Cool Completely: Let the tart crusts cool completely in the pans before filling.
- Combine Sugar and Water: In a medium saucepan, combine the sugar and water. Stir to moisten the sugar.
- Cook the Caramel: Cook over medium heat, without stirring, until the sugar dissolves and turns into a deep amber color.
- Add Warm Cream: Once the caramel is a deep amber color, carefully pour in the warm heavy cream. Be careful, as the mixture will bubble vigorously.
- Stir and Cook: Stir constantly with a whisk until the caramel is smooth and the cream is fully incorporated.
- Add Butter: Remove the saucepan from the heat and stir in the butter until it is melted and smooth.
- Add Vanilla and Salt: Stir in the vanilla extract and sea salt. Adjust the amount of salt to your taste.
- Cool Slightly: Let the caramel cool slightly before pouring it into the prepared tart crusts.
- Pour into Crusts: Pour the salted caramel filling into the cooled tart crusts, filling them almost to the top.
- Chill: Refrigerate the tarts for at least 1 hour, or until the caramel is set.
- Chop the Chocolate: Finely chop the semi-sweet chocolate and place it in a heatproof bowl.
- Heat the Cream: In a small saucepan, heat the heavy cream over medium heat until it just begins to simmer.
- Pour Cream over Chocolate: Pour the hot cream over the chopped chocolate. Let it sit for 1 minute to allow the heat to melt the chocolate.
- Whisk Until Smooth: Gently whisk the mixture until the chocolate is completely melted and the ganache is smooth and glossy.
- Add Butter: Stir in the softened butter until it is fully incorporated and the ganache is even more smooth and shiny.
- Cool Slightly: Let the ganache cool slightly before pouring it over the caramel-filled tarts.
- Pour over Tarts: Pour the chocolate ganache over the chilled caramel-filled tarts, spreading it evenly to cover the caramel.
- Chill Again: Refrigerate the tarts for at least 30 minutes, or until the ganache is set.
- Garnish (Optional): Before serving, garnish the tarts with a sprinkle of sea salt flakes or a dusting of cocoa powder.
- Serving: Carefully remove the tarts from the tart pans. You can use a small offset spatula to help release them.
- Enjoy: Serve the chocolate salted caramel tarts chilled or at room temperature. They are best enjoyed within a few days of making them.
Notes
- For the flakiest crust, keep all ingredients cold, especially the butter.
- Don’t overmix the tart dough, or it will become tough.
- Watch the caramel carefully as it cooks, as it can burn easily.
- Warming the heavy cream for the caramel prevents the sugar from seizing up.
- Adjust the amount of sea salt in the caramel to your preference.
- Finely chopping the chocolate ensures a smooth ganache.
- Letting the ganache cool slightly before pouring it over the caramel prevents the caramel from melting.
- The chilling times are important for setting the caramel and ganache, making the tarts easier to handle and slice.


Leave a Comment