
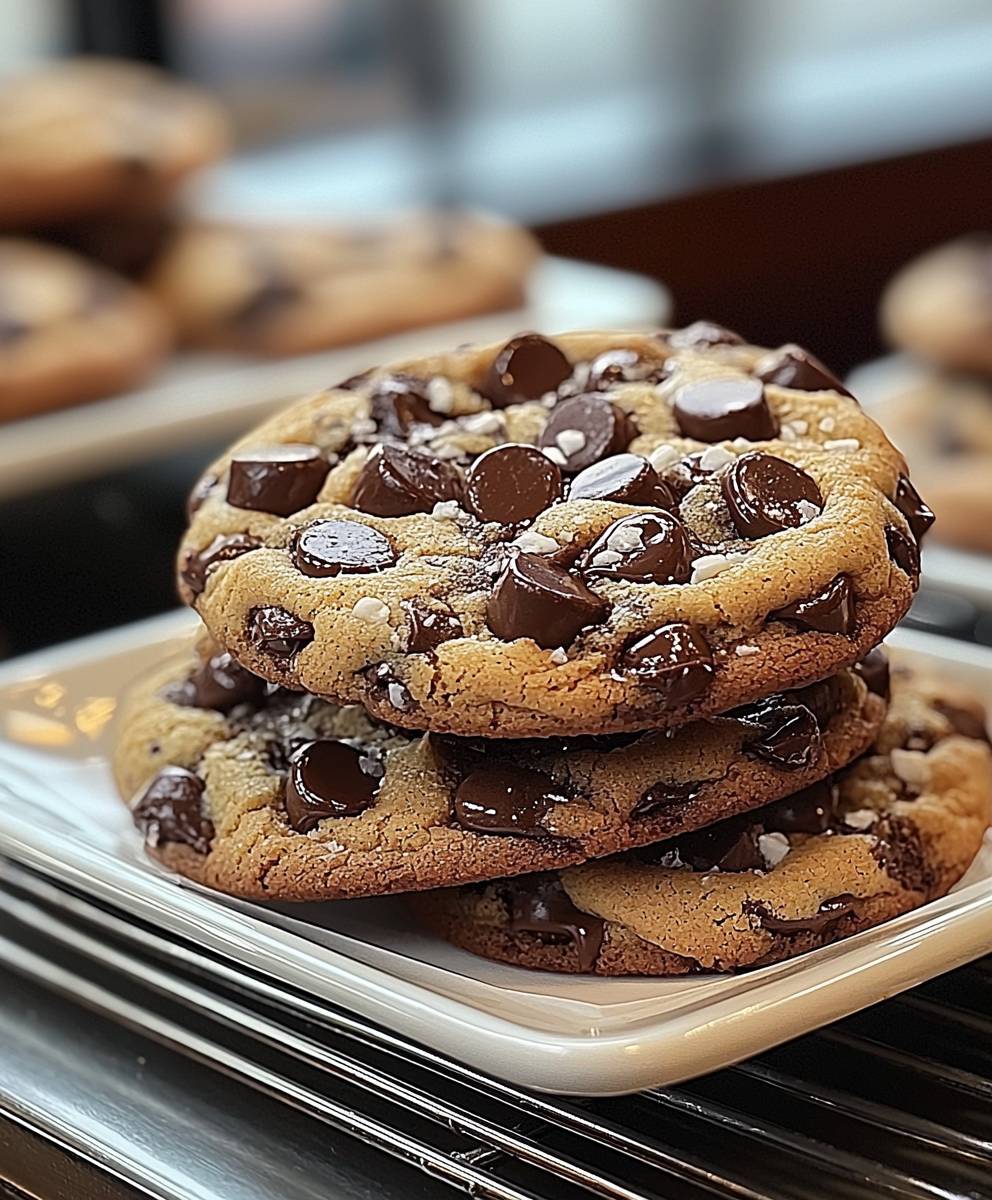
Levain Bakery NYC Cookies: Just the name conjures images of enormous, decadent cookies, oozing with melted chocolate and boasting a perfectly crisp exterior. Have you ever dreamt of recreating these legendary treats in your own kitchen? Well, dream no more! I’m thrilled to share a recipe that brings the magic of Levain Bakery right to your home.
While Levain Bakery might seem like a modern marvel, its roots are firmly planted in a commitment to quality and simple, delicious ingredients. Founded in 1995 on the Upper West Side of Manhattan, the bakery quickly gained a cult following for its rustic breads and, of course, its unbelievably large and intensely flavorful cookies. These aren’t your average, flat, crispy cookies; they’re thick, almost underbaked in the center, and packed with chunks of chocolate and walnuts.
What is it about Levain Bakery NYC Cookies that makes them so irresistible? It’s the combination of textures the slightly crunchy outside giving way to a gooey, almost brownie-like interior. It’s the sheer indulgence of biting into a cookie that’s practically overflowing with chocolate. And it’s the satisfying heft of each cookie, a promise of pure, unadulterated deliciousness. Plus, let’s be honest, there’s something incredibly comforting about a homemade cookie, especially one that rivals the best bakeries in New York City. Get ready to experience cookie perfection!

Ingredients:
- For the Dough:
- 4 cups (500g) all-purpose flour, plus more for dusting
- 1 teaspoon baking powder
- 1 teaspoon baking soda
- 1/2 teaspoon salt
- 1 cup (2 sticks or 226g) unsalted butter, cold and cut into cubes
- 1 cup (200g) granulated sugar
- 1 cup (200g) packed light brown sugar
- 2 large eggs
- 1 tablespoon vanilla extract
- For the Chocolate Chips:
- 1 1/2 cups (300g) semi-sweet chocolate chips
- 1 1/2 cups (300g) dark chocolate chips
- For the Walnuts (Optional):
- 1 cup (100g) coarsely chopped walnuts
Preparing the Dough:
- Combine Dry Ingredients: In a large bowl, whisk together the flour, baking powder, baking soda, and salt. Make sure everything is evenly distributed. This ensures a consistent rise and texture in your cookies.
- Cream Butter and Sugars: In a separate large bowl (or the bowl of a stand mixer), cream together the cold, cubed butter, granulated sugar, and brown sugar until light and fluffy. This step is crucial for incorporating air into the dough, which will contribute to the cookies’ soft and chewy texture. Don’t rush this step; it should take about 3-5 minutes. Scrape down the sides of the bowl occasionally to ensure everything is evenly mixed.
- Add Eggs and Vanilla: Beat in the eggs one at a time, mixing well after each addition. Then, stir in the vanilla extract. The vanilla enhances the overall flavor of the cookies, so don’t skip it!
- Gradually Add Dry Ingredients: Gradually add the dry ingredients to the wet ingredients, mixing on low speed until just combined. Be careful not to overmix the dough, as this can develop the gluten and result in tough cookies. Mix until you no longer see streaks of flour.
- Incorporate Chocolate Chips and Walnuts: Fold in the semi-sweet chocolate chips, dark chocolate chips, and chopped walnuts (if using). Make sure the chocolate chips and walnuts are evenly distributed throughout the dough. I like to use a rubber spatula for this step to avoid overmixing.
- Chill the Dough: Cover the bowl with plastic wrap and refrigerate the dough for at least 1 hour, or preferably overnight. Chilling the dough allows the flavors to meld together and prevents the cookies from spreading too much during baking. This is a key step for achieving that signature Levain Bakery cookie thickness.
Baking the Cookies:
- Preheat Oven: Preheat your oven to 350°F (175°C). Line a baking sheet with parchment paper. Parchment paper prevents the cookies from sticking and makes cleanup a breeze.
- Shape the Dough: Remove the dough from the refrigerator. Using a large ice cream scoop or your hands, scoop out about 1/2 cup of dough per cookie. Gently shape the dough into a tall, slightly irregular mound. Don’t flatten the dough; you want it to maintain its height during baking. The irregular shape is part of the Levain Bakery cookie charm.
- Arrange on Baking Sheet: Place the dough mounds on the prepared baking sheet, leaving about 2 inches between each cookie. This allows for proper air circulation and prevents the cookies from baking together.
- Bake: Bake for 11-13 minutes, or until the edges are golden brown and the centers are still slightly soft. The cookies will continue to bake slightly as they cool on the baking sheet. Keep a close eye on them, as baking times may vary depending on your oven.
- Cool: Remove the baking sheet from the oven and let the cookies cool on the baking sheet for a few minutes before transferring them to a wire rack to cool completely. This allows the cookies to set slightly and prevents them from breaking apart.
Tips and Tricks for Perfect Levain Bakery Cookies:
- Use Cold Butter: Cold butter is essential for creating a tender and chewy cookie. The cold butter creates pockets of steam during baking, which results in a lighter texture.
- Don’t Overmix: Overmixing the dough develops the gluten, which can lead to tough cookies. Mix until just combined.
- Chill the Dough: Chilling the dough is crucial for preventing the cookies from spreading too much during baking. It also allows the flavors to meld together.
- Underbake Slightly: Underbaking the cookies slightly will result in a soft and chewy center. The cookies will continue to bake slightly as they cool on the baking sheet.
- Use High-Quality Chocolate: Using high-quality chocolate chips will enhance the overall flavor of the cookies. I recommend using a combination of semi-sweet and dark chocolate chips for a balanced flavor.
- Adjust Baking Time: Baking times may vary depending on your oven. Keep a close eye on the cookies and adjust the baking time as needed.
- Experiment with Flavors: Feel free to experiment with different flavors and add-ins. You can try adding nuts, dried fruit, or different types of chocolate.
- Storage: Store the cookies in an airtight container at room temperature for up to 3 days. They are best enjoyed fresh.
- Reheating: To reheat the cookies, warm them in the oven at 300°F (150°C) for a few minutes.
- Freezing: You can freeze the cookie dough for later use. Shape the dough into mounds and place them on a baking sheet lined with parchment paper. Freeze for about 30 minutes, or until the dough is firm. Then, transfer the frozen dough mounds to a freezer bag and store them in the freezer for up to 2 months. When ready to bake, bake the frozen dough mounds directly from the freezer, adding a few minutes to the baking time.
Troubleshooting:
- Cookies are too flat: This could be due to several factors, including using softened butter, not chilling the dough long enough, or overmixing the dough. Make sure to use cold butter, chill the dough for at least 1 hour, and avoid overmixing.
- Cookies are too dry: This could be due to overbaking the cookies or using too much flour. Make sure to bake the cookies until the edges are golden brown and the centers are still slightly soft. Also, be careful not to add too much flour to the dough.
- Cookies are too hard: This could be due to overbaking the cookies or using too much sugar. Make sure to bake the cookies until the edges are golden brown and the centers are still slightly soft. Also, be careful not to add too much sugar to the dough.
- Cookies are not spreading: This could be due to using too much flour or not enough butter. Make sure to use the correct amount of flour and butter in the recipe.
Variations:
- Chocolate Walnut Cookies: This is the classic Levain Bakery cookie. Simply add 1 cup of coarsely chopped walnuts to the dough.
- Dark Chocolate Chocolate Chip Cookies: Use all dark chocolate chips instead of a combination of semi-sweet and dark chocolate chips.
- Peanut Butter Chocolate Chip Cookies: Add 1/2 cup of peanut butter chips to the dough.
- Oatmeal Raisin Cookies: Substitute 1 cup of flour with 1 cup of rolled oats and add 1/2 cup of raisins to the dough.
- White Chocolate Macadamia Nut Cookies: Substitute the semi-sweet and dark chocolate chips with 1 1/2 cups of white chocolate chips and add 1 cup of chopped macadamia nuts to the dough.
Serving Suggestions:
- Serve the cookies warm with a glass of cold milk.
- Enjoy the cookies as a dessert after a meal.
- Pack the cookies in a lunchbox for a sweet treat.
- Give the cookies as a gift to friends and family.
Conclusion:
Okay, friends, let’s be honest you’ve read this far because you’re craving a cookie that’s more than just a cookie. You’re craving an experience. And that’s exactly what these homemade Levain Bakery NYC Cookies deliver. From the satisfying heft in your hand to the explosion of molten chocolate and perfectly crisp edges, this recipe is a guaranteed crowd-pleaser. It’s not just about following instructions; it’s about creating a little bit of New York magic in your own kitchen. Why is this a must-try? Because it’s more than just flour, butter, and sugar. It’s about the texture that glorious contrast between the slightly underbaked center and the golden-brown exterior. It’s about the flavor the rich, deep chocolate intensified by the hint of salt. And it’s about the sheer joy of biting into something so decadent and satisfying. Trust me, once you’ve tasted these, you’ll understand why people line up around the block for the real deal. And now, you can skip the plane ticket and bake them yourself! But the fun doesn’t stop there! Feel free to get creative with your Levain Bakery NYC Cookies. Want to add a little extra crunch? Throw in some chopped walnuts or pecans. Craving something a bit more adventurous? Try swirling in some peanut butter or adding a handful of dried cranberries. For a truly decadent experience, serve them warm with a scoop of vanilla ice cream and a drizzle of chocolate sauce. Or, if you’re feeling particularly ambitious, use them to make ice cream sandwiches! The possibilities are endless. Here are a few serving suggestions to get you started:- Classic: Enjoy them warm, straight from the oven, with a tall glass of cold milk.
- Decadent: Serve with a scoop of vanilla ice cream and a drizzle of hot fudge.
- Elevated: Pair with a strong cup of coffee or espresso for an afternoon treat.
- Festive: Add chopped nuts and dried cranberries for a holiday twist.
- Portable: Wrap them individually and take them on the go for a delicious snack.
Levain Bakery NYC Cookies: The Ultimate Guide

Giant, decadent, chewy chocolate chip walnut cookies inspired by Levain Bakery. Thick, slightly underbaked, and packed with chocolate.
- Prep Time: 20 minutes
- Cook Time: 11 minutes
- Total Time: 91 minutes
- Yield: 10–12 large cookies 1x
Ingredients
- 4 cups (500g) all-purpose flour, plus more for dusting
- 1 teaspoon baking powder
- 1 teaspoon baking soda
- 1/2 teaspoon salt
- 1 cup (2 sticks or 226g) unsalted butter, cold and cut into cubes
- 1 cup (200g) granulated sugar
- 1 cup (200g) packed light brown sugar
- 2 large eggs
- 1 tablespoon vanilla extract
- 1 1/2 cups (300g) semi-sweet chocolate chips
- 1 1/2 cups (300g) dark chocolate chips
- 1 cup (100g) coarsely chopped walnuts
Instructions
- Combine Dry Ingredients: In a large bowl, whisk together the flour, baking powder, baking soda, and salt.
- Cream Butter and Sugars: In a separate large bowl (or the bowl of a stand mixer), cream together the cold, cubed butter, granulated sugar, and brown sugar until light and fluffy (about 3-5 minutes). Scrape down the sides of the bowl occasionally.
- Add Eggs and Vanilla: Beat in the eggs one at a time, mixing well after each addition. Then, stir in the vanilla extract.
- Gradually Add Dry Ingredients: Gradually add the dry ingredients to the wet ingredients, mixing on low speed until just combined. Be careful not to overmix.
- Incorporate Chocolate Chips and Walnuts: Fold in the semi-sweet chocolate chips, dark chocolate chips, and chopped walnuts (if using).
- Chill the Dough: Cover the bowl with plastic wrap and refrigerate the dough for at least 1 hour, or preferably overnight.
- Preheat Oven: Preheat your oven to 350°F (175°C). Line a baking sheet with parchment paper.
- Shape the Dough: Remove the dough from the refrigerator. Using a large ice cream scoop or your hands, scoop out about 1/2 cup of dough per cookie. Gently shape the dough into a tall, slightly irregular mound. Don’t flatten the dough.
- Arrange on Baking Sheet: Place the dough mounds on the prepared baking sheet, leaving about 2 inches between each cookie.
- Bake: Bake for 11-13 minutes, or until the edges are golden brown and the centers are still slightly soft.
- Cool: Remove the baking sheet from the oven and let the cookies cool on the baking sheet for a few minutes before transferring them to a wire rack to cool completely.
Notes
- Use cold butter for a tender and chewy cookie.
- Don’t overmix the dough.
- Chilling the dough is crucial for preventing spreading.
- Underbake slightly for a soft center.
- Use high-quality chocolate chips for the best flavor.
- Baking times may vary depending on your oven.
- Store cookies in an airtight container at room temperature for up to 3 days.
- Freeze cookie dough for later use. Shape the dough into mounds and freeze for about 30 minutes, or until the dough is firm. Then, transfer the frozen dough mounds to a freezer bag and store them in the freezer for up to 2 months. When ready to bake, bake the frozen dough mounds directly from the freezer, adding a few minutes to the baking time.


Leave a Comment