
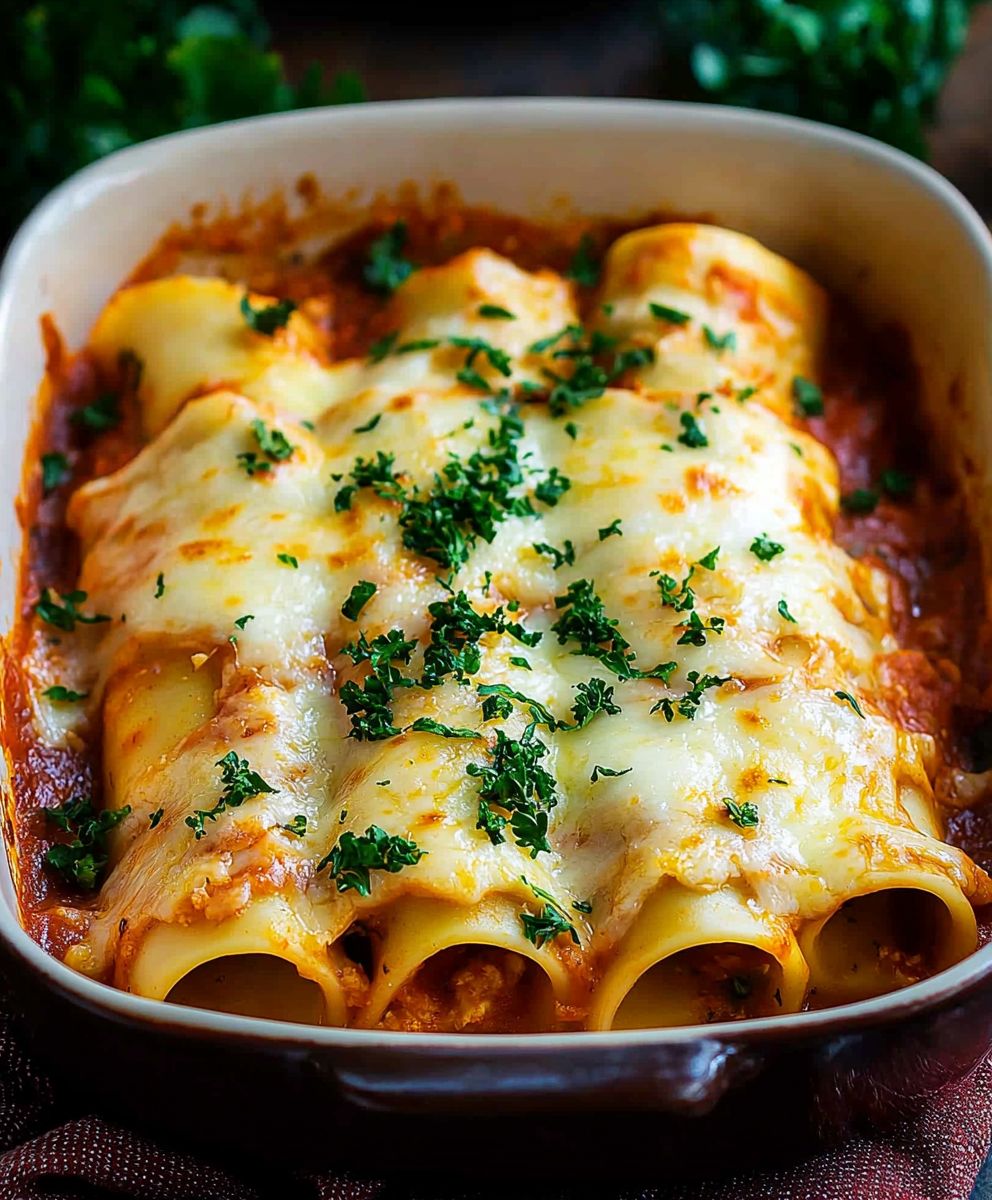
Easy Manicotti, a dish that whispers of cozy Italian kitchens and comforting family dinners, is about to become your new weeknight hero. Imagine tender pasta tubes, generously stuffed with a creamy, flavorful ricotta cheese mixture, blanketed in a rich tomato sauce, and then baked to golden, bubbly perfection. Are you drooling yet? I know I am!
Manicotti, meaning “sleeves” in Italian, has a history as rich and layered as the dish itself. While its exact origins are debated, it’s widely believed to be a Southern Italian creation, evolving from similar stuffed pasta dishes. It represents the resourcefulness of Italian cooks, transforming simple ingredients into a satisfying and elegant meal. For generations, manicotti has been a staple at family gatherings and festive celebrations, a symbol of love and togetherness shared around the table.
But what makes easy manicotti so universally loved? It’s the perfect combination of textures and flavors: the smooth, yielding pasta, the creamy, slightly tangy filling, and the sweet, acidic tomato sauce. Plus, it’s incredibly versatile! You can customize the filling with your favorite herbs, spices, and cheeses. And let’s be honest, the convenience factor is a huge draw. This recipe is designed to be simple and straightforward, perfect for busy weeknights when you crave a delicious, home-cooked meal without spending hours in the kitchen. Get ready to experience the joy of homemade manicotti without the fuss!

Ingredients:
- 1 pound manicotti shells (about 24 shells)
- 15 ounces ricotta cheese
- 10 ounces frozen chopped spinach, thawed and squeezed dry
- 1 large egg, lightly beaten
- 1/2 cup grated Parmesan cheese, plus more for topping
- 1/4 cup chopped fresh parsley
- 1 teaspoon garlic powder
- 1/2 teaspoon salt
- 1/4 teaspoon black pepper
- 26 ounces jarred marinara sauce
- 1 cup shredded mozzarella cheese
Preparing the Ricotta Filling
Okay, let’s get started with the heart of our manicotti the creamy, cheesy filling! This is where all the flavor magic happens, so pay close attention to each step. I promise, it’s easier than it looks!
- Thaw and Drain the Spinach: This is a crucial step! You absolutely MUST squeeze out as much excess water as possible from the thawed spinach. Trust me, you don’t want a watery filling. I usually place the thawed spinach in a clean kitchen towel or cheesecloth and wring it out over the sink until I can’t squeeze out any more liquid. This might take a few minutes, but it’s worth the effort. Excess water will make your manicotti soggy.
- Combine the Ricotta and Spinach: In a large bowl, add the ricotta cheese and the squeezed-dry spinach. Make sure the spinach is evenly distributed throughout the ricotta. I like to use a fork to break up any large clumps of ricotta and ensure everything is nicely combined.
- Add the Egg: Pour in the lightly beaten egg. The egg acts as a binder, helping to hold the filling together and prevent it from becoming too dry during baking. Make sure the egg is fully incorporated into the ricotta and spinach mixture.
- Incorporate the Parmesan Cheese, Parsley, and Spices: Now for the flavor boosters! Add the 1/2 cup of grated Parmesan cheese, chopped fresh parsley, garlic powder, salt, and black pepper to the bowl. The Parmesan adds a salty, nutty flavor, while the parsley provides a fresh, herbaceous note. The garlic powder, salt, and pepper season the filling perfectly.
- Mix Thoroughly: Using a fork or spoon, mix all the ingredients together until they are evenly combined. Be careful not to overmix, as this can make the ricotta cheese tough. You want a smooth, creamy, and well-seasoned filling. Taste the filling and adjust the seasonings as needed. If you like a little more garlic, add a pinch more garlic powder. If you prefer a saltier filling, add a pinch more salt.
Stuffing the Manicotti Shells
Now comes the fun part stuffing the manicotti shells! This can be a little messy, but don’t worry, it’s all part of the process. There are a few different ways to stuff the shells, so I’ll share my favorite method.
- Prepare the Piping Bag (Optional): While you can use a spoon, I find that using a piping bag makes the stuffing process much easier and less messy. If you have a piping bag, fit it with a large round tip. If you don’t have a piping bag, you can use a large zip-top bag. Simply cut off one of the bottom corners of the bag to create a makeshift piping bag.
- Fill the Piping Bag: Carefully spoon the ricotta filling into the piping bag. Be careful not to overfill the bag, as this can make it difficult to handle. If you’re using a zip-top bag, seal the bag tightly and squeeze the filling towards the cut corner.
- Stuff the Manicotti Shells: Hold a manicotti shell in one hand and insert the tip of the piping bag into one end of the shell. Gently squeeze the piping bag to fill the shell with the ricotta filling. Work your way down the shell, filling it completely. Repeat this process with the remaining shells. If you’re not using a piping bag, use a small spoon to carefully stuff the shells with the ricotta filling.
- Arrange the Stuffed Shells: As you stuff each shell, place it in a baking dish that has been lightly coated with marinara sauce. I usually use a 9×13 inch baking dish. Arrange the shells in a single layer, making sure they are not overcrowded.
Assembling and Baking the Manicotti
We’re almost there! Now it’s time to assemble the manicotti and bake it to golden-brown perfection. This is the final step, so let’s make it count!
- Preheat the Oven: Preheat your oven to 375°F (190°C). Make sure your oven is fully preheated before you put the manicotti in to bake.
- Spread Marinara Sauce: Pour the remaining marinara sauce over the stuffed manicotti shells, making sure they are completely covered. The marinara sauce will help to keep the shells moist and prevent them from drying out during baking.
- Sprinkle with Mozzarella Cheese: Sprinkle the shredded mozzarella cheese evenly over the marinara sauce. The mozzarella cheese will melt and create a gooey, cheesy topping.
- Add Parmesan Cheese (Optional): For an extra layer of flavor, sprinkle a little more grated Parmesan cheese over the mozzarella cheese. This will add a salty, nutty flavor and create a beautiful golden-brown crust.
- Cover and Bake: Cover the baking dish with aluminum foil. This will help to trap the moisture and prevent the manicotti from drying out. Bake for 30 minutes.
- Uncover and Bake: Remove the aluminum foil and bake for another 15-20 minutes, or until the cheese is melted and bubbly and the manicotti shells are heated through. The top should be lightly golden brown.
- Let it Rest: Remove the baking dish from the oven and let the manicotti rest for 10-15 minutes before serving. This will allow the filling to set and prevent it from being too runny.
Serving Suggestions
Now that your Easy Manicotti is ready, it’s time to serve it and enjoy! Here are a few serving suggestions to make your meal even more special:
- Garnish with Fresh Parsley: Sprinkle some fresh chopped parsley over the manicotti before serving for a pop of color and freshness.
- Serve with a Side Salad: A simple green salad with a light vinaigrette dressing is the perfect accompaniment to the rich and cheesy manicotti.
- Add Garlic Bread: Warm garlic bread is always a welcome addition to any Italian meal.
- Pair with a Glass of Wine: A glass of red wine, such as Chianti or Merlot, pairs perfectly with the flavors of the manicotti.
Tips and Variations
Want to customize your Easy Manicotti? Here are a few tips and variations to try:
- Add Meat: For a heartier meal, add cooked ground beef, Italian sausage, or shredded chicken to the ricotta filling.
- Use Different Cheeses: Experiment with different cheeses in the filling, such as provolone, mozzarella, or fontina.
- Add Vegetables: Add other vegetables to the filling, such as chopped mushrooms, onions, or bell peppers.
- Make it Spicy: Add a pinch of red pepper flakes to the filling or marinara sauce for a little heat.
- Use Homemade Marinara Sauce: For an even more flavorful dish, use homemade marinara sauce instead of jarred sauce.
- Make it Ahead: You can assemble the manicotti ahead of time and store it in the refrigerator for up to 24 hours before baking. Just add a few extra minutes to the baking time.
- Freeze it: Baked manicotti can be frozen for up to 3 months. Thaw completely in the refrigerator before reheating in the oven.
Troubleshooting
Sometimes things don’t go exactly as planned in the kitchen. Here are a few common problems and how to fix them:
- Manicotti Shells are Cracking: If your manicotti shells are cracking while you’re stuffing them, try soaking them in warm water for a few minutes to soften them.
- Filling is Too Watery: If your filling is too watery, make sure you squeeze out as much excess water as possible from the spinach. You can also add a tablespoon or two of breadcrumbs to the filling to absorb some of the moisture.
- Manicotti is Dry: If your manicotti is dry, make sure you cover the baking dish with aluminum foil during the first part of baking. You can also add a little extra marinara sauce to the baking dish.
- Cheese is Burning: If the cheese is browning too quickly, lower the oven temperature slightly or cover the baking dish with aluminum foil.
Conclusion:
This Easy Manicotti recipe isn’t just another pasta dish; it’s a guaranteed crowd-pleaser that’s surprisingly simple to make. From the creamy, ricotta-filled shells to the rich, tangy tomato sauce, every bite is an explosion of flavor that will leave you wanting more. I know, I know, manicotti can seem intimidating, but trust me, this version streamlines the process without sacrificing any of the deliciousness. It’s the perfect weeknight meal that feels like a weekend indulgence, and honestly, who doesn’t love that? But why is this recipe a must-try? Beyond its ease of preparation, it’s incredibly versatile. You can easily adapt it to your own tastes and preferences. Feeling adventurous? Add some cooked spinach or mushrooms to the ricotta mixture for an extra layer of flavor and nutrients. Want to kick up the heat? A pinch of red pepper flakes in the sauce will do the trick. And for those who prefer a meatier dish, browned Italian sausage or ground beef can be incorporated into the filling or layered within the sauce. The possibilities are truly endless! Speaking of serving, this Easy Manicotti is fantastic on its own, but it also pairs beautifully with a simple side salad and some crusty garlic bread to soak up all that delicious sauce. For a more complete meal, consider serving it alongside roasted vegetables like asparagus or broccoli. And don’t forget the Parmesan cheese! A generous grating of freshly grated Parmesan over the top just before serving adds the perfect finishing touch. Looking for variations? Consider using different types of cheese in the filling. A blend of ricotta, mozzarella, and provolone would be absolutely divine. Or, for a lighter option, try using part-skim ricotta and adding some fresh herbs like basil or oregano to the filling. You could even experiment with different sauces, such as a creamy Alfredo sauce or a pesto sauce. The key is to have fun and make it your own! I’m confident that this Easy Manicotti recipe will become a staple in your kitchen. It’s a comforting, satisfying, and relatively easy dish that’s perfect for any occasion. Whether you’re cooking for a family dinner, a potluck, or a special occasion, this recipe is sure to impress. So, what are you waiting for? Grab your ingredients, preheat your oven, and get ready to experience the joy of homemade manicotti. I promise you won’t be disappointed. And once you’ve tried it, I’d love to hear about your experience! Share your photos, your tips, and your variations in the comments below. Let’s create a community of manicotti lovers and inspire each other with our culinary creations. Happy cooking! I can’t wait to see what you come up with. Don’t forget to rate the recipe after you’ve tried it! Your feedback helps others discover this amazing dish. Enjoy! PrintEasy Manicotti: The Ultimate Guide to Perfect Homemade Manicotti
Classic manicotti filled with a creamy ricotta and spinach mixture, baked in marinara sauce and topped with mozzarella cheese. A comforting and easy Italian-American favorite!
- Prep Time: 30 minutes
- Cook Time: 45 minutes
- Total Time: 75 minutes
- Yield: 6–8 servings 1x
Ingredients
- 1 pound manicotti shells (about 24 shells)
- 15 ounces ricotta cheese
- 10 ounces frozen chopped spinach, thawed and squeezed dry
- 1 large egg, lightly beaten
- 1/2 cup grated Parmesan cheese, plus more for topping
- 1/4 cup chopped fresh parsley
- 1 teaspoon garlic powder
- 1/2 teaspoon salt
- 1/4 teaspoon black pepper
- 26 ounces jarred marinara sauce
- 1 cup shredded mozzarella cheese
Instructions
- Prepare the Ricotta Filling: Thaw and squeeze the spinach to remove excess water. In a large bowl, combine ricotta cheese and spinach. Add the egg, Parmesan cheese, parsley, garlic powder, salt, and pepper. Mix thoroughly until well combined. Taste and adjust seasonings as needed.
- Stuff the Manicotti Shells: Spoon the ricotta filling into a piping bag or zip-top bag with a cut corner. Hold a manicotti shell and insert the tip of the piping bag into one end. Gently squeeze the piping bag to fill the shell completely. Repeat with remaining shells.
- Assemble and Bake: Preheat oven to 375°F (190°C). Lightly coat a 9×13 inch baking dish with marinara sauce. Arrange the stuffed shells in a single layer in the dish. Pour the remaining marinara sauce over the shells, covering them completely. Sprinkle with mozzarella cheese and additional Parmesan cheese (optional).
- Bake: Cover the baking dish with aluminum foil and bake for 30 minutes. Remove the foil and bake for another 15-20 minutes, or until the cheese is melted and bubbly and the shells are heated through.
- Rest and Serve: Remove from oven and let rest for 10-15 minutes before serving. Garnish with fresh parsley, serve with a side salad and garlic bread.
Notes
- Spinach: Squeezing the spinach dry is crucial to prevent a watery filling.
- Piping Bag: Using a piping bag makes stuffing the shells easier, but a spoon works too.
- Make Ahead: Assemble the manicotti ahead of time and store in the refrigerator for up to 24 hours before baking.
- Variations: Add cooked ground beef, Italian sausage, or shredded chicken to the ricotta filling. Experiment with different cheeses or vegetables. Add red pepper flakes for a little heat.
- Troubleshooting: If shells are cracking, soak them in warm water. If filling is too watery, add breadcrumbs. If manicotti is dry, cover with foil during baking. If cheese is burning, lower the oven temperature.


Leave a Comment