
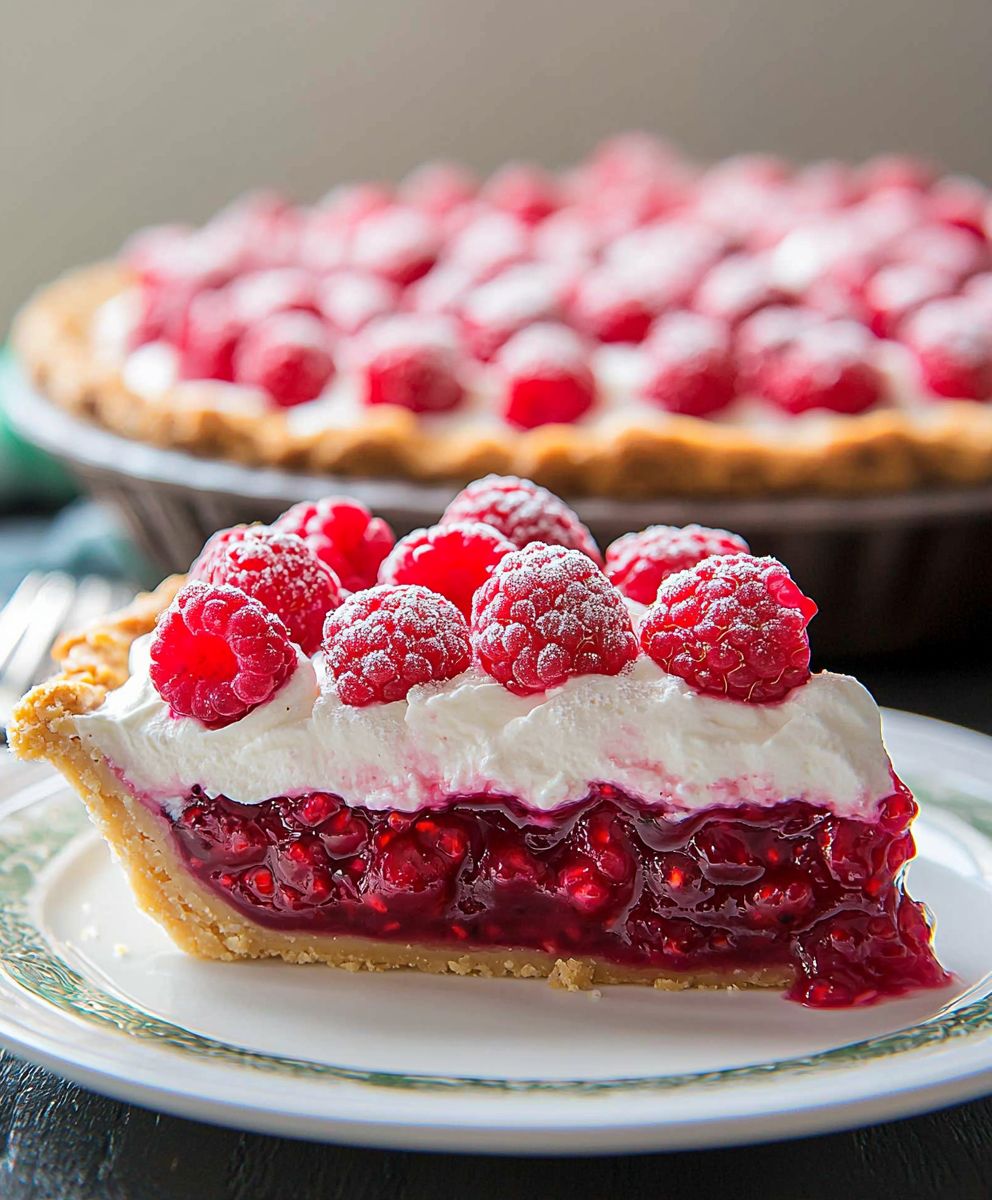
No Bake Raspberry Pie: the words alone conjure up images of effortless elegance and a burst of summer flavor. Imagine sinking your fork into a cool, creamy filling, studded with juicy, tart raspberries, all nestled in a perfectly crisp crust. This isn’t just dessert; it’s a celebration of simplicity and deliciousness, perfect for those warm days when turning on the oven feels like a chore.
While the origins of fruit pies stretch back centuries, the beauty of a no-bake version lies in its modern convenience. It allows us to enjoy the classic flavors of a raspberry pie without the fuss of traditional baking. This makes it an ideal choice for busy weeknights, potlucks, or any occasion where you want to impress without spending hours in the kitchen.
What is it about no bake raspberry pie that makes it so irresistible? Perhaps it’s the vibrant combination of sweet and tart, the smooth, velvety texture of the filling, or the satisfying crunch of the crust. Whatever the reason, this dessert is a guaranteed crowd-pleaser. It’s a delightful treat that’s both refreshing and indulgent, making it a perfect ending to any meal. So, let’s dive into this easy-to-follow recipe and create a stunning dessert that will have everyone asking for seconds!

Ingredients:
- For the Crust:
- 1 ½ cups graham cracker crumbs (about 12 full graham crackers)
- 5 tablespoons (70g) unsalted butter, melted
- ¼ cup (50g) granulated sugar
- Pinch of salt
- For the Raspberry Filling:
- 24 ounces (about 6 cups) fresh raspberries, divided
- 1 cup (200g) granulated sugar
- ¼ cup (30g) cornstarch
- ¼ cup (60ml) water
- 2 tablespoons lemon juice, freshly squeezed
- 1 teaspoon vanilla extract
- For the Whipped Cream Topping (Optional):
- 1 cup (240ml) heavy cream, cold
- 2 tablespoons (25g) powdered sugar
- ½ teaspoon vanilla extract
Preparing the Graham Cracker Crust:
Okay, let’s get started with the foundation of our delicious no-bake raspberry pie the graham cracker crust! This part is super easy and requires absolutely no baking. I promise!
- Crush the Graham Crackers: First, you’ll need to crush your graham crackers into fine crumbs. You can do this in a couple of ways. My preferred method is to use a food processor. Just toss the graham crackers in and pulse until you have a nice, even crumb. If you don’t have a food processor, no worries! You can place the graham crackers in a large zip-top bag, seal it tightly, and then use a rolling pin to crush them. Just roll back and forth until you get those fine crumbs.
- Combine the Ingredients: In a medium-sized bowl, combine the graham cracker crumbs, melted butter, granulated sugar, and a pinch of salt. Make sure the butter is evenly distributed throughout the crumbs. I like to use a fork to toss everything together until it’s all nicely moistened.
- Press into the Pie Plate: Now, it’s time to press the mixture into your pie plate. I usually use a 9-inch pie plate. Pour the crumb mixture into the plate and use the bottom of a measuring cup or your fingers to firmly press the crumbs evenly across the bottom and up the sides of the plate. Make sure the crust is compact and uniform in thickness. This will give you a sturdy base for your filling.
- Chill the Crust: Once you’ve pressed the crust into the pie plate, cover it with plastic wrap and place it in the refrigerator to chill for at least 30 minutes. This will help the crust set and become firm. You can even chill it for longer, up to a few hours, if you need to prep ahead.
Making the Raspberry Filling:
Now for the star of the show the raspberry filling! This is where the magic happens, and the vibrant flavors really come to life. We’ll be using fresh raspberries for the best possible taste, and a simple cooking process to create a luscious, glossy filling.
- Prepare the Raspberries: Gently rinse your fresh raspberries under cool water and pat them dry with a paper towel. Divide the raspberries into two portions: one for cooking and one for reserving. I usually reserve about 1 ½ cups of the prettiest raspberries for topping the pie later.
- Combine Ingredients in a Saucepan: In a medium-sized saucepan, combine the remaining raspberries (the ones you’re not reserving for topping), granulated sugar, cornstarch, and water. Stir everything together until the cornstarch is fully dissolved. This is important to prevent lumps in your filling.
- Cook the Filling: Place the saucepan over medium heat and bring the mixture to a simmer, stirring constantly. As the mixture heats up, the raspberries will start to break down and release their juices. Continue to cook, stirring frequently, until the filling thickens and becomes glossy. This usually takes about 5-7 minutes. You’ll know it’s ready when the filling coats the back of a spoon.
- Add Lemon Juice and Vanilla: Remove the saucepan from the heat and stir in the lemon juice and vanilla extract. The lemon juice will add a bright, tangy flavor that complements the sweetness of the raspberries, and the vanilla extract will enhance the overall flavor profile.
- Cool the Filling: Allow the raspberry filling to cool slightly for about 15-20 minutes before pouring it into the prepared graham cracker crust. This will prevent the crust from becoming soggy.
Assembling the No-Bake Raspberry Pie:
We’re almost there! Now it’s time to put everything together and create our beautiful no-bake raspberry pie. This is the easiest part, I promise!
- Pour Filling into Crust: Carefully pour the slightly cooled raspberry filling into the chilled graham cracker crust. Spread the filling evenly across the crust.
- Arrange Reserved Raspberries: Arrange the reserved fresh raspberries on top of the filling in a decorative pattern. You can create concentric circles, rows, or simply scatter them randomly. Get creative and make it look beautiful!
- Chill the Pie: Cover the pie with plastic wrap and refrigerate for at least 3-4 hours, or preferably overnight. This will allow the filling to set completely and the flavors to meld together.
Making the Whipped Cream Topping (Optional):
While the pie is chilling, you can prepare the whipped cream topping, if desired. This is totally optional, but I think it adds a lovely touch of richness and sweetness to the pie. Plus, who doesn’t love whipped cream?
- Chill the Bowl and Whisk: Before you start, make sure your mixing bowl and whisk (or beaters if you’re using an electric mixer) are well-chilled. This will help the heavy cream whip up more quickly and easily. You can even pop them in the freezer for a few minutes.
- Combine Ingredients: In the chilled bowl, combine the cold heavy cream, powdered sugar, and vanilla extract.
- Whip the Cream: Using a whisk or an electric mixer, whip the cream until stiff peaks form. Be careful not to overwhip, or the cream will turn grainy. You’ll know it’s ready when the cream holds its shape and forms stiff peaks when you lift the whisk or beaters.
Serving the Pie:
Finally, the moment we’ve all been waiting for! It’s time to serve and enjoy our delicious no-bake raspberry pie.
- Add Whipped Cream (Optional): If you made the whipped cream topping, dollop it onto the pie just before serving. You can pipe it on using a piping bag for a more elegant presentation, or simply spoon it on.
- Slice and Serve: Slice the pie into wedges and serve immediately.
- Enjoy! Take a bite and savor the sweet, tangy, and creamy flavors of this delightful no-bake raspberry pie. It’s the perfect dessert for any occasion!
Conclusion:
This No Bake Raspberry Pie is truly a dessert game-changer! If you’re looking for a show-stopping treat that requires minimal effort and delivers maximum flavor, then look no further. The vibrant raspberry filling, perfectly balanced between sweet and tart, combined with the satisfying crunch of the graham cracker crust, creates a symphony of textures and tastes that will leave everyone wanting more. It’s the perfect solution for those hot summer days when you don’t want to turn on the oven, or for any occasion when you need a quick and impressive dessert. But what truly makes this recipe a must-try is its versatility. While the classic raspberry pie is divine on its own, there are so many ways to customize it to your liking. For a richer, more decadent experience, try adding a layer of white chocolate shavings to the bottom of the crust before pouring in the filling. The white chocolate complements the raspberries beautifully and adds a touch of elegance. Alternatively, if you’re a fan of citrus, a squeeze of fresh lemon or lime juice into the raspberry filling will enhance the tartness and create an even more refreshing flavor profile. You could also experiment with different types of berries. A mixed berry pie, featuring raspberries, blueberries, and strawberries, would be a delightful twist on the original. Serving suggestions are endless! A dollop of freshly whipped cream or a scoop of vanilla ice cream is the perfect accompaniment to this No Bake Raspberry Pie. For a more sophisticated presentation, consider garnishing with fresh raspberries, mint sprigs, or a dusting of powdered sugar. It’s also fantastic served with a drizzle of raspberry sauce or a side of Greek yogurt for a lighter option. And don’t forget about variations on the crust! While the graham cracker crust is a classic choice, you could also use a chocolate cookie crust for a richer, more indulgent flavor. Or, for a gluten-free option, try using a crust made from almond flour and dates. The possibilities are truly endless! I’m confident that this recipe will become a staple in your dessert repertoire. It’s easy to make, incredibly delicious, and endlessly customizable. It’s the kind of dessert that will impress your friends and family without requiring hours in the kitchen. So, what are you waiting for? Grab your ingredients and get ready to create a masterpiece! I’m so excited for you to try this recipe and experience the joy of a perfect No Bake Raspberry Pie. Once you’ve made it, I would absolutely love to hear about your experience. Did you try any variations? What did your friends and family think? Share your photos and stories in the comments below! Your feedback is invaluable and helps me continue to create recipes that you’ll love. Happy baking (or rather, no-baking!) and I can’t wait to see your creations! Let me know if you have any questions, and I’ll do my best to help. Enjoy! PrintNo Bake Raspberry Pie: The Easiest Dessert Recipe Ever!

A refreshing no-bake raspberry pie with a graham cracker crust and luscious raspberry filling. Optional whipped cream topping. Perfect for a no-fuss dessert!
- Prep Time: 25 minutes
- Cook Time: 7 minutes
- Total Time: 272 minutes
- Yield: 8 servings 1x
Ingredients
- 1 ½ cups graham cracker crumbs (about 12 full graham crackers)
- 5 tablespoons (70g) unsalted butter, melted
- ¼ cup (50g) granulated sugar
- Pinch of salt
- 24 ounces (about 6 cups) fresh raspberries, divided
- 1 cup (200g) granulated sugar
- ¼ cup (30g) cornstarch
- ¼ cup (60ml) water
- 2 tablespoons lemon juice, freshly squeezed
- 1 teaspoon vanilla extract
- 1 cup (240ml) heavy cream, cold
- 2 tablespoons (25g) powdered sugar
- ½ teaspoon vanilla extract
Instructions
- Prepare the Graham Cracker Crust:
- Crush the graham crackers into fine crumbs using a food processor or by placing them in a zip-top bag and crushing with a rolling pin.
- In a medium bowl, combine graham cracker crumbs, melted butter, granulated sugar, and salt. Mix well.
- Press the mixture firmly into a 9-inch pie plate, covering the bottom and sides evenly.
- Chill the crust in the refrigerator for at least 30 minutes (or longer) to set.
- Make the Raspberry Filling:
- Rinse raspberries and pat dry. Divide into two portions: one for cooking and one for topping (reserve about 1 ½ cups for topping).
- In a medium saucepan, combine the remaining raspberries, granulated sugar, cornstarch, and water. Stir until cornstarch is dissolved.
- Cook over medium heat, stirring constantly, until the mixture simmers, thickens, and becomes glossy (about 5-7 minutes).
- Remove from heat and stir in lemon juice and vanilla extract.
- Let the filling cool slightly for 15-20 minutes.
- Assemble the Pie:
- Pour the slightly cooled raspberry filling into the chilled graham cracker crust. Spread evenly.
- Arrange the reserved fresh raspberries on top of the filling in a decorative pattern.
- Cover the pie with plastic wrap and refrigerate for at least 3-4 hours, or preferably overnight, to set.
- Make the Whipped Cream Topping (Optional):
- Chill the mixing bowl and whisk (or beaters).
- In the chilled bowl, combine cold heavy cream, powdered sugar, and vanilla extract.
- Whip until stiff peaks form. Be careful not to overwhip.
- Serve:
- If using, dollop or pipe whipped cream onto the pie just before serving.
- Slice and serve immediately.
Notes
- For the best flavor, use fresh, ripe raspberries.
- Make sure the graham cracker crust is firmly pressed to prevent it from crumbling.
- Chilling the pie overnight allows the flavors to meld together and the filling to set completely.
- The whipped cream topping is optional but adds a nice touch of richness.
- If you don’t have fresh raspberries, you can use frozen raspberries. Thaw them completely and drain any excess liquid before using.
- To easily crush graham crackers, use a food processor or place them in a zip-top bag and crush with a rolling pin.


Leave a Comment