
Earl Grey Crème Brûlée: just the name itself evokes a sense of elegance and sophistication, doesn’t it? But don’t let that fool you! This isn’t some fussy, complicated dessert reserved for Michelin-starred restaurants. I’m here to show you how incredibly easy it is to create this decadent treat in your very own kitchen.
Crème brûlée, meaning “burnt cream” in French, has a rich history dating back to the 17th century. While its exact origins are debated, with claims from England and Spain as well, France has undoubtedly perfected this classic dessert. The traditional vanilla bean custard, with its signature brittle, caramelized sugar crust, is a testament to simple ingredients transformed into something extraordinary. But today, we’re taking a delightful detour with the addition of Earl Grey tea.
What makes Earl Grey Crème Brûlée so irresistible? It’s the perfect marriage of textures and flavors. The creamy, smooth custard infused with the delicate bergamot notes of Earl Grey tea creates a symphony of taste that dances on your palate. Then, there’s the satisfying crack of the caramelized sugar, offering a delightful contrast to the velvety custard beneath. People adore this dish because it’s both comforting and refined, familiar yet exciting. Plus, it’s surprisingly simple to make ahead of time, making it the perfect dessert for entertaining or simply treating yourself to a little bit of luxury. So, are you ready to embark on this culinary adventure with me? Let’s get started!

Ingredients:
- 1 quart (4 cups) heavy cream
- 1 vanilla bean, split lengthwise and seeds scraped
- 6 Earl Grey tea bags
- 1 cup granulated sugar, plus extra for brûléeing
- 8 large egg yolks
- Pinch of salt
Infusing the Cream:
Okay, let’s start by infusing that beautiful heavy cream with the aromatic essence of Earl Grey. This is where the magic begins! We want to coax all those lovely bergamot notes out of the tea and into our crème brûlée base.
- Combine Cream and Vanilla: In a medium-sized, heavy-bottomed saucepan, pour in the heavy cream. Add the scraped vanilla bean seeds and the pod itself. The pod adds even more vanilla flavor, so don’t toss it!
- Add Earl Grey Tea Bags: Gently nestle the Earl Grey tea bags into the cream. Make sure they are fully submerged. You want them to release all their flavor into the cream.
- Heat Gently: Place the saucepan over medium heat. We’re not looking for a boil here, just a gentle simmer. Heat the cream until it’s steaming and small bubbles begin to form around the edges. This usually takes about 5-7 minutes.
- Infuse: Remove the saucepan from the heat. Cover it with a lid and let the tea bags steep in the cream for at least 1 hour, or even better, up to 2 hours. The longer it steeps, the stronger the Earl Grey flavor will be. I usually go for 2 hours for a really pronounced flavor.
- Remove Tea Bags and Vanilla Pod: After steeping, remove the tea bags from the cream, squeezing them gently to extract as much liquid as possible. Discard the tea bags. Remove the vanilla bean pod, rinse it, and save it for another use (like flavoring sugar!).
Preparing the Custard Base:
Now that we have our beautifully infused cream, it’s time to create the custard base. This part is all about achieving a smooth, creamy texture, so we’ll be gentle and patient.
- Preheat Oven and Prepare Baking Dish: Preheat your oven to 300°F (150°C). While the oven is heating, prepare a baking dish. You’ll need a baking dish large enough to hold your ramekins in a water bath. A 9×13 inch baking dish usually works well.
- Whisk Egg Yolks and Sugar: In a medium-sized bowl, whisk together the egg yolks, granulated sugar, and salt until the mixture is pale yellow and slightly thickened. This usually takes about 2-3 minutes. Don’t over-whisk, as you don’t want to incorporate too much air.
- Temper the Cream: This is a crucial step to prevent the egg yolks from scrambling. Slowly pour a small amount of the warm Earl Grey cream into the egg yolk mixture, whisking constantly. This will gradually raise the temperature of the egg yolks. Continue adding the cream in a slow, steady stream, whisking continuously until all the cream is incorporated.
- Strain the Custard: Pour the custard mixture through a fine-mesh sieve into a clean bowl or a large measuring cup with a spout. This will remove any lumps or bits of cooked egg, ensuring a perfectly smooth custard.
Baking the Crème Brûlée:
Baking the crème brûlée in a water bath is essential for even cooking and a creamy texture. The water bath helps to regulate the temperature and prevent the custard from curdling.
- Pour Custard into Ramekins: Divide the custard mixture evenly among the ramekins. I usually use 6-ounce ramekins, but you can use slightly larger ones if you prefer.
- Prepare the Water Bath: Place the ramekins in the prepared baking dish. Carefully pour hot water into the baking dish until the water reaches about halfway up the sides of the ramekins. Be careful not to splash any water into the custard.
- Bake: Carefully transfer the baking dish to the preheated oven. Bake for 40-50 minutes, or until the custards are set around the edges but still slightly jiggly in the center. The baking time may vary depending on your oven and the size of your ramekins.
- Check for Doneness: To check for doneness, gently tap the side of a ramekin. The custard should be set around the edges but still have a slight wobble in the center. If the custard is still too liquid, continue baking for a few more minutes, checking frequently.
- Cool: Once the custards are done, carefully remove the baking dish from the oven. Let the ramekins cool in the water bath for about 30 minutes. Then, remove the ramekins from the water bath and let them cool completely at room temperature.
- Chill: Cover the ramekins with plastic wrap and refrigerate for at least 4 hours, or preferably overnight. This allows the custard to fully set and the flavors to meld together.
Brûléeing the Sugar:
This is the fun part! The brûléeing process creates that signature crispy, caramelized sugar crust that makes crème brûlée so irresistible. You’ll need a kitchen torch for this step. If you don’t have a kitchen torch, you can use your oven’s broiler, but be very careful not to burn the sugar.
- Prepare the Sugar: Just before serving, sprinkle a thin, even layer of granulated sugar over the top of each custard. Use enough sugar to completely cover the surface, but not so much that it’s a thick layer.
- Brûlée the Sugar: Hold the kitchen torch a few inches away from the surface of the sugar. Move the torch in a circular motion, slowly caramelizing the sugar until it’s a deep golden brown color. Be careful not to burn the sugar. If you’re using a broiler, place the ramekins on a baking sheet and broil for a few minutes, watching closely until the sugar is caramelized.
- Let the Sugar Harden: Let the caramelized sugar harden for a minute or two before serving. This will create a crisp, crackly crust.
- Serve Immediately: Crème brûlée is best served immediately after brûléeing. The contrast between the cold, creamy custard and the warm, crispy sugar crust is simply divine!
Tips for Success:
- Use High-Quality Ingredients: The quality of your ingredients will directly impact the flavor of your crème brûlée. Use high-quality heavy cream, fresh egg yolks, and good-quality Earl Grey tea.
- Don’t Overbake: Overbaking the custard will result in a dry, curdled texture. Be sure to check for doneness frequently and remove the custards from the oven as soon as they are set around the edges but still slightly jiggly in the center.
- Use a Kitchen Torch: A kitchen torch is the best way to achieve a perfectly caramelized sugar crust. If you don’t have a kitchen torch, you can use your oven’s broiler, but be very careful not to burn the sugar.
- Serve Immediately: Crème brûlée is best served immediately after brûléeing. The longer it sits, the softer the sugar crust will become.
- Experiment with Flavors: Once you’ve mastered the basic crème brûlée recipe, feel free to experiment with different flavors. You can try using different types of tea, adding extracts, or incorporating fruit purees.

Conclusion:
This Earl Grey Crème Brûlée isn’t just dessert; it’s an experience. The delicate floral notes of the Earl Grey tea infused into the creamy custard, topped with that satisfyingly crisp caramelized sugar crust, create a symphony of flavors and textures that will leave you wanting more. Trust me, this is a recipe you absolutely must try. It’s elegant enough for a special occasion, yet simple enough to whip up for a weeknight treat. The subtle bergamot aroma elevates the classic crème brûlée to a whole new level of sophistication. But why is this particular recipe a must-try? It’s all about the balance. We’ve carefully crafted the proportions to ensure the tea flavor is present but not overpowering, allowing the richness of the cream and the sweetness of the sugar to shine through. The method is straightforward, minimizing the risk of curdling or other common crème brûlée mishaps. Plus, the visual appeal is undeniable. That golden, crackly top just begs to be broken into, revealing the smooth, fragrant custard beneath. Beyond the basic recipe, there’s plenty of room for personalization. For a richer flavor, try using brown sugar for the caramelized topping. The molasses notes will complement the Earl Grey beautifully. If you’re feeling adventurous, a sprinkle of lavender buds on top before torching adds another layer of floral complexity. Or, for a festive twist, infuse the cream with a hint of orange zest alongside the tea. Serving suggestions? The possibilities are endless! A small ramekin of this Earl Grey Crème Brûlée is perfect on its own as a light dessert. For a more decadent experience, serve it alongside fresh berries, such as raspberries or blueberries, which will provide a delightful contrast to the creamy custard. A dollop of whipped cream or a scoop of vanilla ice cream would also be a welcome addition. And for the ultimate indulgence, pair it with a glass of dessert wine, such as Sauternes or Vin Santo. The sweetness of the wine will complement the caramelized sugar and enhance the tea flavor. Don’t be intimidated by the fancy name. Crème brûlée is surprisingly easy to make at home, and this Earl Grey version is even easier thanks to our detailed instructions. The key is to use high-quality ingredients and to pay attention to the baking time. Remember, you want the custard to be set around the edges but still slightly wobbly in the center. This will ensure a perfectly smooth and creamy texture. I truly believe that this recipe will become a new favorite in your household. It’s a guaranteed crowd-pleaser and a wonderful way to impress your friends and family. So, what are you waiting for? Gather your ingredients, preheat your oven, and get ready to create a truly unforgettable dessert. I’m so excited for you to try this recipe! Once you’ve made it, please come back and share your experience in the comments below. Let me know what variations you tried, what you served it with, and most importantly, what you thought of the flavor. I can’t wait to hear from you! Happy baking! PrintEarl Grey Crème Brûlée: A Deliciously Unique Dessert Recipe
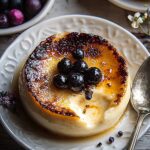
A creamy, elegant Earl Grey Crème Brûlée infused with the delicate flavor of bergamot, topped with a crisp, caramelized sugar crust.
- Prep Time: 20 minutes
- Cook Time: 40-50 minutes
- Total Time: 300 minutes
- Yield: 6 servings 1x
Ingredients
- 1 quart (4 cups) heavy cream
- 1 vanilla bean, split lengthwise and seeds scraped
- 6 Earl Grey tea bags
- 1 cup granulated sugar, plus extra for brûléeing
- 8 large egg yolks
- Pinch of salt
Instructions
- In a medium-sized, heavy-bottomed saucepan, pour in the heavy cream. Add the scraped vanilla bean seeds and the pod itself.
- Gently nestle the Earl Grey tea bags into the cream, ensuring they are fully submerged.
- Place the saucepan over medium heat. Heat the cream until it’s steaming and small bubbles begin to form around the edges (about 5-7 minutes).
- Remove the saucepan from the heat. Cover it with a lid and let the tea bags steep in the cream for at least 1 hour, or up to 2 hours for a stronger flavor.
- After steeping, remove the tea bags from the cream, squeezing them gently to extract as much liquid as possible. Discard the tea bags. Remove the vanilla bean pod, rinse it, and save it for another use.
- Preheat your oven to 300°F (150°C). Prepare a baking dish large enough to hold your ramekins in a water bath (e.g., a 9×13 inch baking dish).
- In a medium-sized bowl, whisk together the egg yolks, granulated sugar, and salt until the mixture is pale yellow and slightly thickened (about 2-3 minutes).
- Slowly pour a small amount of the warm Earl Grey cream into the egg yolk mixture, whisking constantly. Continue adding the cream in a slow, steady stream, whisking continuously until all the cream is incorporated.
- Pour the custard mixture through a fine-mesh sieve into a clean bowl or a large measuring cup with a spout.
- Divide the custard mixture evenly among the ramekins (6-ounce ramekins recommended).
- Place the ramekins in the prepared baking dish. Carefully pour hot water into the baking dish until the water reaches about halfway up the sides of the ramekins.
- Carefully transfer the baking dish to the preheated oven. Bake for 40-50 minutes, or until the custards are set around the edges but still slightly jiggly in the center.
- Gently tap the side of a ramekin. The custard should be set around the edges but still have a slight wobble in the center. If the custard is still too liquid, continue baking for a few more minutes, checking frequently.
- Once the custards are done, carefully remove the baking dish from the oven. Let the ramekins cool in the water bath for about 30 minutes. Then, remove the ramekins from the water bath and let them cool completely at room temperature.
- Cover the ramekins with plastic wrap and refrigerate for at least 4 hours, or preferably overnight.
- Just before serving, sprinkle a thin, even layer of granulated sugar over the top of each custard.
- Hold the kitchen torch a few inches away from the surface of the sugar. Move the torch in a circular motion, slowly caramelizing the sugar until it’s a deep golden brown color. Be careful not to burn the sugar. If using a broiler, place the ramekins on a baking sheet and broil for a few minutes, watching closely until the sugar is caramelized.
- Let the caramelized sugar harden for a minute or two before serving.
- Crème brûlée is best served immediately after brûléeing.
Notes
- Use high-quality ingredients for the best flavor.
- Don’t overbake the custard.
- A kitchen torch is recommended for brûléeing the sugar.
- Serve immediately after brûléeing for the best texture.
- Experiment with different flavors once you’ve mastered the basic recipe.
Leave a Comment