
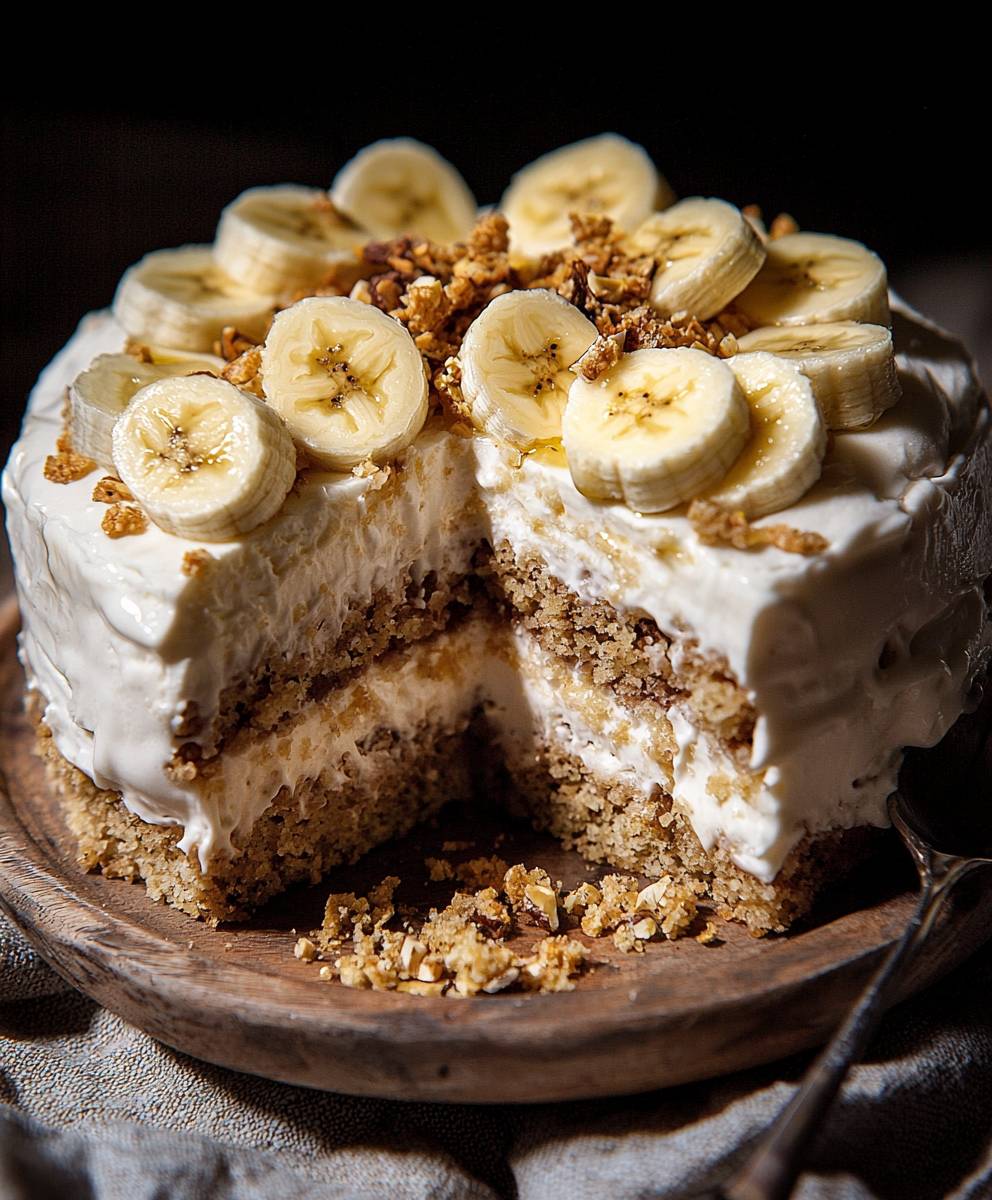
Banana Pudding Ice Cream Cake: Prepare to have your dessert world rocked! Imagine the creamy, dreamy goodness of banana pudding, the cool refreshment of ice cream, and the satisfying crunch of vanilla wafers all melded into one glorious, no-bake cake. Sounds divine, right? This isn’t just a dessert; it’s a nostalgic trip down memory lane with a frosty, modern twist.
Banana pudding itself is a Southern staple, a comforting classic often found gracing tables at family gatherings and potlucks. Its origins are debated, but it gained popularity in the early 20th century and has remained a beloved dessert ever since. We’ve taken that comforting flavor profile and elevated it into something truly special.
What makes this Banana Pudding Ice Cream Cake so irresistible? It’s the perfect combination of textures and flavors. The creamy ice cream complements the soft, pudding-like layers, while the vanilla wafers provide a delightful crunch. Plus, it’s incredibly easy to make no baking required! This makes it the ideal dessert for hot summer days, busy weeknights, or any occasion where you want a show-stopping treat without spending hours in the kitchen. Get ready to impress your friends and family with this unforgettable dessert!

Ingredients:
- For the Vanilla Wafer Crust:
- 3 cups vanilla wafer crumbs (about 1 (12-ounce) box)
- 6 tablespoons unsalted butter, melted
- 2 tablespoons granulated sugar
- For the Banana Pudding Ice Cream Layer:
- 1 (14-ounce) can sweetened condensed milk
- 1 ½ cups heavy cream
- 1 (3.4-ounce) package instant banana cream pudding mix
- 2 cups milk (whole or 2%)
- 1 teaspoon vanilla extract
- 3 ripe bananas, mashed
- For the Whipped Cream Topping:
- 2 cups heavy cream
- 4 tablespoons powdered sugar
- 1 teaspoon vanilla extract
- For Garnish:
- Vanilla wafers, for decorating
- Sliced bananas, for decorating (optional)
- Caramel sauce, for drizzling (optional)
Preparing the Vanilla Wafer Crust:
- First, let’s get that delicious vanilla wafer crust ready! In a medium bowl, combine the vanilla wafer crumbs, melted butter, and granulated sugar. Make sure everything is nicely mixed together so the butter coats all the crumbs.
- Press the mixture firmly into the bottom of a 9-inch springform pan. I like to use the bottom of a measuring cup to really pack it down and create a solid base. This will prevent the crust from crumbling too much when we slice the cake later.
- Place the springform pan in the freezer while you prepare the ice cream layer. This will help the crust set and stay firm.
Making the Banana Pudding Ice Cream Layer:
- Now for the star of the show the banana pudding ice cream! In a large bowl, whisk together the sweetened condensed milk, heavy cream, banana cream pudding mix, milk, and vanilla extract. Whisk until the pudding mix is fully dissolved and the mixture starts to thicken slightly. This usually takes about 2-3 minutes.
- Gently fold in the mashed bananas. Be careful not to overmix, as you want to keep some texture from the bananas. Overmixing can make the mixture a bit too liquid.
- Pour the banana pudding ice cream mixture over the prepared vanilla wafer crust in the springform pan. Spread it evenly to ensure a consistent layer.
- Cover the springform pan tightly with plastic wrap and freeze for at least 6 hours, or preferably overnight. This is crucial for the ice cream layer to set properly and become firm enough to slice.
Preparing the Whipped Cream Topping:
- Once the ice cream layer is completely frozen, it’s time to make the whipped cream topping. In a large, chilled bowl (chilling the bowl helps the cream whip up faster and hold its shape better), combine the heavy cream, powdered sugar, and vanilla extract.
- Using an electric mixer (either a stand mixer or a hand mixer), beat the mixture on medium-high speed until stiff peaks form. Be careful not to overwhip, as this can turn the cream into butter! You’ll know it’s ready when the cream holds its shape and forms stiff peaks when you lift the beaters.
Assembling the Banana Pudding Ice Cream Cake:
- Remove the ice cream cake from the freezer and carefully remove the sides of the springform pan. You might need to run a warm knife around the edges of the pan to loosen the cake if it’s sticking.
- Spread the whipped cream evenly over the top of the ice cream cake. You can use a spatula or a piping bag to create a decorative design.
- Now for the fun part decorating! Arrange vanilla wafers around the edge of the cake. You can stand them up vertically or lay them flat, depending on your preference.
- If you’re using sliced bananas, arrange them on top of the whipped cream. This adds a fresh and fruity element to the cake.
- For an extra touch of indulgence, drizzle caramel sauce over the top of the cake. This adds a beautiful visual appeal and a delicious caramel flavor that complements the banana and vanilla.
- Return the assembled cake to the freezer for at least 30 minutes to allow the whipped cream to firm up slightly. This will make it easier to slice and serve.
Serving and Storage:
- To serve, remove the cake from the freezer about 10-15 minutes before slicing. This will allow it to soften slightly and make it easier to cut.
- Use a sharp knife to slice the cake into wedges. I find that running the knife under hot water between slices helps to create clean cuts.
- Serve immediately and enjoy!
- Store any leftover cake in the freezer, tightly wrapped in plastic wrap or in an airtight container. It will keep for up to a week, but it’s best enjoyed within a few days for optimal flavor and texture.
Tips and Variations:
- Vanilla Wafer Crust Variations: For a richer crust, you can add a tablespoon of brown sugar to the vanilla wafer crumb mixture. You can also use other types of cookies, such as graham crackers or shortbread cookies, for a different flavor profile.
- Banana Pudding Ice Cream Layer Variations: If you want a more intense banana flavor, you can add a teaspoon of banana extract to the ice cream mixture. You can also add chopped pecans or walnuts for a nutty crunch. For a chocolate twist, swirl in some hot fudge sauce or chocolate shavings.
- Whipped Cream Topping Variations: For a stabilized whipped cream that will hold its shape longer, you can add a teaspoon of cornstarch to the heavy cream before whipping. You can also flavor the whipped cream with other extracts, such as almond or coconut.
- Garnish Variations: Get creative with your garnishes! You can use chocolate shavings, sprinkles, chopped nuts, or even fresh berries to decorate the cake.
- Make it Ahead: This cake is perfect for making ahead of time. You can prepare the crust and ice cream layer up to a week in advance and store them in the freezer. Just add the whipped cream topping and garnishes before serving.
- Springform Pan Alternative: If you don’t have a springform pan, you can use a regular cake pan lined with parchment paper. Just make sure to leave enough overhang on the parchment paper to easily lift the cake out of the pan.
- Dairy-Free Option: To make this cake dairy-free, you can use dairy-free vanilla wafers, coconut cream instead of heavy cream, and dairy-free milk. Make sure to use a dairy-free banana cream pudding mix as well.
Conclusion:
This Banana Pudding Ice Cream Cake isn’t just a dessert; it’s a nostalgic trip down memory lane with a cool, creamy twist! I truly believe this recipe is a must-try for anyone who loves the classic flavors of banana pudding but wants something a little more exciting and perfect for a warm day. The combination of the crunchy vanilla wafer crust, the rich banana ice cream, the creamy pudding layer, and the fluffy whipped topping creates a symphony of textures and tastes that will have everyone begging for seconds. What makes this cake so special is its simplicity and adaptability. It’s surprisingly easy to assemble, even for beginner bakers, and the results are always impressive. The layers come together beautifully, creating a visually stunning dessert that’s as delicious as it looks. Plus, it’s a fantastic make-ahead dessert, which is always a bonus when you’re entertaining. You can prepare it a day or two in advance and simply pull it out of the freezer when you’re ready to serve. But the best part? You can totally customize it to your liking! Feeling adventurous? Try adding a layer of salted caramel sauce between the ice cream and pudding for an extra touch of indulgence. Or, if you’re a chocolate lover, sprinkle some chocolate shavings on top of the whipped cream. For a more tropical vibe, consider adding some toasted coconut flakes or chopped macadamia nuts. You could even swirl in some peanut butter into the ice cream before freezing for a banana-peanut butter explosion! When it comes to serving, the possibilities are endless. A simple slice on its own is divine, but you can also dress it up with a drizzle of chocolate syrup, a sprinkle of chopped nuts, or a few fresh banana slices. For a truly decadent experience, serve it with a scoop of vanilla ice cream on the side. And don’t forget the whipped cream! A generous dollop on top is the perfect finishing touch. I’m so confident that you’ll love this Banana Pudding Ice Cream Cake that I urge you to give it a try. It’s the perfect dessert for any occasion, from summer barbecues to birthday parties to simple weeknight treats. Its a guaranteed crowd-pleaser that will leave everyone smiling. I’ve poured my heart into perfecting this recipe, and I’m so excited to share it with you. Now it’s your turn to get creative in the kitchen! Once you’ve made it, I’d absolutely love to hear about your experience. Did you make any variations? What did your family and friends think? Share your photos and stories in the comments below. I can’t wait to see your creations and hear all about your Banana Pudding Ice Cream Cake adventures! Happy baking! PrintBanana Pudding Ice Cream Cake: The Ultimate Dessert Recipe
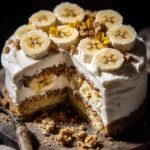
Vanilla wafer crust topped with creamy banana pudding ice cream and fluffy whipped cream. A refreshing frozen dessert!
- Prep Time: 30 minutes
- Cook Time: 0 minutes
- Total Time: 390 minutes
- Yield: 12 servings 1x
Ingredients
- 3 cups vanilla wafer crumbs (about 1 (12-ounce) box)
- 6 tablespoons unsalted butter, melted
- 2 tablespoons granulated sugar
- 1 (14-ounce) can sweetened condensed milk
- 1 ½ cups heavy cream
- 1 (3.4-ounce) package instant banana cream pudding mix
- 2 cups milk (whole or 2%)
- 1 teaspoon vanilla extract
- 3 ripe bananas, mashed
- 2 cups heavy cream
- 4 tablespoons powdered sugar
- 1 teaspoon vanilla extract
- Vanilla wafers, for decorating
- Sliced bananas, for decorating (optional)
- Caramel sauce, for drizzling (optional)
Instructions
- Prepare the Vanilla Wafer Crust: In a medium bowl, combine vanilla wafer crumbs, melted butter, and granulated sugar. Mix well.
- Press the mixture firmly into the bottom of a 9-inch springform pan. Use the bottom of a measuring cup to pack it down.
- Place the springform pan in the freezer while you prepare the ice cream layer.
- Make the Banana Pudding Ice Cream Layer: In a large bowl, whisk together sweetened condensed milk, heavy cream, banana cream pudding mix, milk, and vanilla extract until the pudding mix is dissolved and the mixture starts to thicken.
- Gently fold in the mashed bananas. Be careful not to overmix.
- Pour the banana pudding ice cream mixture over the prepared vanilla wafer crust in the springform pan. Spread evenly.
- Cover the springform pan tightly with plastic wrap and freeze for at least 6 hours, or preferably overnight.
- Prepare the Whipped Cream Topping: In a large, chilled bowl, combine heavy cream, powdered sugar, and vanilla extract.
- Using an electric mixer, beat the mixture on medium-high speed until stiff peaks form. Be careful not to overwhip.
- Assemble the Banana Pudding Ice Cream Cake: Remove the ice cream cake from the freezer and carefully remove the sides of the springform pan.
- Spread the whipped cream evenly over the top of the ice cream cake.
- Arrange vanilla wafers around the edge of the cake.
- If using, arrange sliced bananas on top of the whipped cream.
- Drizzle caramel sauce over the top of the cake, if desired.
- Return the assembled cake to the freezer for at least 30 minutes to allow the whipped cream to firm up slightly.
- Serving and Storage: To serve, remove the cake from the freezer about 10-15 minutes before slicing.
- Use a sharp knife to slice the cake into wedges. Run the knife under hot water between slices for clean cuts.
- Serve immediately and enjoy!
- Store any leftover cake in the freezer, tightly wrapped in plastic wrap or in an airtight container.
Notes
- For a richer crust, add a tablespoon of brown sugar to the vanilla wafer crumb mixture.
- If you want a more intense banana flavor, you can add a teaspoon of banana extract to the ice cream mixture.
- For a stabilized whipped cream that will hold its shape longer, you can add a teaspoon of cornstarch to the heavy cream before whipping.
- Get creative with your garnishes! You can use chocolate shavings, sprinkles, chopped nuts, or even fresh berries to decorate the cake.
- This cake is perfect for making ahead of time. You can prepare the crust and ice cream layer up to a week in advance and store them in the freezer. Just add the whipped cream topping and garnishes before serving.
- If you don’t have a springform pan, you can use a regular cake pan lined with parchment paper.
- To make this cake dairy-free, you can use dairy-free vanilla wafers, coconut cream instead of heavy cream, and dairy-free milk. Make sure to use a dairy-free banana cream pudding mix as well.

Leave a Comment