
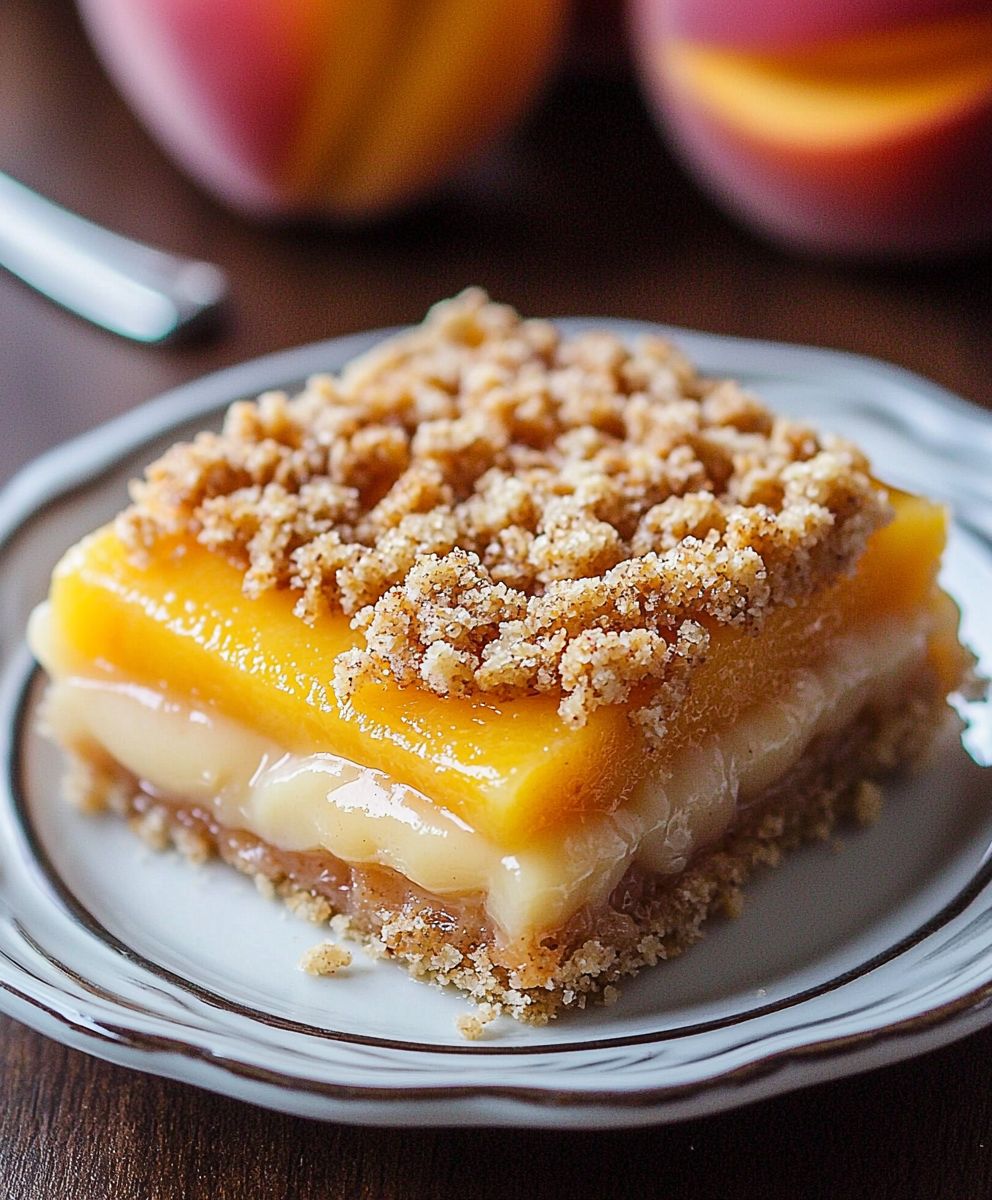
Peach Pie Crumble Bars: Imagine sinking your teeth into a slice of summer sunshine, even when the days are getting shorter. That’s precisely what these delightful bars offer a taste of juicy, ripe peaches nestled between a buttery, crumbly crust and topping. Forget fussy pie crusts and complicated lattice designs; these bars are all about ease and deliciousness!
While the exact origins of crumble toppings are debated, they’ve become a beloved part of fruit desserts across cultures. Think of the comforting apple crumble of England or the various streusel-topped treats found throughout Europe. The beauty lies in its simplicity a rustic, forgiving topping that perfectly complements the sweetness of the fruit.
People adore Peach Pie Crumble Bars for so many reasons. The combination of the soft, yielding peaches with the crisp, buttery crumble is simply irresistible. They’re also incredibly convenient. Perfect for potlucks, picnics, or a simple weeknight treat, these bars are easy to transport and require no forks! Plus, the warm, comforting aroma that fills your kitchen as they bake is an experience in itself. Get ready to bake a batch of these irresistible bars and experience the taste of summer all year round!

Ingredients:
- For the Crust:
- 1 ½ cups all-purpose flour
- ½ cup (1 stick) cold unsalted butter, cut into cubes
- ¼ cup granulated sugar
- ¼ teaspoon salt
- 4-6 tablespoons ice water
- For the Peach Filling:
- 4 cups peeled and sliced fresh peaches (about 6 medium peaches)
- ¼ cup granulated sugar
- 2 tablespoons cornstarch
- 1 tablespoon lemon juice
- ½ teaspoon ground cinnamon
- ¼ teaspoon ground nutmeg
- For the Crumble Topping:
- ¾ cup all-purpose flour
- ½ cup packed light brown sugar
- ½ cup rolled oats (not instant)
- ½ teaspoon ground cinnamon
- ¼ teaspoon salt
- ½ cup (1 stick) cold unsalted butter, cut into cubes
- Optional:
- Vanilla ice cream, for serving
- Powdered sugar, for dusting
Preparing the Crust
- Combine Dry Ingredients: In a large bowl, whisk together the flour, sugar, and salt. This ensures that the salt is evenly distributed throughout the crust, which is crucial for flavor.
- Cut in the Butter: Add the cold, cubed butter to the flour mixture. Using a pastry blender or your fingertips, cut the butter into the flour until the mixture resembles coarse crumbs. The key here is to work quickly so the butter doesn’t melt. Small pieces of butter are what create flaky layers in the crust. If you don’t have a pastry blender, you can use two knives to cut the butter in a criss-cross motion.
- Add Ice Water: Gradually add the ice water, one tablespoon at a time, mixing gently after each addition. Continue adding water until the dough just comes together. Be careful not to overmix, as this will develop the gluten in the flour and result in a tough crust. The dough should be slightly shaggy but hold together when pressed.
- Form the Dough: Gently form the dough into a disc. Wrap it tightly in plastic wrap and refrigerate for at least 30 minutes. This chilling time allows the gluten to relax and the butter to firm up, which will make the crust easier to roll out and prevent it from shrinking during baking. You can even chill it for longer, up to a couple of hours, if needed.
- Preheat Oven and Prepare Pan: While the dough is chilling, preheat your oven to 375°F (190°C). Grease and flour a 9×13 inch baking pan. Alternatively, you can line the pan with parchment paper, leaving an overhang on the sides for easy removal of the bars after baking.
- Roll Out the Dough: On a lightly floured surface, roll out the chilled dough into a rectangle slightly larger than your baking pan. Carefully transfer the dough to the prepared pan, pressing it evenly into the bottom and up the sides. If the dough tears, simply patch it up with your fingers.
- Pre-bake the Crust: Prick the bottom of the crust several times with a fork. This will prevent the crust from puffing up during baking. Bake the crust for 15-20 minutes, or until it is lightly golden brown. This pre-baking step ensures that the crust is fully cooked and crisp before adding the filling.
Preparing the Peach Filling
- Prepare the Peaches: Peel and slice the fresh peaches. If you’re using frozen peaches, make sure they are thawed and drained well. The key to a good peach filling is to use ripe but firm peaches. Overripe peaches will become mushy during baking.
- Combine Filling Ingredients: In a large bowl, combine the sliced peaches, sugar, cornstarch, lemon juice, cinnamon, and nutmeg. Gently toss to coat the peaches evenly. The cornstarch will help to thicken the filling as it bakes, while the lemon juice adds a touch of brightness and enhances the peach flavor. The cinnamon and nutmeg add warmth and depth to the filling.
Making the Crumble Topping
- Combine Dry Ingredients: In a medium bowl, whisk together the flour, brown sugar, oats, cinnamon, and salt. The brown sugar adds a caramel-like flavor to the crumble topping, while the oats provide a nice texture.
- Cut in the Butter: Add the cold, cubed butter to the flour mixture. Using a pastry blender or your fingertips, cut the butter into the flour until the mixture resembles coarse crumbs. Again, work quickly to prevent the butter from melting. The crumble topping should have a mixture of small and slightly larger clumps of butter for the best texture.
Assembling and Baking the Peach Pie Crumble Bars
- Pour in the Filling: Pour the peach filling evenly over the pre-baked crust. Make sure the peaches are distributed evenly across the crust.
- Sprinkle with Crumble Topping: Sprinkle the crumble topping evenly over the peach filling. Gently press the topping down slightly to help it adhere to the filling.
- Bake: Bake in the preheated oven for 30-35 minutes, or until the crumble topping is golden brown and the filling is bubbly. The baking time may vary depending on your oven, so keep an eye on the bars and adjust the time as needed.
- Cool Completely: Let the bars cool completely in the pan before cutting into squares. This is important because the filling will continue to thicken as it cools. If you cut the bars while they are still warm, the filling will be runny. Cooling them completely also makes them easier to cut cleanly.
- Serve: Cut into squares and serve. These bars are delicious on their own, but they are even better served warm with a scoop of vanilla ice cream. You can also dust them with powdered sugar for a pretty presentation.
Tips for Success
- Use Cold Butter: Cold butter is essential for both the crust and the crumble topping. It creates flaky layers in the crust and a crumbly texture in the topping.
- Don’t Overmix: Overmixing the dough will develop the gluten in the flour and result in a tough crust. Mix just until the ingredients are combined.
- Chill the Dough: Chilling the dough allows the gluten to relax and the butter to firm up, which will make the crust easier to roll out and prevent it from shrinking during baking.
- Use Ripe but Firm Peaches: Ripe but firm peaches will hold their shape during baking and prevent the filling from becoming mushy.
- Cool Completely: Let the bars cool completely before cutting into squares to allow the filling to thicken and make them easier to cut.
Variations
- Add Nuts: Add chopped pecans or walnuts to the crumble topping for extra flavor and texture.
- Use Different Fruit: Substitute other fruits for the peaches, such as apples, berries, or plums.
- Add Spices: Experiment with different spices, such as ginger, cardamom, or allspice.
- Make it Gluten-Free: Use a gluten-free flour blend to make these bars gluten-free.
Conclusion:
And there you have it! These Peach Pie Crumble Bars are truly a must-try recipe, and I’m confident they’ll become a new favorite in your household. The combination of the sweet, juicy peaches, the buttery shortbread crust, and the crumbly topping is simply irresistible. It’s like a slice of summer sunshine in every bite!
What makes these bars so special is their versatility and ease of preparation. Unlike a traditional peach pie, these bars are incredibly portable, making them perfect for picnics, potlucks, or even a simple afternoon treat. Plus, the recipe is surprisingly straightforward, even for beginner bakers. You don’t need any fancy equipment or complicated techniques to achieve bakery-worthy results.
But the best part? The flavor! The peaches become wonderfully soft and caramelized during baking, their natural sweetness intensified and complemented by the warm spices. The shortbread crust provides a sturdy and buttery base, while the crumble topping adds a delightful textural contrast. It’s a symphony of flavors and textures that will leave you wanting more.
Serving Suggestions and Variations:
These Peach Pie Crumble Bars are delicious on their own, but they’re even better with a few simple additions. For a truly decadent experience, try serving them warm with a scoop of vanilla ice cream or a dollop of whipped cream. A sprinkle of cinnamon or a drizzle of caramel sauce would also be fantastic.
If you’re feeling adventurous, you can easily adapt this recipe to suit your preferences. Substitute the peaches with other fruits, such as nectarines, plums, or even berries. Add a handful of chopped nuts to the crumble topping for extra crunch. Or, experiment with different spices, such as cardamom or nutmeg, to create your own unique flavor profile.
For a vegan version, simply substitute the butter in the crust and crumble topping with a vegan butter alternative. You can also use a plant-based milk in the filling, if desired.
These bars are also great for meal prepping. They can be stored in an airtight container at room temperature for up to three days, or in the refrigerator for up to a week. They also freeze well, so you can make a batch ahead of time and enjoy them whenever you’re craving a taste of summer.
Time to Bake!
I truly believe that everyone should experience the joy of these Peach Pie Crumble Bars. They’re the perfect balance of sweet, buttery, and crumbly, and they’re sure to impress your family and friends.
So, what are you waiting for? Preheat your oven, gather your ingredients, and get ready to bake up a batch of these irresistible treats. I promise you won’t be disappointed.
And most importantly, I’d love to hear about your experience! Once you’ve tried the recipe, please share your photos and comments on social media using [Your Hashtag]. Let me know what you think, what variations you tried, and how much you enjoyed them. Your feedback is invaluable, and it helps me to create even better recipes for you in the future. Happy baking!
Peach Pie Crumble Bars: The Ultimate Summer Dessert Recipe
Buttery peach pie crumble bars with a sweet peach filling and crunchy oat topping. Perfect for summer!
Ingredients
- 1 ½ cups all-purpose flour
- ½ cup (1 stick) cold unsalted butter, cut into cubes
- ¼ cup granulated sugar
- ¼ teaspoon salt
- 4-6 tablespoons ice water
- 4 cups peeled and sliced fresh peaches (about 6 medium peaches)
- ¼ cup granulated sugar
- 2 tablespoons cornstarch
- 1 tablespoon lemon juice
- ½ teaspoon ground cinnamon
- ¼ teaspoon ground nutmeg
- ¾ cup all-purpose flour
- ½ cup packed light brown sugar
- ½ cup rolled oats (not instant)
- ½ teaspoon ground cinnamon
- ¼ teaspoon salt
- ½ cup (1 stick) cold unsalted butter, cut into cubes
- Vanilla ice cream, for serving
- Powdered sugar, for dusting
Instructions
- In a large bowl, whisk together the flour, sugar, and salt.
- Add the cold, cubed butter to the flour mixture. Using a pastry blender or your fingertips, cut the butter into the flour until the mixture resembles coarse crumbs.
- Gradually add the ice water, one tablespoon at a time, mixing gently after each addition. Continue adding water until the dough just comes together. Be careful not to overmix.
- Gently form the dough into a disc. Wrap it tightly in plastic wrap and refrigerate for at least 30 minutes.
- While the dough is chilling, preheat your oven to 375°F (190°C). Grease and flour a 9×13 inch baking pan.
- On a lightly floured surface, roll out the chilled dough into a rectangle slightly larger than your baking pan. Carefully transfer the dough to the prepared pan, pressing it evenly into the bottom and up the sides.
- Prick the bottom of the crust several times with a fork. Bake the crust for 15-20 minutes, or until it is lightly golden brown.
- Peel and slice the fresh peaches.
- In a large bowl, combine the sliced peaches, sugar, cornstarch, lemon juice, cinnamon, and nutmeg. Gently toss to coat the peaches evenly.
- In a medium bowl, whisk together the flour, brown sugar, oats, cinnamon, and salt.
- Add the cold, cubed butter to the flour mixture. Using a pastry blender or your fingertips, cut the butter into the flour until the mixture resembles coarse crumbs.
- Pour the peach filling evenly over the pre-baked crust.
- Sprinkle the crumble topping evenly over the peach filling. Gently press the topping down slightly to help it adhere to the filling.
- Bake in the preheated oven for 30-35 minutes, or until the crumble topping is golden brown and the filling is bubbly.
- Let the bars cool completely in the pan before cutting into squares.
- Cut into squares and serve. These bars are delicious on their own, but they are even better served warm with a scoop of vanilla ice cream. You can also dust them with powdered sugar for a pretty presentation.
Notes
- Use Cold Butter: Cold butter is essential for both the crust and the crumble topping. It creates flaky layers in the crust and a crumbly texture in the topping.
- Don’t Overmix: Overmixing the dough will develop the gluten in the flour and result in a tough crust. Mix just until the ingredients are combined.
- Chill the Dough: Chilling the dough allows the gluten to relax and the butter to firm up, which will make the crust easier to roll out and prevent it from shrinking during baking.
- Use Ripe but Firm Peaches: Ripe but firm peaches will hold their shape during baking and prevent the filling from becoming mushy.
- Cool Completely: Let the bars cool completely before cutting into squares to allow the filling to thicken and make them easier to cut.
- Variations:
- Add chopped pecans or walnuts to the crumble topping for extra flavor and texture.
- Substitute other fruits for the peaches, such as apples, berries, or plums.
- Experiment with different spices, such as ginger, cardamom, or allspice.
- Use a gluten-free flour blend to make these bars gluten-free.

Leave a Comment