
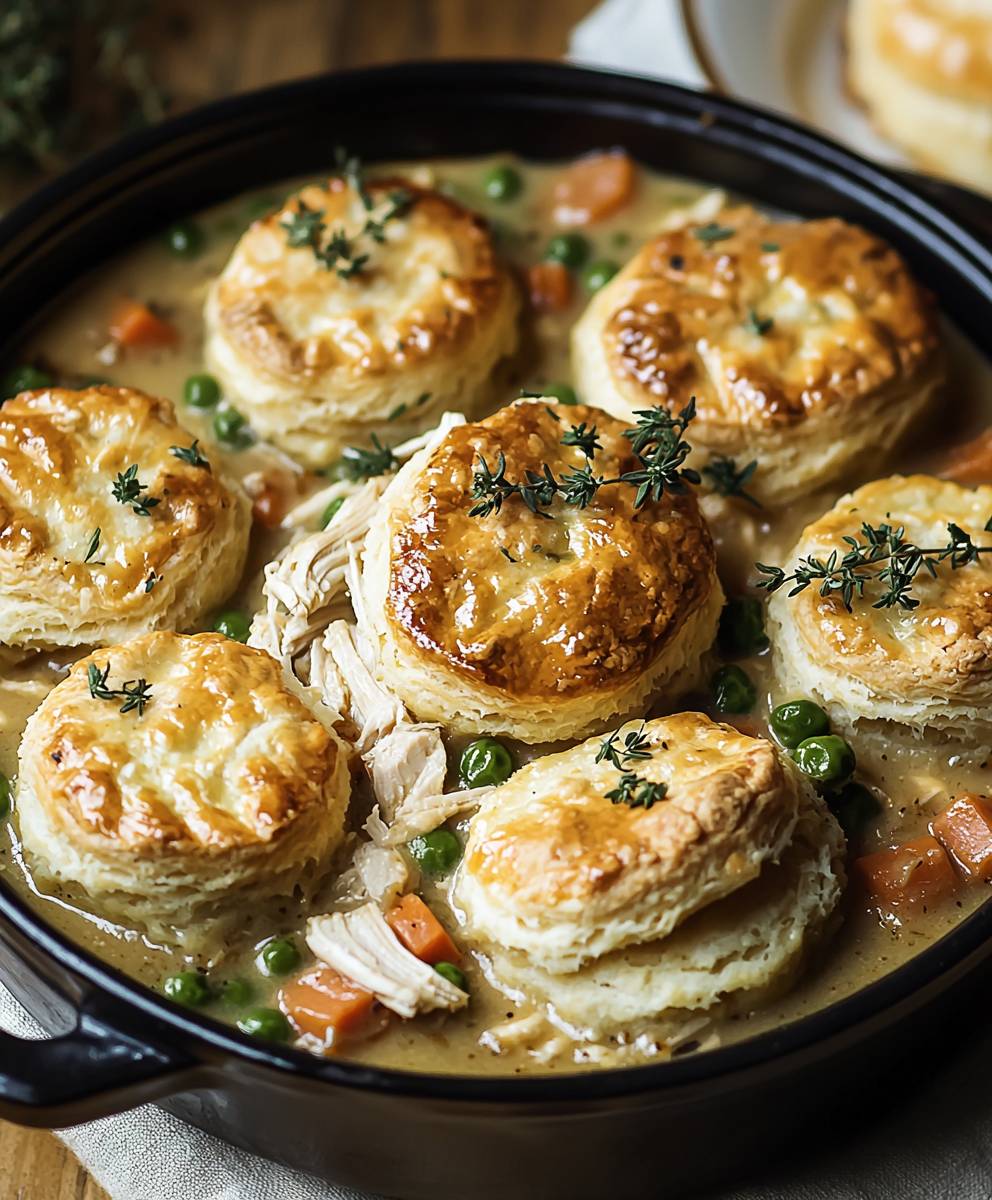
Chicken Pot Pie Biscuits: the ultimate comfort food mashup you didn’t know you needed! Imagine the flaky, buttery goodness of a homemade biscuit cradling the creamy, savory filling of a classic chicken pot pie. It’s a handheld hug on a cold day, and trust me, once you try it, you’ll be hooked.
Chicken pot pie itself has a rich history, dating back to ancient Greece, where pies were often filled with meats and vegetables. Over time, the dish evolved, finding its way to America with European settlers. It became a staple of home cooking, a way to use leftover chicken and vegetables in a hearty, satisfying meal. But we’re taking it one step further!
What makes these Chicken Pot Pie Biscuits so irresistible? It’s the perfect combination of textures and flavors. The flaky, slightly sweet biscuit complements the rich, savory filling beautifully. People adore chicken pot pie for its comforting warmth, its creamy texture, and its ability to satisfy even the biggest appetites. By encasing it in a biscuit, we’ve made it even more convenient and portable. No forks required! Get ready to experience a delightful twist on a timeless classic.

Ingredients:
- For the Chicken Pot Pie Filling:
- 2 tablespoons olive oil
- 1 large onion, chopped
- 2 carrots, peeled and chopped
- 2 celery stalks, chopped
- 8 ounces cremini mushrooms, sliced
- 1 teaspoon dried thyme
- 1/2 teaspoon dried rosemary
- 1/4 teaspoon ground nutmeg
- 1/4 cup all-purpose flour
- 4 cups chicken broth
- 1 cup heavy cream
- 2 cups cooked chicken, shredded (rotisserie chicken works great!)
- 1 cup frozen peas
- 1 cup frozen corn
- 1/2 cup chopped fresh parsley
- Salt and freshly ground black pepper to taste
- For the Cheddar Biscuits:
- 2 cups all-purpose flour
- 1 tablespoon baking powder
- 1 teaspoon salt
- 1/2 teaspoon baking soda
- 1/2 cup (1 stick) cold unsalted butter, cut into cubes
- 3/4 cup cold buttermilk
- 1 cup shredded sharp cheddar cheese
- 2 tablespoons melted butter, for brushing
Preparing the Chicken Pot Pie Filling:
- Sauté the Vegetables: Heat the olive oil in a large Dutch oven or pot over medium heat. Add the chopped onion, carrots, and celery and cook, stirring occasionally, until the vegetables are softened, about 8-10 minutes.
- Add Mushrooms and Herbs: Add the sliced mushrooms, dried thyme, dried rosemary, and ground nutmeg to the pot. Cook, stirring occasionally, until the mushrooms are softened and have released their moisture, about 5-7 minutes. The aroma at this point is just wonderful!
- Create a Roux: Sprinkle the all-purpose flour over the vegetables and cook, stirring constantly, for 1-2 minutes. This will help thicken the sauce. Make sure to scrape the bottom of the pot to prevent the flour from burning.
- Add the Broth and Cream: Gradually whisk in the chicken broth, making sure to break up any lumps that may form. Bring the mixture to a simmer, then reduce the heat to low and simmer for 10-15 minutes, or until the sauce has thickened slightly. Stir in the heavy cream and bring back to a gentle simmer.
- Incorporate the Chicken and Vegetables: Stir in the shredded cooked chicken, frozen peas, and frozen corn. Cook for another 5-7 minutes, or until the vegetables are heated through.
- Season and Finish: Stir in the chopped fresh parsley. Season with salt and freshly ground black pepper to taste. Remember, you can always add more seasoning, but you can’t take it away! Taste and adjust as needed. Set the filling aside while you prepare the biscuits.
Making the Cheddar Biscuits:
- Preheat and Prep: Preheat your oven to 450°F (232°C). Line a baking sheet with parchment paper. This will prevent the biscuits from sticking and make cleanup a breeze.
- Combine Dry Ingredients: In a large bowl, whisk together the all-purpose flour, baking powder, salt, and baking soda. Make sure everything is well combined so the biscuits rise evenly.
- Cut in the Butter: Add the cold, cubed butter to the dry ingredients. Use a pastry blender or your fingertips to cut the butter into the flour mixture until it resembles coarse crumbs. The smaller the butter pieces, the flakier your biscuits will be. You want to see small pea-sized pieces of butter throughout the flour.
- Add Cheese and Buttermilk: Stir in the shredded cheddar cheese. Then, pour in the cold buttermilk and stir until just combined. Be careful not to overmix the dough, as this will result in tough biscuits. The dough should be slightly shaggy and sticky.
- Turn Out and Pat Down: Turn the dough out onto a lightly floured surface. Gently pat the dough into a rectangle about 1 inch thick.
- Cut the Biscuits: Use a 2-inch biscuit cutter (or a sharp knife) to cut out the biscuits. Try not to twist the cutter as you press down, as this can seal the edges and prevent the biscuits from rising properly. Reroll the scraps of dough and cut out more biscuits until all the dough is used.
- Arrange on Baking Sheet: Place the biscuits onto the prepared baking sheet, leaving a little space between each biscuit.
- Brush with Butter: Brush the tops of the biscuits with the melted butter. This will give them a beautiful golden-brown color and a rich, buttery flavor.
- Bake: Bake for 12-15 minutes, or until the biscuits are golden brown and cooked through. Keep a close eye on them, as oven temperatures can vary.
Assembling the Chicken Pot Pie Biscuits:
- Let Biscuits Cool Slightly: Remove the biscuits from the oven and let them cool slightly on the baking sheet for a few minutes. This will make them easier to handle.
- Slice the Biscuits: Using a serrated knife, carefully slice each biscuit in half horizontally.
- Fill with Chicken Pot Pie: Spoon a generous amount of the warm chicken pot pie filling onto the bottom half of each biscuit.
- Top and Serve: Place the top half of the biscuit over the filling. Serve immediately and enjoy! These are best served warm, so the biscuits are still flaky and the filling is nice and comforting.
Conclusion:
This isn’t just another recipe; it’s a warm hug on a plate, a comforting symphony of flavors, and a guaranteed crowd-pleaser. Seriously, you need to try these Chicken Pot Pie Biscuits. They’re the perfect blend of flaky, buttery biscuit goodness and the creamy, savory filling of a classic chicken pot pie, all conveniently packaged into individual servings. What’s not to love?
I know, I know, you might be thinking, “Another chicken pot pie recipe? What’s so special about this one?” Well, let me tell you, the biscuit topping takes this dish to a whole new level. It’s lighter and flakier than a traditional pie crust, and it adds a delightful textural contrast to the rich, creamy filling. Plus, the individual biscuit format makes them perfect for portion control (if you can resist eating more than one!) and easy to serve at parties or potlucks.
But the real magic lies in the flavor. The combination of tender chicken, sweet vegetables, and a creamy, herb-infused sauce is simply irresistible. And the best part? It’s surprisingly easy to make! Even if you’re a beginner in the kitchen, you can totally nail this recipe. I’ve broken down each step into simple, easy-to-follow instructions, so you’ll be enjoying these delicious biscuits in no time.
Now, let’s talk serving suggestions and variations. While these Chicken Pot Pie Biscuits are fantastic on their own, they’re even better with a side of fresh green salad. The crisp, refreshing greens provide a nice contrast to the richness of the biscuits. You could also serve them with a simple tomato soup for a truly comforting and satisfying meal.
Feeling adventurous? Here are a few variations you might want to try:
* Spice it up: Add a pinch of red pepper flakes to the filling for a little kick.
* Go vegetarian: Substitute the chicken with mushrooms, lentils, or chickpeas for a delicious vegetarian option.
* Add some cheese: Stir in a handful of shredded cheddar cheese or Gruyere cheese to the filling for extra flavor and richness.
* Use different herbs: Experiment with different herbs like thyme, rosemary, or sage to customize the flavor to your liking.
* Make it ahead: Prepare the filling ahead of time and store it in the refrigerator for up to 2 days. Then, just bake the biscuits when you’re ready to serve.
Seriously, the possibilities are endless! Don’t be afraid to get creative and experiment with different flavors and ingredients to make this recipe your own.
I’m so confident that you’re going to love these Chicken Pot Pie Biscuits that I’m practically begging you to try them. So, what are you waiting for? Grab your ingredients, preheat your oven, and get ready to experience a taste sensation that will leave you wanting more.
Once you’ve made them, I’d love to hear about your experience! Did you make any variations? What did you think of the flavor? Share your photos and comments on social media using #ChickenPotPieBiscuits or tag me in your posts. I can’t wait to see your creations! Happy baking!
Chicken Pot Pie Biscuits: A Comfort Food Recipe
Comforting chicken pot pie filling served in flaky, homemade cheddar biscuits. A delicious twist on a classic!
Ingredients
- 2 tablespoons olive oil
- 1 large onion, chopped
- 2 carrots, peeled and chopped
- 2 celery stalks, chopped
- 8 ounces cremini mushrooms, sliced
- 1 teaspoon dried thyme
- 1/2 teaspoon dried rosemary
- 1/4 teaspoon ground nutmeg
- 1/4 cup all-purpose flour
- 4 cups chicken broth
- 1 cup heavy cream
- 2 cups cooked chicken, shredded (rotisserie chicken works great!)
- 1 cup frozen peas
- 1 cup frozen corn
- 1/2 cup chopped fresh parsley
- Salt and freshly ground black pepper to taste
- 2 cups all-purpose flour
- 1 tablespoon baking powder
- 1 teaspoon salt
- 1/2 teaspoon baking soda
- 1/2 cup (1 stick) cold unsalted butter, cut into cubes
- 3/4 cup cold buttermilk
- 1 cup shredded sharp cheddar cheese
- 2 tablespoons melted butter, for brushing
Instructions
- Heat the olive oil in a large Dutch oven or pot over medium heat. Add the chopped onion, carrots, and celery and cook, stirring occasionally, until the vegetables are softened, about 8-10 minutes.
- Add the sliced mushrooms, dried thyme, dried rosemary, and ground nutmeg to the pot. Cook, stirring occasionally, until the mushrooms are softened and have released their moisture, about 5-7 minutes.
- Sprinkle the all-purpose flour over the vegetables and cook, stirring constantly, for 1-2 minutes. This will help thicken the sauce. Make sure to scrape the bottom of the pot to prevent the flour from burning.
- Gradually whisk in the chicken broth, making sure to break up any lumps that may form. Bring the mixture to a simmer, then reduce the heat to low and simmer for 10-15 minutes, or until the sauce has thickened slightly. Stir in the heavy cream and bring back to a gentle simmer.
- Stir in the shredded cooked chicken, frozen peas, and frozen corn. Cook for another 5-7 minutes, or until the vegetables are heated through.
- Stir in the chopped fresh parsley. Season with salt and freshly ground black pepper to taste. Taste and adjust as needed. Set the filling aside while you prepare the biscuits.
- Preheat your oven to 450°F (232°C). Line a baking sheet with parchment paper.
- In a large bowl, whisk together the all-purpose flour, baking powder, salt, and baking soda.
- Add the cold, cubed butter to the dry ingredients. Use a pastry blender or your fingertips to cut the butter into the flour mixture until it resembles coarse crumbs. You want to see small pea-sized pieces of butter throughout the flour.
- Stir in the shredded cheddar cheese. Then, pour in the cold buttermilk and stir until just combined. Be careful not to overmix the dough. The dough should be slightly shaggy and sticky.
- Turn the dough out onto a lightly floured surface. Gently pat the dough into a rectangle about 1 inch thick.
- Use a 2-inch biscuit cutter (or a sharp knife) to cut out the biscuits. Try not to twist the cutter as you press down. Reroll the scraps of dough and cut out more biscuits until all the dough is used.
- Place the biscuits onto the prepared baking sheet, leaving a little space between each biscuit.
- Brush the tops of the biscuits with the melted butter.
- Bake for 12-15 minutes, or until the biscuits are golden brown and cooked through.
- Remove the biscuits from the oven and let them cool slightly on the baking sheet for a few minutes.
- Using a serrated knife, carefully slice each biscuit in half horizontally.
- Spoon a generous amount of the warm chicken pot pie filling onto the bottom half of each biscuit.
- Place the top half of the biscuit over the filling. Serve immediately and enjoy!
Notes
- Rotisserie chicken is a great shortcut for the cooked chicken.
- Make sure your butter and buttermilk are very cold for the flakiest biscuits.
- Don’t overmix the biscuit dough!
- The biscuits are best served warm.

Leave a Comment