
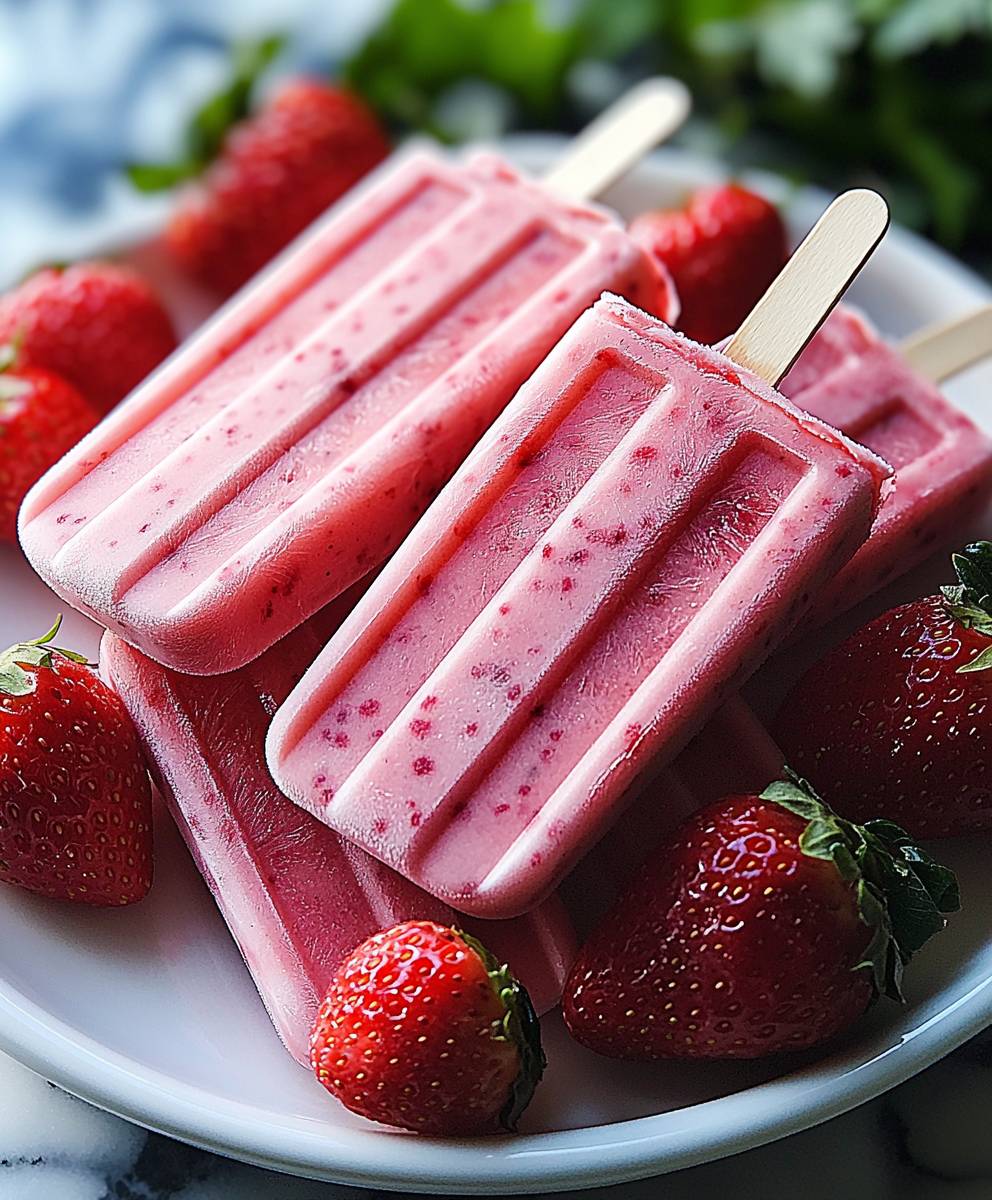
Strawberry Popsicles Kids are the quintessential summer treat, and I’m thrilled to share my foolproof recipe with you! Imagine the delighted faces of your little ones as they savor the sweet, icy burst of fresh strawberries on a hot day. Forget store-bought popsicles loaded with artificial flavors and colors; this recipe is all about wholesome goodness and natural deliciousness.
Popsicles, in general, have a surprisingly rich history, dating back to the early 20th century when an 11-year-old accidentally left a sugary drink outside with a stirring stick in it overnight. The rest, as they say, is frozen history! While the original wasn’t strawberry, the concept of freezing fruit juice into a refreshing treat quickly caught on. And what’s not to love? The combination of icy coolness and fruity sweetness is simply irresistible.
What makes these Strawberry Popsicles Kids so special? It’s the simplicity! With just a handful of ingredients and minimal effort, you can create a healthy and satisfying snack that kids (and adults!) adore. The vibrant flavor of ripe strawberries shines through, offering a naturally sweet and tangy experience. Plus, they’re incredibly convenient perfect for a quick dessert, an after-school snack, or a refreshing treat by the pool. Get ready to make some memories with these delightful homemade popsicles!

Ingredients:
- 2 pounds fresh strawberries, hulled
- 1/2 cup granulated sugar (adjust to taste depending on strawberry sweetness)
- 1/4 cup fresh lemon juice
- 1/4 cup water (optional, if strawberries are very thick)
- Popsicle molds (6-8 molds, depending on size)
- Popsicle sticks
Preparing the Strawberry Puree
Okay, let’s get started! First things first, we need to create a delicious strawberry puree that will form the base of our popsicles. This is the most important step, so pay close attention!
- Wash and Hull the Strawberries: Thoroughly wash the strawberries under cool running water to remove any dirt or debris. Then, using a paring knife or a strawberry huller, carefully remove the green tops (hulls). Make sure you get all the green parts off, as they can be a little bitter.
- Combine Ingredients: In a blender or food processor, combine the hulled strawberries, granulated sugar, and fresh lemon juice. The lemon juice helps to brighten the flavor and prevent the popsicles from becoming too icy.
- Blend Until Smooth: Blend the mixture until it is completely smooth and creamy. If the mixture seems too thick, you can add the 1/4 cup of water, one tablespoon at a time, until you reach your desired consistency. Remember, we want a smooth puree, so don’t be afraid to blend for a minute or two to get rid of any chunks.
- Taste and Adjust: Now, give the puree a taste! This is your chance to adjust the sweetness to your liking. If the strawberries are particularly tart, you might want to add a little more sugar, a teaspoon at a time, until you reach the perfect balance. Remember, it will taste slightly less sweet once frozen, so err on the side of slightly sweeter.
- Strain (Optional): If you prefer a super smooth popsicle without any seeds, you can strain the puree through a fine-mesh sieve. This step is totally optional, but it can make a big difference in the final texture, especially for picky eaters! Simply pour the puree into the sieve, set over a bowl, and use a spoon to gently press the puree through, leaving the seeds behind.
Filling the Popsicle Molds
Now that we have our amazing strawberry puree, it’s time to fill the popsicle molds. This part is pretty straightforward, but here are a few tips to make it even easier.
- Prepare the Molds: Make sure your popsicle molds are clean and dry. If you’re using molds that have been stored for a while, give them a quick rinse with warm water.
- Fill the Molds: Carefully pour the strawberry puree into the popsicle molds, leaving a little bit of space at the top (about 1/4 inch) to allow for expansion during freezing. You can use a small measuring cup or a spoon to help prevent spills.
- Remove Air Bubbles: Gently tap the molds on the counter a few times to release any trapped air bubbles. This will help to create a more even and solid popsicle.
- Insert Popsicle Sticks: Insert the popsicle sticks into the center of each mold, making sure they are securely in place. If your molds have a built-in stick holder, even better!
- Clean Up Spills: Wipe away any spills or drips from the molds with a damp cloth. This will prevent the popsicles from sticking together in the freezer.
Freezing the Popsicles
Almost there! Now comes the hardest part: waiting for the popsicles to freeze. But trust me, the wait is worth it!
- Place in Freezer: Carefully transfer the filled popsicle molds to the freezer. Make sure they are placed on a flat surface so they don’t tip over.
- Freeze Completely: Freeze the popsicles for at least 4-6 hours, or preferably overnight, until they are completely solid. The freezing time will depend on the size and shape of your molds, as well as the temperature of your freezer.
- Check for Solidification: To check if the popsicles are frozen solid, gently press on the top of one. If it feels firm and doesn’t give, they’re ready!
Removing the Popsicles from the Molds
Finally, the moment we’ve all been waiting for! It’s time to unmold those beautiful strawberry popsicles and enjoy the fruits (literally!) of our labor.
- Loosen the Popsicles: There are a couple of ways to loosen the popsicles from the molds. The easiest method is to run the molds under warm water for a few seconds. Be careful not to let the water get too hot, as this can melt the popsicles. Another method is to dip the molds in a bowl of warm water for a few seconds.
- Gently Pull Out: Once the popsicles are loosened, gently pull them out of the molds by the stick. If they are still sticking, try running them under warm water for a few more seconds.
- Enjoy Immediately: Serve the strawberry popsicles immediately and enjoy! They are best enjoyed on a hot day, but honestly, they’re delicious any time of year.
- Storage (If Any Left!): If you happen to have any popsicles left over (which is unlikely!), you can store them in a freezer bag or airtight container in the freezer for up to a week. Just make sure they are wrapped individually to prevent them from sticking together.
Tips and Variations
Want to take your strawberry popsicles to the next level? Here are a few tips and variations to try:
- Add Other Fruits: Get creative and add other fruits to your strawberry popsicles! Blueberries, raspberries, or even a little bit of banana can add extra flavor and nutrients.
- Make a Swirl: For a fun and colorful popsicle, create a swirl by layering different purees. For example, you could layer strawberry puree with a layer of yogurt or a layer of another fruit puree.
- Add Chocolate: Who doesn’t love chocolate and strawberries? Dip the finished popsicles in melted chocolate and sprinkle with chopped nuts or sprinkles for a decadent treat.
- Use Honey or Maple Syrup: If you prefer a more natural sweetener, you can substitute honey or maple syrup for the granulated sugar. Just keep in mind that these sweeteners will add a slightly different flavor to the popsicles.
- Make it Dairy-Free: For a dairy-free version, use coconut milk or almond milk instead of yogurt.
- Add Herbs: A little bit of fresh mint or basil can add a surprising and refreshing twist to your strawberry popsicles.
- Layered Popsicles: Create distinct layers by freezing each layer separately. For example, freeze a layer of strawberry puree, then add a layer of yogurt, and then another layer of strawberry puree.
- Yogurt Swirls: Swirl in some Greek yogurt for a creamy and tangy popsicle. This also adds a boost of protein!
- Strawberry Lemonade Popsicles: Combine strawberry puree with lemonade for a refreshing twist.
- Strawberry Shortcake Popsicles: Crumble some shortcake cookies into the popsicle mixture for a taste of strawberry shortcake.
Important Notes:
- Adjust Sweetness: Always taste the puree before freezing and adjust the sweetness as needed. Remember that frozen treats tend to taste less sweet.
- Prevent Icy Texture: Adding a little bit of lemon juice or corn syrup can help prevent the popsicles from becoming too icy.
- Unmolding Tips: If you’re having trouble unmolding the popsicles, try running the molds under warm water for a longer period of time. You can also try gently twisting the popsicle sticks to loosen them.
- Safety First: Always supervise children when they are eating popsicles, especially if they are very young.
I hope you enjoy making these delicious strawberry popsicles! They are a perfect treat for kids and adults alike. Have fun experimenting with different flavors and variations, and don’t be afraid to get creative!
Conclusion:
And there you have it! These Strawberry Popsicles Kids will absolutely become a summertime staple in your household. Seriously, what’s not to love? They’re bursting with fresh strawberry flavor, incredibly easy to make (even the little ones can help!), and a much healthier alternative to store-bought popsicles loaded with artificial colors and sugars. I truly believe this recipe is a must-try for anyone looking for a refreshing and wholesome treat.
But the fun doesn’t stop there! Feel free to get creative with your popsicles. Want to add a little tang? A squeeze of lemon or lime juice will do the trick. Looking for extra creaminess? Swirl in a spoonful of Greek yogurt or coconut cream before freezing. For a more sophisticated flavor profile, try adding a few fresh basil leaves or a splash of balsamic vinegar (trust me, it’s delicious!). You could even dip the finished popsicles in melted dark chocolate and sprinkle them with chopped nuts for an extra decadent treat.
Serving suggestions are endless, too. These popsicles are perfect for a hot afternoon snack, a refreshing dessert after dinner, or even a fun addition to a summer party. Imagine serving a tray of these vibrant popsicles at your next barbecue they’re sure to be a hit with both kids and adults! You can also pair them with fresh fruit, a dollop of whipped cream, or a sprinkle of granola for a more complete and satisfying treat.
I’ve made these Strawberry Popsicles Kids countless times, and they always disappear in a flash. The best part is knowing that I’m giving my family a healthy and delicious treat that they genuinely enjoy. It’s a win-win!
So, what are you waiting for? Gather your ingredients, grab your popsicle molds, and get ready to create some frozen magic. I promise you won’t be disappointed. This recipe is so simple and satisfying, it’s practically foolproof.
I’m so excited for you to try this recipe and experience the joy of homemade popsicles. Once you’ve made your batch of these delightful Strawberry Popsicles Kids, I would absolutely love to hear about your experience! Did you make any variations? What did your family think? Share your photos and stories in the comments below I can’t wait to see your creations! Your feedback helps me improve the recipe and inspires other readers to give it a try. Let’s spread the popsicle love! Happy freezing!
Strawberry Popsicles Kids: Easy Homemade Recipe
Refreshing and easy homemade strawberry popsicles, perfect for a hot day! Made with fresh strawberries, a touch of lemon, and customizable sweetness.
Ingredients
- 2 pounds fresh strawberries, hulled
- 1/2 cup granulated sugar (adjust to taste)
- 1/4 cup fresh lemon juice
- 1/4 cup water (optional)
- Popsicle molds (6-8 molds)
- Popsicle sticks
Instructions
- Wash and Hull: Wash strawberries and remove green tops.
- Combine: Blend strawberries, sugar, and lemon juice in a blender or food processor.
- Blend: Blend until smooth. Add water (1 tbsp at a time) if too thick.
- Taste and Adjust: Taste and add more sugar if needed.
- Strain (Optional): Strain puree through a fine-mesh sieve for a smoother texture.
- Prepare Molds: Ensure popsicle molds are clean and dry.
- Fill Molds: Pour puree into molds, leaving 1/4 inch space at the top.
- Remove Air Bubbles: Gently tap molds to release air bubbles.
- Insert Sticks: Insert popsicle sticks into the center of each mold.
- Clean Up: Wipe away any spills.
- Freeze: Place molds in the freezer on a flat surface.
- Freeze Completely: Freeze for at least 4-6 hours, or preferably overnight.
- Check: Ensure popsicles are frozen solid.
- Loosen: Run molds under warm water for a few seconds to loosen popsicles.
- Pull Out: Gently pull popsicles out by the stick.
- Enjoy: Serve immediately!
- Storage: Store leftover popsicles in a freezer bag or airtight container for up to a week.
Notes
- Adjust sweetness to your liking. Remember frozen treats taste less sweet.
- Straining the puree removes seeds for a smoother texture.
- To prevent icy texture, add a little lemon juice.
- If having trouble unmolding, run molds under warm water longer.
- Supervise children when eating popsicles.
Leave a Comment