
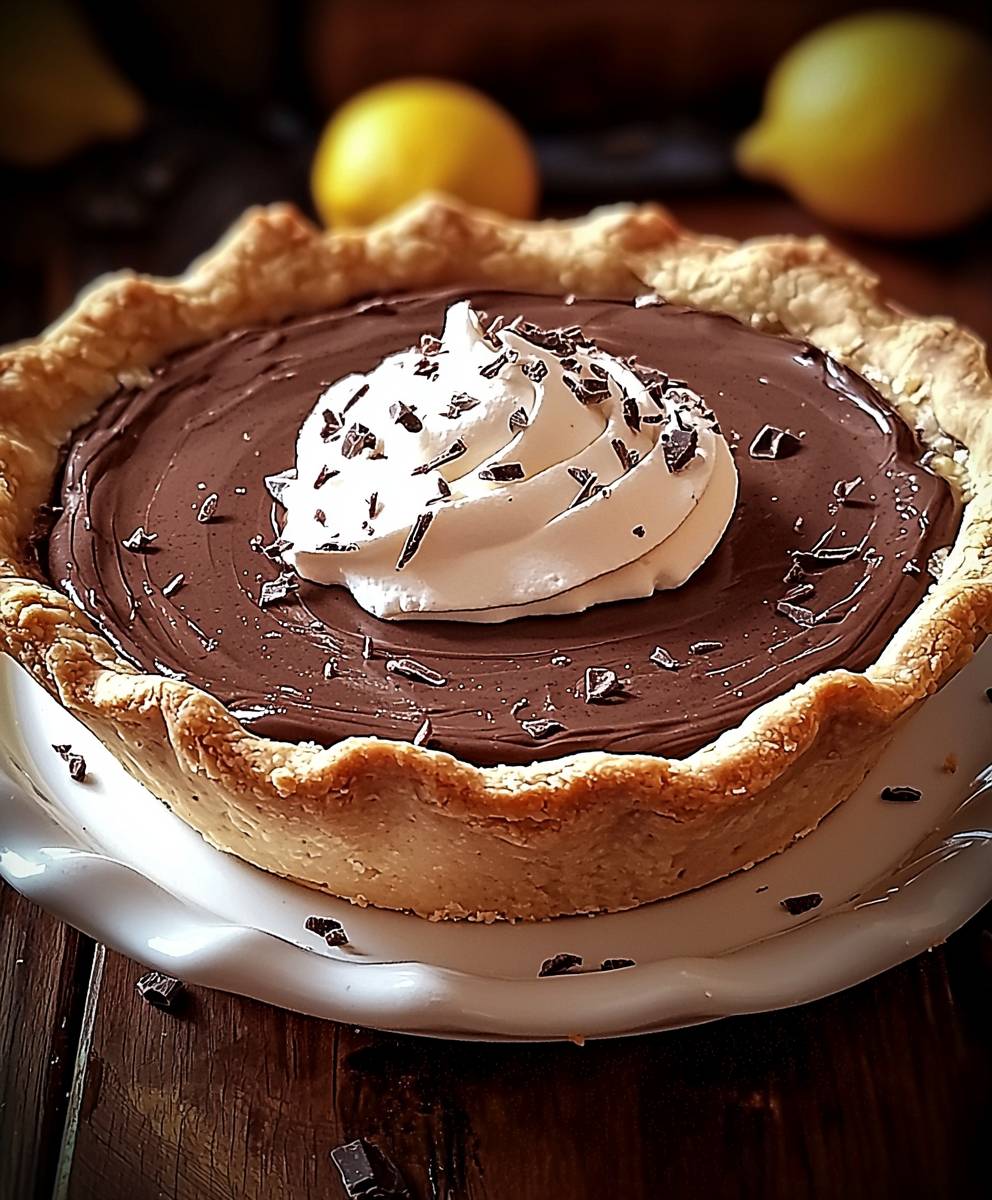
Chocolate Cream Pie, oh, where do I even begin? Imagine sinking your fork into a cloud of rich, decadent chocolate, so smooth it practically melts on your tongue, all nestled in a perfectly crisp, flaky crust. That, my friends, is the magic of this timeless dessert, and I’m thrilled to share my foolproof recipe with you!
While the exact origins of Chocolate Cream Pie are a bit hazy, its roots can be traced back to the early 20th century, a time when home baking was flourishing. It quickly became a staple in American households, gracing countless holiday tables and family gatherings. Its a dessert that evokes feelings of nostalgia and comfort, reminding us of simpler times and cherished memories.
But what is it about this pie that makes it so universally loved? Well, for starters, the combination of textures is simply divine. The creamy, velvety filling contrasts beautifully with the buttery, crumbly crust, creating a symphony of sensations in every bite. And let’s not forget the taste! The deep, intense chocolate flavor is perfectly balanced by a touch of sweetness, making it utterly irresistible. Plus, while it might seem intimidating, this recipe is surprisingly easy to make, even for beginner bakers. So, get ready to impress your friends and family with this classic dessert that’s guaranteed to be a crowd-pleaser!

Ingredients:
- For the Chocolate Crust:
- 1 ½ cups chocolate wafer crumbs (about 36 wafers)
- 5 tablespoons unsalted butter, melted
- ¼ cup granulated sugar
- Pinch of salt
- For the Chocolate Filling:
- 1 ½ cups heavy cream, divided
- 4 ounces bittersweet chocolate, finely chopped
- ¼ cup granulated sugar
- 3 tablespoons cornstarch
- ¼ teaspoon salt
- 2 cups whole milk
- 2 large egg yolks
- 2 tablespoons unsalted butter
- 1 teaspoon vanilla extract
- For the Whipped Cream Topping:
- 1 ½ cups heavy cream
- 3 tablespoons powdered sugar
- ½ teaspoon vanilla extract
- Optional Garnish:
- Chocolate shavings
Preparing the Chocolate Crust:
- Crush the Chocolate Wafers: If you’re using whole chocolate wafers, you’ll need to crush them into fine crumbs. The easiest way to do this is in a food processor. Pulse until you have a consistent, sandy texture. Alternatively, you can place the wafers in a resealable bag and crush them with a rolling pin.
- Combine the Crust Ingredients: In a medium bowl, combine the chocolate wafer crumbs, melted butter, granulated sugar, and salt. Mix well until all the crumbs are evenly moistened. The mixture should resemble wet sand.
- Press into the Pie Plate: Transfer the crumb mixture to a 9-inch pie plate. Use the bottom of a measuring cup or your fingers to firmly press the crumbs evenly across the bottom and up the sides of the pie plate. Make sure the crust is compact and uniform in thickness.
- Pre-bake the Crust (Optional): For a sturdier crust, you can pre-bake it. Preheat your oven to 350°F (175°C). Place the pie plate on a baking sheet and bake for 8-10 minutes. This will help the crust set and prevent it from becoming soggy. Let the crust cool completely before adding the filling. If you skip the pre-baking, that’s okay too! Just make sure the crust is well-compacted.
Making the Chocolate Filling:
- Prepare the Chocolate: Place the finely chopped bittersweet chocolate in a heatproof bowl. Set aside.
- Heat Some of the Cream: In a small saucepan, heat ½ cup of the heavy cream over medium heat until it just begins to simmer. Do not boil.
- Pour over Chocolate: Pour the hot cream over the chopped chocolate. Let it sit for about a minute to soften the chocolate.
- Whisk Until Smooth: Gently whisk the cream and chocolate together until the chocolate is completely melted and the mixture is smooth and glossy. Set aside to cool slightly.
- Combine Dry Ingredients: In a medium saucepan, whisk together the granulated sugar, cornstarch, and salt. This ensures the cornstarch is evenly distributed and prevents lumps from forming.
- Whisk in Milk and Egg Yolks: Gradually whisk in the whole milk until the mixture is smooth. Then, whisk in the egg yolks until well combined. The egg yolks will add richness and help thicken the filling.
- Cook the Filling: Place the saucepan over medium heat and cook, stirring constantly with a whisk, until the mixture thickens and begins to bubble. This usually takes about 5-7 minutes. Be patient and keep stirring to prevent scorching. The mixture should be thick enough to coat the back of a spoon.
- Temper the Chocolate Mixture: Remove the saucepan from the heat. Gradually whisk about ½ cup of the hot milk mixture into the melted chocolate mixture. This is called tempering, and it helps prevent the chocolate from seizing when it’s added to the hot filling.
- Combine Everything: Pour the tempered chocolate mixture back into the saucepan with the remaining milk mixture. Whisk constantly until everything is smooth and well combined.
- Cook Briefly: Return the saucepan to medium heat and cook for another minute or two, stirring constantly, until the filling is very thick and glossy.
- Remove from Heat and Finish: Remove the saucepan from the heat. Stir in the butter and vanilla extract until the butter is melted and everything is well combined. The butter adds extra richness and shine to the filling.
- Pour into Crust: Pour the hot chocolate filling into the prepared chocolate crust. Spread it evenly to the edges.
- Cover and Chill: Place a piece of plastic wrap directly on the surface of the filling to prevent a skin from forming. Gently press the plastic wrap down so it’s touching the filling. Refrigerate for at least 4 hours, or preferably overnight, to allow the filling to set completely.
Making the Whipped Cream Topping:
- Chill the Bowl and Whisk: Place your mixing bowl and whisk (or the bowl and whisk attachment of your stand mixer) in the freezer for about 15-20 minutes. This will help the cream whip up faster and hold its shape better.
- Combine Ingredients: Pour the heavy cream into the chilled bowl. Add the powdered sugar and vanilla extract.
- Whip the Cream: Begin whipping the cream on medium speed. Gradually increase the speed to high. Whip until stiff peaks form. This means that when you lift the whisk, the peaks of the whipped cream stand up straight and hold their shape. Be careful not to overwhip, or the cream will turn grainy.
Assembling the Pie:
- Remove Plastic Wrap: Once the chocolate filling is completely set, remove the plastic wrap from the surface of the pie.
- Spread Whipped Cream: Spread the whipped cream evenly over the top of the chocolate filling. You can create swirls or a decorative pattern with a spoon or spatula.
- Garnish (Optional): If desired, garnish the pie with chocolate shavings. You can use a vegetable peeler to shave chocolate from a chocolate bar.
- Chill Briefly: Refrigerate the assembled pie for another 30 minutes to an hour to allow the whipped cream to set slightly. This will make it easier to slice and serve.
- Slice and Serve: Slice the chocolate cream pie into wedges and serve chilled. Enjoy!
Conclusion:
This Chocolate Cream Pie isn’t just dessert; it’s an experience. From the satisfying crunch of the homemade crust to the velvety smooth, intensely chocolatey filling, every bite is a symphony of textures and flavors. It’s a classic for a reason, and this recipe elevates it to a whole new level of deliciousness. You absolutely *must* try it!
I know, I know, making a pie from scratch can seem daunting, but trust me, this recipe is designed to be approachable and rewarding. The instructions are clear, the ingredients are readily available, and the end result is so worth the effort. Think of it as a labor of love a gift you give yourself and anyone lucky enough to share a slice.
And the best part? This Chocolate Cream Pie is incredibly versatile. While it’s divine served chilled as is, you can easily customize it to suit your preferences. For a richer experience, try using dark chocolate with a higher cocoa percentage in the filling. Or, if you’re feeling adventurous, add a hint of espresso powder to the chocolate mixture to enhance the chocolate flavor even further.
Serving Suggestions and Variations:
* Classic Presentation: Serve chilled with a dollop of freshly whipped cream and a sprinkle of cocoa powder.
* Chocolate Shavings: Garnish with dark chocolate shavings for an elegant touch.
* Berry Bliss: Add fresh raspberries or strawberries on top for a burst of fruity sweetness that complements the rich chocolate.
* Peanut Butter Power: Swirl a spoonful of peanut butter into the filling before baking for a decadent peanut butter chocolate pie.
* Mint Chocolate Magic: Add a few drops of peppermint extract to the filling for a refreshing mint chocolate twist.
* Boozy Boost: A tablespoon of your favorite liqueur, like Kahlua or Baileys, can add a sophisticated touch to the filling.
* Individual Pies: For a fun and convenient presentation, bake the filling in individual tart shells or ramekins.
Don’t be afraid to experiment and make this recipe your own! The possibilities are endless.
I’m so confident that you’ll love this Chocolate Cream Pie recipe. It’s perfect for special occasions, holiday gatherings, or simply a well-deserved treat on a cozy night in. It’s a guaranteed crowd-pleaser, and I promise you’ll be asked to make it again and again.
So, what are you waiting for? Gather your ingredients, preheat your oven, and get ready to create a truly unforgettable dessert. I can’t wait to hear about your experience! Please, come back and leave a comment below to let me know how it turned out. Did you make any variations? What did your family and friends think? I’m eager to hear all about your Chocolate Cream Pie adventures! Happy baking!
Chocolate Cream Pie: The Ultimate Guide to Baking Perfection
Decadent chocolate cream pie with a rich chocolate crust, smooth chocolate filling, and fluffy whipped cream topping. A chocolate lover's dream!
Ingredients
- 1 ½ cups chocolate wafer crumbs (about 36 wafers)
- 5 tablespoons unsalted butter, melted
- ¼ cup granulated sugar
- Pinch of salt
- 1 ½ cups heavy cream, divided
- 4 ounces bittersweet chocolate, finely chopped
- ¼ cup granulated sugar
- 3 tablespoons cornstarch
- ¼ teaspoon salt
- 2 cups whole milk
- 2 large egg yolks
- 2 tablespoons unsalted butter
- 1 teaspoon vanilla extract
- 1 ½ cups heavy cream
- 3 tablespoons powdered sugar
- ½ teaspoon vanilla extract
- Chocolate shavings
Instructions
- Crush the Chocolate Wafers: If using whole chocolate wafers, crush them into fine crumbs using a food processor (pulse until sandy) or a resealable bag and rolling pin.
- Combine the Crust Ingredients: In a medium bowl, combine the chocolate wafer crumbs, melted butter, granulated sugar, and salt. Mix well until evenly moistened (resembling wet sand).
- Press into the Pie Plate: Transfer the crumb mixture to a 9-inch pie plate. Use the bottom of a measuring cup or your fingers to firmly press the crumbs evenly across the bottom and up the sides of the pie plate. Make sure the crust is compact and uniform in thickness.
- Pre-bake the Crust (Optional): For a sturdier crust, preheat your oven to 350°F (175°C). Place the pie plate on a baking sheet and bake for 8-10 minutes. Let the crust cool completely before adding the filling. If you skip the pre-baking, that’s okay too! Just make sure the crust is well-compacted.
- Prepare the Chocolate: Place the finely chopped bittersweet chocolate in a heatproof bowl. Set aside.
- Heat Some of the Cream: In a small saucepan, heat ½ cup of the heavy cream over medium heat until it just begins to simmer. Do not boil.
- Pour over Chocolate: Pour the hot cream over the chopped chocolate. Let it sit for about a minute to soften the chocolate.
- Whisk Until Smooth: Gently whisk the cream and chocolate together until the chocolate is completely melted and the mixture is smooth and glossy. Set aside to cool slightly.
- Combine Dry Ingredients: In a medium saucepan, whisk together the granulated sugar, cornstarch, and salt. This ensures the cornstarch is evenly distributed and prevents lumps from forming.
- Whisk in Milk and Egg Yolks: Gradually whisk in the whole milk until the mixture is smooth. Then, whisk in the egg yolks until well combined. The egg yolks will add richness and help thicken the filling.
- Cook the Filling: Place the saucepan over medium heat and cook, stirring constantly with a whisk, until the mixture thickens and begins to bubble. This usually takes about 5-7 minutes. Be patient and keep stirring to prevent scorching. The mixture should be thick enough to coat the back of a spoon.
- Temper the Chocolate Mixture: Remove the saucepan from the heat. Gradually whisk about ½ cup of the hot milk mixture into the melted chocolate mixture. This is called tempering, and it helps prevent the chocolate from seizing when it’s added to the hot filling.
- Combine Everything: Pour the tempered chocolate mixture back into the saucepan with the remaining milk mixture. Whisk constantly until everything is smooth and well combined.
- Cook Briefly: Return the saucepan to medium heat and cook for another minute or two, stirring constantly, until the filling is very thick and glossy.
- Remove from Heat and Finish: Remove the saucepan from the heat. Stir in the butter and vanilla extract until the butter is melted and everything is well combined. The butter adds extra richness and shine to the filling.
- Pour into Crust: Pour the hot chocolate filling into the prepared chocolate crust. Spread it evenly to the edges.
- Cover and Chill: Place a piece of plastic wrap directly on the surface of the filling to prevent a skin from forming. Gently press the plastic wrap down so it’s touching the filling. Refrigerate for at least 4 hours, or preferably overnight, to allow the filling to set completely.
- Chill the Bowl and Whisk: Place your mixing bowl and whisk (or the bowl and whisk attachment of your stand mixer) in the freezer for about 15-20 minutes. This will help the cream whip up faster and hold its shape better.
- Combine Ingredients: Pour the heavy cream into the chilled bowl. Add the powdered sugar and vanilla extract.
- Whip the Cream: Begin whipping the cream on medium speed. Gradually increase the speed to high. Whip until stiff peaks form. This means that when you lift the whisk, the peaks of the whipped cream stand up straight and hold their shape. Be careful not to overwhip, or the cream will turn grainy.
- Remove Plastic Wrap: Once the chocolate filling is completely set, remove the plastic wrap from the surface of the pie.
- Spread Whipped Cream: Spread the whipped cream evenly over the top of the chocolate filling. You can create swirls or a decorative pattern with a spoon or spatula.
- Garnish (Optional): If desired, garnish the pie with chocolate shavings. You can use a vegetable peeler to shave chocolate from a chocolate bar.
- Chill Briefly: Refrigerate the assembled pie for another 30 minutes to an hour to allow the whipped cream to set slightly. This will make it easier to slice and serve.
- Slice and Serve: Slice the chocolate cream pie into wedges and serve chilled. Enjoy!
Notes
- For the best flavor, use high-quality bittersweet chocolate.
- Be sure to chill the filling completely before adding the whipped cream topping.
- If you don’t have chocolate wafer crumbs, you can use Oreo cookies with the filling scraped out.
- The pre-baking of the crust is optional, but it will help prevent it from becoming soggy.
- Be careful not to overwhip the whipped cream, or it will turn grainy.

Leave a Comment