
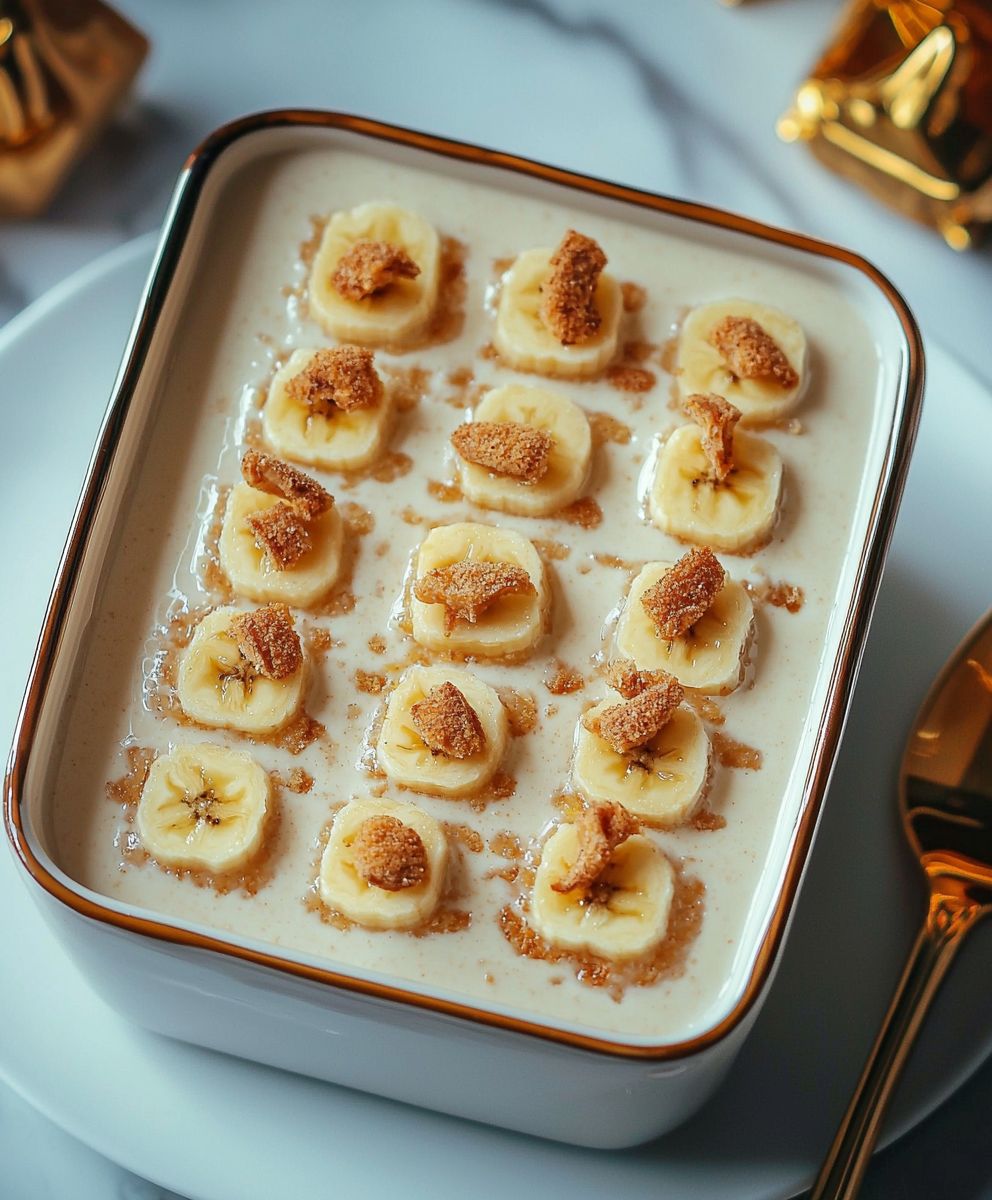
Banana Pudding, oh, where do I even begin? This isn’t just a dessert; it’s a creamy, dreamy, nostalgic hug in a bowl. Imagine layers of sweet vanilla custard, soft vanilla wafers, and slices of ripe banana all melding together in perfect harmony. It’s a symphony of textures and flavors that will transport you back to childhood summers and family gatherings.
While the exact origins are debated, banana pudding as we know it gained popularity in the early 20th century, thanks in part to the widespread availability of commercially produced vanilla wafers. It quickly became a staple in Southern cuisine, a comforting and accessible treat that graced countless potlucks and holiday tables. It’s a dish that speaks of simplicity and resourcefulness, transforming humble ingredients into something truly special.
People adore banana pudding for so many reasons. Its creamy texture is incredibly satisfying, and the sweetness is perfectly balanced by the subtle tang of the bananas. It’s also incredibly easy to make, requiring minimal effort and readily available ingredients. Whether you’re looking for a quick weeknight dessert or a crowd-pleasing dish for a special occasion, banana pudding is always a winner. Plus, who can resist that classic combination of vanilla, banana, and creamy goodness? It’s a flavor profile that’s universally loved and guaranteed to bring a smile to your face. So, let’s dive into this easy and delicious recipe!

Ingredients:
- For the Pudding:
- 6 large egg yolks
- 1 ½ cups granulated sugar
- ¼ cup all-purpose flour
- ¼ cup cornstarch
- ½ teaspoon salt
- 4 cups whole milk
- 4 tablespoons unsalted butter
- 2 teaspoons vanilla extract
- For the Assembly:
- 1 (12-ounce) box vanilla wafers
- 4-5 ripe bananas, sliced
- Whipped cream, for topping (homemade or store-bought)
Preparing the Pudding:
- Whisk the Egg Yolks and Dry Ingredients: In a large bowl, whisk together the egg yolks, granulated sugar, flour, cornstarch, and salt until well combined and slightly pale. This step is crucial for ensuring a smooth and lump-free pudding. Make sure there are no clumps of flour or cornstarch remaining.
- Heat the Milk: In a medium saucepan, heat the milk over medium heat until it just begins to simmer. Watch it carefully to prevent it from scorching. You’ll see small bubbles forming around the edges of the pan. Do not let it boil!
- Temper the Egg Mixture: This is a very important step to prevent the eggs from scrambling. Slowly drizzle about 1 cup of the hot milk into the egg yolk mixture, whisking constantly and vigorously. This will gradually raise the temperature of the egg mixture without cooking the eggs.
- Combine and Cook: Pour the tempered egg mixture into the saucepan with the remaining hot milk. Whisk constantly over medium heat until the pudding thickens significantly. This usually takes about 8-12 minutes. The pudding is ready when it coats the back of a spoon and you can draw a line through it with your finger that doesn’t immediately disappear. Be patient and keep whisking to prevent scorching.
- Stir in Butter and Vanilla: Remove the saucepan from the heat and stir in the butter until it is completely melted and incorporated. Then, stir in the vanilla extract. The butter adds richness and the vanilla enhances the flavor.
- Cool the Pudding: Pour the pudding into a heat-safe bowl. Cover the surface of the pudding directly with plastic wrap to prevent a skin from forming. Press the plastic wrap gently onto the surface of the pudding. Refrigerate for at least 2 hours, or preferably overnight, to allow the pudding to cool completely and thicken further. This chilling time is essential for the best texture.
Assembling the Banana Pudding:
- Prepare Your Dish: Choose a large trifle bowl or individual serving dishes. A trifle bowl is ideal for showcasing the layers of the pudding.
- Layer the Ingredients: Begin by placing a layer of vanilla wafers on the bottom of the dish. You can break some of the wafers to fill in any gaps.
- Add Banana Slices: Arrange a layer of sliced bananas over the vanilla wafers. Try to create an even layer of banana slices.
- Pour Pudding Over: Spoon a layer of the cooled pudding over the bananas. Spread it evenly to cover the bananas completely.
- Repeat Layers: Repeat the layers of vanilla wafers, bananas, and pudding until all the ingredients are used, ending with a layer of pudding on top. You can adjust the number of layers depending on the size of your dish.
- Chill Before Serving: Cover the dish with plastic wrap and refrigerate for at least 1 hour before serving. This allows the flavors to meld together and the pudding to set further.
- Add Whipped Cream: Just before serving, top the banana pudding with whipped cream. You can use store-bought whipped cream or make your own. For a homemade version, whip heavy cream with a little sugar and vanilla extract until stiff peaks form.
- Garnish (Optional): If desired, garnish the whipped cream with a few extra vanilla wafers, banana slices, or a sprinkle of cinnamon.
Tips and Variations:
- Preventing Banana Browning: To prevent the banana slices from browning, you can toss them with a little lemon juice before layering them. This will help them retain their color.
- Homemade Whipped Cream: For the best flavor and texture, I highly recommend making your own whipped cream. It’s easy to do and tastes so much better than store-bought. Simply whip heavy cream with powdered sugar and vanilla extract until stiff peaks form.
- Vanilla Wafer Alternatives: If you don’t have vanilla wafers, you can use other cookies such as shortbread cookies or graham crackers.
- Adding a Rum Flavor: For an adult twist, you can add a tablespoon or two of rum to the pudding while it’s still warm.
- Meringue Topping: Instead of whipped cream, you can top the banana pudding with a meringue. To make a meringue, whisk egg whites with sugar until stiff peaks form, then spread it over the pudding and bake it in a low oven until lightly browned.
- Individual Servings: Banana pudding is also great served in individual cups or jars. This makes it easy to portion and serve.
- Make Ahead: Banana pudding can be made a day or two in advance. Just be sure to store it in the refrigerator. Add the whipped cream topping just before serving to prevent it from becoming soggy.
- Using Different Types of Milk: While whole milk provides the richest flavor, you can use 2% milk or even almond milk if you prefer. Keep in mind that the pudding may not be as thick if you use a lower-fat milk.
- Adjusting Sweetness: If you prefer a less sweet pudding, you can reduce the amount of sugar in the recipe. Start by reducing it by ¼ cup and taste the pudding before adding more.
- Adding Nuts: For added texture and flavor, you can sprinkle chopped pecans or walnuts between the layers of the banana pudding.
Troubleshooting:
- Lumpy Pudding: If your pudding is lumpy, it could be due to the flour or cornstarch not being properly incorporated. Try whisking the dry ingredients together very thoroughly before adding the milk. You can also strain the pudding through a fine-mesh sieve to remove any lumps.
- Thin Pudding: If your pudding is too thin, it may not have been cooked long enough. Continue cooking it over medium heat, whisking constantly, until it thickens to the desired consistency.
- Scorched Pudding: To prevent the pudding from scorching, use a heavy-bottomed saucepan and stir it constantly while it’s cooking. If the pudding does scorch, immediately remove it from the heat and transfer it to a clean bowl. Do not scrape the bottom of the pan, as this will transfer the burnt flavor to the pudding.
- Skin Forming on Pudding: To prevent a skin from forming on the pudding while it’s cooling, cover the surface of the pudding directly with plastic wrap. Press the plastic wrap gently onto the surface of the pudding.
Serving Suggestions:
- Classic Dessert: Banana pudding is a classic dessert that’s perfect for potlucks, picnics, and family gatherings.
- Summer Treat: It’s also a refreshing treat on a hot summer day.
- Holiday Dessert: Banana pudding can be a great addition to your holiday dessert table.
- Pairing with Other Desserts: Serve it alongside other desserts such as chocolate cake, pecan pie, or fruit salad.
- Coffee or Tea: Enjoy a slice of banana pudding with a cup of coffee or tea.
Nutritional Information (Approximate):
Note: Nutritional information is an estimate and may vary based on specific ingredients and portion sizes.
- Calories: 350-450 per serving
- Fat: 15-25g
- Saturated Fat: 8-15g
- Cholesterol: 150-200mg
- Sodium: 200-300mg
- Carbohydrates: 45-60g
- Sugar: 30-40g
- Protein: 5-8g
Storage Instructions:
- Refrigeration: Store leftover banana pudding in an airtight container in the refrigerator for up to 3 days.
- Freezing: Freezing is not recommended, as the texture of the pudding and bananas may change upon thawing. The whipped cream will also not hold up well.
Why This Recipe Works:
This banana pudding recipe is a winner because it focuses on creating a rich, creamy, and flavorful pudding from scratch.
Conclusion:
This isn’t just another dessert; it’s a journey back to simpler times, a hug in a bowl, and a guaranteed crowd-pleaser. This banana pudding recipe is a must-try because it perfectly balances creamy sweetness with the comforting flavor of ripe bananas and the satisfying crunch of vanilla wafers. It’s quick, easy, and requires no fancy equipment, making it the ideal treat for busy weeknights or impromptu gatherings. But beyond its simplicity, its the taste that truly sets it apart. The layers meld together beautifully, creating a symphony of textures and flavors that will leave you wanting more.
Think of it: the smooth, rich custard, the soft, sweet bananas, and the slightly softened wafers, all working in harmony. It’s a classic for a reason, and this recipe elevates it to a whole new level. I’ve tweaked and perfected it over the years, ensuring that every bite is bursting with flavor and that the texture is just right. It’s not too sweet, not too heavy, and perfectly balanced.
But the best part? It’s incredibly versatile! While I adore it served chilled straight from the fridge, there are so many ways to customize it to your liking. For a more decadent experience, try adding a layer of whipped cream on top just before serving. Or, if you’re feeling adventurous, sprinkle some toasted pecans or walnuts for added crunch and nutty flavor.
Want to take it to the next level? Consider using different types of cookies! While vanilla wafers are the traditional choice, you could experiment with shortbread cookies, graham crackers, or even gingersnaps for a unique twist. For a richer, more intense banana flavor, use overripe bananas the kind that are almost too soft to eat on their own. They’ll add a deeper sweetness and a more pronounced banana aroma to the pudding.
And don’t forget about presentation! While it tastes amazing no matter how you serve it, a little extra effort can make it even more special. Layer the pudding in individual glass bowls or mason jars for an elegant touch. Or, for a more rustic look, serve it in a large trifle bowl, showcasing the beautiful layers of custard, bananas, and wafers.
I truly believe that this banana pudding recipe is one you’ll come back to again and again. It’s a timeless classic that’s perfect for any occasion, from casual family dinners to festive holiday gatherings. It’s also a wonderful way to use up those ripe bananas that are sitting on your counter!
So, what are you waiting for? Gather your ingredients, put on your apron, and get ready to create a dessert that will impress your family and friends. I’m confident that you’ll love this recipe as much as I do.
And most importantly, I want to hear about your experience! Did you try any variations? Did you add any special ingredients? What did your family and friends think? Share your photos and stories in the comments below. I can’t wait to see what you create! Happy baking (or should I say, pudding-making)! Let me know if you have any questions, and I’ll be happy to help. Enjoy!
Banana Pudding: The Ultimate Guide to Making It Perfect
Classic Southern Banana Pudding made from scratch! Layers of creamy vanilla pudding, sweet bananas, and vanilla wafers topped with whipped cream. A perfect make-ahead dessert for any occasion.
Ingredients
- 6 large egg yolks
- 1 ½ cups granulated sugar
- ¼ cup all-purpose flour
- ¼ cup cornstarch
- ½ teaspoon salt
- 4 cups whole milk
- 4 tablespoons unsalted butter
- 2 teaspoons vanilla extract
- 1 (12-ounce) box vanilla wafers
- 4-5 ripe bananas, sliced
- Whipped cream, for topping (homemade or store-bought)
Instructions
- Whisk the Egg Yolks and Dry Ingredients: In a large bowl, whisk together the egg yolks, granulated sugar, flour, cornstarch, and salt until well combined and slightly pale. Make sure there are no clumps of flour or cornstarch remaining.
- Heat the Milk: In a medium saucepan, heat the milk over medium heat until it just begins to simmer. Watch it carefully to prevent it from scorching. Do not let it boil!
- Temper the Egg Mixture: Slowly drizzle about 1 cup of the hot milk into the egg yolk mixture, whisking constantly and vigorously. This will gradually raise the temperature of the egg mixture without cooking the eggs.
- Combine and Cook: Pour the tempered egg mixture into the saucepan with the remaining hot milk. Whisk constantly over medium heat until the pudding thickens significantly. This usually takes about 8-12 minutes. The pudding is ready when it coats the back of a spoon and you can draw a line through it with your finger that doesn’t immediately disappear. Be patient and keep whisking to prevent scorching.
- Stir in Butter and Vanilla: Remove the saucepan from the heat and stir in the butter until it is completely melted and incorporated. Then, stir in the vanilla extract.
- Cool the Pudding: Pour the pudding into a heat-safe bowl. Cover the surface of the pudding directly with plastic wrap to prevent a skin from forming. Press the plastic wrap gently onto the surface of the pudding. Refrigerate for at least 2 hours, or preferably overnight, to allow the pudding to cool completely and thicken further.
- Prepare Your Dish: Choose a large trifle bowl or individual serving dishes.
- Layer the Ingredients: Begin by placing a layer of vanilla wafers on the bottom of the dish. You can break some of the wafers to fill in any gaps.
- Add Banana Slices: Arrange a layer of sliced bananas over the vanilla wafers.
- Pour Pudding Over: Spoon a layer of the cooled pudding over the bananas. Spread it evenly to cover the bananas completely.
- Repeat Layers: Repeat the layers of vanilla wafers, bananas, and pudding until all the ingredients are used, ending with a layer of pudding on top.
- Chill Before Serving: Cover the dish with plastic wrap and refrigerate for at least 1 hour before serving.
- Add Whipped Cream: Just before serving, top the banana pudding with whipped cream.
- Garnish (Optional): If desired, garnish the whipped cream with a few extra vanilla wafers, banana slices, or a sprinkle of cinnamon.
Notes
- Preventing Banana Browning: Toss banana slices with a little lemon juice.
- Homemade Whipped Cream: Whip heavy cream with powdered sugar and vanilla extract until stiff peaks form.
- Vanilla Wafer Alternatives: Shortbread cookies or graham crackers can be used.
- Adding a Rum Flavor: Add a tablespoon or two of rum to the pudding while it’s still warm.
- Meringue Topping: Top with meringue instead of whipped cream.
- Individual Servings: Great served in individual cups or jars.
- Make Ahead: Can be made a day or two in advance. Add whipped cream just before serving.
- Using Different Types of Milk: 2% milk or almond milk can be used.
- Adjusting Sweetness: Reduce the amount of sugar if desired.
- Adding Nuts: Sprinkle chopped pecans or walnuts between the layers.
- Lumpy Pudding: Strain the pudding through a fine-mesh sieve.
- Thin Pudding: Cook longer until it thickens.
- Scorched Pudding: Transfer to a clean bowl immediately.
- Skin Forming on Pudding: Cover the surface of the pudding directly with plastic wrap.


Leave a Comment