
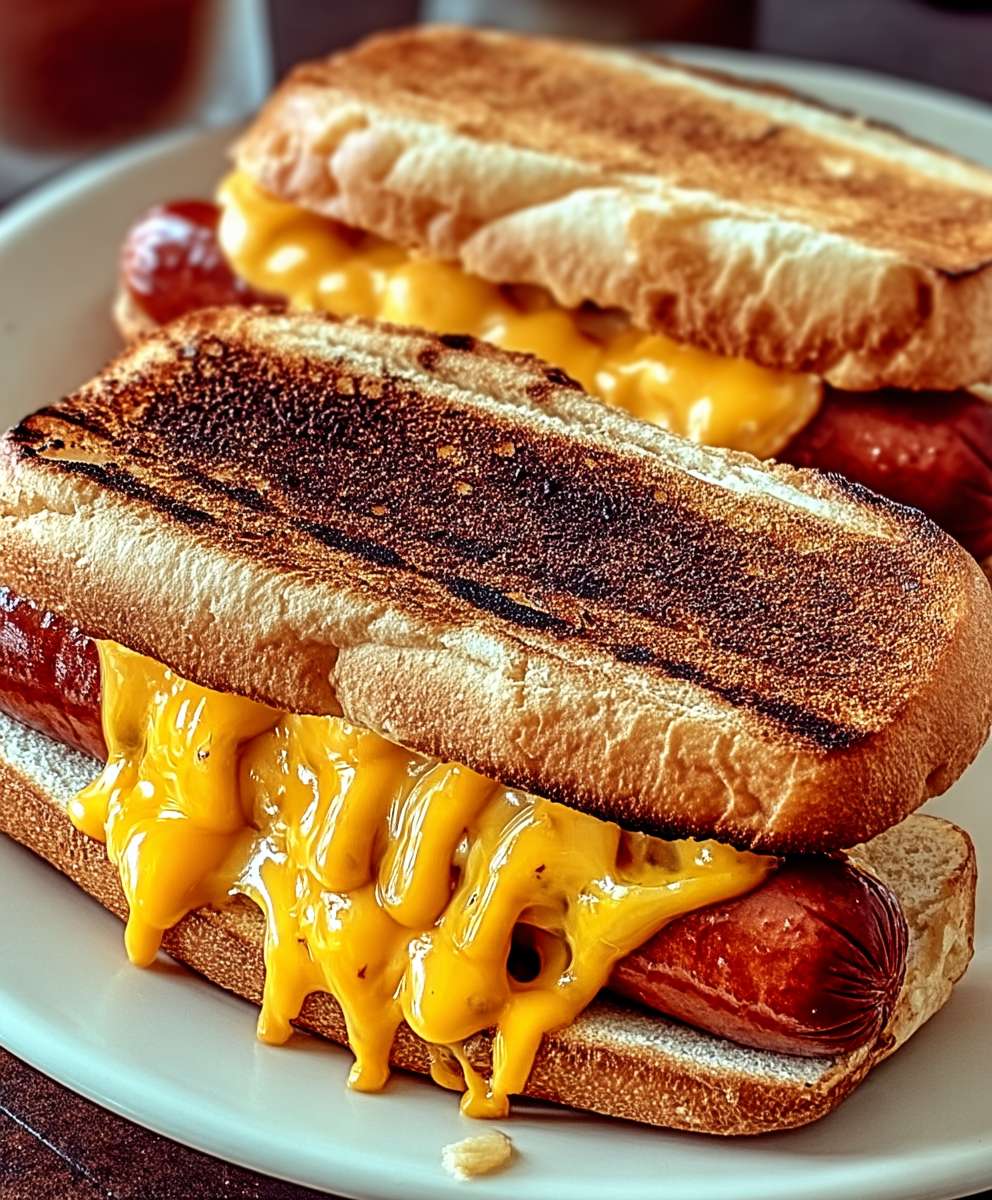
Grilled Cheese Hot Dog: Prepare to have your mind blown! Forget everything you thought you knew about comfort food because this recipe is about to redefine it. Imagine the satisfying crunch of perfectly toasted bread, the gooey, melty goodness of cheddar cheese, and the savory snap of a juicy hot dog, all harmoniously combined in one glorious bite. It’s not just a meal; it’s an experience!
While the exact origins of the Grilled Cheese Hot Dog remain shrouded in mystery (likely born from a late-night craving and a well-stocked fridge!), its appeal is undeniable. It takes two beloved American classics and elevates them to a whole new level of deliciousness. Think of it as a culinary mashup that celebrates the simple joys of childhood favorites, but with a grown-up twist.
People adore this dish for its sheer indulgence and ease of preparation. It’s quick, satisfying, and requires minimal ingredients, making it perfect for a weeknight dinner or a fun weekend treat. The combination of textures the crispy bread, the smooth cheese, and the firm hot dog is simply irresistible. Plus, who can resist the nostalgic charm of a grilled cheese sandwich combined with the all-American appeal of a hot dog? Get ready to experience a flavor explosion that will leave you craving more!

Ingredients:
- 6 Hot Dogs
- 6 Hot Dog Buns
- 12 Slices of Bread (Your favorite kind! I prefer sourdough or Texas toast)
- 6 Slices of Cheese (Cheddar, American, or your favorite melting cheese)
- 3 Tablespoons Butter, softened
- Optional: Ketchup, Mustard, Relish, or other favorite hot dog toppings
Preparing the Grilled Cheese Hot Dog Components
Alright, let’s get started! This recipe is all about taking two classics and mashing them together into something truly special. We’re going to build a grilled cheese around a hot dog, and trust me, it’s as delicious as it sounds. First, we need to prep our ingredients. This will make the whole process smoother and faster.
- Prepare the Hot Dogs: You have a few options here. You can grill them, boil them, or pan-fry them. I personally prefer grilling for that smoky flavor, but any method works. If grilling, preheat your grill to medium heat. If boiling, bring a pot of water to a boil. If pan-frying, heat a skillet over medium heat.
- Grilling (if applicable): Place the hot dogs on the grill and cook for about 5-7 minutes, turning occasionally, until they are heated through and have grill marks.
- Boiling (if applicable): Place the hot dogs in the boiling water and cook for about 5-7 minutes, until they are heated through.
- Pan-Frying (if applicable): Add a little oil to the skillet. Place the hot dogs in the skillet and cook for about 5-7 minutes, turning occasionally, until they are heated through and have a nice sear.
- Prepare the Buns (Optional): If you like, you can lightly toast the hot dog buns. This adds a nice texture. You can do this in a toaster, under the broiler, or on the grill for a minute or two. Just keep an eye on them so they don’t burn!
- Butter the Bread: This is crucial for that golden-brown, crispy grilled cheese goodness. Spread a thin, even layer of softened butter on one side of each slice of bread. Make sure the butter is softened, not melted, for the best results.
- Slice the Cheese (if needed): If you’re using a block of cheese, slice it into approximately 1/8-inch thick slices. This will help it melt evenly and quickly.
Assembling the Grilled Cheese Hot Dogs
Now for the fun part! We’re going to build our grilled cheese sandwiches around the hot dogs. This is where the magic happens. Don’t be afraid to get creative with your cheese placement!
- Lay Down the First Slice of Bread: Place one slice of bread, butter-side down, in a non-stick skillet. Make sure the skillet is cold at this point. We want to build the sandwich before applying heat.
- Add Cheese: Place a slice of cheese on top of the bread. Make sure the cheese covers most of the bread surface. You want that cheesy goodness in every bite!
- Place the Hot Dog: Place a cooked hot dog on top of the cheese. Position it in the center of the bread, leaving a little space on each end.
- Add More Cheese: Place another slice of cheese on top of the hot dog. Again, make sure the cheese covers most of the hot dog.
- Top with the Second Slice of Bread: Place the second slice of bread on top of the cheese, butter-side up.
- Repeat: Repeat steps 1-5 for the remaining hot dogs.
Cooking the Grilled Cheese Hot Dogs
This is where patience comes in. We want a perfectly golden-brown grilled cheese with a melty, gooey interior. Low and slow is the key! Don’t rush the process, or you’ll end up with a burnt exterior and cold cheese.
- Heat the Skillet: Place the skillet with the assembled grilled cheese hot dog over medium-low heat. This is important! Medium-low heat allows the cheese to melt completely without burning the bread.
- Cook the First Side: Cook for about 3-5 minutes, or until the bottom slice of bread is golden brown and crispy. Use a spatula to gently lift the edge of the sandwich to check for doneness.
- Flip the Sandwich: Carefully flip the sandwich using a spatula. Be gentle so you don’t lose any cheese or hot dog!
- Cook the Second Side: Cook for another 3-5 minutes, or until the second slice of bread is golden brown and crispy, and the cheese is completely melted and gooey. Again, check for doneness by gently lifting the edge of the sandwich.
- Remove from Skillet: Remove the grilled cheese hot dog from the skillet and place it on a cutting board.
- Repeat: Repeat steps 1-5 for the remaining grilled cheese hot dogs.
Serving and Enjoying Your Grilled Cheese Hot Dogs
You’ve made it! Now it’s time to enjoy the fruits of your labor. These grilled cheese hot dogs are best served immediately, while the cheese is still melty and the bread is crispy. But before you dig in, let’s talk about serving suggestions and optional toppings.
- Cut in Half (Optional): If you like, you can cut the grilled cheese hot dog in half before serving. This makes it easier to handle and eat.
- Add Toppings (Optional): This is where you can really customize your grilled cheese hot dog. Ketchup, mustard, relish, onions, sauerkraut, chili the possibilities are endless! Add your favorite hot dog toppings to the inside of the sandwich or on top.
- Serve Immediately: As I mentioned before, these are best served immediately. The cheese will be at its melty best, and the bread will be nice and crispy.
- Pair with Sides: Grilled cheese hot dogs are great on their own, but they’re even better with sides. Potato chips, french fries, coleslaw, or a simple salad are all great choices.
- Enjoy! Take a bite and savor the delicious combination of grilled cheese and hot dog. You’ve earned it!
Tips and Variations
Want to take your grilled cheese hot dogs to the next level? Here are a few tips and variations to try:
- Use Different Cheeses: Experiment with different cheeses to find your favorite combination. Pepper jack, provolone, mozzarella, or even a blend of cheeses would be delicious.
- Add a Sauce: Spread a thin layer of your favorite sauce on the bread before adding the cheese. Pesto, marinara sauce, or even a spicy mayo would add a lot of flavor.
- Add Veggies: Sauté some onions, peppers, or mushrooms and add them to the sandwich for extra flavor and nutrients.
- Use Different Breads: Try using different types of bread, such as brioche, ciabatta, or even a pretzel roll.
- Make it Spicy: Add a pinch of red pepper flakes or a drizzle of hot sauce to the sandwich for a little kick.
- Air Fryer Method: You can also cook these in an air fryer! Assemble the sandwiches as directed, then place them in the air fryer basket. Cook at 375°F (190°C) for about 5-7 minutes, flipping halfway through, until golden brown and the cheese is melted.
Troubleshooting
Sometimes things don’t go exactly as planned. Here are a few common problems and how to fix them:
- Bread is Burning, Cheese Isn’t Melting: Your heat is too high! Reduce the heat to medium-low and cook for a longer period of time.
- Cheese is Melting Too Quickly: Your heat is too high! Reduce the heat to medium-low. You can also try using a thicker slice of cheese.
- Sandwich is Sticking to the Skillet: Make sure you’re using a non-stick skillet and that you’ve buttered the bread properly. You can also add a little oil to the skillet.
- Hot Dog is Cold: Make sure the hot dog is heated through before assembling the sandwich. You can also cook the sandwich for a longer period of time to heat the hot dog through.
Storage and Reheating
While these are best served immediately, you can store leftovers in the refrigerator for up to 2 days. To reheat, you can pan-fry them in
Conclusion:
Okay, friends, let’s be honest you’ve probably never seen anything quite like this Grilled Cheese Hot Dog. But trust me, once you try it, you’ll wonder where it’s been all your life! It’s the ultimate comfort food mashup, a symphony of cheesy, savory, and slightly smoky flavors that will have you craving it again and again. This isn’t just a meal; it’s an experience, a culinary adventure that’s surprisingly simple to pull off.
Why is this a must-try? Because it’s ridiculously delicious, incredibly easy, and guaranteed to put a smile on your face. It’s the perfect weeknight dinner when you’re short on time but big on flavor. It’s a crowd-pleaser at barbecues, a fun twist on a classic, and a guaranteed conversation starter. Forget boring hot dogs and predictable grilled cheese this recipe elevates both to a whole new level of awesome. The combination of the crispy, buttery bread, the melty, gooey cheese, and the perfectly grilled hot dog is simply irresistible.
But the fun doesn’t stop there! This recipe is also incredibly versatile. Feeling adventurous? Try swapping out the cheddar cheese for pepper jack for a spicy kick. Add a slice of tomato or some caramelized onions for extra flavor. For a truly decadent experience, try using brioche bread instead of regular sandwich bread. You could even add a drizzle of your favorite hot sauce or a dollop of mustard for an extra layer of zing.
Here are a few serving suggestions to get you started:
Serving Suggestions:
* Classic Combo: Serve your Grilled Cheese Hot Dog with a side of crispy potato chips and a dill pickle.
* Elevated Experience: Pair it with a simple green salad with a light vinaigrette to balance the richness.
* Game Day Grub: Cut the Grilled Cheese Hot Dogs into smaller pieces and serve them as appetizers at your next game day gathering.
* Kid-Friendly Feast: Serve with carrot sticks, apple slices, and a small cup of ketchup for dipping.
* Spicy Fiesta: Top with pickled jalapeños and a drizzle of sriracha mayo for a fiery twist.
Don’t be afraid to experiment and make this recipe your own! The possibilities are endless. I encourage you to get creative and have fun with it.
So, what are you waiting for? Grab your ingredients, fire up your skillet, and get ready to experience the magic of the Grilled Cheese Hot Dog. I promise you won’t be disappointed.
And now for the most important part: I want to hear about your experience! Did you try the recipe? Did you make any modifications? What did you think? Share your photos, your stories, and your feedback in the comments below. I can’t wait to see what you create! Let’s spread the word about this amazing recipe and bring a little cheesy, hot doggy joy to the world, one bite at a time. Happy cooking!
Grilled Cheese Hot Dog: The Ultimate Comfort Food Recipe
A fun twist on grilled cheese and hot dogs! This easy sandwich is a guaranteed crowd-pleaser.
Ingredients
- 6 Hot Dogs
- 6 Hot Dog Buns (optional)
- 12 Slices of Bread (Sourdough or Texas toast recommended)
- 6 Slices of Cheese (Cheddar, American, or your favorite melting cheese)
- 3 Tablespoons Butter, softened
- Optional: Ketchup, Mustard, Relish, or other favorite hot dog toppings
Instructions
- Prepare the Hot Dogs: Grill, boil, or pan-fry the hot dogs until heated through (5-7 minutes).
- Prepare the Buns (Optional): Lightly toast the hot dog buns.
- Butter the Bread: Spread a thin, even layer of softened butter on one side of each slice of bread.
- Slice the Cheese (if needed): If using a block, slice cheese into approximately 1/8-inch thick slices.
- Assemble the Grilled Cheese Hot Dogs:
- Place one slice of bread, butter-side down, in a cold non-stick skillet.
- Add a slice of cheese on top of the bread.
- Place a cooked hot dog on top of the cheese.
- Add another slice of cheese on top of the hot dog.
- Top with the second slice of bread, butter-side up.
- Repeat for remaining hot dogs.
- Cook the Grilled Cheese Hot Dogs:
- Place the skillet over medium-low heat.
- Cook for 3-5 minutes per side, or until the bread is golden brown and crispy, and the cheese is completely melted and gooey. Gently lift the edge to check for doneness.
- Carefully flip the sandwich using a spatula.
- Remove from skillet and place on a cutting board.
- Repeat for remaining grilled cheese hot dogs.
- Serve and Enjoy:
- Cut in half (optional).
- Add toppings (optional).
- Serve immediately.
- Pair with sides like potato chips, french fries, coleslaw, or a salad.
Notes
- Cheese Variations: Experiment with different cheeses like pepper jack, provolone, or mozzarella.
- Sauce Addition: Spread a thin layer of your favorite sauce (pesto, marinara, spicy mayo) on the bread before adding cheese.
- Veggie Boost: Sauté onions, peppers, or mushrooms and add them to the sandwich.
- Bread Options: Try brioche, ciabatta, or pretzel rolls.
- Spice it Up: Add red pepper flakes or hot sauce.
- Air Fryer Method: Assemble sandwiches, place in air fryer basket, and cook at 375°F (190°C) for 5-7 minutes, flipping halfway through.
- Troubleshooting:
Bread Burning, Cheese Not Melting: Lower heat to medium-low.
Cheese Melting Too Quickly: Lower heat to medium-low, use thicker cheese slices.
Sandwich Sticking: Use non-stick skillet, butter bread well, add a little oil.
Hot Dog Cold: Ensure hot dog is heated through before assembling, cook sandwich longer. - Storage and Reheating: Store leftovers in the refrigerator for up to 2 days. Reheat by pan-frying.


Leave a Comment