
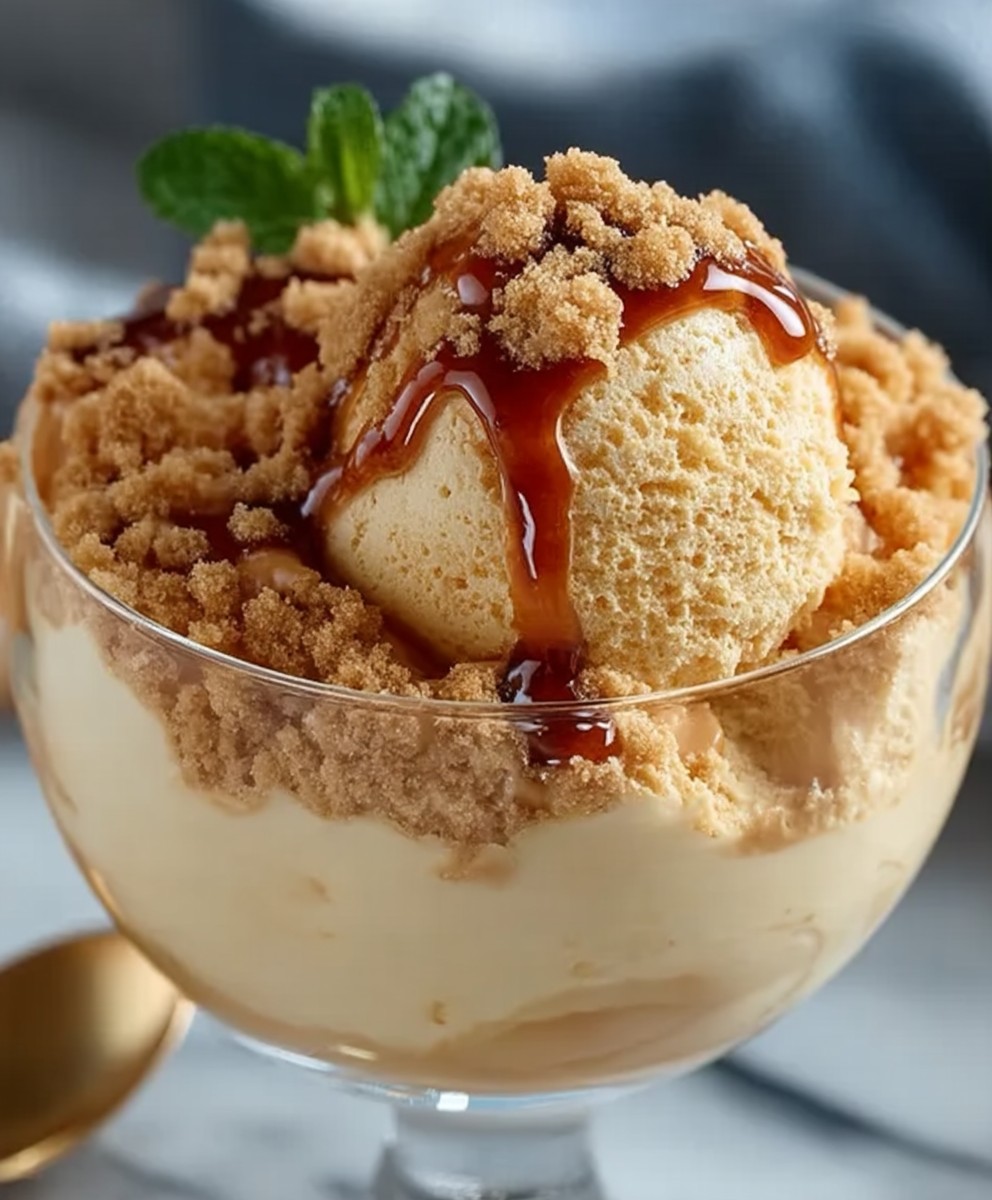
Peanut Butter Pudding: Prepare to be transported back to childhood with a sophisticated twist! Remember those carefree days of sneaking spoonfuls of peanut butter straight from the jar? This recipe captures that same irresistible flavor but elevates it into a creamy, dreamy dessert that’s perfect for any occasion. Forget complicated baking projects; this pudding is incredibly easy to make, requiring minimal ingredients and effort.
While peanut butter itself has a relatively modern history, gaining popularity in the late 19th and early 20th centuries, the concept of creamy, comforting puddings dates back centuries. This Peanut Butter Pudding is a delightful fusion of classic dessert traditions and the universally loved taste of peanut butter. Its a celebration of simplicity and flavor!
What makes this pudding so irresistible? It’s the perfect balance of sweet and salty, the smooth, velvety texture that melts in your mouth, and the sheer convenience of whipping it up in minutes. Whether you’re craving a quick weeknight treat or need a crowd-pleasing dessert for a potluck, this peanut butter pudding is guaranteed to be a hit. Get ready to experience peanut butter in a whole new, utterly delicious way!

Ingredients:
- 1 cup granulated sugar
- 1/2 cup cornstarch
- 1/4 teaspoon salt
- 3 cups whole milk
- 1/2 cup creamy peanut butter
- 2 teaspoons vanilla extract
- Optional: Whipped cream, chopped peanuts, chocolate shavings for garnish
Preparing the Peanut Butter Pudding Base
Alright, let’s get started on this incredibly easy and delicious peanut butter pudding! The first step is to create the base, which involves combining the dry ingredients and then slowly incorporating the milk. This is crucial for a smooth, lump-free pudding.
- Combine Dry Ingredients: In a medium-sized saucepan, whisk together the granulated sugar, cornstarch, and salt. Make sure there are no lumps of cornstarch. A whisk works best for this, ensuring everything is evenly distributed. This step is important because the cornstarch is what thickens the pudding, and if it’s not properly mixed, you’ll end up with a clumpy mess.
- Gradually Add Milk: Slowly pour in the milk, whisking constantly to prevent lumps from forming. This is where patience comes in handy! Don’t dump all the milk in at once. Add it in a steady stream while continuously whisking. This gradual incorporation allows the cornstarch to properly dissolve and prevents it from clumping together. I usually add the milk in about three additions, whisking thoroughly after each addition.
Cooking the Pudding
Now comes the cooking part! This is where the magic happens, and the mixture transforms from a milky liquid into a thick, creamy pudding. It’s important to keep a close eye on it and stir constantly to prevent scorching.
- Cook Over Medium Heat: Place the saucepan over medium heat and cook, stirring constantly, until the mixture thickens and begins to bubble. This usually takes about 5-7 minutes. Don’t walk away from the stove during this process! Constant stirring is key to preventing the pudding from sticking to the bottom of the pan and burning. You’ll notice the mixture gradually thickening as the cornstarch cooks.
- Reduce Heat and Simmer: Once the mixture has thickened and is bubbling, reduce the heat to low and continue to cook, stirring constantly, for another 1-2 minutes. This ensures that the cornstarch is fully cooked and the pudding is smooth and creamy. If you don’t cook it long enough, the pudding might have a slightly starchy taste.
- Remove From Heat: Take the saucepan off the heat. It’s time to add the peanut butter and vanilla!
Adding Peanut Butter and Vanilla
This is where the peanut butter flavor really shines! Make sure you use a good quality creamy peanut butter for the best results. The vanilla extract enhances the overall flavor and adds a touch of sweetness.
- Stir in Peanut Butter: Add the peanut butter to the hot pudding and stir until it is completely melted and smooth. Make sure the peanut butter is fully incorporated. You don’t want any streaks of peanut butter in your pudding. I find that using a whisk at this stage helps to break down the peanut butter and ensure it’s evenly distributed.
- Add Vanilla Extract: Stir in the vanilla extract. This adds a lovely aroma and enhances the overall flavor of the pudding.
Cooling and Serving
Now that the pudding is ready, it’s time to cool it down and let it set. This is an important step because the pudding will continue to thicken as it cools. You can enjoy it warm, but I personally prefer it chilled.
- Pour into Serving Dishes: Pour the pudding into individual serving dishes or a large bowl. If you’re using individual dishes, this makes for easy serving later on. If you’re using a large bowl, you can scoop out portions as needed.
- Cover and Chill: Cover the pudding with plastic wrap, pressing it directly onto the surface to prevent a skin from forming. This is a crucial step! The plastic wrap creates a barrier that prevents the pudding from drying out and forming an unpleasant skin on top. Chill in the refrigerator for at least 2 hours, or until completely set. I usually chill it for at least 4 hours, or even overnight, for the best results.
- Garnish and Serve: Once the pudding is chilled and set, you can garnish it with whipped cream, chopped peanuts, chocolate shavings, or any other toppings you like. Get creative and have fun with it! Serve chilled and enjoy!
Tips and Variations
Here are a few extra tips and variations to help you customize this recipe to your liking:
- For a richer flavor: Use whole milk instead of low-fat milk. You can also add a tablespoon of butter to the pudding while it’s cooking for extra richness.
- For a smoother texture: After cooking, you can strain the pudding through a fine-mesh sieve to remove any lumps.
- For a chocolate peanut butter pudding: Add 2 tablespoons of cocoa powder to the dry ingredients.
- For a vegan version: Use almond milk or soy milk instead of cow’s milk. Make sure to use a vegan-friendly peanut butter.
- To prevent a skin from forming: As mentioned earlier, pressing plastic wrap directly onto the surface of the pudding while it cools is the best way to prevent a skin from forming. You can also sprinkle a thin layer of sugar on top of the pudding before chilling.
- Storage: Leftover pudding can be stored in the refrigerator for up to 3 days. Make sure to keep it covered to prevent it from drying out.
Troubleshooting
Sometimes things don’t go exactly as planned. Here are a few common problems and how to fix them:
- Lumpy pudding: This is usually caused by not whisking the cornstarch and milk together properly. To fix it, you can try straining the pudding through a fine-mesh sieve.
- Thin pudding: This could be caused by not cooking the pudding long enough. If the pudding is too thin, you can return it to the saucepan and cook it for a few more minutes, stirring constantly, until it thickens.
- Pudding is too thick: This could be caused by cooking the pudding for too long. If the pudding is too thick, you can add a little bit of milk to thin it out.
- Pudding is burning: This is usually caused by not stirring the pudding constantly. If the pudding starts to burn, immediately remove it from the heat and transfer it to a clean saucepan. Be careful not to scrape the burnt bits from the bottom of the pan.
Serving Suggestions
This peanut butter pudding is delicious on its own, but here are a few ideas for serving it:
- As a dessert: Serve it chilled in individual dishes, garnished with whipped cream, chopped peanuts, and chocolate shavings.
- As a filling: Use it as a filling for pies, tarts, or cakes.
- As a topping: Use it as a topping for ice cream, waffles, or pancakes.
- In parfaits: Layer it with granola, fruit, and whipped cream to create a delicious parfait.
Nutritional Information (Approximate)
Please note that the nutritional information is an estimate and may vary depending on the specific ingredients used.
- Calories: Approximately 250-300 per serving
- Fat: Approximately 10-15 grams per serving
- Protein: Approximately 5-7 grams per serving
- Carbohydrates: Approximately 30-40 grams per serving
Enjoy your homemade peanut butter pudding! I hope you find this recipe easy to follow and that you love the results. Let me know in the comments if you have any questions or if you try any variations!
Conclusion:
This Peanut Butter Pudding is truly a dessert experience you won’t want to miss! From its incredibly smooth and creamy texture to the intense peanut butter flavor that dances on your tongue, it’s a guaranteed crowd-pleaser. It’s quick, easy, and requires minimal ingredients, making it the perfect solution for those last-minute dessert cravings or when you need to whip up something impressive without spending hours in the kitchen. Trust me, once you taste this, you’ll be adding it to your regular dessert rotation.
But the best part? It’s incredibly versatile! While it’s absolutely divine served chilled straight from the fridge, there are so many ways to elevate this simple pudding into something truly spectacular. For a decadent treat, try layering it with crushed chocolate cookies and whipped cream in individual parfait glasses. The contrasting textures and flavors create a symphony of deliciousness that’s hard to resist.
If you’re looking for a lighter option, consider topping it with fresh berries like raspberries or strawberries. The tartness of the berries cuts through the richness of the peanut butter, creating a perfectly balanced dessert. A sprinkle of chopped peanuts adds a delightful crunch and enhances the nutty flavor.
For the adventurous souls out there, why not experiment with different variations? A swirl of caramel sauce adds a touch of sweetness and complexity. A dash of cinnamon or nutmeg can warm up the flavor profile, making it perfect for cozy evenings. And for the ultimate peanut butter lover, a drizzle of melted peanut butter on top is pure indulgence.
You can also easily adapt this recipe to suit different dietary needs. For a vegan version, simply substitute the milk with your favorite plant-based milk, such as almond milk or soy milk. Just be sure to choose a plant-based milk that is unsweetened to avoid making the pudding too sweet. You can also use a vegan cream cheese alternative for a similar texture.
Another great variation is to add a layer of chocolate ganache on top. The combination of peanut butter and chocolate is a classic for a reason, and it takes this pudding to a whole new level of decadence. Simply melt some chocolate chips with a little bit of cream and pour it over the chilled pudding. Let it set in the fridge for a few minutes before serving.
I’m so excited for you to try this recipe and discover just how amazing Peanut Butter Pudding can be. It’s a simple pleasure that brings so much joy, and I’m confident that you’ll love it as much as I do.
So, what are you waiting for? Gather your ingredients, follow the simple steps, and prepare to be amazed. And most importantly, don’t forget to share your creations with me! I’d love to see your photos and hear about your experiences. Tag me on social media and let me know what variations you tried and how much you enjoyed it. Happy pudding making! I can’t wait to see what delicious creations you come up with. Let me know in the comments below how you liked it!
Peanut Butter Pudding: The Ultimate Guide to Delicious & Easy Recipes
Creamy, homemade peanut butter pudding that's quick, easy, and irresistibly delicious. Perfect for a simple dessert or a sweet treat.
Ingredients
- 1 cup granulated sugar
- 1/2 cup cornstarch
- 1/4 teaspoon salt
- 3 cups whole milk
- 1/2 cup creamy peanut butter
- 2 teaspoons vanilla extract
- Optional: Whipped cream, chopped peanuts, chocolate shavings for garnish
Instructions
- Combine Dry Ingredients: In a medium-sized saucepan, whisk together the granulated sugar, cornstarch, and salt until there are no lumps.
- Gradually Add Milk: Slowly pour in the milk, whisking constantly to prevent lumps from forming. Add the milk in a steady stream while continuously whisking.
- Cook Over Medium Heat: Place the saucepan over medium heat and cook, stirring constantly, until the mixture thickens and begins to bubble (about 5-7 minutes).
- Reduce Heat and Simmer: Reduce the heat to low and continue to cook, stirring constantly, for another 1-2 minutes.
- Remove From Heat: Take the saucepan off the heat.
- Stir in Peanut Butter: Add the peanut butter to the hot pudding and stir until it is completely melted and smooth.
- Add Vanilla Extract: Stir in the vanilla extract.
- Pour into Serving Dishes: Pour the pudding into individual serving dishes or a large bowl.
- Cover and Chill: Cover the pudding with plastic wrap, pressing it directly onto the surface to prevent a skin from forming. Chill in the refrigerator for at least 2 hours, or until completely set.
- Garnish and Serve: Once the pudding is chilled and set, you can garnish it with whipped cream, chopped peanuts, chocolate shavings, or any other toppings you like. Serve chilled and enjoy!
Notes
- For a richer flavor, use whole milk and add a tablespoon of butter while cooking.
- For a smoother texture, strain the pudding after cooking.
- For chocolate peanut butter pudding, add 2 tablespoons of cocoa powder to the dry ingredients.
- For a vegan version, use almond or soy milk and vegan-friendly peanut butter.
- To prevent a skin from forming, press plastic wrap directly onto the surface while cooling.
- Leftover pudding can be stored in the refrigerator for up to 3 days.
- If the pudding is lumpy, strain it through a fine-mesh sieve.
- If the pudding is too thin, return it to the saucepan and cook it for a few more minutes.
- If the pudding is too thick, add a little bit of milk to thin it out.
- If the pudding starts to burn, immediately remove it from the heat and transfer it to a clean saucepan.
Leave a Comment