
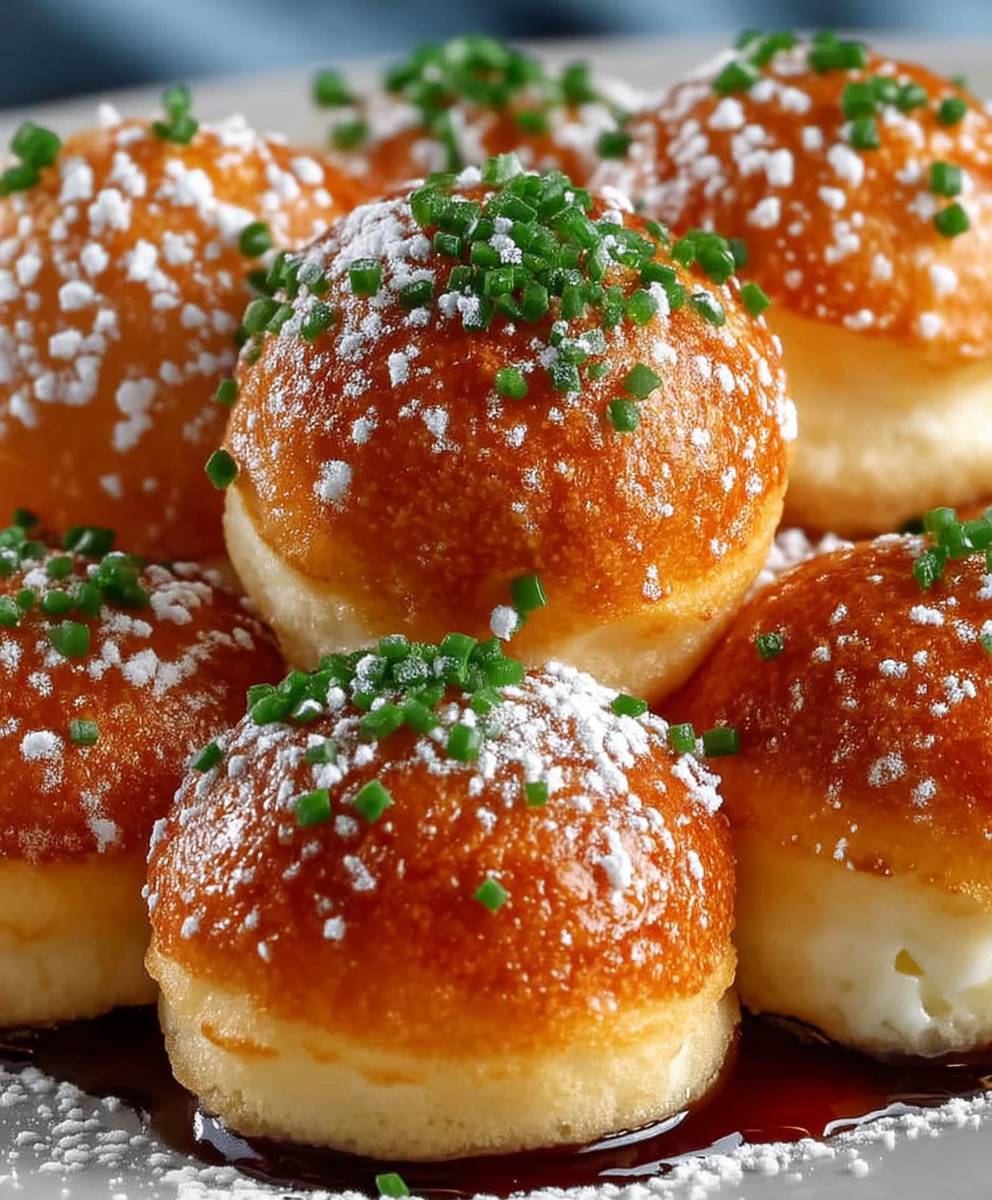
Breakfast Pancake Poppers: Prepare to revolutionize your morning routine with these bite-sized bursts of joy! Forget standing over a hot griddle flipping pancakes one at a time. We’re taking the classic breakfast staple and transforming it into a fun, convenient, and utterly irresistible treat that the whole family will adore.
Pancakes have been a breakfast staple in cultures around the world for centuries, evolving from simple flatbreads to the fluffy, sweet delights we know and love today. These Breakfast Pancake Poppers are a modern twist on that tradition, offering a playful and portable way to enjoy the comforting flavors of pancakes without the fuss.
What makes these poppers so special? It’s the perfect combination of fluffy texture, customizable flavors, and grab-and-go convenience. Imagine sinking your teeth into a warm, golden-brown sphere, bursting with the familiar taste of pancakes, perhaps with a hint of cinnamon, a sprinkle of chocolate chips, or even a hidden dollop of fruit. They’re incredibly easy to make, perfect for busy mornings, and a guaranteed crowd-pleaser for kids and adults alike. Get ready to experience breakfast in a whole new way!

Ingredients:
- 1 ½ cups all-purpose flour
- 3 ½ teaspoons baking powder
- ¼ teaspoon baking soda
- 1 teaspoon salt
- 1 tablespoon granulated sugar
- 1 ¼ cups milk
- 1 large egg
- 3 tablespoons unsalted butter, melted
- 1 teaspoon vanilla extract
- Optional toppings: maple syrup, fresh berries, chocolate chips, whipped cream, sprinkles
- Cooking spray or oil for greasing the pan
Preparing the Pancake Batter
Okay, let’s get started with the most important part the batter! This is where the magic happens, and a good batter means fluffy, delicious pancake poppers. I’ll walk you through each step to make sure it’s perfect.
- Combine the dry ingredients: In a large mixing bowl, whisk together the flour, baking powder, baking soda, salt, and sugar. Make sure everything is well combined. This helps to distribute the leavening agents (baking powder and baking soda) evenly throughout the batter, which is crucial for light and airy poppers. I like to use a whisk for this because it helps to break up any clumps in the flour.
- Combine the wet ingredients: In a separate bowl, whisk together the milk, egg, melted butter, and vanilla extract. The melted butter adds richness and flavor, while the vanilla extract enhances the overall sweetness. Ensure the butter isn’t too hot when you add it to the egg mixture, or you might accidentally cook the egg!
- Combine wet and dry ingredients: Gradually pour the wet ingredients into the dry ingredients, whisking gently until just combined. Be careful not to overmix! Overmixing develops the gluten in the flour, which can result in tough, chewy poppers. A few lumps are okay; they’ll disappear during cooking. I usually stop mixing when I see just a few streaks of flour remaining.
- Let the batter rest (optional but recommended): Allow the batter to rest for 5-10 minutes. This allows the gluten to relax and the baking powder to activate, resulting in even lighter and fluffier poppers. While the batter rests, you can prepare your toppings and get your pan ready.
Cooking the Pancake Poppers
Now for the fun part cooking! This is where the batter transforms into golden-brown, bite-sized delights. I’ll share some tips and tricks to ensure they cook evenly and don’t stick to the pan.
- Prepare your cooking surface: Lightly grease a mini muffin tin or a non-stick skillet with cooking spray or oil. If using a skillet, you’ll need to drop spoonfuls of batter onto the hot surface. For the muffin tin, make sure each cup is well greased to prevent sticking. I prefer using a mini muffin tin because it creates perfectly round poppers that are easy to handle.
- Heat the pan: If using a skillet, heat it over medium heat. You want the pan to be hot enough to cook the poppers quickly but not so hot that they burn. A good way to test the temperature is to flick a few drops of water onto the pan. If the water sizzles and evaporates quickly, the pan is ready. If using a muffin tin, you can preheat it in the oven for a few minutes for even cooking.
- Fill the muffin tin or skillet: If using a mini muffin tin, fill each cup about ¾ full with batter. If using a skillet, drop spoonfuls of batter onto the hot surface, leaving some space between each popper. You can use a small cookie scoop or a spoon to portion the batter.
- Add toppings (optional): If desired, sprinkle your favorite toppings onto the poppers while they’re still wet. Chocolate chips, blueberries, sprinkles, or even small pieces of cooked bacon are all great options. Press the toppings lightly into the batter to prevent them from falling off during cooking.
- Cook the poppers: If using a mini muffin tin, bake in a preheated oven at 375°F (190°C) for 8-10 minutes, or until golden brown and a toothpick inserted into the center comes out clean. If using a skillet, cook for 2-3 minutes per side, or until golden brown and cooked through. Flip the poppers carefully with a spatula to ensure even cooking.
- Check for doneness: The poppers are done when they’re golden brown on all sides and a toothpick inserted into the center comes out clean. If they’re browning too quickly, reduce the heat slightly. If they’re not browning enough, increase the heat slightly.
- Remove from pan: Once cooked, remove the poppers from the muffin tin or skillet and place them on a wire rack to cool slightly. If using a muffin tin, you may need to use a small knife or spatula to loosen the edges of the poppers before removing them.
Serving and Enjoying Your Pancake Poppers
Finally, the best part serving and enjoying your delicious pancake poppers! Here are some ideas for serving and making them even more special.
- Serve warm: Pancake poppers are best served warm, straight from the oven or skillet. They’re also delicious at room temperature, but they tend to be a bit softer.
- Add toppings: Drizzle with maple syrup, honey, or your favorite pancake syrup. You can also top them with fresh berries, whipped cream, chocolate chips, sprinkles, or any other toppings you like. I love to create a pancake popper bar with a variety of toppings so everyone can customize their own.
- Make them ahead of time: Pancake poppers can be made ahead of time and reheated. Store them in an airtight container in the refrigerator for up to 3 days. To reheat, simply microwave them for a few seconds or bake them in a preheated oven at 350°F (175°C) for a few minutes.
- Freeze them for later: Pancake poppers can also be frozen for longer storage. Allow them to cool completely, then place them in a single layer on a baking sheet and freeze for about 30 minutes. Once frozen, transfer them to a freezer bag or airtight container and store them in the freezer for up to 2 months. To reheat, simply microwave them for a few seconds or bake them in a preheated oven at 350°F (175°C) for a few minutes.
- Get creative with flavors: Don’t be afraid to experiment with different flavors and ingredients. You can add spices like cinnamon or nutmeg to the batter, or you can add different types of fruit or chocolate chips. You can also try using different types of flour, such as whole wheat flour or almond flour.
- Enjoy! Most importantly, have fun and enjoy your delicious homemade pancake poppers! They’re perfect for breakfast, brunch, snacks, or even dessert.
Tips for Perfect Pancake Poppers
Here are a few extra tips to ensure your pancake poppers turn out perfectly every time:
- Don’t overmix the batter: Overmixing develops the gluten in the flour, which can result in tough, chewy poppers. Mix the batter until just combined, and don’t worry about a few lumps.
- Use a hot pan: A hot pan is essential for cooking the poppers evenly and preventing them from sticking. Make sure the pan is hot before adding the batter.
- Don’t overcrowd the pan: If using a skillet, don’t overcrowd the pan. Cook the poppers in batches to ensure they cook evenly.
- Use a non-stick pan: A non-stick pan will help prevent the poppers from sticking and make them easier to flip.
- Adjust the heat as needed: If the poppers are browning too quickly, reduce the heat slightly. If they’re not browning enough, increase the heat slightly.
- Be patient: Don’t rush the cooking process. Allow the poppers to cook until they’re golden brown and cooked through.
Variations and Add-ins
Want to spice things up? Here are some fun variations and add-ins to try:
- Chocolate Chip Pancake Poppers: Add ½ cup of chocolate chips to the batter.
- Blueberry Pancake Poppers: Add ½ cup of fresh or frozen blueberries to the batter.
- Cinnamon Roll Pancake Poppers: Swirl a mixture of melted butter, cinnamon, and brown sugar into the batter before cooking.
- Banana Pancake Poppers: Mash one ripe banana and add it to the batter.
- Savory Pancake Poppers: Add shredded cheese, chopped ham, or cooked bacon to the batter.
- 1 ½ cups all-purpose flour
- 3 ½ teaspoons baking powder
- ¼ teaspoon baking soda
- 1 teaspoon salt
- 1 tablespoon granulated sugar
- 1 ¼ cups milk
- 1 large egg
- 3 tablespoons unsalted butter, melted
- 1 teaspoon vanilla extract
- Optional toppings: maple syrup, fresh berries, chocolate chips, whipped cream, sprinkles
- Cooking spray or oil for greasing the pan
- Combine dry ingredients: In a large mixing bowl, whisk together the flour, baking powder, baking soda, salt, and sugar.
- Combine wet ingredients: In a separate bowl, whisk together the milk, egg, melted butter, and vanilla extract.
- Combine wet and dry ingredients: Gradually pour the wet ingredients into the dry ingredients, whisking gently until just combined. Be careful not to overmix. A few lumps are okay.
- Let the batter rest (optional): Allow the batter to rest for 5-10 minutes.
- Prepare cooking surface: Lightly grease a mini muffin tin or a non-stick skillet with cooking spray or oil.
- Heat the pan: If using a skillet, heat it over medium heat.
- Fill the muffin tin or skillet: If using a mini muffin tin, fill each cup about ¾ full with batter. If using a skillet, drop spoonfuls of batter onto the hot surface, leaving some space between each popper.
- Add toppings (optional): If desired, sprinkle your favorite toppings onto the poppers while they’re still wet.
- Cook the poppers: If using a mini muffin tin, bake in a preheated oven at 375°F (190°C) for 8-10 minutes, or until golden brown and a toothpick inserted into the center comes out clean. If using a skillet, cook for 2-3 minutes per side, or until golden brown and cooked through. Flip the poppers carefully with a spatula to ensure even cooking.
- Remove from pan: Once cooked, remove the poppers from the muffin tin or skillet and place them on a wire rack to cool slightly.
- Serve warm: Pancake poppers are best served warm, straight from the oven or skillet.
- Add toppings: Drizzle with maple syrup, honey, or your favorite pancake syrup. You can also top them with fresh berries, whipped cream, chocolate chips, sprinkles, or any other toppings you like.
- Don’t overmix the batter.
- Letting the batter rest helps create lighter poppers.
- Use a hot pan to prevent sticking.
- Adjust heat as needed to prevent burning.
- Pancake poppers can be made ahead of time and reheated. Store them in an airtight container in the refrigerator for up to 3 days.
- Pancake poppers can also be frozen for longer storage. Allow them to cool completely, then place them in a single layer on a baking sheet and freeze for about 30 minutes. Once frozen, transfer them to a freezer bag or airtight container and store them in the freezer for up to 2 months.
Conclusion:
So there you have it! These Breakfast Pancake Poppers are truly a game-changer for busy mornings, fun weekend brunches, or even a delightful dessert. I genuinely believe this recipe is a must-try for anyone who loves pancakes but wants a more convenient and playful way to enjoy them. The combination of fluffy pancake batter, customizable fillings, and that perfectly golden-brown exterior makes them utterly irresistible.
But why are these poppers so special? It’s the versatility, my friends! You can adapt them to suit any taste or dietary need. Feeling fruity? Add blueberries, raspberries, or chopped strawberries to the batter. Craving something savory? Incorporate cooked bacon bits, shredded cheese, or even a sprinkle of everything bagel seasoning. The possibilities are endless!
Beyond the batter itself, think about the dipping sauces! Classic maple syrup is always a winner, but why not experiment? A warm chocolate sauce, a tangy cream cheese glaze, or even a dollop of Greek yogurt with honey would be fantastic. For a more sophisticated touch, try a homemade berry compote or a salted caramel sauce. Don’t be afraid to get creative and let your taste buds guide you.
And speaking of serving suggestions, these Breakfast Pancake Poppers are perfect for so many occasions. Imagine serving them as a fun appetizer at a brunch party, or packing them in your kids’ lunchboxes for a sweet treat. They’re also a great option for a quick and easy breakfast on the go. Just pop a few in a container and you’re ready to face the day!
For variations, consider using different types of flour. Whole wheat flour will add a nutty flavor and boost the fiber content, while almond flour will make them gluten-free. You could also experiment with different spices, such as cinnamon, nutmeg, or even a pinch of cardamom. And if you’re feeling adventurous, try adding a splash of vanilla extract or almond extract to the batter for an extra layer of flavor.
I’m so excited for you to try this recipe and discover just how delicious and convenient these little poppers can be. I’ve poured my heart into perfecting this recipe, and I truly believe you’ll love it as much as I do.
So, what are you waiting for? Gather your ingredients, preheat your oven, and get ready to experience the joy of Breakfast Pancake Poppers! I promise you won’t be disappointed.
And finally, I would absolutely love to hear about your experience! Once you’ve made these poppers, please come back and share your thoughts in the comments below. Let me know what fillings you used, what dipping sauces you tried, and any variations you made. I’m always eager to learn from my readers and see how you’ve put your own spin on my recipes. Happy cooking, and happy popping! I can’t wait to hear all about your pancake adventures!
Breakfast Pancake Poppers: The Ultimate Guide to Delicious Mini Pancakes
Fluffy and fun bite-sized pancake poppers, perfect for breakfast, brunch, or a sweet treat! Easy to customize with your favorite toppings.
Leave a Comment