
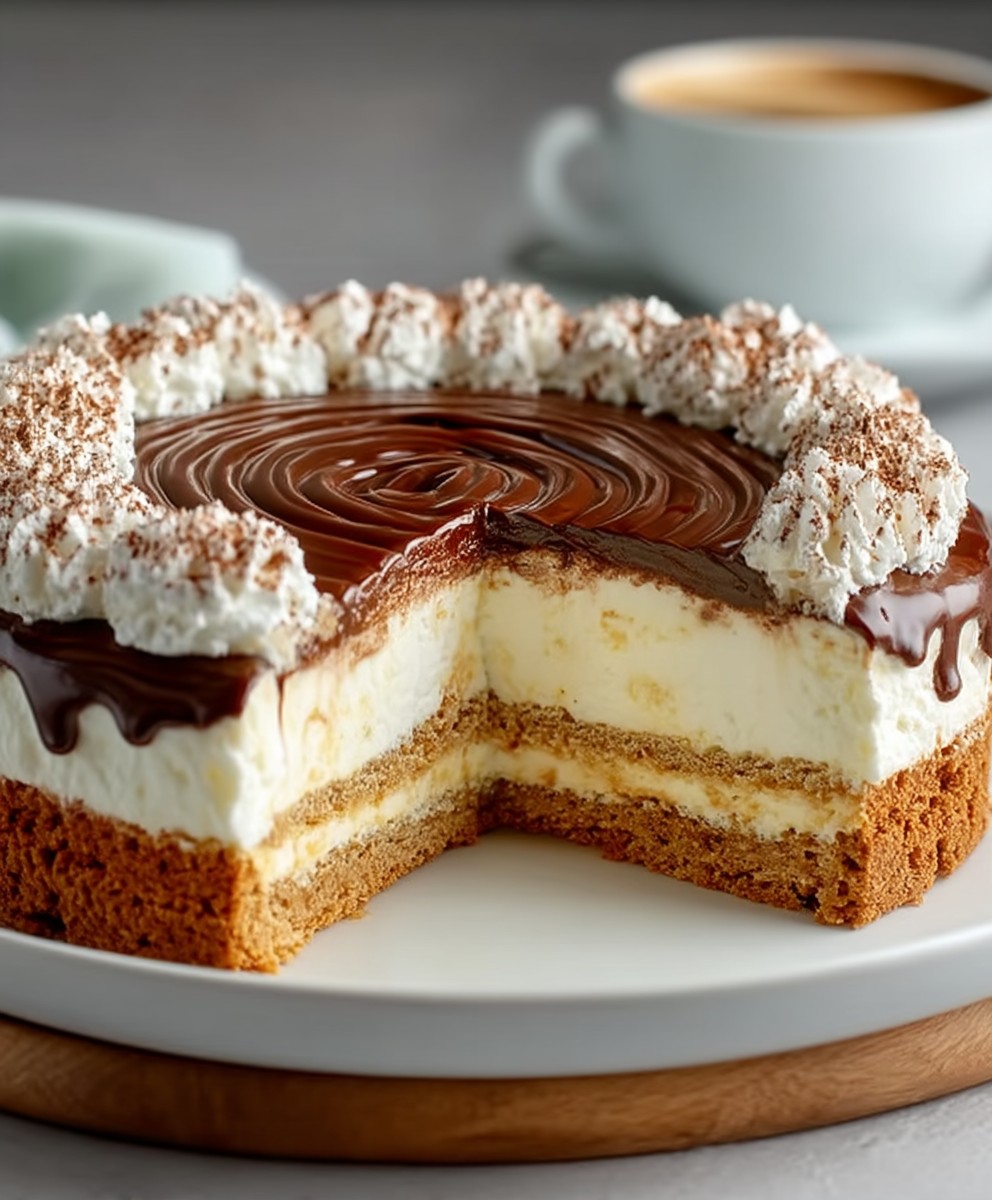
Espresso Biscuit Cake: Prepare to be amazed by this incredibly simple yet utterly decadent dessert that requires absolutely no baking! Yes, you read that right. Forget preheating the oven and meticulously measuring ingredients. This recipe is all about layering rich, coffee-soaked biscuits with a luscious, creamy filling for a treat that’s ready in minutes.
While its exact origins are shrouded in a bit of mystery, similar no-bake biscuit cakes have been enjoyed across Europe for generations. They represent a resourceful and delicious way to create a show-stopping dessert without the need for specialized equipment or advanced baking skills. Think of it as the ultimate “lazy baker’s” dream come true!
What makes this Espresso Biscuit Cake so irresistible? It’s the perfect marriage of textures and flavors. The slightly softened biscuits offer a delightful chewiness, while the espresso infusion provides a deep, robust coffee flavor that’s balanced by the sweet and creamy filling. People adore this dessert because it’s quick, easy, and satisfyingly delicious. It’s the ideal treat for a last-minute gathering, a cozy night in, or whenever you crave a little something special without the fuss.

Ingredients:
- For the Biscuits:
- 3 cups all-purpose flour, plus more for dusting
- 1 tablespoon baking powder
- 1/2 teaspoon baking soda
- 1/4 teaspoon salt
- 3/4 cup (1 1/2 sticks) cold unsalted butter, cut into cubes
- 1/2 cup granulated sugar
- 1/4 cup packed light brown sugar
- 1 cup heavy cream, cold
- 1/2 cup strong brewed espresso, cooled
- 1 teaspoon vanilla extract
- For the Espresso Cream:
- 2 cups heavy cream, cold
- 1/2 cup powdered sugar
- 2 tablespoons strong brewed espresso, cooled
- 1 teaspoon vanilla extract
- For the Espresso Soak:
- 1 cup strong brewed espresso, cooled
- 2 tablespoons granulated sugar
- 1 tablespoon coffee liqueur (optional)
- Optional Garnishes:
- Cocoa powder, for dusting
- Chocolate shavings
- Espresso beans
Making the Espresso Biscuits:
- Combine Dry Ingredients: In a large bowl, whisk together the flour, baking powder, baking soda, and salt. Make sure everything is evenly distributed for a consistent rise.
- Cut in the Butter: Add the cold, cubed butter to the dry ingredients. Using a pastry blender or your fingertips, cut the butter into the flour mixture until it resembles coarse crumbs. The butter should still be in small pieces; this is crucial for creating flaky biscuits. Don’t overwork it!
- Add Sugars: Stir in the granulated sugar and brown sugar until evenly combined.
- Combine Wet Ingredients: In a separate bowl, whisk together the cold heavy cream, cooled espresso, and vanilla extract.
- Combine Wet and Dry: Gradually add the wet ingredients to the dry ingredients, mixing gently with a fork or spatula until just combined. Be careful not to overmix; a few streaks of flour are okay. Overmixing will develop the gluten and result in tough biscuits.
- Turn Out and Knead Lightly: Turn the dough out onto a lightly floured surface. Gently pat the dough into a 1-inch thick rectangle. Fold the dough in half, then pat it back into a 1-inch thick rectangle. Repeat this folding process 3-4 times. This creates layers in the biscuits, making them extra flaky.
- Cut Out Biscuits: Use a 2-3 inch biscuit cutter (or a sharp knife) to cut out biscuits. Try not to twist the cutter, as this can seal the edges and prevent them from rising properly. Re-roll any scraps to cut out more biscuits, but keep in mind that the re-rolled dough will be a bit tougher.
- Chill the Biscuits: Place the cut biscuits on a baking sheet lined with parchment paper. Cover them loosely with plastic wrap and chill in the refrigerator for at least 30 minutes. This helps the butter stay cold, which is essential for flaky biscuits. You can even chill them for longer, up to a few hours.
- Preheat Oven: While the biscuits are chilling, preheat your oven to 425°F (220°C).
- Bake the Biscuits: Bake the chilled biscuits for 15-20 minutes, or until they are golden brown and have risen nicely. Rotate the baking sheet halfway through baking to ensure even browning.
- Cool the Biscuits: Let the biscuits cool on a wire rack before assembling the cake.
Making the Espresso Cream:
- Chill Bowl and Whisk: Place your mixing bowl and whisk (or the bowl and whisk attachment of your stand mixer) in the freezer for at least 15 minutes. This helps the cream whip up faster and hold its shape better.
- Combine Ingredients: Pour the cold heavy cream into the chilled bowl. Add the powdered sugar, cooled espresso, and vanilla extract.
- Whip the Cream: Beat the cream on medium speed until stiff peaks form. Be careful not to overwhip, or the cream will turn grainy. You want it to be thick and fluffy, but still smooth.
- Refrigerate: Cover the espresso cream and refrigerate until ready to assemble the cake. This will help it stay firm.
Making the Espresso Soak:
- Combine Ingredients: In a small bowl, combine the cooled espresso, granulated sugar, and coffee liqueur (if using).
- Stir Until Dissolved: Stir until the sugar is completely dissolved.
Assembling the Espresso Biscuit Cake:
- Prepare the First Layer: Choose a serving plate or cake stand. Slice a few biscuits in half horizontally. Dip the cut sides of the biscuit halves into the espresso soak, allowing them to absorb some of the liquid. Don’t soak them too much, or they will become soggy.
- Arrange the First Layer: Arrange the soaked biscuit halves on the serving plate, cut-side up, to form the base of the cake. You can break the biscuits into smaller pieces to fill in any gaps.
- Add a Layer of Espresso Cream: Spread a generous layer of the espresso cream over the biscuit base.
- Repeat Layers: Repeat steps 1-3 with the remaining biscuits and espresso cream, creating multiple layers. Aim for about 3-4 layers, depending on the size of your biscuits and the desired height of the cake.
- Frost the Cake: Frost the entire cake with the remaining espresso cream, smoothing it out as much as possible.
- Chill the Cake: Cover the cake loosely with plastic wrap and chill in the refrigerator for at least 2 hours, or preferably overnight. This allows the flavors to meld together and the biscuits to soften slightly.
- Garnish (Optional): Before serving, dust the cake with cocoa powder, sprinkle with chocolate shavings, or garnish with espresso beans.
- Serve and Enjoy: Slice and serve the espresso biscuit cake. It’s delicious on its own or with a scoop of vanilla ice cream.
Conclusion:
This Espresso Biscuit Cake is truly a revelation, and I genuinely believe it deserves a spot in your regular baking rotation. It’s more than just a dessert; it’s an experience a symphony of textures and flavors that will leave you wanting more. The simplicity of the recipe belies the incredible depth of taste, making it perfect for both seasoned bakers and those just starting their culinary journey.
Why is it a must-try? Well, beyond the obvious deliciousness, it’s the sheer versatility and ease of preparation. Forget spending hours slaving over a complicated cake recipe. This one comes together in a flash, requiring minimal effort and readily available ingredients. It’s the ideal solution for those moments when you crave something sweet and satisfying but don’t have the time or energy for a full-blown baking project. Plus, the rich espresso flavor adds a sophisticated touch that elevates it beyond your average biscuit cake.
But the best part? You can easily customize it to your liking! For a truly decadent experience, try serving it with a scoop of vanilla bean ice cream or a dollop of freshly whipped cream. A dusting of cocoa powder or a drizzle of chocolate sauce would also be divine. If you’re feeling adventurous, consider adding a layer of mascarpone cheese between the biscuit layers for an extra creamy texture.
For a more coffee-forward variation, you could soak the biscuits in a stronger espresso mixture or even add a splash of coffee liqueur. Alternatively, if you prefer a less intense coffee flavor, you can use decaffeinated espresso or reduce the amount of espresso in the soaking liquid. You could also experiment with different types of biscuits perhaps a buttery shortbread or a crunchy biscotti for a unique twist.
And don’t limit yourself to just espresso! You could easily adapt this recipe to create other flavor combinations. Imagine a lemon biscuit cake with a tangy lemon curd filling, or a raspberry biscuit cake with a layer of fresh raspberries and raspberry jam. The possibilities are endless!
I’m so confident that you’ll love this Espresso Biscuit Cake that I urge you to give it a try. It’s the perfect dessert for any occasion, from a casual weeknight treat to a special celebration. It’s also a fantastic make-ahead dessert, as the flavors meld together beautifully over time.
Once you’ve made it (and devoured it!), I would absolutely love to hear about your experience. Did you try any variations? Did you serve it with anything special? What did your family and friends think? Please share your thoughts and photos in the comments below! Your feedback is invaluable, and it helps me to create even better recipes for you in the future. So go ahead, grab your ingredients, and get baking! I promise you won’t regret it. Happy baking!
Espresso Biscuit Cake: The Ultimate No-Bake Dessert Recipe
Layered dessert with flaky espresso biscuits soaked in coffee liqueur, layered with espresso cream. Perfect for coffee lovers!
Ingredients
- 3 cups all-purpose flour, plus more for dusting
- 1 tablespoon baking powder
- 1/2 teaspoon baking soda
- 1/4 teaspoon salt
- 3/4 cup (1 1/2 sticks) cold unsalted butter, cut into cubes
- 1/2 cup granulated sugar
- 1/4 cup packed light brown sugar
- 1 cup heavy cream, cold
- 1/2 cup strong brewed espresso, cooled
- 1 teaspoon vanilla extract
- 2 cups heavy cream, cold
- 1/2 cup powdered sugar
- 2 tablespoons strong brewed espresso, cooled
- 1 teaspoon vanilla extract
- 1 cup strong brewed espresso, cooled
- 2 tablespoons granulated sugar
- 1 tablespoon coffee liqueur (optional)
- Cocoa powder, for dusting
- Chocolate shavings
- Espresso beans
Instructions
- Combine Dry Ingredients: In a large bowl, whisk together the flour, baking powder, baking soda, and salt.
- Cut in the Butter: Add the cold, cubed butter to the dry ingredients. Using a pastry blender or your fingertips, cut the butter into the flour mixture until it resembles coarse crumbs.
- Add Sugars: Stir in the granulated sugar and brown sugar until evenly combined.
- Combine Wet Ingredients: In a separate bowl, whisk together the cold heavy cream, cooled espresso, and vanilla extract.
- Combine Wet and Dry: Gradually add the wet ingredients to the dry ingredients, mixing gently with a fork or spatula until just combined. Be careful not to overmix.
- Turn Out and Knead Lightly: Turn the dough out onto a lightly floured surface. Gently pat the dough into a 1-inch thick rectangle. Fold the dough in half, then pat it back into a 1-inch thick rectangle. Repeat this folding process 3-4 times.
- Cut Out Biscuits: Use a 2-3 inch biscuit cutter (or a sharp knife) to cut out biscuits. Try not to twist the cutter. Re-roll any scraps to cut out more biscuits.
- Chill the Biscuits: Place the cut biscuits on a baking sheet lined with parchment paper. Cover them loosely with plastic wrap and chill in the refrigerator for at least 30 minutes.
- Preheat Oven: While the biscuits are chilling, preheat your oven to 425°F (220°C).
- Bake the Biscuits: Bake the chilled biscuits for 15-20 minutes, or until they are golden brown. Rotate the baking sheet halfway through baking.
- Cool the Biscuits: Let the biscuits cool on a wire rack before assembling the cake.
- Chill Bowl and Whisk: Place your mixing bowl and whisk (or the bowl and whisk attachment of your stand mixer) in the freezer for at least 15 minutes.
- Combine Ingredients: Pour the cold heavy cream into the chilled bowl. Add the powdered sugar, cooled espresso, and vanilla extract.
- Whip the Cream: Beat the cream on medium speed until stiff peaks form. Be careful not to overwhip.
- Refrigerate: Cover the espresso cream and refrigerate until ready to assemble the cake.
- Combine Ingredients: In a small bowl, combine the cooled espresso, granulated sugar, and coffee liqueur (if using).
- Stir Until Dissolved: Stir until the sugar is completely dissolved.
- Prepare the First Layer: Choose a serving plate or cake stand. Slice a few biscuits in half horizontally. Dip the cut sides of the biscuit halves into the espresso soak.
- Arrange the First Layer: Arrange the soaked biscuit halves on the serving plate, cut-side up, to form the base of the cake.
- Add a Layer of Espresso Cream: Spread a generous layer of the espresso cream over the biscuit base.
- Repeat Layers: Repeat steps 1-3 with the remaining biscuits and espresso cream, creating multiple layers. Aim for about 3-4 layers.
- Frost the Cake: Frost the entire cake with the remaining espresso cream, smoothing it out as much as possible.
- Chill the Cake: Cover the cake loosely with plastic wrap and chill in the refrigerator for at least 2 hours, or preferably overnight.
- Garnish (Optional): Before serving, dust the cake with cocoa powder, sprinkle with chocolate shavings, or garnish with espresso beans.
- Serve and Enjoy: Slice and serve the espresso biscuit cake.
Notes
- For the flakiest biscuits, keep all ingredients as cold as possible.
- Don’t overmix the biscuit dough; a few streaks of flour are okay.
- Chilling the biscuits before baking is crucial for preventing the butter from melting too quickly.
- Be careful not to overwhip the espresso cream.
- Adjust the amount of espresso soak to your liking, depending on how moist you want the cake to be.
- The coffee liqueur in the espresso soak is optional but adds a nice depth of flavor.

Leave a Comment