
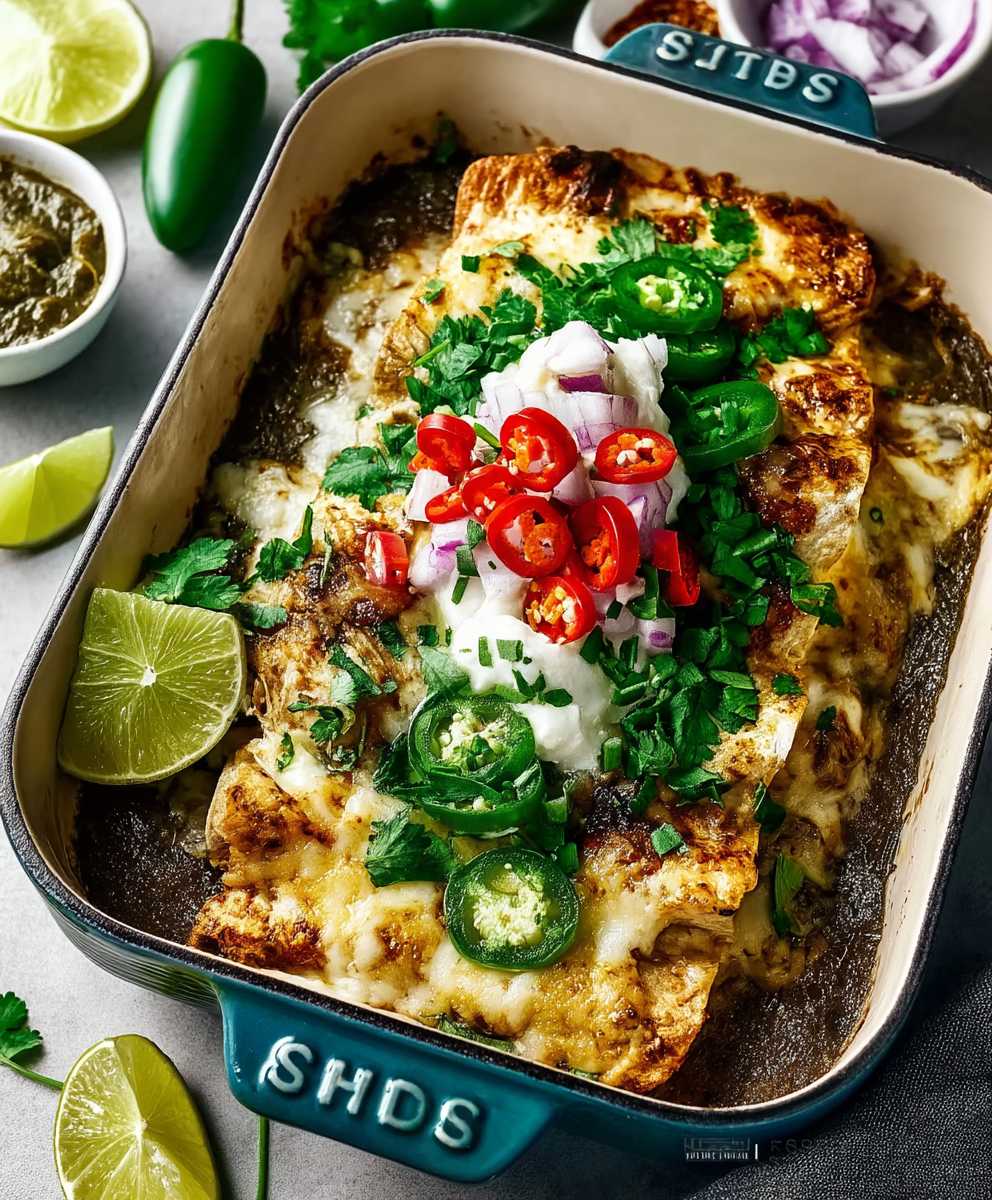
Green Chile Enchiladas: Prepare to embark on a culinary journey that will tantalize your taste buds and leave you craving more! Imagine layers of tender corn tortillas embracing a savory filling, all smothered in a vibrant, flavorful green chile sauce. This isn’t just a meal; it’s an experience, a fiesta on a plate that’s surprisingly easy to create in your own kitchen.
Enchiladas, a cornerstone of Mexican cuisine, boast a rich history dating back to the Mayan civilization. The word “enchilada” itself comes from the Nahuatl word “ch?llap?tzalli,” meaning “chili-seasoned flute.” Over centuries, this simple dish has evolved, incorporating diverse regional ingredients and techniques, but the essence remains the same: a celebration of flavor and community.
What makes Green Chile Enchiladas so universally loved? It’s the perfect harmony of textures and tastes. The soft tortillas, the creamy filling (whether it’s cheese, chicken, or vegetables), and the zesty green chile sauce create a symphony of sensations. Plus, they’re incredibly versatile! You can customize the filling to your liking and adjust the heat level of the sauce to suit your palate. Whether you’re looking for a comforting weeknight dinner or a crowd-pleasing dish for a special occasion, these enchiladas are always a winner. So, let’s dive in and discover the secrets to making the best green chile enchiladas you’ve ever tasted!

Ingredients:
- For the Green Chile Sauce:
- 2 tablespoons olive oil
- 1 medium onion, chopped
- 2 cloves garlic, minced
- 1 pound fresh green chiles (such as Anaheim or Hatch), roasted, peeled, seeded, and chopped (or 2 (12-ounce) cans chopped green chiles, drained)
- 1 teaspoon ground cumin
- 1/2 teaspoon dried oregano
- 1/4 teaspoon salt, or to taste
- 1/4 teaspoon black pepper, or to taste
- 2 cups chicken broth
- 1 tablespoon all-purpose flour (optional, for thickening)
- For the Enchilada Filling:
- 2 tablespoons olive oil
- 1 pound cooked chicken, shredded (rotisserie chicken works great!)
- 1/2 cup chopped onion
- 1 clove garlic, minced
- 1/2 teaspoon ground cumin
- 1/4 teaspoon salt, or to taste
- 1/4 teaspoon black pepper, or to taste
- 1 cup shredded Monterey Jack cheese, divided
- For Assembling the Enchiladas:
- 12 corn tortillas
- 2 cups shredded Monterey Jack cheese, divided
- Optional toppings: sour cream, chopped cilantro, diced tomatoes, sliced avocado
Preparing the Green Chile Sauce
Okay, let’s get started with the heart of these enchiladas the green chile sauce! This is where the magic happens, and trust me, it’s worth the effort. The fresh chiles make a huge difference, but canned ones work in a pinch.
- Sauté the Aromatics: In a medium saucepan, heat the olive oil over medium heat. Add the chopped onion and cook until softened, about 5-7 minutes. Add the minced garlic and cook for another minute until fragrant. Be careful not to burn the garlic!
- Add the Chiles and Spices: Stir in the chopped green chiles, cumin, oregano, salt, and pepper. Cook for about 5 minutes, stirring occasionally, to allow the flavors to meld together. This step is crucial for developing the depth of flavor in the sauce.
- Simmer in Broth: Pour in the chicken broth and bring the mixture to a simmer. Reduce the heat to low and let it simmer for at least 15 minutes, or up to 30 minutes, to allow the flavors to fully develop. The longer it simmers, the richer the sauce will become.
- Thicken (Optional): If you prefer a thicker sauce, whisk the flour with a tablespoon or two of cold water to create a slurry. Slowly drizzle the slurry into the simmering sauce, stirring constantly, until the sauce thickens to your desired consistency. If you are using canned chiles, you might not need to thicken the sauce.
- Blend (Optional): For a smoother sauce, carefully transfer the sauce to a blender (or use an immersion blender) and blend until smooth. Be very careful when blending hot liquids! If using a regular blender, vent the lid to prevent pressure buildup.
- Taste and Adjust: Taste the sauce and adjust the seasoning as needed. You might want to add more salt, pepper, or cumin to suit your taste. If it’s too spicy, add a little bit of sugar or a squeeze of lime juice to balance the flavors.
Preparing the Chicken Filling
Now, let’s move on to the filling. I love using shredded rotisserie chicken for this because it’s quick and easy, but you can also cook your own chicken breasts or thighs. The key is to make sure the chicken is well-seasoned and flavorful.
- Sauté the Aromatics: In a large skillet, heat the olive oil over medium heat. Add the chopped onion and cook until softened, about 5-7 minutes. Add the minced garlic and cook for another minute until fragrant.
- Add the Chicken and Spices: Stir in the shredded chicken, cumin, salt, and pepper. Cook for about 5 minutes, stirring occasionally, until the chicken is heated through and the flavors have melded together.
- Add Cheese: Stir in 1/2 cup of the shredded Monterey Jack cheese. Cook until the cheese is melted and the filling is creamy. This helps bind the filling together and adds a delicious cheesy flavor.
- Taste and Adjust: Taste the filling and adjust the seasoning as needed. You might want to add more salt, pepper, or cumin to suit your taste.
Assembling the Green Chile Enchiladas
Alright, we’re in the home stretch! Now it’s time to assemble the enchiladas. This part can be a little messy, but it’s also the most fun. The key is to work quickly and efficiently to prevent the tortillas from becoming too soggy.
- Warm the Tortillas: This is a crucial step! Warming the tortillas makes them more pliable and prevents them from cracking when you roll them. There are several ways to warm tortillas:
- Microwave: Wrap the tortillas in a damp paper towel and microwave for 30-60 seconds, or until warmed through.
- Oven: Wrap the tortillas in foil and bake in a preheated 350°F (175°C) oven for 10-15 minutes.
- Skillet: Heat a dry skillet over medium heat. Warm each tortilla for about 15-20 seconds per side, until softened.
- Prepare the Baking Dish: Preheat your oven to 350°F (175°C). Lightly grease a 9×13 inch baking dish with cooking spray or olive oil.
- Dip and Fill: Dip each tortilla in the green chile sauce, coating both sides. Don’t soak them for too long, just a quick dip is enough. Place the dipped tortilla on a plate. Spoon about 1/4 cup of the chicken filling down the center of the tortilla.
- Roll and Place: Roll up the tortilla tightly and place it seam-side down in the prepared baking dish. Repeat with the remaining tortillas and filling, arranging them snugly in the dish.
- Top with Sauce and Cheese: Pour the remaining green chile sauce over the enchiladas, making sure to cover them evenly. Sprinkle the remaining 1 1/2 cups of shredded Monterey Jack cheese over the top.
- Bake: Bake in the preheated oven for 20-25 minutes, or until the cheese is melted and bubbly and the enchiladas are heated through.
- Rest: Let the enchiladas rest for a few minutes before serving. This allows the sauce to thicken slightly and prevents them from falling apart when you serve them.
- Serve: Serve the green chile enchiladas hot, garnished with your favorite toppings, such as sour cream, chopped cilantro, diced tomatoes, and sliced avocado. Enjoy!
Tips and Variations:
- Make it Vegetarian: Substitute the chicken with black beans, pinto beans, or roasted vegetables like zucchini, bell peppers, and corn.
- Add Some Heat: Use hotter chiles, such as serrano or jalapeño, in the green chile sauce for a spicier kick.
- Use Different Cheese: Experiment with different types of cheese, such as cheddar, pepper jack, or Oaxaca cheese.
- Make it Ahead: You can assemble the enchiladas ahead of time and store them in the refrigerator for up to 24 hours. Add a few extra minutes to the baking time if baking from cold.
- Freeze for Later: Assemble the enchiladas in a freezer-safe dish, cover tightly with plastic wrap and foil, and freeze for up to 3 months. Thaw overnight in the refrigerator before baking.
Conclusion:
And there you have it! These Green Chile Enchiladas are so much more than just a meal; they’re a warm hug on a plate, a fiesta in your mouth, and a guaranteed crowd-pleaser. I truly believe this recipe is a must-try for anyone who loves authentic Southwestern flavors and enjoys creating something delicious and satisfying in their own kitchen. The combination of the tender chicken, the creamy cheese, and that vibrant, slightly spicy green chile sauce is simply irresistible.
But what makes these enchiladas truly special is their versatility. Feel free to experiment with different fillings! If you’re vegetarian, substitute the chicken with black beans, roasted vegetables like corn and zucchini, or even crumbled tofu. For a spicier kick, add a pinch of cayenne pepper to the green chile sauce or use a hotter variety of green chiles. If you prefer a milder flavor, opt for Anaheim peppers or poblano peppers. The possibilities are endless!
Serving suggestions? Oh, let me count the ways! These enchiladas are fantastic on their own, but they’re even better when accompanied by some classic sides. Consider serving them with a dollop of sour cream or Greek yogurt, a sprinkle of chopped cilantro, and a side of refried beans and Mexican rice. A fresh and zesty salsa, like pico de gallo or a mango salsa, would also be a delightful addition. For a complete meal, add a simple green salad with a lime vinaigrette. And don’t forget the margaritas! A refreshing margarita is the perfect complement to the bold flavors of these enchiladas.
Beyond the traditional sides, think about adding a unique twist. A grilled corn salad with cotija cheese and a chili-lime dressing would be a fantastic contrast to the richness of the enchiladas. Or, how about a creamy avocado crema to drizzle over the top? The cool, creamy texture would perfectly balance the heat of the green chile sauce.
I’ve poured my heart and soul into perfecting this recipe, and I’m confident that you’ll love it as much as I do. It’s a recipe that’s been passed down through generations in my family, and I’m so excited to share it with you. I encourage you to gather your ingredients, put on some music, and get cooking! Don’t be afraid to get creative and make it your own.
But most importantly, I want to hear about your experience! Did you try the recipe? What variations did you make? What did your family and friends think? Please, please, please share your thoughts and photos in the comments below. I’m always eager to learn from your experiences and see how you’ve put your own spin on this classic dish. Your feedback is invaluable, and it helps me to continue creating recipes that you’ll love.
So, go ahead, give these Green Chile Enchiladas a try. I promise you won’t be disappointed. They’re easy to make, incredibly delicious, and perfect for any occasion. From a casual weeknight dinner to a festive weekend gathering, these enchiladas are sure to be a hit. Happy cooking, and I can’t wait to hear what you think! Let’s get cooking and create some delicious memories together!
Green Chile Enchiladas: A Delicious & Easy Recipe
Flavorful green chile chicken enchiladas with homemade green chile sauce and cheesy chicken filling. Perfect for weeknight dinners or crowd-pleasing meals!
Ingredients
- 2 tablespoons olive oil
- 1 medium onion, chopped
- 2 cloves garlic, minced
- 1 pound fresh green chiles (such as Anaheim or Hatch), roasted, peeled, seeded, and chopped (or 2 (12-ounce) cans chopped green chiles, drained)
- 1 teaspoon ground cumin
- 1/2 teaspoon dried oregano
- 1/4 teaspoon salt, or to taste
- 1/4 teaspoon black pepper, or to taste
- 2 cups chicken broth
- 1 tablespoon all-purpose flour (optional, for thickening)
- 2 tablespoons olive oil
- 1 pound cooked chicken, shredded (rotisserie chicken works great!)
- 1/2 cup chopped onion
- 1 clove garlic, minced
- 1/2 teaspoon ground cumin
- 1/4 teaspoon salt, or to taste
- 1/4 teaspoon black pepper, or to taste
- 1 cup shredded Monterey Jack cheese, divided
- 12 corn tortillas
- 2 cups shredded Monterey Jack cheese, divided
- Optional toppings: sour cream, chopped cilantro, diced tomatoes, sliced avocado
Instructions
- In a medium saucepan, heat the olive oil over medium heat. Add the chopped onion and cook until softened, about 5-7 minutes. Add the minced garlic and cook for another minute until fragrant. Be careful not to burn the garlic!
- Stir in the chopped green chiles, cumin, oregano, salt, and pepper. Cook for about 5 minutes, stirring occasionally, to allow the flavors to meld together. This step is crucial for developing the depth of flavor in the sauce.
- Pour in the chicken broth and bring the mixture to a simmer. Reduce the heat to low and let it simmer for at least 15 minutes, or up to 30 minutes, to allow the flavors to fully develop. The longer it simmers, the richer the sauce will become.
- If you prefer a thicker sauce, whisk the flour with a tablespoon or two of cold water to create a slurry. Slowly drizzle the slurry into the simmering sauce, stirring constantly, until the sauce thickens to your desired consistency. If you are using canned chiles, you might not need to thicken the sauce.
- For a smoother sauce, carefully transfer the sauce to a blender (or use an immersion blender) and blend until smooth. Be very careful when blending hot liquids! If using a regular blender, vent the lid to prevent pressure buildup.
- Taste the sauce and adjust the seasoning as needed. You might want to add more salt, pepper, or cumin to suit your taste. If it’s too spicy, add a little bit of sugar or a squeeze of lime juice to balance the flavors.
- In a large skillet, heat the olive oil over medium heat. Add the chopped onion and cook until softened, about 5-7 minutes. Add the minced garlic and cook for another minute until fragrant.
- Stir in the shredded chicken, cumin, salt, and pepper. Cook for about 5 minutes, stirring occasionally, until the chicken is heated through and the flavors have melded together.
- Stir in 1/2 cup of the shredded Monterey Jack cheese. Cook until the cheese is melted and the filling is creamy. This helps bind the filling together and adds a delicious cheesy flavor.
- Taste the filling and adjust the seasoning as needed. You might want to add more salt, pepper, or cumin to suit your taste.
- This is a crucial step! Warming the tortillas makes them more pliable and prevents them from cracking when you roll them. There are several ways to warm tortillas:
- Wrap the tortillas in a damp paper towel and microwave for 30-60 seconds, or until warmed through.
- Wrap the tortillas in foil and bake in a preheated 350°F (175°C) oven for 10-15 minutes.
- Heat a dry skillet over medium heat. Warm each tortilla for about 15-20 seconds per side, until softened.
- Preheat your oven to 350°F (175°C). Lightly grease a 9×13 inch baking dish with cooking spray or olive oil.
- Dip each tortilla in the green chile sauce, coating both sides. Don’t soak them for too long, just a quick dip is enough. Place the dipped tortilla on a plate. Spoon about 1/4 cup of the chicken filling down the center of the tortilla.
- Roll up the tortilla tightly and place it seam-side down in the prepared baking dish. Repeat with the remaining tortillas and filling, arranging them snugly in the dish.
- Pour the remaining green chile sauce over the enchiladas, making sure to cover them evenly. Sprinkle the remaining 1 1/2 cups of shredded Monterey Jack cheese over the top.
- Bake in the preheated oven for 20-25 minutes, or until the cheese is melted and bubbly and the enchiladas are heated through.
- Let the enchiladas rest for a few minutes before serving. This allows the sauce to thicken slightly and prevents them from falling apart when you serve them.
- Serve the green chile enchiladas hot, garnished with your favorite toppings, such as sour cream, chopped cilantro, diced tomatoes, and sliced avocado. Enjoy!
Notes
- Make it Vegetarian: Substitute the chicken with black beans, pinto beans, or roasted vegetables like zucchini, bell peppers, and corn.
- Add Some Heat: Use hotter chiles, such as serrano or jalapeño, in the green chile sauce for a spicier kick.
- Use Different Cheese: Experiment with different types of cheese, such as cheddar, pepper jack, or Oaxaca cheese.
- Make it Ahead: You can assemble the enchiladas ahead of time and store them in the refrigerator for up to 24 hours. Add a few extra minutes to the baking time if baking from cold.
- Freeze for Later: Assemble the enchiladas in a freezer-safe dish, cover tightly with plastic wrap and foil, and freeze for up to 3 months. Thaw overnight in the refrigerator before baking.


Leave a Comment