
Cherry Pretzel Dessert: Prepare to be transported to dessert heaven with this sweet, salty, and utterly irresistible treat! I’m thrilled to share this recipe with you, a delightful combination that has graced family gatherings and potlucks for generations. This isn’t just a dessert; it’s a nostalgic experience, a symphony of textures and flavors that will have everyone reaching for seconds (and maybe thirds!).
While the exact origins of Cherry Pretzel Dessert are shrouded in a bit of mystery, its popularity exploded in the mid-20th century, becoming a staple in church cookbooks and family recipe boxes across America. It perfectly embodies the era’s love for layered desserts and the ingenious use of pantry staples. The salty pretzel crust provides a surprising and satisfying counterpoint to the creamy filling and sweet cherry topping, a balance that keeps you coming back for more.
What makes this dessert so beloved? It’s the harmonious blend of textures the crunchy pretzel base, the smooth and tangy cream cheese filling, and the juicy, sweet burst of cherry pie filling. Plus, it’s incredibly easy to make! With just a handful of ingredients and minimal baking time, you can whip up a show-stopping dessert that’s guaranteed to impress. Whether you’re looking for a crowd-pleasing treat for your next party or simply craving a comforting and delicious dessert, this Cherry Pretzel Dessert is the perfect choice. Let’s get baking!

Ingredients:
- For the Pretzel Crust:
- 2 cups crushed pretzels (about 8 ounces)
- ¾ cup (1 ½ sticks) unsalted butter, melted
- 3 tablespoons granulated sugar
- For the Cream Cheese Layer:
- 8 ounces cream cheese, softened
- 1 cup granulated sugar
- 1 teaspoon vanilla extract
- 8 ounces frozen whipped topping, thawed (like Cool Whip)
- For the Cherry Topping:
- 1 (21 ounce) can cherry pie filling
Preparing the Pretzel Crust
Okay, let’s get started with the foundation of this delicious dessert the pretzel crust! This part is super easy, and the salty-sweet combination is just divine.
- Preheat the Oven: First things first, preheat your oven to 350°F (175°C). This ensures the crust bakes evenly and gets that perfect golden-brown color.
- Crush the Pretzels: Now, for the pretzels. You’ll need about 2 cups of crushed pretzels. You can use a food processor for this, pulsing until you get a fine crumb. If you don’t have a food processor, no worries! Just place the pretzels in a large zip-top bag, seal it tightly, and use a rolling pin to crush them. Make sure you get them nice and fine you don’t want any big chunks.
- Combine Ingredients: In a medium bowl, combine the crushed pretzels, melted butter, and granulated sugar. Mix everything together until the pretzels are evenly coated with the butter and sugar. It should resemble wet sand.
- Press into Pan: Grab a 9×13 inch baking dish. I usually don’t grease it, but if you’re worried about sticking, you can lightly grease it or line it with parchment paper. Press the pretzel mixture evenly into the bottom of the baking dish. Use the bottom of a measuring cup or your fingers to really pack it down firmly. This is important to create a solid base for the other layers.
- Bake the Crust: Place the baking dish in the preheated oven and bake for 8-10 minutes. You want the crust to be lightly golden brown and fragrant. Keep a close eye on it, as it can burn easily.
- Cool Completely: Once the crust is baked, remove it from the oven and let it cool completely. This is crucial! If you add the cream cheese layer while the crust is still warm, it will melt and become runny. So, be patient and let it cool down to room temperature. This usually takes about 30-45 minutes.
Making the Cream Cheese Layer
While the pretzel crust is cooling, let’s move on to the creamy, dreamy cream cheese layer. This is where the magic really happens!
- Soften the Cream Cheese: Make sure your cream cheese is softened to room temperature. This is super important for a smooth and lump-free layer. If you forget to take it out of the fridge ahead of time, you can microwave it in 15-second intervals, stirring in between, until it’s soft. But be careful not to melt it!
- Cream the Cream Cheese and Sugar: In a large bowl, using an electric mixer (either a stand mixer or a hand mixer), beat the softened cream cheese and granulated sugar together until smooth and creamy. This usually takes about 2-3 minutes. Make sure there are no lumps of cream cheese remaining.
- Add Vanilla Extract: Stir in the vanilla extract. This adds a lovely flavor that complements the cream cheese and the other ingredients.
- Fold in Whipped Topping: Gently fold in the thawed whipped topping (like Cool Whip). Be careful not to overmix, as this can deflate the whipped topping and make the layer less fluffy. You want to fold it in until it’s just combined.
- Spread over Crust: Once the pretzel crust is completely cool, spread the cream cheese mixture evenly over the crust. Use a spatula or the back of a spoon to smooth it out.
- Chill: Cover the baking dish with plastic wrap and refrigerate for at least 2 hours, or preferably overnight. This allows the cream cheese layer to set properly and become firm.
Adding the Cherry Topping
Almost there! Now for the final touch the sweet and tangy cherry topping. This is the easiest part, but it really brings the whole dessert together.
- Spread Cherry Pie Filling: Once the cream cheese layer is set, remove the baking dish from the refrigerator. Open the can of cherry pie filling and spread it evenly over the cream cheese layer. You can use a spoon or a spatula to do this. Make sure to cover the entire surface of the cream cheese layer.
- Chill Again (Optional): While not strictly necessary, I like to chill the dessert for another 30 minutes after adding the cherry topping. This helps the cherry pie filling to set slightly and prevents it from being too runny when you cut into the dessert.
Serving and Storage
And that’s it! Your Cherry Pretzel Dessert is ready to be served. This dessert is best served cold, so keep it refrigerated until you’re ready to enjoy it.
- Serving: To serve, cut the dessert into squares or rectangles. You can use a sharp knife to make clean cuts. If you want to get fancy, you can garnish each piece with a dollop of whipped cream or a fresh cherry.
- Storage: Store any leftover dessert in the refrigerator, covered tightly with plastic wrap or in an airtight container. It will keep for up to 3-4 days. However, the pretzel crust may become a little soggy over time, so it’s best to enjoy it as soon as possible.
Tips and Variations
Here are a few tips and variations to make this dessert your own:
- Different Pie Fillings: You can easily substitute the cherry pie filling with other flavors, such as blueberry, strawberry, or apple.
- Chocolate Drizzle: For an extra touch of indulgence, drizzle melted chocolate over the cherry topping.
- Nuts: Sprinkle chopped nuts, such as pecans or walnuts, over the cherry topping for added crunch and flavor.
- Individual Servings: Instead of making a large dessert in a 9×13 inch pan, you can make individual servings in small cups or ramekins.
- Healthier Option: Use a sugar-free whipped topping and a reduced-sugar cherry pie filling to make a slightly healthier version of this dessert.
Enjoy!
I hope you enjoy this Cherry Pretzel Dessert as much as I do! It’s the perfect combination of salty, sweet, creamy, and crunchy a real crowd-pleaser. Let me know in the comments if you try it and what variations you come up with!
Conclusion:
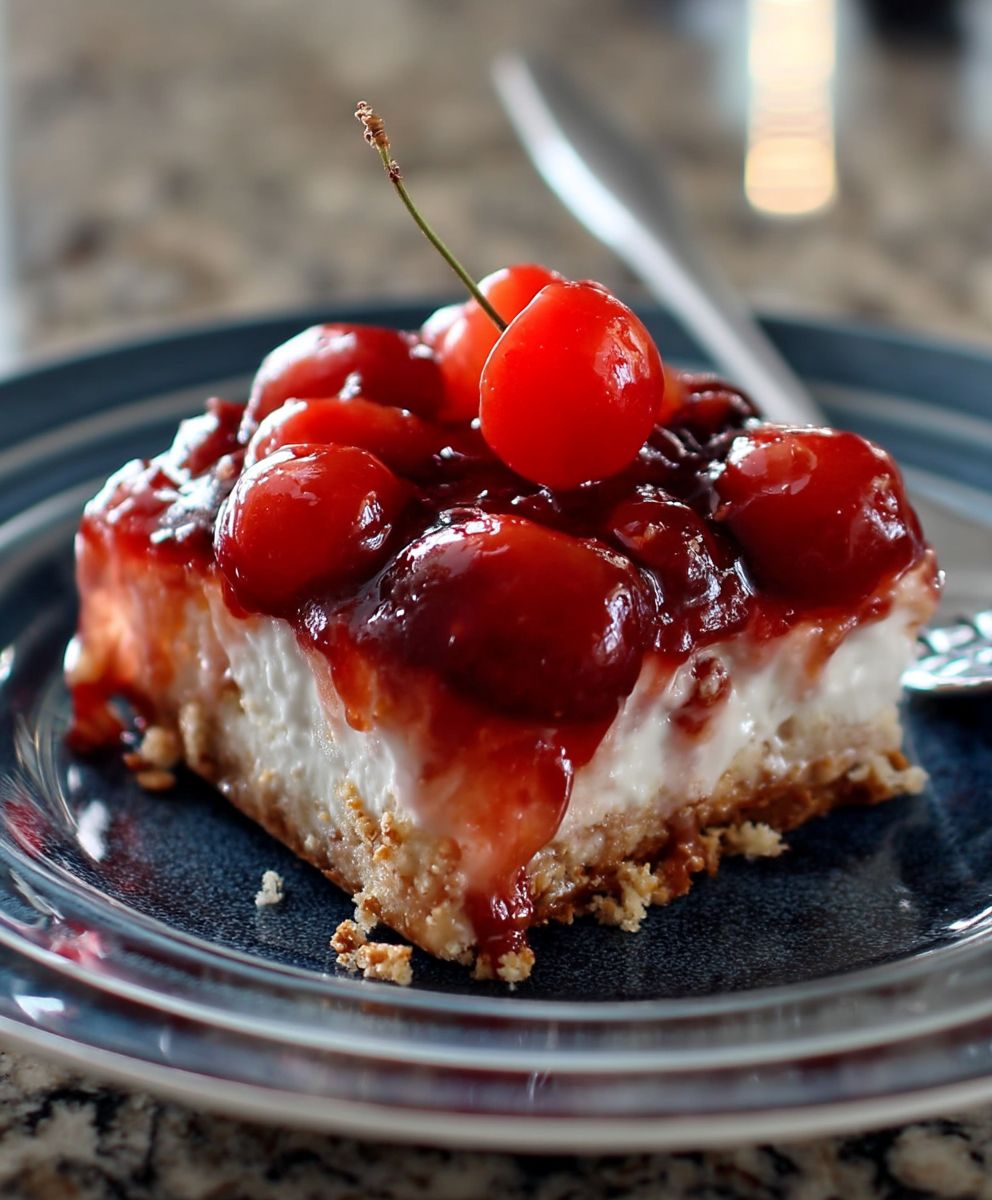
This Cherry Pretzel Dessert is truly a showstopper, and I wholeheartedly believe it deserves a spot on your dessert rotation. It’s the perfect balance of sweet, salty, and creamy, with a satisfying crunch that will keep you coming back for more. The vibrant red of the cherry pie filling against the creamy white filling and the golden pretzel crust makes it visually appealing, too a guaranteed crowd-pleaser at any gathering!
But beyond its aesthetic appeal, the taste is what truly sets this dessert apart. The salty pretzel crust provides a delightful contrast to the sweetness of the cherry pie filling and the creamy, slightly tangy filling. It’s a symphony of flavors and textures that work together in perfect harmony. Trust me, once you take that first bite, you’ll understand why I’m so enthusiastic about this recipe. It’s not just a dessert; it’s an experience!
And the best part? It’s surprisingly easy to make! The steps are straightforward, and you don’t need any fancy equipment or culinary expertise. Even if you’re a beginner baker, you can confidently whip up this Cherry Pretzel Dessert and impress your friends and family. It’s a recipe that’s both delicious and accessible, making it a winner in my book.
Looking for serving suggestions? This dessert is fantastic on its own, but you can also elevate it with a few simple additions. A dollop of whipped cream or a scoop of vanilla ice cream adds an extra layer of indulgence. For a more sophisticated touch, try garnishing it with fresh mint leaves or a sprinkle of chopped pecans.
And if you’re feeling adventurous, there are plenty of variations you can explore. Swap out the cherry pie filling for another fruit filling, such as blueberry, raspberry, or even apple. You could also add a layer of chocolate shavings or a drizzle of caramel sauce for an extra decadent treat. For a festive twist, consider using crushed peppermint candies in the pretzel crust during the holidays. The possibilities are endless!
I truly encourage you to give this recipe a try. It’s a guaranteed hit, and I’m confident that you’ll love it as much as I do. It’s perfect for potlucks, holidays, or simply a sweet treat on a weeknight. It’s a dessert that’s sure to bring smiles to faces and create lasting memories.
So, gather your ingredients, preheat your oven, and get ready to embark on a delicious baking adventure. I’m so excited for you to experience the magic of this Cherry Pretzel Dessert!
Once you’ve made it, I’d absolutely love to hear about your experience. Did you make any variations? What did your friends and family think? Share your photos and stories in the comments below. I can’t wait to see your creations and hear your feedback. Happy baking! Let me know if you have any questions, and I’ll do my best to help. Enjoy!
Cherry Pretzel Dessert: A Sweet & Salty Delight
Salty pretzel crust topped with a creamy cream cheese layer and sweet cherry pie filling. A classic no-bake dessert, perfect for sharing!
Ingredients
- 2 cups crushed pretzels (about 8 ounces)
- ¾ cup (1 ½ sticks) unsalted butter, melted
- 3 tablespoons granulated sugar
- 8 ounces cream cheese, softened
- 1 cup granulated sugar
- 1 teaspoon vanilla extract
- 8 ounces frozen whipped topping, thawed (like Cool Whip)
- 1 (21 ounce) can cherry pie filling
Instructions
- Preheat your oven to 350°F (175°C).
- Crush the pretzels into fine crumbs using a food processor or a zip-top bag and rolling pin.
- In a medium bowl, combine the crushed pretzels, melted butter, and granulated sugar. Mix until evenly coated.
- Press the pretzel mixture evenly into the bottom of a 9×13 inch baking dish. Pack firmly.
- Bake in the preheated oven for 8-10 minutes, or until lightly golden brown and fragrant.
- Remove from oven and let the crust cool completely.
- Ensure cream cheese is softened to room temperature.
- In a large bowl, beat the softened cream cheese and granulated sugar together until smooth and creamy.
- Stir in the vanilla extract.
- Gently fold in the thawed whipped topping until just combined. Do not overmix.
- Spread the cream cheese mixture evenly over the cooled pretzel crust.
- Cover and refrigerate for at least 2 hours, or preferably overnight, to allow the cream cheese layer to set.
- Once the cream cheese layer is set, spread the cherry pie filling evenly over the top.
- Chill for another 30 minutes after adding the cherry topping.
- Cut into squares and serve cold.
Notes
- For best results, ensure the pretzel crust is completely cool before adding the cream cheese layer to prevent it from melting.
- Soften the cream cheese fully for a smooth, lump-free cream cheese layer.
- Be careful not to overmix the whipped topping, as this can deflate it.
- The dessert is best served cold.
- Store leftovers in the refrigerator, covered tightly, for up to 3-4 days. The pretzel crust may become soggy over time.
Leave a Comment