
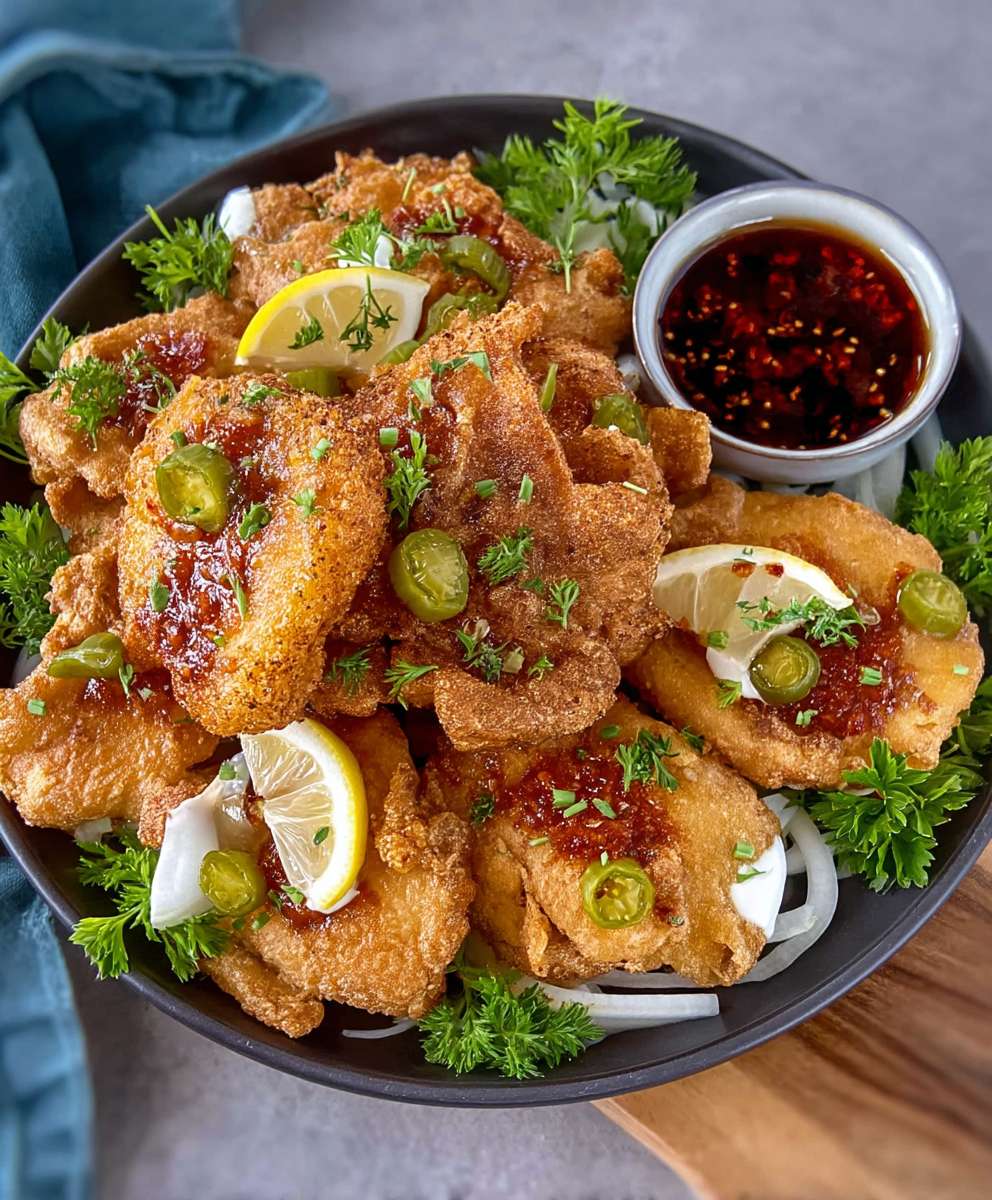
Fried Oyster Mushrooms: Prepare to have your taste buds completely captivated! Imagine biting into a crispy, golden-brown exterior that gives way to a tender, almost meaty interior bursting with savory umami flavor. That’s precisely the experience you’ll have when you make this incredible dish. Forget everything you thought you knew about mushrooms; this recipe transforms humble oyster mushrooms into a culinary masterpiece.
While fried mushrooms, in general, have been enjoyed across various cultures for centuries, the specific preparation of fried oyster mushrooms has gained immense popularity in recent years, particularly within vegan and vegetarian communities. Their unique texture allows them to mimic the satisfying crunch and chewiness of fried chicken or calamari, making them a fantastic alternative for those seeking plant-based comfort food.
What makes this dish so irresistible? It’s the perfect combination of textures and flavors. The crispy coating, often achieved with a blend of seasoned flour or breadcrumbs, provides a delightful contrast to the soft, delicate mushroom. People adore this recipe because it’s surprisingly easy to make, incredibly versatile (perfect as an appetizer, side dish, or even a main course!), and undeniably delicious. Plus, it’s a fantastic way to introduce even the most skeptical eaters to the wonderful world of fungi. Get ready to discover your new favorite way to enjoy oyster mushrooms!

Ingredients:
- 1 pound oyster mushrooms, cleaned and separated
- 1 cup all-purpose flour
- 1/2 cup cornstarch
- 1 teaspoon garlic powder
- 1 teaspoon onion powder
- 1/2 teaspoon smoked paprika
- 1/4 teaspoon cayenne pepper (optional, for a little kick!)
- 1 teaspoon salt
- 1/2 teaspoon black pepper
- 1 cup unsweetened plant-based milk (almond, soy, or oat work well)
- 1 tablespoon apple cider vinegar
- 2 cups panko breadcrumbs
- 1/4 cup nutritional yeast (for a cheesy flavor, optional)
- Vegetable oil, for frying (canola, peanut, or sunflower oil are good choices)
- Your favorite dipping sauce (e.g., vegan ranch, sriracha mayo, BBQ sauce)
Preparing the Oyster Mushrooms:
Before we get into the battering and frying, let’s make sure our oyster mushrooms are prepped and ready to go. This step is crucial for achieving that perfect crispy texture.
- Cleaning the Mushrooms: Oyster mushrooms are delicate, so avoid washing them directly under running water. Instead, gently wipe them clean with a damp paper towel or a soft brush to remove any dirt or debris. If they’re particularly dirty, you can give them a quick rinse, but be sure to pat them dry thoroughly afterward. Excess moisture will prevent the batter from adhering properly.
- Separating the Clusters: Oyster mushrooms often grow in clusters. Carefully separate the individual mushrooms from the cluster. You can gently tear them apart with your hands or use a knife to cut them at the base. Aim for pieces that are manageable for frying about 2-3 inches in size is ideal. Smaller pieces will crisp up nicely, while larger pieces will retain more moisture inside.
- Optional: Tenderizing the Mushrooms: This step is optional, but it can help to tenderize the mushrooms, especially if they are on the larger side. Lightly score the thicker parts of the mushroom caps with a knife in a crosshatch pattern. This will allow the marinade and batter to penetrate more easily.
Making the Batter:
Now for the fun part creating the batter that will give our oyster mushrooms that irresistible crispy coating! This is where the magic happens, so pay close attention to the measurements and mixing techniques.
- Combining the Dry Ingredients: In a medium-sized bowl, whisk together the flour, cornstarch, garlic powder, onion powder, smoked paprika, cayenne pepper (if using), salt, and pepper. The cornstarch helps to create a lighter, crispier coating, while the spices add depth of flavor. Make sure everything is well combined to avoid clumps.
- Creating the Wet Mixture: In a separate bowl, whisk together the plant-based milk and apple cider vinegar. The apple cider vinegar acts as a buttermilk substitute, helping to tenderize the mushrooms and create a slightly tangy flavor. Let this mixture sit for a few minutes to allow it to curdle slightly.
- Combining Wet and Dry: Gradually add the wet mixture to the dry ingredients, whisking constantly until a smooth batter forms. Be careful not to overmix, as this can develop the gluten in the flour and result in a tougher coating. The batter should be thick enough to coat the mushrooms evenly but thin enough to drip off easily. If the batter is too thick, add a little more plant-based milk. If it’s too thin, add a little more flour.
- Preparing the Panko Coating: In a shallow dish, combine the panko breadcrumbs and nutritional yeast (if using). The panko breadcrumbs provide a wonderfully crispy texture, while the nutritional yeast adds a cheesy, savory flavor. Mix well to ensure the nutritional yeast is evenly distributed.
Breading the Mushrooms:
This is where we transform our plain oyster mushrooms into crispy, golden-brown delights! The key is to ensure each mushroom is fully coated in both the batter and the panko breadcrumbs.
- Dipping in Batter: Take a piece of oyster mushroom and dip it into the batter, making sure it’s completely coated. Use a fork or tongs to lift the mushroom out of the batter and let any excess drip off. This will prevent the coating from becoming too thick and soggy.
- Coating with Panko: Immediately transfer the battered mushroom to the dish with the panko breadcrumbs. Use your hands to gently press the panko breadcrumbs onto the mushroom, ensuring it’s completely covered on all sides. Don’t be afraid to really pack the panko on there this is what will give you that amazing crispy texture.
- Repeat: Repeat the dipping and coating process with the remaining oyster mushrooms until they are all breaded.
- Resting (Optional but Recommended): Place the breaded mushrooms on a wire rack and let them rest for about 10-15 minutes before frying. This allows the batter to adhere to the mushrooms and the panko breadcrumbs to set, which will help prevent them from falling off during frying.
Frying the Oyster Mushrooms:
Now for the grand finale frying the oyster mushrooms to golden-brown perfection! This is where patience and attention to detail are key. We want to achieve a crispy exterior and a tender interior without burning the mushrooms.
- Heating the Oil: Pour enough vegetable oil into a large, heavy-bottomed pot or deep fryer to reach a depth of about 2-3 inches. Heat the oil over medium-high heat until it reaches a temperature of 350-375°F (175-190°C). Use a deep-fry thermometer to monitor the temperature of the oil. If you don’t have a thermometer, you can test the oil by dropping a small piece of bread into it. If the bread turns golden brown in about 30-60 seconds, the oil is ready.
- Frying in Batches: Carefully add the breaded oyster mushrooms to the hot oil in batches, making sure not to overcrowd the pot. Overcrowding will lower the temperature of the oil and result in soggy mushrooms. Fry the mushrooms for about 2-3 minutes per side, or until they are golden brown and crispy.
- Removing and Draining: Use a slotted spoon or tongs to remove the fried oyster mushrooms from the oil and place them on a wire rack lined with paper towels to drain off any excess oil. This will help them stay crispy.
- Repeat: Repeat the frying process with the remaining breaded mushrooms until they are all cooked.
Serving and Enjoying:
Congratulations, you’ve successfully fried your oyster mushrooms! Now it’s time to enjoy the fruits (or rather, fungi) of your labor. Here are some serving suggestions to elevate your fried oyster mushroom experience:
- Dipping Sauces: Serve the fried oyster mushrooms with your favorite dipping sauces. Vegan ranch, sriracha mayo, BBQ sauce, sweet chili sauce, and even a simple lemon aioli are all excellent choices.
- As an Appetizer: Arrange the fried oyster mushrooms on a platter and serve them as an appetizer at your next gathering. They’re sure to be a crowd-pleaser!
- In Tacos or Wraps: Use the fried oyster mushrooms as a filling for tacos or wraps. Add some shredded lettuce, diced tomatoes, avocado, and your favorite salsa for a delicious and satisfying meal.
- On Salads: Top a salad with fried oyster mushrooms for a crispy and flavorful addition. They pair well with mixed greens, roasted vegetables, and a light vinaigrette.
- As a Side Dish: Serve the fried oyster mushrooms as a side dish with your favorite main course. They’re a great accompaniment to grilled vegetables, pasta dishes, or even a vegan burger.
Tips for Extra Crispy Mushrooms:
- Double Breading: For an extra crispy coating, you can double bread the mushrooms. After the first coating of batter and panko, dip them back into the batter and then back into the panko breadcrumbs.
- Cold Oil Start (Controversial): Some people swear by starting with cold oil and letting it heat up gradually with the mushrooms in it. This can result in a very crispy texture, but it’s important to monitor the temperature carefully to prevent the mushrooms from becoming greasy.
- Don’t Overcrowd: As mentioned before, overcrowding the pot will lower the oil temperature and result in soggy mushrooms. Fry in small batches for best results.
- High-Quality Panko: Use high-quality panko breadcrumbs for the best texture. Look for panko that is light and airy, not dense and heavy.
Conclusion:
So, there you have it! My take on perfectly Fried Oyster Mushrooms. I truly believe this recipe is a must-try, and here’s why: it’s incredibly simple, unbelievably flavorful, and offers a fantastic alternative to meat-based appetizers or side dishes. The crispy, golden-brown exterior gives way to a tender, almost melt-in-your-mouth interior, creating a textural symphony that will leave you wanting more. Plus, oyster mushrooms are packed with nutrients, making this a relatively guilt-free indulgence!
But the best part? The versatility! These fried delights are begging to be customized. For a classic approach, serve them immediately with a squeeze of fresh lemon juice and a sprinkle of sea salt. The acidity of the lemon cuts through the richness of the frying, creating a balanced and refreshing bite. Alternatively, whip up a quick dipping sauce. A creamy aioli, a spicy sriracha mayo, or even a simple sweet chili sauce would all complement the earthy flavor of the mushrooms beautifully.
Looking for more adventurous serving suggestions? Consider adding these crispy oyster mushrooms to your favorite tacos for a vegetarian twist. They’d be fantastic in a slaw-topped taco with a drizzle of chipotle crema. Or, use them as a topping for a hearty grain bowl. Imagine a bed of quinoa or brown rice, topped with roasted vegetables, a handful of these fried mushrooms, and a tahini dressing pure deliciousness! You could even chop them up and toss them into a salad for added texture and flavor. The possibilities are truly endless!
And don’t be afraid to experiment with the recipe itself! If you’re feeling adventurous, try adding a pinch of smoked paprika or garlic powder to the breading for an extra layer of flavor. For a spicier kick, incorporate a dash of cayenne pepper. You could also try using different types of flour for the breading. Rice flour would create an extra crispy coating, while almond flour would make the recipe gluten-free. Remember, cooking is all about having fun and making it your own!
I’m so excited for you to try this recipe and experience the magic of perfectly Fried Oyster Mushrooms for yourself. I’m confident that you’ll be amazed by how easy it is to create such a delicious and satisfying dish. Once you’ve given it a go, I’d absolutely love to hear about your experience. Did you try any variations? What dipping sauce did you choose? What did you serve them with? Share your photos and stories in the comments below! Your feedback is invaluable and helps me continue to create recipes that you’ll love. So, go ahead, grab some oyster mushrooms, and get frying! Happy cooking!
I can’t wait to see what culinary masterpieces you create. Don’t forget to tag me in your photos on social media I’m always thrilled to see your creations. Happy frying, and enjoy!
Fried Oyster Mushrooms: Crispy Recipe & Cooking Tips
Crispy, golden-brown fried oyster mushrooms with a savory, crunchy coating. Perfect as an appetizer, snack, or addition to tacos and salads!
Ingredients
- 1 pound oyster mushrooms, cleaned and separated
- 1 cup all-purpose flour
- 1/2 cup cornstarch
- 1 teaspoon garlic powder
- 1 teaspoon onion powder
- 1/2 teaspoon smoked paprika
- 1/4 teaspoon cayenne pepper (optional)
- 1 teaspoon salt
- 1/2 teaspoon black pepper
- 1 cup unsweetened plant-based milk (almond, soy, or oat)
- 1 tablespoon apple cider vinegar
- 2 cups panko breadcrumbs
- 1/4 cup nutritional yeast (optional)
- Vegetable oil, for frying
- Your favorite dipping sauce
Instructions
- Prepare the Mushrooms: Gently wipe oyster mushrooms clean with a damp paper towel. Separate into manageable pieces (2-3 inches). Lightly score thicker parts of caps (optional).
- Make the Batter: In a bowl, whisk together flour, cornstarch, garlic powder, onion powder, smoked paprika, cayenne pepper (if using), salt, and pepper.
- In a separate bowl, whisk together plant-based milk and apple cider vinegar. Let sit for a few minutes.
- Gradually add the wet mixture to the dry ingredients, whisking until a smooth batter forms. Adjust consistency with more milk or flour if needed.
- Prepare the Panko Coating: In a shallow dish, combine panko breadcrumbs and nutritional yeast (if using).
- Bread the Mushrooms: Dip each mushroom into the batter, letting excess drip off.
- Transfer to the panko mixture and press to coat completely.
- Place breaded mushrooms on a wire rack and let rest for 10-15 minutes (optional).
- Fry the Mushrooms: Heat vegetable oil in a pot or deep fryer to 350-375°F (175-190°C).
- Fry mushrooms in batches for 2-3 minutes per side, until golden brown and crispy.
- Remove and drain on a wire rack lined with paper towels.
- Serve: Serve hot with your favorite dipping sauces.
Notes
- For extra crispy mushrooms, double bread them (batter, panko, batter, panko).
- Don’t overcrowd the pot when frying.
- Use high-quality panko breadcrumbs.
- Serve immediately for best crispness.

Leave a Comment