
Belgian waffles: just the name conjures images of golden-brown squares, piled high with whipped cream and glistening berries, doesn’t it? Forget those flimsy, store-bought imitations; we’re talking about the real deal thick, fluffy, and boasting those signature deep pockets practically begging to be filled with your favorite toppings. Have you ever wondered what makes these waffles so special?
The history of Belgian waffles is as rich as their flavor. While variations existed before, the version we know and love today gained international fame at the 1964 New York World’s Fair. Maurice Vermersch, a Belgian entrepreneur, introduced his “Bel-Gem” waffles, and the rest, as they say, is history. Americans went wild for the light, airy texture and the irresistible sweetness.
But what is it about these waffles that makes them so universally adored? It’s a combination of factors, really. The use of yeast or baking powder creates a light and airy interior, while the deep pockets provide the perfect canvas for holding melted butter, syrup, fruit, or whatever your heart desires. The slight crispness on the outside gives way to a soft, pillowy inside, creating a textural symphony in every bite. Plus, they’re incredibly versatile perfect for a leisurely weekend brunch or a quick and satisfying breakfast. So, are you ready to learn how to make authentic Belgian waffles at home? Let’s get started!

Ingredients:
- 2 cups all-purpose flour
- 1 tablespoon baking powder
- 1/4 teaspoon salt
- 2 tablespoons granulated sugar
- 2 large eggs, separated
- 1 3/4 cups milk
- 1/2 cup (1 stick) unsalted butter, melted and slightly cooled
- 1 teaspoon vanilla extract
- Optional toppings: fresh fruit (berries, bananas), whipped cream, chocolate syrup, maple syrup, powdered sugar
Preparing the Batter:
- Combine the dry ingredients: In a large bowl, whisk together the flour, baking powder, salt, and sugar. Make sure everything is evenly distributed to avoid clumps and ensure proper leavening. I like to use a whisk for this because it helps incorporate air and prevents the baking powder from clumping.
- Separate the eggs: Carefully separate the egg yolks from the egg whites. Place the yolks in a separate medium-sized bowl and the whites in a clean, grease-free bowl. It’s crucial that the bowl for the egg whites is completely clean; even a tiny bit of yolk or grease can prevent them from whipping properly.
- Whisk the egg yolks: To the bowl with the egg yolks, add the milk, melted butter (make sure it’s not too hot, or it will cook the eggs!), and vanilla extract. Whisk until everything is well combined and the mixture is smooth.
- Combine wet and dry ingredients: Gradually add the wet ingredients to the dry ingredients, whisking gently until just combined. Be careful not to overmix the batter. A few lumps are okay; overmixing will develop the gluten in the flour, resulting in tough waffles. I usually stop whisking when I see just a few streaks of flour remaining.
- Whip the egg whites: Using an electric mixer (handheld or stand mixer), beat the egg whites until stiff peaks form. This is a crucial step for achieving light and fluffy waffles. Start on low speed and gradually increase to high speed. You’ll know the egg whites are ready when they hold their shape and form stiff, glossy peaks when you lift the beaters. Be careful not to overwhip, or they’ll become dry and grainy.
- Gently fold in the egg whites: Using a rubber spatula, gently fold the whipped egg whites into the batter in two or three additions. Be careful not to deflate the egg whites; this is what gives the waffles their airy texture. Fold until just combined, leaving some streaks of egg white visible. Don’t worry about getting everything perfectly smooth; a little bit of unevenness is fine.
- Let the batter rest (optional but recommended): Cover the bowl with plastic wrap and let the batter rest for 10-15 minutes. This allows the gluten to relax and the baking powder to fully activate, resulting in even lighter and fluffier waffles. While the batter rests, you can preheat your waffle iron.
Cooking Process:
- Preheat the waffle iron: Preheat your waffle iron according to the manufacturer’s instructions. Most waffle irons have an indicator light that will tell you when it’s ready. It’s important to make sure the iron is hot before adding the batter, or the waffles will stick.
- Grease the waffle iron (if necessary): If your waffle iron isn’t non-stick, lightly grease it with cooking spray or melted butter. Even if it is non-stick, a light coating of cooking spray can help prevent sticking and ensure even browning.
- Pour the batter onto the waffle iron: Pour the batter onto the hot waffle iron, using the amount recommended by the manufacturer. Be careful not to overfill the iron, or the batter will spill over the sides. I usually start with about 1/2 cup of batter per waffle and adjust as needed.
- Cook the waffles: Close the waffle iron and cook the waffles according to the manufacturer’s instructions, usually for 3-5 minutes, or until they are golden brown and crispy. The cooking time will vary depending on your waffle iron. You’ll know the waffles are done when the steam stops escaping from the iron and they release easily.
- Remove the waffles: Carefully remove the waffles from the waffle iron using a fork or tongs. Be careful not to scratch the surface of the iron.
- Keep warm (optional): If you’re making a large batch of waffles, you can keep them warm in a preheated oven (200°F) until ready to serve. Place the waffles on a wire rack in a single layer to prevent them from getting soggy.
Serving and Toppings:
- Serve immediately: Serve the waffles immediately while they are still warm and crispy.
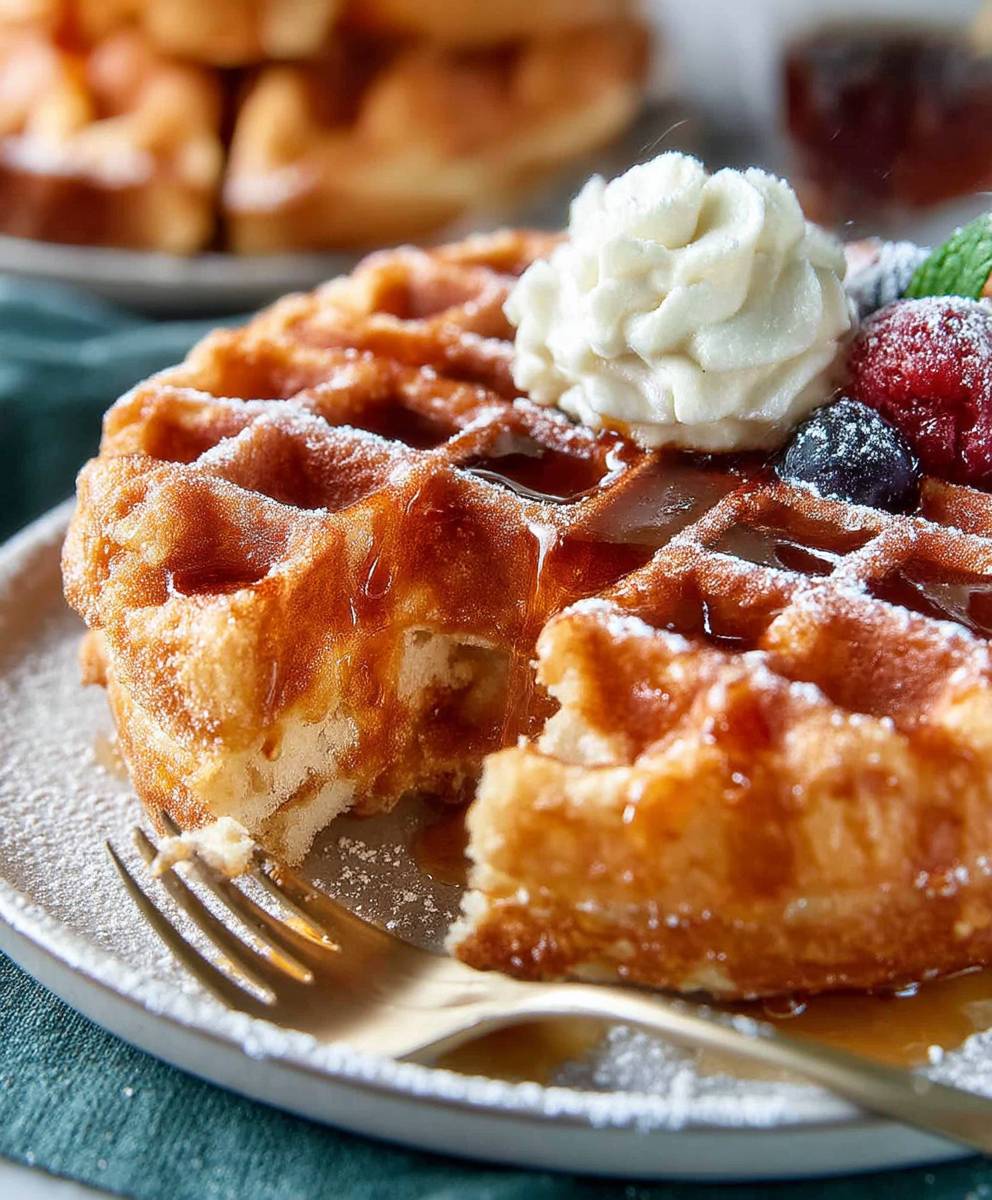
- Add your favorite toppings: Top the waffles with your favorite toppings, such as fresh fruit (berries, bananas), whipped cream, chocolate syrup, maple syrup, powdered sugar, or a combination of all of the above! I personally love a classic combination of fresh berries, whipped cream, and a drizzle of maple syrup.
- Enjoy! Enjoy your delicious homemade Belgian waffles!
Tips for Perfect Waffles:
- Don’t overmix the batter: Overmixing develops the gluten in the flour, resulting in tough waffles. Mix until just combined, leaving some lumps.
- Whip the egg whites properly: Whipped egg whites are essential for light and fluffy waffles. Make sure to beat them until stiff peaks form.
- Don’t overcook the waffles: Overcooked waffles will be dry and hard. Cook until they are golden brown and crispy.
- Use a good quality waffle iron: A good quality waffle iron will heat evenly and prevent the waffles from sticking.
- Experiment with different flavors: Try adding different extracts, spices, or fruits to the batter to create your own unique waffle flavors. For example, you could add a teaspoon of cinnamon for cinnamon waffles, or a handful of blueberries for blueberry waffles.
- Make a big batch and freeze them: Waffles freeze well, so you can make a big batch and freeze them for later. To freeze, let the waffles cool completely, then place them in a single layer on a baking sheet and freeze for about 30 minutes. Once they are frozen, transfer them to a freezer bag or container. To reheat, toast them in a toaster or oven until warm and crispy.
- Use melted butter, not oil: Melted butter adds a richness and flavor that oil simply can’t match. Make sure the butter is slightly cooled before adding it to the batter, or it will cook the eggs.
- Let the batter rest: Letting the batter rest for 10-15 minutes allows the gluten to relax and the baking powder to fully activate, resulting in even lighter and fluffier waffles.
- Don’t open the waffle iron too early: Resist the urge to open the waffle iron before the waffles are done. Opening it too early can cause the waffles to stick and tear.
- Clean your waffle iron properly: Clean your waffle iron according to the manufacturer’s instructions. Most waffle irons can be cleaned with a damp cloth. Avoid using abrasive cleaners or scouring pads, as they can damage the surface of the iron.
Variations:
- Chocolate Waffles: Add 1/4 cup of unsweetened cocoa powder to the dry ingredients. You can also add chocolate chips to the batter.
- Blueberry Waffles: Gently fold 1 cup of fresh or frozen blueberries into the batter.
- Cinnamon Waffles: Add 1 teaspoon of ground cinnamon to the dry ingredients.
- Lemon Waffles: Add 1 tablespoon of lemon zest and 1 tablespoon of lemon juice to the wet ingredients.
- Savory Waffles: Omit the sugar and vanilla extract. Add 1/2 cup of shredded cheese and 1/4 cup of chopped herbs (such as chives or parsley) to the batter. Serve with savory toppings such as fried eggs, bacon, or avocado.
Troubleshooting:
- Waffles are sticking to the iron: Make sure the waffle iron is properly preheated and greased. If the waffles are still sticking, try adding a little more oil or butter to the batter.
- Waffles are not cooking evenly: Make sure the waffle iron is heating evenly. If it’s not, you may need to replace it.
- Waffles are too dense: Make sure you’re not overmixing the batter. Also, make sure the baking powder is fresh.
- Waffles are too dry: Add a little more milk to the batter.
- Waffles are not crispy: Cook the waffles for a longer time. You can also try adding a little cornstarch to the batter.
Conclusion:
And there you have it! This isn’t just another waffle recipe; it’s your ticket to experiencing truly authentic, unbelievably delicious Belgian waffles right in your own kitchen. From the light and airy interior to the perfectly crisp, golden-brown exterior, every bite is a symphony of textures and flavors that will transport you straight to a charming Belgian café. I know, I know, I might be a little biased, but trust me on this one you absolutely *need* to try this recipe.
What makes these waffles so special? It’s the combination of simple ingredients, a little bit of patience, and a whole lot of love. The yeast gives them that signature lightness, while the pearl sugar adds a delightful sweetness and a satisfying crunch. Forget those dense, heavy waffles you might be used to; these are in a league of their own.
But the best part about this recipe is its versatility! While they’re absolutely divine on their own, a little creativity can take them to the next level. For a classic touch, top them with a generous dollop of whipped cream and a scattering of fresh berries. Strawberries, raspberries, blueberries the choice is yours! Or, if you’re feeling a bit more decadent, drizzle them with warm chocolate sauce and a sprinkle of chopped nuts.
Looking for something a little different? Try serving them with a scoop of vanilla ice cream and a drizzle of maple syrup for a truly indulgent treat. For a savory twist, top them with fried chicken for a delicious and satisfying brunch. You could even get creative with the batter itself! Add a handful of chocolate chips for a chocolatey delight, or stir in some cinnamon and nutmeg for a warm and cozy flavor. The possibilities are truly endless!
Here are a few more serving suggestions to get your creative juices flowing:
- Fruit Compote: A warm fruit compote, made with seasonal fruits like apples, peaches, or cherries, is a perfect complement to the light and airy waffles.
- Speculoos Spread: For an extra dose of Belgian flavor, spread a generous layer of speculoos spread on top.
- Lemon Curd: The tangy sweetness of lemon curd pairs beautifully with the richness of the waffles.
- Savory Toppings: Don’t be afraid to experiment with savory toppings! Smoked salmon, avocado, and a poached egg make for a sophisticated and satisfying brunch.
I’ve poured my heart and soul into perfecting this recipe, and I’m confident that you’ll love it as much as I do. So, what are you waiting for? Gather your ingredients, dust off your waffle iron, and get ready to experience the magic of homemade Belgian waffles.
I’m so excited for you to try this recipe! Once you’ve had a chance to whip up a batch, I’d absolutely love to hear about your experience. Did you make any variations? What were your favorite toppings? Share your photos and stories in the comments below I can’t wait to see what you create! Happy waffle-making! Let me know if you have any questions, and I’ll do my best to help. Enjoy!
Belgian Waffles: The Ultimate Guide to Light and Fluffy Perfection
Light and fluffy homemade Belgian waffles, perfect for a weekend brunch! This recipe features whipped egg whites for an extra airy texture and can be customized with your favorite toppings.
Ingredients
- 2 cups all-purpose flour
- 1 tablespoon baking powder
- 1/4 teaspoon salt
- 2 tablespoons granulated sugar
- 2 large eggs, separated
- 1 3/4 cups milk
- 1/2 cup (1 stick) unsalted butter, melted and slightly cooled
- 1 teaspoon vanilla extract
- Optional toppings: fresh fruit (berries, bananas), whipped cream, chocolate syrup, maple syrup, powdered sugar
Instructions
- Combine the dry ingredients: In a large bowl, whisk together the flour, baking powder, salt, and sugar.
- Separate the eggs: Carefully separate the egg yolks from the egg whites. Place the yolks in a separate medium-sized bowl and the whites in a clean, grease-free bowl.
- Whisk the egg yolks: To the bowl with the egg yolks, add the milk, melted butter (make sure it’s not too hot), and vanilla extract. Whisk until well combined.
- Combine wet and dry ingredients: Gradually add the wet ingredients to the dry ingredients, whisking gently until just combined. Be careful not to overmix.
- Whip the egg whites: Using an electric mixer, beat the egg whites until stiff peaks form.
- Gently fold in the egg whites: Using a rubber spatula, gently fold the whipped egg whites into the batter in two or three additions. Be careful not to deflate the egg whites.
- Let the batter rest (optional): Cover the bowl with plastic wrap and let the batter rest for 10-15 minutes.
- Preheat the waffle iron: Preheat your waffle iron according to the manufacturer’s instructions.
- Grease the waffle iron (if necessary): If your waffle iron isn’t non-stick, lightly grease it with cooking spray or melted butter.
- Pour the batter onto the waffle iron: Pour the batter onto the hot waffle iron, using the amount recommended by the manufacturer.
- Cook the waffles: Close the waffle iron and cook the waffles according to the manufacturer’s instructions, usually for 3-5 minutes, or until they are golden brown and crispy.
- Remove the waffles: Carefully remove the waffles from the waffle iron using a fork or tongs.
- Keep warm (optional): If you’re making a large batch of waffles, you can keep them warm in a preheated oven (200°F) until ready to serve.
- Serve immediately: Serve the waffles immediately while they are still warm and crispy.
- Add your favorite toppings: Top the waffles with your favorite toppings.
- Enjoy!
Notes
- Don’t overmix the batter. A few lumps are okay.
- Make sure the bowl for the egg whites is completely clean.
- Melted butter should be slightly cooled before adding to the egg yolks.
- Letting the batter rest for 10-15 minutes allows the gluten to relax and the baking powder to fully activate, resulting in even lighter and fluffier waffles.
- Don’t open the waffle iron too early.


Leave a Comment