
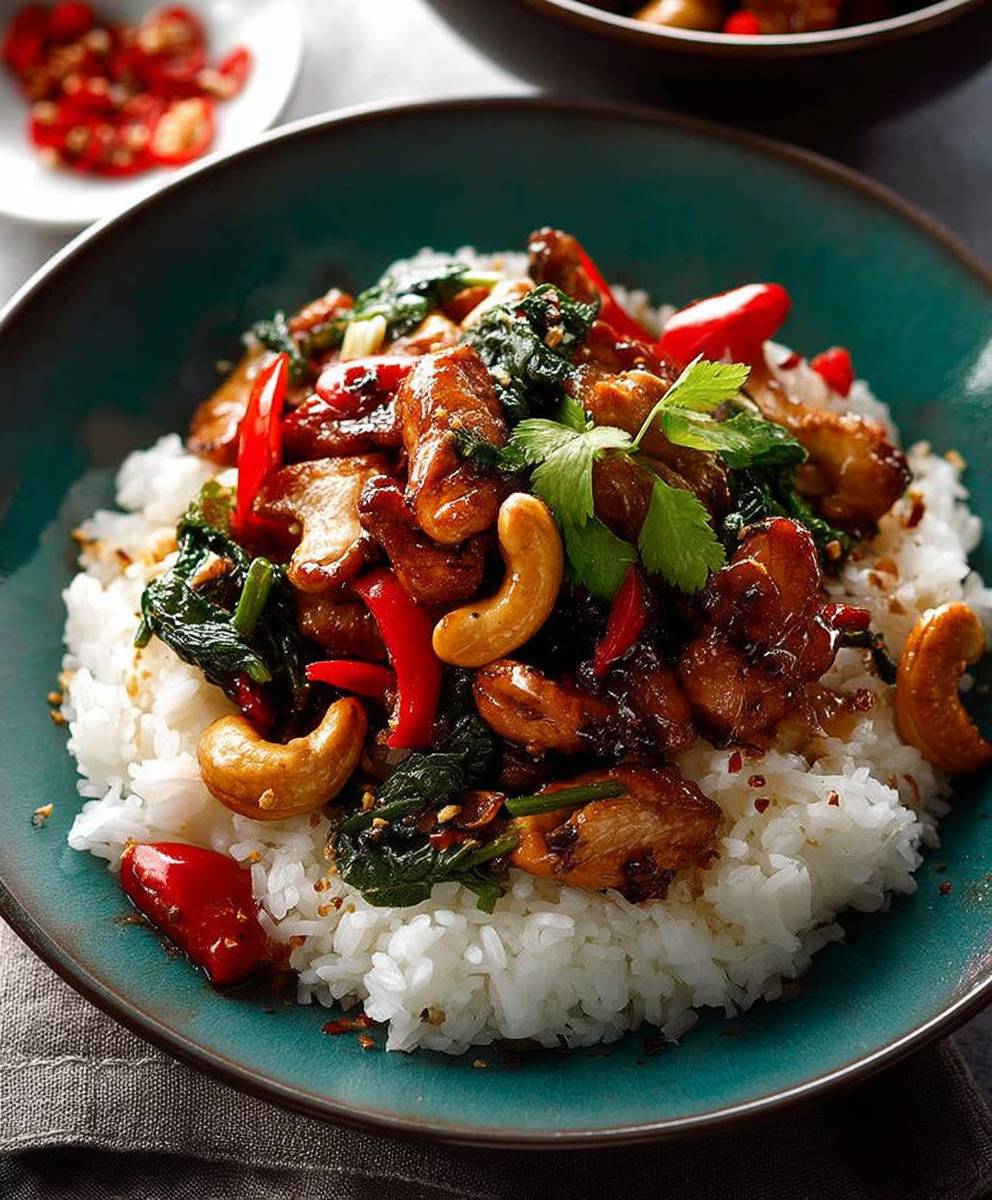
Thai Cashew Chicken: craving a dish that explodes with flavor and comes together faster than you can say “takeout”? Then you’ve landed in the right place! Forget dialing for delivery; I’m going to show you how to create a restaurant-quality version of this beloved Asian-inspired dish right in your own kitchen.
While its exact origins are debated, dishes featuring cashews stir-fried with chicken and vegetables have become a staple in Thai-Chinese cuisine, gaining immense popularity worldwide. The beauty of Thai Cashew Chicken lies in its perfect balance of sweet, savory, and slightly spicy notes, all complemented by the satisfying crunch of roasted cashews.
What makes this dish so irresistible? It’s the symphony of textures tender chicken, crisp vegetables, and those wonderfully nutty cashews. The sauce, a harmonious blend of soy sauce, oyster sauce, honey, and a touch of chili, coats every ingredient, creating an addictive flavor profile that will have you coming back for more. Plus, it’s incredibly convenient! This recipe is quick enough for a weeknight meal, yet impressive enough to serve to guests. Get ready to experience a culinary adventure that’s both delicious and easy!

Ingredients:
- For the Chicken:
- 1.5 lbs boneless, skinless chicken thighs, cut into 1-inch pieces
- 1/4 cup cornstarch
- 1/4 teaspoon salt
- 1/4 teaspoon black pepper
- 1 tablespoon vegetable oil
- For the Sauce:
- 1/4 cup soy sauce
- 2 tablespoons oyster sauce
- 2 tablespoons honey
- 1 tablespoon rice vinegar
- 1 tablespoon cornstarch
- 1 teaspoon sesame oil
- 1/2 teaspoon red pepper flakes (or more, to taste)
- 1/4 cup chicken broth
- For the Vegetables and Aromatics:
- 1 tablespoon vegetable oil
- 4 cloves garlic, minced
- 1 inch ginger, minced
- 1 red bell pepper, cut into 1-inch pieces
- 1 yellow bell pepper, cut into 1-inch pieces
- 1 medium onion, cut into 1-inch pieces
- 1 cup broccoli florets
- 1/2 cup roasted cashews
- 2 green onions, thinly sliced, for garnish
- Optional:
- Cooked white rice, for serving
- Sesame seeds, for garnish
Preparing the Chicken:
Okay, let’s get started with the chicken! This is a crucial step, as we want it to be nice and crispy on the outside while staying juicy inside. Trust me, it’s easier than it sounds!
- Prepare the Chicken Pieces: First, make sure your chicken thighs are cut into roughly 1-inch pieces. This size is perfect for quick cooking and ensures even browning. Pat the chicken pieces dry with paper towels. This helps the cornstarch adhere better and promotes crispiness.
- Coat the Chicken: In a medium bowl, combine the cornstarch, salt, and pepper. Add the chicken pieces to the bowl and toss to coat evenly. Make sure each piece is well-covered with the cornstarch mixture. This coating is what will give us that lovely crispy texture.
- Sear the Chicken: Heat 1 tablespoon of vegetable oil in a large skillet or wok over medium-high heat. Once the oil is shimmering and hot (but not smoking!), add the chicken in a single layer. You might need to do this in batches to avoid overcrowding the pan, which can lower the temperature and result in steamed, rather than seared, chicken.
- Cook Until Golden Brown: Cook the chicken for about 3-4 minutes per side, or until golden brown and cooked through. The internal temperature should reach 165°F (74°C). Remove the chicken from the skillet and set aside. We’ll add it back in later to soak up all that delicious sauce.
Making the Sauce:
Now, let’s move on to the heart of this dish the sauce! This is where all the magic happens, bringing together sweet, savory, and spicy flavors. Don’t be intimidated by the list of ingredients; it’s all about balance and creating that perfect Thai flavor profile.
- Combine the Sauce Ingredients: In a small bowl, whisk together the soy sauce, oyster sauce, honey, rice vinegar, cornstarch, sesame oil, red pepper flakes, and chicken broth. Make sure the cornstarch is fully dissolved to prevent any lumps in the sauce.
- Taste and Adjust: Give the sauce a taste and adjust the seasonings to your liking. If you prefer a sweeter sauce, add a little more honey. For more heat, add more red pepper flakes. If it’s too salty, add a splash more chicken broth. This is your chance to customize the sauce to your personal preference.
- Set Aside: Once you’re happy with the flavor, set the sauce aside. We’ll use it later to coat the chicken and vegetables.
Stir-Frying the Vegetables:
Next up, the veggies! We want them to be tender-crisp, retaining their vibrant colors and nutrients. The key is to stir-fry them quickly over high heat, so they cook evenly without becoming soggy.
- Prepare the Vegetables: Make sure all your vegetables are prepped and ready to go. The bell peppers and onion should be cut into 1-inch pieces, and the broccoli should be separated into florets. Having everything ready beforehand will make the stir-frying process much smoother.
- Sauté the Aromatics: Heat 1 tablespoon of vegetable oil in the same skillet or wok over medium-high heat. Add the minced garlic and ginger and sauté for about 30 seconds, or until fragrant. Be careful not to burn the garlic, as it can become bitter.
- Add the Vegetables: Add the bell peppers, onion, and broccoli to the skillet. Stir-fry for about 5-7 minutes, or until the vegetables are tender-crisp. You want them to be slightly softened but still have a bit of bite.
Bringing It All Together:
Alright, we’re in the home stretch! This is where we combine all the elements the chicken, the sauce, and the vegetables to create the final masterpiece. Get ready for some serious flavor explosion!
- Add the Chicken Back In: Add the cooked chicken back to the skillet with the vegetables.
- Pour in the Sauce: Pour the sauce over the chicken and vegetables. Stir well to coat everything evenly.
- Simmer and Thicken: Bring the sauce to a simmer and cook for about 2-3 minutes, or until the sauce has thickened and coats the chicken and vegetables beautifully. The cornstarch in the sauce will help it thicken up nicely.
- Add the Cashews: Stir in the roasted cashews. This adds a wonderful crunch and nutty flavor to the dish.
- Garnish and Serve: Remove the skillet from the heat. Garnish with thinly sliced green onions and sesame seeds (if using). Serve immediately over cooked white rice.
Tips and Variations:
Here are a few extra tips and ideas to make this Thai Cashew Chicken even more amazing:
- Spice Level: Adjust the amount of red pepper flakes to your liking. If you’re sensitive to spice, start with a small amount and add more as needed. You can also use a pinch of cayenne pepper for extra heat.
- Vegetable Variations: Feel free to substitute or add other vegetables, such as carrots, snap peas, water chestnuts, or bamboo shoots.
- Protein Options: If you’re not a fan of chicken thighs, you can use chicken breast, tofu, or shrimp instead. Just adjust the cooking time accordingly.
- Nut Allergy: If you have a nut allergy, you can omit the cashews or substitute them with sunflower seeds or pumpkin seeds.
- Make it Gluten-Free: To make this dish gluten-free, use tamari instead of soy sauce. Tamari is a gluten-free soy sauce alternative.
- Meal Prep: This dish is great for meal prepping! Store it in an airtight container in the refrigerator for up to 3-4 days. Reheat in the microwave or on the stovetop.
- Serving Suggestions: Serve with steamed rice, brown rice, or quinoa. You can also add a side of stir-fried noodles for a more complete meal.
Enjoy!
I hope you enjoy this delicious and easy Thai Cashew Chicken recipe! It’s a guaranteed crowd-pleaser and a great way to satisfy your cravings for authentic Thai flavors. Happy cooking!
Conclusion:
This Thai Cashew Chicken recipe isn’t just another weeknight dinner; it’s a flavor explosion waiting to happen! From the savory, slightly sweet sauce to the satisfying crunch of the cashews and the tender chicken, every bite is a delightful experience. I truly believe this recipe is a must-try because it delivers authentic Thai flavors without requiring hours in the kitchen or a trip to a specialty grocery store. It’s quick, easy, and incredibly satisfying the trifecta of a perfect weeknight meal!
But the best part? It’s incredibly versatile! Serve it over fluffy jasmine rice for a classic pairing that soaks up all that delicious sauce. Or, for a lower-carb option, try it with cauliflower rice or even zucchini noodles. If you’re feeling adventurous, toss in some extra veggies like bell peppers (red, yellow, or orange for a vibrant touch), broccoli florets, or even some sliced water chestnuts for added texture.
For a spicier kick, add a pinch of red pepper flakes to the sauce or serve with a side of sriracha. If you prefer a milder flavor, you can reduce the amount of chili garlic sauce or omit it altogether. And if you’re looking for a vegetarian option, simply substitute the chicken with tofu or tempeh. Just be sure to press the tofu well to remove excess moisture before stir-frying. You could even use a mix of vegetables like mushrooms, carrots, and snap peas for a hearty and flavorful vegetarian dish.
Serving Suggestions:
* Classic: Serve over jasmine rice with a sprinkle of fresh cilantro.
* Low-Carb: Enjoy with cauliflower rice or zucchini noodles.
* Spicy: Add red pepper flakes or serve with sriracha.
* Vegetarian: Substitute chicken with tofu, tempeh, or a mix of vegetables.
I’ve poured my heart into perfecting this recipe, and I’m confident that you’ll love it as much as I do. It’s a guaranteed crowd-pleaser, whether you’re cooking for your family, friends, or just yourself. The balance of sweet, savory, and slightly spicy flavors is simply irresistible, and the satisfying crunch of the cashews adds the perfect finishing touch.
So, what are you waiting for? Gather your ingredients, fire up your wok (or skillet!), and get ready to experience the magic of homemade Thai Cashew Chicken. I promise you won’t be disappointed.
And most importantly, I want to hear about your experience! Did you make any modifications? Did you add any special ingredients? What did your family think? Share your photos and stories in the comments below. I can’t wait to see your culinary creations and hear how this recipe has become a part of your own kitchen adventures. Happy cooking! Let me know if you have any questions, and I’ll do my best to help. I’m always looking for ways to improve my recipes, so your feedback is invaluable. Enjoy!
Thai Cashew Chicken: A Delicious & Easy Recipe
Quick and easy Thai Cashew Chicken with tender chicken, crisp vegetables, and a flavorful sauce. Perfect for a weeknight dinner!
Ingredients
- 1.5 lbs boneless, skinless chicken thighs, cut into 1-inch pieces
- 1/4 cup cornstarch
- 1/4 teaspoon salt
- 1/4 teaspoon black pepper
- 1 tablespoon vegetable oil
- 1/4 cup soy sauce
- 2 tablespoons oyster sauce
- 2 tablespoons honey
- 1 tablespoon rice vinegar
- 1 tablespoon cornstarch
- 1 teaspoon sesame oil
- 1/2 teaspoon red pepper flakes (or more, to taste)
- 1/4 cup chicken broth
- 1 tablespoon vegetable oil
- 4 cloves garlic, minced
- 1 inch ginger, minced
- 1 red bell pepper, cut into 1-inch pieces
- 1 yellow bell pepper, cut into 1-inch pieces
- 1 medium onion, cut into 1-inch pieces
- 1 cup broccoli florets
- 1/2 cup roasted cashews
- 2 green onions, thinly sliced, for garnish
- Cooked white rice, for serving
- Sesame seeds, for garnish
Instructions
- Cut chicken thighs into 1-inch pieces. Pat dry with paper towels.
- In a medium bowl, combine cornstarch, salt, and pepper. Add chicken and toss to coat evenly.
- Heat 1 tablespoon of vegetable oil in a large skillet or wok over medium-high heat. Add chicken in a single layer (cook in batches if needed).
- Cook for 3-4 minutes per side, until golden brown and cooked through (internal temperature of 165°F/74°C). Remove from skillet and set aside.
- In a small bowl, whisk together soy sauce, oyster sauce, honey, rice vinegar, cornstarch, sesame oil, red pepper flakes, and chicken broth. Ensure cornstarch is fully dissolved.
- Taste the sauce and adjust seasonings to your liking (more honey for sweetness, more red pepper flakes for heat, more chicken broth if too salty).
- Cut bell peppers and onion into 1-inch pieces. Separate broccoli into florets.
- Heat 1 tablespoon of vegetable oil in the same skillet or wok over medium-high heat. Add minced garlic and ginger and sauté for about 30 seconds, until fragrant.
- Add bell peppers, onion, and broccoli to the skillet. Stir-fry for about 5-7 minutes, until tender-crisp.
- Add the cooked chicken back to the skillet with the vegetables.
- Pour the sauce over the chicken and vegetables. Stir well to coat everything evenly.
- Bring the sauce to a simmer and cook for about 2-3 minutes, until the sauce has thickened and coats the chicken and vegetables.
- Stir in the roasted cashews.
- Remove the skillet from the heat. Garnish with thinly sliced green onions and sesame seeds (if using). Serve immediately over cooked white rice.
Notes
- Spice Level: Adjust red pepper flakes to your preference.
- Vegetable Variations: Substitute or add other vegetables like carrots, snap peas, water chestnuts, or bamboo shoots.
- Protein Options: Use chicken breast, tofu, or shrimp instead of chicken thighs. Adjust cooking time accordingly.
- Nut Allergy: Omit cashews or substitute with sunflower seeds or pumpkin seeds.
- Gluten-Free: Use tamari instead of soy sauce.
- Meal Prep: Store in an airtight container in the refrigerator for up to 3-4 days. Reheat in the microwave or on the stovetop.
- Serving Suggestions: Serve with steamed rice, brown rice, or quinoa. Add a side of stir-fried noodles.


Leave a Comment