
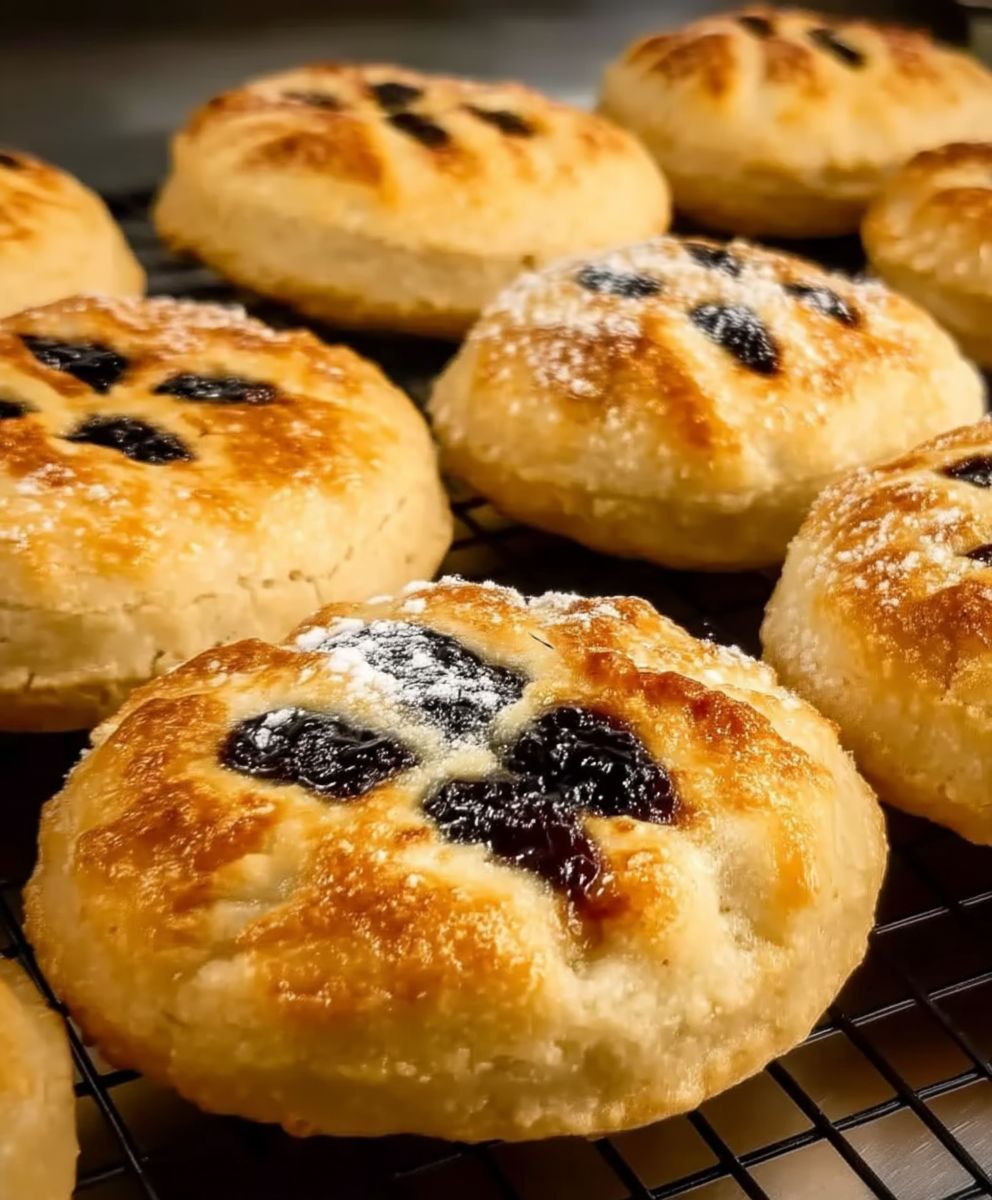
Ultimate Eccles Cakes: Prepare to be transported to a world of flaky pastry, sweet currants, and a hint of spice with this irresistible recipe! Have you ever bitten into a treat that perfectly balances sweet and savory, crisp and chewy? That’s precisely what awaits you with these delightful Lancashire treasures.
Eccles cakes, named after the town of Eccles near Manchester, England, have a history stretching back to the 18th century. While their exact origins are shrouded in a bit of mystery, it’s believed they were first sold commercially around 1793. These little cakes quickly became a local favorite, and their popularity has endured for centuries. The beauty of ultimate Eccles Cakes lies in their simplicity and the satisfying contrast of textures and flavors. The buttery, flaky pastry gives way to a rich, moist filling of currants, sugar, and spices, creating a truly unforgettable experience.
People adore Eccles cakes for several reasons. Their compact size makes them perfect for a quick snack or a delightful addition to afternoon tea. The combination of sweet currants and warming spices like nutmeg and cinnamon creates a comforting and nostalgic flavor profile. Plus, the satisfying crunch of the pastry provides a textural contrast that keeps you coming back for more. Whether you’re a seasoned baker or a novice in the kitchen, this recipe for ultimate Eccles Cakes is sure to impress. So, let’s roll up our sleeves and embark on a baking adventure that will tantalize your taste buds and fill your home with the aroma of freshly baked goodness!

Ingredients:
- For the Flaky Pastry:
- 300g (10.5 oz) plain flour, plus extra for dusting
- 250g (8.8 oz) cold unsalted butter, cubed
- Pinch of salt
- 120-150ml (4-5 fl oz) ice-cold water
- For the Filling:
- 225g (8 oz) currants
- 50g (1.8 oz) butter, melted
- 50g (1.8 oz) light muscovado sugar
- 25g (0.9 oz) mixed peel, finely chopped
- 1/4 teaspoon ground mixed spice
- Zest of 1 lemon
- For the Glaze:
- 1 tablespoon milk
- 1 tablespoon caster sugar
Making the Flaky Pastry:
- Prepare the Flour and Butter: In a large bowl, sift the flour and salt together. Add the cubed cold butter. The key here is to keep everything cold! This prevents the butter from melting into the flour, which is crucial for creating those lovely flaky layers.
- Rub in the Butter (Partially): Using your fingertips, lightly rub the butter into the flour. Don’t overwork it! You want to leave some visible chunks of butter about the size of peas or even slightly larger. This is what creates the flakiness. If the butter gets too warm, the pastry will be tough.
- Add the Water: Gradually add the ice-cold water, a tablespoon at a time, mixing lightly with a knife or spatula after each addition. Be careful not to add too much water at once. You want the dough to come together into a shaggy mass, but it shouldn’t be sticky.
- Form the Dough: Gently bring the dough together with your hands. Don’t knead it! Just press it together until it forms a rough ball. If it’s too dry, add a tiny bit more water. If it’s too wet, add a little more flour.
- First Rest and Roll: Lightly flour a clean work surface. Roll the dough into a rectangle, about 30cm x 20cm (12 inches x 8 inches).
- First Fold: Fold the top third of the rectangle down to the center, and then fold the bottom third up and over the top, like folding a letter. This creates the first set of layers.
- Wrap and Chill: Wrap the dough tightly in cling film and chill in the refrigerator for at least 30 minutes. This allows the gluten to relax and the butter to firm up again.
- Second Rest and Roll: After 30 minutes, remove the dough from the refrigerator and place it on a lightly floured surface. Rotate the dough 90 degrees (so the open ends are to your left and right) and repeat the rolling and folding process as described in steps 5 and 6.
- Second Fold: Roll the dough into a rectangle, about 30cm x 20cm (12 inches x 8 inches). Fold the top third of the rectangle down to the center, and then fold the bottom third up and over the top, like folding a letter.
- Wrap and Chill Again: Wrap the dough tightly in cling film and chill in the refrigerator for another 30 minutes. This second rest is crucial for developing even more layers.
- Third Rest and Roll: Repeat the rolling and folding process one more time. This will give you a total of three folds, which is perfect for flaky pastry.
- Final Chill: Wrap the dough tightly in cling film and chill in the refrigerator for at least 1 hour, or even better, overnight. This allows the pastry to fully relax and will make it easier to work with.
Preparing the Filling:
- Combine the Ingredients: In a medium bowl, combine the currants, melted butter, muscovado sugar, mixed peel, mixed spice, and lemon zest. Mix well to ensure all the ingredients are evenly distributed.
- Let it Sit: Cover the bowl and let the filling sit for at least 30 minutes, or even longer. This allows the currants to plump up and absorb the flavors.
Assembling and Baking the Eccles Cakes:
- Preheat the Oven: Preheat your oven to 200°C (400°F/Gas Mark 6). Line a baking sheet with parchment paper.
- Roll Out the Pastry: Remove the pastry from the refrigerator and place it on a lightly floured surface. Roll it out to a thickness of about 3mm (1/8 inch).
- Cut Out Circles: Using a round cutter (about 8-10cm/3-4 inches in diameter), cut out circles from the pastry. You should get about 10-12 circles, depending on the size of your cutter.
- Fill the Circles: Place a generous spoonful of the currant filling in the center of each pastry circle. Don’t overfill them, or they will be difficult to seal.
- Shape the Cakes: Bring the edges of the pastry circle up and over the filling, pinching them together to seal. Make sure the seal is tight to prevent the filling from leaking out during baking.
- Flatten and Shape: Gently flatten each filled pastry ball with your hand. Then, using a rolling pin, roll it out into a slightly flattened circle, about 8-10cm (3-4 inches) in diameter.
- Score the Tops: Using a sharp knife, make three shallow cuts on the top of each cake in a radial pattern. This allows steam to escape during baking and helps the cakes to puff up evenly.
- Glaze the Cakes: In a small bowl, mix together the milk and caster sugar to make the glaze. Brush the tops of the Eccles cakes with the glaze. This will give them a lovely golden color and a slightly sweet crust.
- Bake: Place the Eccles cakes on the prepared baking sheet and bake for 15-20 minutes, or until they are golden brown and the pastry is cooked through.
- Cool and Serve: Remove the Eccles cakes from the oven and let them cool on a wire rack for a few minutes before serving. They are best served warm, but they are also delicious at room temperature.
Tips for Perfect Eccles Cakes:
- Keep everything cold: This is the most important tip for making flaky pastry. Make sure your butter and water are ice-cold.
- Don’t overwork the dough: Overworking the dough will develop the gluten and make the pastry tough.
- Rest the dough: Resting the dough allows the gluten to relax and the butter to firm up, which will result in a flakier pastry.
- Don’t overfill the cakes: Overfilling the cakes will make them difficult to seal and the filling may leak out during baking.
- Score the tops: Scoring the tops of the cakes allows steam to escape and helps them to puff up evenly.
- Use good quality ingredients: Using good quality ingredients will make a big difference in the flavor of your Eccles cakes.
Variations:
- Add spices: You can add other spices to the filling, such as cinnamon, nutmeg, or cloves.
- Add nuts: You can add chopped nuts to the filling, such as walnuts or almonds.
- Use different dried fruits: You can use other dried fruits in the filling, such as raisins, sultanas, or dried cranberries.
- Make mini Eccles cakes: You can use a smaller cutter to make mini Eccles cakes.
- Add a touch of rum or brandy: A tablespoon of rum or brandy added to the filling can enhance the flavor.
Enjoy your homemade Eccles cakes! They are a delicious treat that is perfect for afternoon tea or any time you want a little something sweet.
Conclusion:
And there you have it! These aren’t just any Eccles Cakes; they’re Ultimate Eccles Cakes, a delightful explosion of flaky pastry, sweet currants, and that hint of spice that makes them utterly irresistible. I truly believe this recipe is a must-try for anyone who appreciates a classic British bake with a homemade touch. The combination of textures and flavors is simply divine, and the satisfaction of creating these little pockets of joy from scratch is unparalleled.
Why is this recipe a must-try? Well, beyond the incredible taste, it’s about the experience. It’s about connecting with a baking tradition, about filling your kitchen with the warm, comforting aroma of baking spices, and about sharing something truly special with your loved ones. Forget the store-bought versions once you’ve tasted these homemade Eccles Cakes, you’ll never go back! The flaky, buttery pastry encasing the sweet, spiced currant filling is a symphony of flavors and textures that will leave you wanting more. Plus, you have complete control over the ingredients, ensuring the highest quality and freshness in every bite.
But the fun doesn’t stop there! Feel free to experiment with variations to make these Eccles Cakes truly your own. For a richer flavor, try soaking the currants in rum or brandy overnight. A sprinkle of demerara sugar on top before baking adds a delightful crunch. You could even add a touch of orange or lemon zest to the pastry for a citrusy twist.
Serving suggestions? Oh, the possibilities are endless! These Eccles Cakes are perfect served warm with a dollop of clotted cream or a scoop of vanilla ice cream. They’re also delicious enjoyed with a cup of tea or coffee. For a more decadent treat, try drizzling them with a simple icing made from powdered sugar and a little milk or lemon juice. They make a wonderful addition to afternoon tea, a delightful snack, or even a light dessert. Imagine serving these warm, fragrant Eccles Cakes to your friends and family they’ll be absolutely delighted!
I’m so confident that you’ll love this recipe. It might seem a little daunting at first, but I’ve broken it down into easy-to-follow steps, and I’m here to guide you every step of the way. Don’t be afraid to get your hands dirty and embrace the process. Baking is a labor of love, and the reward is well worth the effort.
So, what are you waiting for? Gather your ingredients, preheat your oven, and get ready to embark on a baking adventure. I promise you won’t regret it. And most importantly, don’t forget to share your creations with me! I’d love to see your photos and hear about your experiences. Tag me on social media using #UltimateEcclesCakes or leave a comment below. I can’t wait to see your delicious creations and hear how much you enjoyed this recipe. Happy baking! I hope you enjoy making and eating these Ultimate Eccles Cakes as much as I do!
Ultimate Eccles Cakes: The Only Recipe You'll Ever Need
Flaky, buttery Eccles cakes filled with a sweet and spiced currant mixture. A classic British treat perfect warm with a cup of tea.
Ingredients
- 300g (10.5 oz) plain flour, plus extra for dusting
- 250g (8.8 oz) cold unsalted butter, cubed
- Pinch of salt
- 120-150ml (4-5 fl oz) ice-cold water
- 225g (8 oz) currants
- 50g (1.8 oz) butter, melted
- 50g (1.8 oz) light muscovado sugar
- 25g (0.9 oz) mixed peel, finely chopped
- 1/4 teaspoon ground mixed spice
- Zest of 1 lemon
- 1 tablespoon milk
- 1 tablespoon caster sugar
Instructions
- In a large bowl, sift the flour and salt together. Add the cubed cold butter. The key here is to keep everything cold! This prevents the butter from melting into the flour, which is crucial for creating those lovely flaky layers.
- Using your fingertips, lightly rub the butter into the flour. Don’t overwork it! You want to leave some visible chunks of butter about the size of peas or even slightly larger. This is what creates the flakiness. If the butter gets too warm, the pastry will be tough.
- Gradually add the ice-cold water, a tablespoon at a time, mixing lightly with a knife or spatula after each addition. Be careful not to add too much water at once. You want the dough to come together into a shaggy mass, but it shouldn’t be sticky.
- Gently bring the dough together with your hands. Don’t knead it! Just press it together until it forms a rough ball. If it’s too dry, add a tiny bit more water. If it’s too wet, add a little more flour.
- Lightly flour a clean work surface. Roll the dough into a rectangle, about 30cm x 20cm (12 inches x 8 inches).
- Fold the top third of the rectangle down to the center, and then fold the bottom third up and over the top, like folding a letter. This creates the first set of layers.
- Wrap the dough tightly in cling film and chill in the refrigerator for at least 30 minutes. This allows the gluten to relax and the butter to firm up again.
- After 30 minutes, remove the dough from the refrigerator and place it on a lightly floured surface. Rotate the dough 90 degrees (so the open ends are to your left and right) and repeat the rolling and folding process as described in steps 5 and 6.
- Roll the dough into a rectangle, about 30cm x 20cm (12 inches x 8 inches). Fold the top third of the rectangle down to the center, and then fold the bottom third up and over the top, like folding a letter.
- Wrap the dough tightly in cling film and chill in the refrigerator for another 30 minutes. This second rest is crucial for developing even more layers.
- Repeat the rolling and folding process one more time. This will give you a total of three folds, which is perfect for flaky pastry.
- Wrap the dough tightly in cling film and chill in the refrigerator for at least 1 hour, or even better, overnight. This allows the pastry to fully relax and will make it easier to work with.
- In a medium bowl, combine the currants, melted butter, muscovado sugar, mixed peel, mixed spice, and lemon zest. Mix well to ensure all the ingredients are evenly distributed.
- Cover the bowl and let the filling sit for at least 30 minutes, or even longer. This allows the currants to plump up and absorb the flavors.
- Preheat your oven to 200°C (400°F/Gas Mark 6). Line a baking sheet with parchment paper.
- Remove the pastry from the refrigerator and place it on a lightly floured surface. Roll it out to a thickness of about 3mm (1/8 inch).
- Using a round cutter (about 8-10cm/3-4 inches in diameter), cut out circles from the pastry. You should get about 10-12 circles, depending on the size of your cutter.
- Place a generous spoonful of the currant filling in the center of each pastry circle. Don’t overfill them, or they will be difficult to seal.
- Bring the edges of the pastry circle up and over the filling, pinching them together to seal. Make sure the seal is tight to prevent the filling from leaking out during baking.
- Gently flatten each filled pastry ball with your hand. Then, using a rolling pin, roll it out into a slightly flattened circle, about 8-10cm (3-4 inches) in diameter.
- Using a sharp knife, make three shallow cuts on the top of each cake in a radial pattern. This allows steam to escape during baking and helps the cakes to puff up evenly.
- In a small bowl, mix together the milk and caster sugar to make the glaze. Brush the tops of the Eccles cakes with the glaze. This will give them a lovely golden color and a slightly sweet crust.
- Place the Eccles cakes on the prepared baking sheet and bake for 15-20 minutes, or until they are golden brown and the pastry is cooked through.
- Remove the Eccles cakes from the oven and let them cool on a wire rack for a few minutes before serving. They are best served warm, but they are also delicious at room temperature.
Notes
- Keep everything cold: This is the most important tip for making flaky pastry. Make sure your butter and water are ice-cold.
- Don’t overwork the dough: Overworking the dough will develop the gluten and make the pastry tough.
- Rest the dough: Resting the dough allows the gluten to relax and the butter to firm up, which will result in a flakier pastry.
- Don’t overfill the cakes: Overfilling the cakes will make them difficult to seal and the filling may leak out during baking.
- Score the tops: Scoring the tops of the cakes allows steam to escape and helps them to puff up evenly.
- Use good quality ingredients: Using good quality ingredients will make a big difference in the flavor of your Eccles cakes.
- Variations:
- Add spices: You can add other spices to the filling, such as cinnamon, nutmeg, or cloves.
- Add nuts: You can add chopped nuts to the filling, such as walnuts or almonds.
- Use different dried fruits: You can use other dried fruits in the filling, such as raisins, sultanas, or dried cranberries.
- Make mini Eccles cakes: You can use a smaller cutter to make mini Eccles cakes.
- Add a touch of rum or brandy: A tablespoon of rum or brandy added to the filling can enhance the flavor.

Leave a Comment