
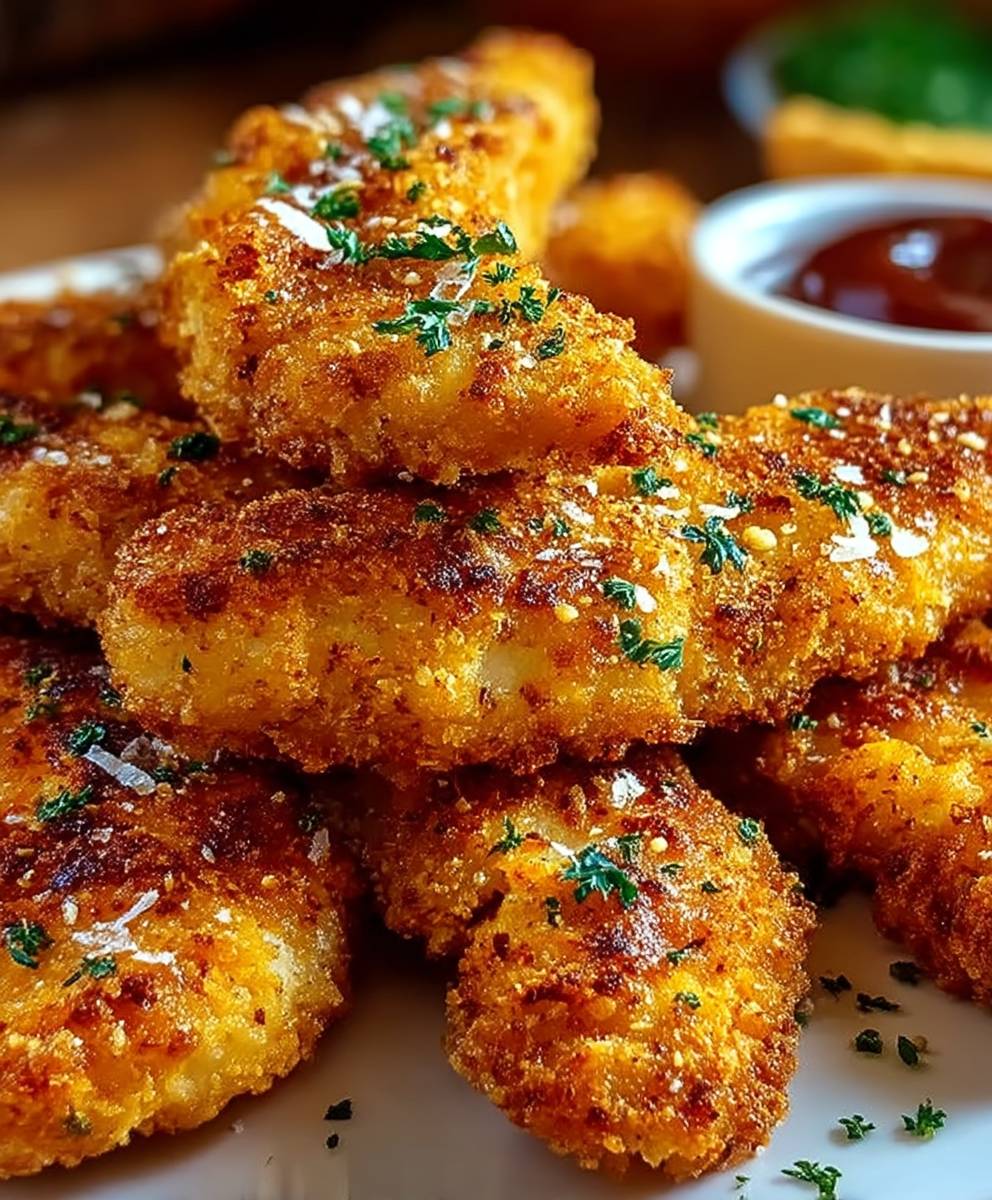
Baked Chicken Tenders: Forget greasy fast food! Are you craving that satisfying crunch and juicy tenderness of chicken tenders, but without the guilt? I’ve got you covered. My recipe for perfectly Baked Chicken Tenders delivers all the flavor and texture you love, but baked to golden perfection in your oven.
Chicken tenders, a beloved staple in American cuisine, have evolved from simple kid-friendly fare to a versatile dish enjoyed by people of all ages. While their exact origins are debated, they gained popularity in the late 20th century, quickly becoming a restaurant and home-cooking favorite. Their appeal lies in their simplicity and adaptability a blank canvas for countless flavor combinations.
What makes these baked chicken tenders so irresistible? It’s the perfect balance of crispy coating and tender, juicy chicken. Baking them instead of frying cuts down on the fat and calories, making them a healthier option without sacrificing flavor. Plus, they’re incredibly easy to make! Whether you’re looking for a quick weeknight dinner, a crowd-pleasing appetizer, or a fun snack, these baked chicken tenders are sure to be a hit. Get ready to experience chicken tender perfection, the healthy way!

Ingredients:
- 1.5 lbs boneless, skinless chicken breasts, cut into 1-inch thick strips
- 1 cup all-purpose flour
- 1 teaspoon salt
- 1/2 teaspoon black pepper
- 1 teaspoon garlic powder
- 1/2 teaspoon paprika
- 1/4 teaspoon cayenne pepper (optional, for a little kick!)
- 2 large eggs
- 1/4 cup milk
- 1 cup panko breadcrumbs
- 1/2 cup grated Parmesan cheese
- 2 tablespoons olive oil
- Cooking spray
Preparing the Chicken and Breading Station
- Prepare the Chicken: First things first, let’s get our chicken ready. Take your chicken breasts and cut them into strips that are about 1-inch thick. This size is perfect for even cooking and a satisfying bite. Make sure they are relatively uniform in size so they cook at the same rate.
- Set up the Flour Mixture: In a shallow dish, whisk together the flour, salt, pepper, garlic powder, paprika, and cayenne pepper (if you’re using it). This is our first layer of flavor and helps the egg mixture adhere properly. Make sure everything is well combined.
- Prepare the Egg Wash: In another shallow dish, whisk together the eggs and milk until they are fully combined and slightly frothy. This will help the breadcrumbs stick to the chicken.
- Create the Panko Mixture: In a third shallow dish, combine the panko breadcrumbs and grated Parmesan cheese. The Parmesan adds a lovely savory and cheesy flavor to the tenders. Mix well to ensure the cheese is evenly distributed throughout the breadcrumbs.
Breading the Chicken Tenders
- Dredge in Flour: Take each chicken strip and dredge it thoroughly in the flour mixture, making sure to coat all sides. Shake off any excess flour. This step is crucial for creating a good base for the egg wash and breadcrumbs to stick to.
- Dip in Egg Wash: Next, dip the floured chicken strip into the egg wash, ensuring it’s completely coated. Let any excess egg drip off before moving on to the next step.
- Coat with Panko Mixture: Finally, press the chicken strip into the panko breadcrumb mixture, making sure to coat it evenly on all sides. Press gently to help the breadcrumbs adhere firmly. You want a nice, thick coating of breadcrumbs for that perfect crispy texture.
- Repeat: Repeat the breading process for all the remaining chicken strips. It can get a little messy, but it’s totally worth it!
Baking the Chicken Tenders
- Preheat Oven: Preheat your oven to 400°F (200°C). This temperature is ideal for baking the chicken tenders to a golden brown and ensuring they are cooked through.
- Prepare Baking Sheet: Lightly grease a baking sheet with cooking spray. This will prevent the chicken tenders from sticking to the pan. You can also line the baking sheet with parchment paper for easier cleanup.
- Arrange Chicken Tenders: Arrange the breaded chicken tenders on the prepared baking sheet in a single layer, making sure they are not overcrowded. Overcrowding can cause the chicken to steam instead of bake, resulting in less crispy tenders.
- Drizzle with Olive Oil: Drizzle the chicken tenders with olive oil. This will help them get nice and golden brown and add a touch of richness.
- Bake: Bake in the preheated oven for 20-25 minutes, or until the chicken is cooked through and the breadcrumbs are golden brown and crispy. The internal temperature of the chicken should reach 165°F (74°C). Use a meat thermometer to check for doneness.
- Flip (Optional): For even browning, you can flip the chicken tenders halfway through the baking time. This will ensure that both sides are equally crispy.
- Broil (Optional): If you want extra crispy chicken tenders, you can broil them for the last 1-2 minutes of baking. Keep a close eye on them, as they can burn quickly under the broiler.
Serving and Enjoying Your Baked Chicken Tenders
- Let Rest: Once the chicken tenders are done, remove them from the oven and let them rest for a few minutes before serving. This allows the juices to redistribute, resulting in more tender and flavorful chicken.
- Serve: Serve the baked chicken tenders immediately while they are still warm and crispy.
- Dipping Sauces: These baked chicken tenders are delicious on their own, but they are even better with your favorite dipping sauces. Here are a few suggestions:
- Honey Mustard
- BBQ Sauce
- Ranch Dressing
- Ketchup
- Sweet Chili Sauce
- Sides: Serve the chicken tenders with your favorite sides, such as:
- French Fries
- Sweet Potato Fries
- Coleslaw
- Mac and Cheese
- Salad
- Storage: Store any leftover chicken tenders in an airtight container in the refrigerator for up to 3-4 days. Reheat them in the oven or air fryer for the best results. Microwaving can make them a bit soggy.
Tips for the Best Baked Chicken Tenders
- Pound the Chicken: For even cooking, you can lightly pound the chicken breasts to an even thickness before cutting them into strips. This will ensure that they cook at the same rate.
- Don’t Overcrowd the Pan: Make sure to arrange the chicken tenders in a single layer on the baking sheet, without overcrowding. This will allow them to bake evenly and get crispy. If necessary, bake them in batches.
- Use Fresh Breadcrumbs: For the best flavor and texture, use fresh panko breadcrumbs. You can also make your own by pulsing stale bread in a food processor.
- Add Spices to the Breadcrumbs: Feel free to add other spices to the breadcrumb mixture, such as onion powder, dried herbs, or chili powder.
- Adjust Baking Time: The baking time may vary depending on the thickness of the chicken tenders and your oven. Use a meat thermometer to ensure that the chicken is cooked through.
- Make it Gluten-Free: To make these chicken tenders gluten-free, simply substitute the all-purpose flour with a gluten-free flour blend and use gluten-free breadcrumbs.
Variations
- Spicy Chicken Tenders: Add more cayenne pepper or a pinch of chili flakes to the flour mixture for a spicier kick.
- Lemon Pepper Chicken Tenders: Add lemon zest and lemon pepper seasoning to the flour mixture for a bright and flavorful twist.
- Italian Chicken Tenders: Add Italian seasoning and garlic powder to the flour mixture and use Italian-style breadcrumbs.
- Honey Garlic Chicken Tenders: After baking, toss the chicken tenders in a honey garlic sauce for a sweet and savory treat.
Conclusion:
And there you have it! These Baked Chicken Tenders are truly a game-changer. Forget greasy, calorie-laden fast food this recipe delivers all the satisfying crunch and flavor you crave, but with a fraction of the guilt. I genuinely believe this will become a staple in your household, just as it has in mine. The simplicity of the preparation, combined with the incredible taste, makes it a winner for busy weeknights or even a fun weekend cooking project with the kids.
But why is this recipe a must-try? It’s more than just convenience. It’s about enjoying a delicious, wholesome meal that you can feel good about. The perfectly seasoned breading creates a delightful crispy texture that contrasts beautifully with the juicy, tender chicken inside. Plus, baking them instead of frying significantly reduces the fat content without sacrificing any of the flavor. It’s a win-win!
Now, let’s talk about serving suggestions and variations. The possibilities are endless! For a classic pairing, serve these Baked Chicken Tenders with your favorite dipping sauces. Ketchup, honey mustard, ranch dressing, or even a spicy sriracha mayo are all fantastic choices. On the side, consider some crispy sweet potato fries, a fresh garden salad, or some steamed broccoli for a complete and balanced meal.
Looking to spice things up? Try adding a pinch of cayenne pepper or some smoked paprika to the breadcrumb mixture for a little extra heat. You could also experiment with different herbs and spices to create your own unique flavor profile. Italian seasoning, garlic powder, onion powder, or even a touch of curry powder can all add a delicious twist.
For a fun and interactive meal, set up a “chicken tender bar” with a variety of dipping sauces, toppings, and sides. This is a great way to get everyone involved and let them customize their own perfect bite. Think shredded lettuce, diced tomatoes, shredded cheese, and even some crumbled bacon for an extra indulgent treat.
If you’re looking for a healthier option, you can easily swap out the regular breadcrumbs for whole wheat breadcrumbs or even crushed cornflakes for a gluten-free alternative. You can also use boneless, skinless chicken breasts cut into strips for a leaner protein source.
Don’t be afraid to get creative and experiment with different variations to find your perfect combination. The beauty of this recipe is that it’s so versatile and adaptable to your own personal preferences.
I am confident that you will love these Baked Chicken Tenders as much as I do. They are a quick, easy, and delicious way to enjoy a classic comfort food without all the unhealthy baggage. So, what are you waiting for? Head to the kitchen, gather your ingredients, and get ready to experience chicken tender perfection!
I’m so excited for you to try this recipe! Once you’ve made it, please come back and share your experience in the comments below. I’d love to hear what you thought, what variations you tried, and any tips or tricks you discovered along the way. Your feedback is invaluable and helps me to continue creating recipes that you’ll love. Happy cooking!
Baked Chicken Tenders: The Crispiest, Healthiest Recipe You'll Ever Need
Crispy baked chicken tenders are a healthier alternative to fried, perfect for a quick and easy weeknight meal. These tenders are coated in a flavorful panko and Parmesan breadcrumb mixture and baked to golden perfection.
Ingredients
- 1.5 lbs boneless, skinless chicken breasts, cut into 1-inch thick strips
- 1 cup all-purpose flour
- 1 teaspoon salt
- 1/2 teaspoon black pepper
- 1 teaspoon garlic powder
- 1/2 teaspoon paprika
- 1/4 teaspoon cayenne pepper (optional)
- 2 large eggs
- 1/4 cup milk
- 1 cup panko breadcrumbs
- 1/2 cup grated Parmesan cheese
- 2 tablespoons olive oil
- Cooking spray
Instructions
- Prepare the Chicken: Cut chicken breasts into 1-inch thick strips.
- Set up Flour Mixture: In a shallow dish, whisk together flour, salt, pepper, garlic powder, paprika, and cayenne pepper (if using).
- Prepare Egg Wash: In another shallow dish, whisk together eggs and milk.
- Create Panko Mixture: In a third shallow dish, combine panko breadcrumbs and grated Parmesan cheese.
- Dredge in Flour: Dredge each chicken strip in the flour mixture, shaking off excess.
- Dip in Egg Wash: Dip the floured chicken strip into the egg wash, letting excess drip off.
- Coat with Panko Mixture: Press the chicken strip into the panko breadcrumb mixture, coating evenly.
- Repeat: Repeat the breading process for all remaining chicken strips.
- Preheat Oven: Preheat oven to 400°F (200°C).
- Prepare Baking Sheet: Lightly grease a baking sheet with cooking spray.
- Arrange Chicken Tenders: Arrange breaded chicken tenders on the prepared baking sheet in a single layer.
- Drizzle with Olive Oil: Drizzle the chicken tenders with olive oil.
- Bake: Bake for 20-25 minutes, or until chicken is cooked through and breadcrumbs are golden brown and crispy. Internal temperature should reach 165°F (74°C).
- Flip (Optional): For even browning, flip the chicken tenders halfway through baking.
- Broil (Optional): For extra crispy chicken tenders, broil for the last 1-2 minutes, watching carefully.
- Let Rest: Let the chicken tenders rest for a few minutes before serving.
- Serve: Serve immediately with your favorite dipping sauces and sides.
Notes
- For even cooking, lightly pound chicken breasts to an even thickness before cutting into strips.
- Don’t overcrowd the baking sheet; bake in batches if necessary.
- Use fresh panko breadcrumbs for the best flavor and texture.
- Add spices to the breadcrumb mixture, such as onion powder, dried herbs, or chili powder.
- Baking time may vary; use a meat thermometer to ensure chicken is cooked through.
- To make gluten-free, substitute all-purpose flour with a gluten-free flour blend and use gluten-free breadcrumbs.

Leave a Comment