
Easy Pumpkin Cake Pops are truly a delightful autumn treat, combining the festive flavors of the season with an irresistibly charming, portable design. As the air turns crisp and leaves begin to display their vibrant hues, our cravings naturally shift towards the warm, comforting spices of pumpkin. While pies and lattes are autumn staples, there’s something uniquely enchanting about a perfectly portioned, incredibly moist cake pop that captures the essence of fall in every bite. I find these adorable confections instantly elevate any gathering, whether it’s a casual get-together or a more formal holiday celebration.
The cake pop itself has evolved into a beloved modern classic, transforming traditional cake into a fun, bite-sized experience. When infused with the quintessential flavors of the harvest season, they become an instant crowd-pleaser. What makes this recipe so special is its genuine simplicity; I’ve crafted it to ensure that even novice bakers can achieve stunning, bakery-quality results. That’s why I’m so thrilled to share my ultimate guide to creating these Easy Pumpkin Cake Pops; they’re not just incredibly delicious and visually appealing, but also surprisingly straightforward to master, bringing immense joy without any unnecessary fuss. Get ready to impress your friends and family with these charming, spice-infused masterpieces!

Ingredients:
-
For the Moist Pumpkin Cake:
- 2 ½ cups (300g) all-purpose flour, sifted
- 2 teaspoons baking powder
- 1 teaspoon baking soda
- 2 teaspoons ground cinnamon
- 1 teaspoon ground ginger
- ½ teaspoon ground nutmeg
- ¼ teaspoon ground cloves (or a pinch of allspice for a milder flavor)
- ½ teaspoon salt
- 1 ½ cups (300g) granulated sugar
- ½ cup (100g) packed light brown sugar
- ¾ cup (180ml) vegetable oil (or canola oil)
- 2 large eggs, at room temperature
- 1 teaspoon vanilla extract
- 1 (15-ounce / 425g) can pure pumpkin puree (make sure it’s not pumpkin pie filling)
-
For the Cream Cheese Frosting (Binding Agent):
- 4 ounces (113g) cream cheese, softened
- ¼ cup (56g) unsalted butter, softened
- 1 ½ cups (180g) powdered sugar (confectioners’ sugar), sifted
- ½ teaspoon vanilla extract
- 1-2 tablespoons milk or heavy cream (optional, for consistency)
-
For the Candy Coating and Decorations:
- 24 ounces (680g) orange candy melts (or white, dark, or milk chocolate for variation)
- 6 ounces (170g) white candy melts (for drizzle or additional decoration)
- 1-2 tablespoons paramount crystals or vegetable shortening (optional, for thinning coating)
- Assorted fall-themed sprinkles, edible glitter, or piping gel for detail
-
Essential Equipment:
- 9×13 inch baking pan
- Large mixing bowls
- Electric mixer (stand or hand-held)
- Rubber spatula
- Wire cooling rack
- Small cookie scoop (for portioning cake pop balls)
- Cake pop sticks (approx. 40-50, 6-inch length)
- Tall, narrow microwave-safe glass or mug (for dipping)
- Styrofoam block or cake pop stand (for drying)
- Parchment paper or silicone baking mats
- Optional: Food processor (for crumbling cake)
- Optional: Piping bags with small round tips (for fine details)
Preparing the Moist Pumpkin Cake Base
- Preheat and Prepare: First, let’s get our oven ready. Preheat your oven to 350°F (175°C). Take your 9×13 inch baking pan and grease it thoroughly, then lightly flour it. This little step ensures your beautiful pumpkin cake won’t stick, making the whole process of creating your Easy Pumpkin Cake Pops much smoother later on. I always like to line the bottom with a piece of parchment paper too, just for extra insurance!
- Combine Dry Ingredients: In a large mixing bowl, sift together your flour, baking powder, baking soda, ground cinnamon, ground ginger, ground nutmeg, ground cloves, and salt. Sifting is key here; it helps to remove any lumps and aerate the flour, contributing to a lighter cake texture. Whisk these dry ingredients together thoroughly until they are uniformly combined. Set this bowl aside for now.
- Whisk Wet Ingredients: In a separate, even larger mixing bowl, combine your granulated sugar and packed light brown sugar. Pour in the vegetable oil and whisk vigorously for about 1-2 minutes until the sugars are well incorporated into the oil and the mixture looks slightly emulsified. The brown sugar adds a lovely depth of flavor and moisture to our pumpkin cake, which is perfect for cake pops.
- Incorporate Eggs and Vanilla: To the sugar and oil mixture, crack in your two large eggs, one at a time, whisking well after each addition until fully combined. Then, stir in the vanilla extract. The vanilla enhances all those wonderful warm spice notes we’re building.
- Add Pumpkin Puree: Now for the star ingredient! Add the entire can of pure pumpkin puree to the wet mixture. Stir it in until it’s completely smooth and no streaks of pumpkin remain. Make absolutely sure you’re using pure pumpkin puree and not pumpkin pie filling, as the latter contains spices and sugar that would alter our recipe’s balance. This pumpkin goodness is what will give our Easy Pumpkin Cake Pops their signature flavor and color.
- Combine Wet and Dry: Gradually add the dry ingredient mixture to the wet pumpkin mixture, stirring on low speed with an electric mixer or by hand with a rubber spatula. Mix just until combined, being careful not to overmix. Overmixing can develop the gluten in the flour too much, leading to a tougher cake, which is something we want to avoid for soft cake pops. Scrape down the sides of the bowl to ensure everything is incorporated.
- Bake the Cake: Pour the cake batter evenly into your prepared 9×13 inch baking pan. Place it in the preheated oven and bake for approximately 30-35 minutes, or until a wooden skewer or toothpick inserted into the center comes out clean. Ovens vary, so start checking around the 30-minute mark.
- Cool Completely: Once baked, remove the cake from the oven and let it cool in the pan on a wire rack for about 15-20 minutes. After this initial cooling, invert the cake onto the wire rack, carefully remove the pan and parchment paper, and allow the cake to cool completely to room temperature. This step is crucial! Attempting to crumble or mix a warm cake will result in a greasy, mushy mess, not the firm yet pliable “cake pop dough” we’re aiming for. This might take 1-2 hours. Patience is a virtue here for perfect Easy Pumpkin Cake Pops!
Crushing and Mixing the Cake Pop Dough
- Prepare the Cream Cheese Frosting: While your cake is cooling, let’s make a simple cream cheese frosting. In a medium mixing bowl, beat the softened cream cheese and unsalted butter together with an electric mixer until light and fluffy, about 2-3 minutes. This ensures a smooth, lump-free frosting.
- Add Powdered Sugar and Vanilla: Gradually add the sifted powdered sugar, ½ cup at a time, beating on low speed until fully incorporated. Once all the sugar is in, increase the speed to medium-high and beat until the frosting is smooth and creamy. Stir in the vanilla extract. If the frosting seems too thick, add milk or heavy cream, ½ tablespoon at a time, until it reaches a spreadable, but not runny, consistency. We don’t need a lot of frosting for binding, so a slightly firmer consistency is better.
-
Crumble the Cooled Cake: Once your pumpkin cake is completely cool, it’s time for the fun part! You can do this by hand or with a food processor.
- By Hand: Break the cake into large pieces and place them in a very large mixing bowl. Using your fingertips, gently crumble the cake until it resembles fine crumbs. Ensure there are no large chunks remaining. This can be quite therapeutic!
- With a Food Processor: Break the cooled cake into a few large pieces and pulse in a food processor until fine crumbs form. Be careful not to over-process, as you don’t want to turn it into a paste.
The goal is fine, uniform crumbs, which will allow for a smooth and consistent cake pop texture.
- Mix in the Frosting: Add the cream cheese frosting to the cake crumbs, starting with about half of the prepared frosting. Using your hands (or a rubber spatula initially, then your hands), mix and knead the cake and frosting together. The warmth of your hands helps to meld everything. Continue adding frosting, a tablespoon at a time, until the mixture is cohesive and can be easily rolled into a ball without crumbling or being too sticky. The key is to add just enough frosting to bind the crumbs together. Too much frosting will result in soft, oily cake pops that won’t hold their shape or dip well, and too little will make them fall apart. You might not need all the frosting; usually, about ¾ of the batch is perfect for this size cake. This step is critical for achieving perfect Easy Pumpkin Cake Pops.
Forming and Chilling the Cake Pops
- Form the Cake Balls: Line a baking sheet with parchment paper or a silicone baking mat. Using a small cookie scoop (about 1.5 tablespoons capacity) or your hands, scoop out portions of the cake mixture. Roll each portion firmly between your palms to form smooth, compact balls, approximately 1 to 1.5 inches in diameter. The firmness is important to prevent cracking later. Place the formed cake balls onto the prepared baking sheet. This recipe should yield about 40-50 cake pops.
- Chill the Cake Balls: Once all your cake balls are formed, place the baking sheet into the refrigerator and chill them for at least 30 minutes, or in the freezer for 15-20 minutes. This chilling step is absolutely essential! It helps the cake balls firm up, making them much easier to dip and less likely to fall apart from their sticks when coated. A well-chilled cake pop is a happy cake pop!
Preparing the Coating and Dipping
- Melt the Candy Melts: Prepare your candy coating while the cake balls are chilling. Place the orange candy melts into a tall, narrow, microwave-safe glass or mug. This shape helps ensure the cake pop can be fully submerged in one quick dip. Melt the candy melts in the microwave in 30-second intervals, stirring thoroughly after each interval, until completely smooth and fluid. Be careful not to overheat, as this can cause the melts to seize or burn. If the coating seems too thick, stir in 1-2 tablespoons of paramount crystals or vegetable shortening (not water, as it will seize the chocolate) until it reaches a smooth, dip-able consistency. Aim for the consistency of warm paint.
- Prepare for Dipping: Set up your dipping station. Have your melted candy melts, cake pop sticks, chilled cake balls, and your styrofoam block (or cake pop stand) ready. Speed and efficiency are key here!
- Dip the Sticks: Take one cake pop stick and dip about ¼ inch of its tip into the melted candy coating. Immediately insert the coated tip into the center of a chilled cake ball, pushing it about halfway through. The melted candy acts as a “glue” to secure the cake ball to the stick.
- Chill Again (Briefly): Place the cake pops (with sticks inserted) back onto the baking sheet and return them to the refrigerator or freezer for another 5-10 minutes. This allows the candy “glue” to set completely, ensuring your cake balls stay firmly on the sticks during the main dipping process. This small extra chill makes a big difference for your Easy Pumpkin Cake Pops.
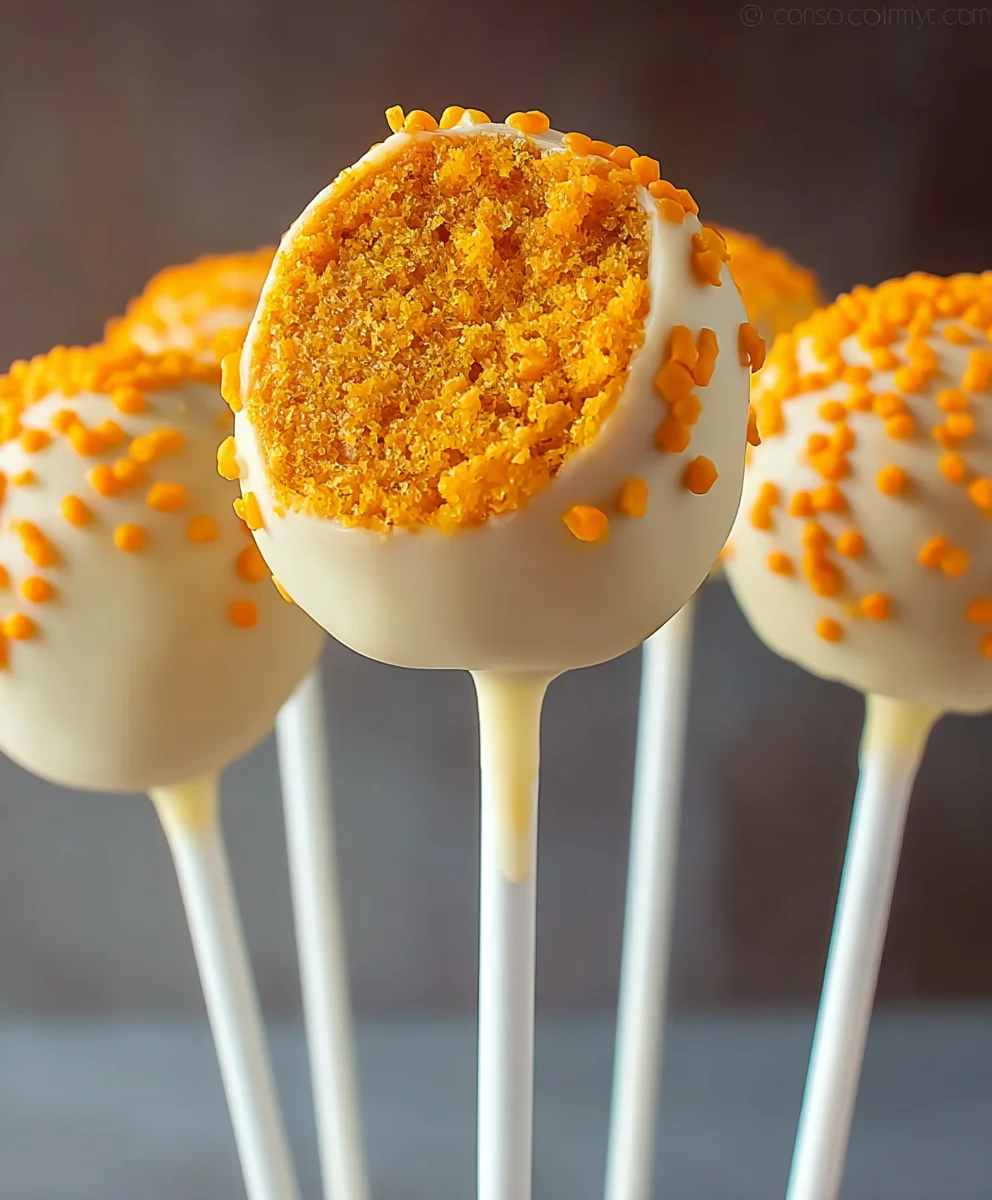
- Dip the Cake Pops: Once the sticks are set, retrieve a few cake pops at a time from the fridge/freezer. Hold a cake pop by its stick and submerge the entire cake ball into the melted orange candy coating. Swirl gently to ensure full coverage. Tap the stick gently against the rim of the glass or mug to remove any excess coating. You want a smooth, even layer, not a thick drip. Work quickly, as the cold cake pop will cause the coating to set rapidly.
- Let Set and Dry: As soon as you’ve dipped a cake pop, immediately insert the stick into your styrofoam block or cake pop stand to allow the coating to set completely. Do not lay them flat, as this will create a flat spot on one side. The coating should harden within a few minutes at room temperature. For a quicker set, you can place the styrofoam block with dipped pops into the refrigerator for 5-10 minutes.
Decorating Your Easy Pumpkin Cake Pops
- Prepare for Decoration: Once the orange coating on your Easy Pumpkin Cake Pops is completely set, you can get creative with decorations! If you plan to add sprinkles, do so immediately after dipping, before the coating sets. If you’re doing drizzles or finer details, ensure the base coat is fully hardened.
- Melt White Candy Melts (for Drizzle): For a contrasting drizzle, melt the white candy melts using the same method as the orange melts (in a microwave-safe bowl, 30-second intervals, stirring). If needed, thin with paramount crystals or shortening.
-
Drizzle or Pipe Details: You have a few options for applying the white candy melts:
- Spoon Drizzle: Dip a fork or a small spoon into the melted white candy and lightly drizzle it back and forth over the orange cake pops in a zigzag pattern.
- Piping Bag: Transfer the melted white candy to a small piping bag (or a ziploc bag with a tiny corner snipped off). Pipe thin lines, dots, or even small ghost or spiderweb shapes for a spooky touch, if applicable for the season.
- Sprinkles: If you want to add sprinkles, you could dip the pop in orange, then immediately after tapping off excess, roll it gently in a bowl of sprinkles, or simply sprinkle them over the wet coating. For precision, apply sprinkles to specific areas.
Don’t be afraid to experiment! These are your delightful creations.
- Final Set: After decorating, allow any additional coatings or drizzles to set completely. You can place them back in the styrofoam block or stand. For faster setting, a brief chill in the refrigerator is fine.
Storage and Serving Suggestions
- Store Properly: Once your Easy Pumpkin Cake Pops are fully set and decorated, they can be stored at room temperature in an airtight container for up to 2-3 days. For longer freshness, especially because of the cream cheese frosting, store them in the refrigerator for up to a week. If refrigerated, let them come to room temperature for about 15-20 minutes before serving for the best texture and flavor.
- Serving: Arrange your beautiful pumpkin cake pops on a platter, stand them upright in a decorative container, or individually wrap them in clear treat bags with a ribbon for gifting. They are perfect for fall gatherings, Halloween parties, Thanksgiving dessert tables, or just a delightful treat anytime you’re craving that comforting pumpkin spice flavor. Enjoy these wonderfully moist, flavorful, and easy-to-make pumpkin cake pops!
Conclusion:
So, there you have it, my friends! We’ve journeyed through the delightful process of creating what I genuinely believe will become your new favorite autumn treat. These aren’t just any ordinary cake pops; they are a celebration of fall flavors, encapsulated in a perfectly portioned, incredibly adorable bite. The rich, warm spices of pumpkin, combined with a moist, tender cake and a crisp, sweet coating, create an irresistible symphony of textures and tastes that truly defines comfort food. It’s a recipe that promises not only a delicious outcome but also a fun, engaging baking experience, making it a fantastic activity for a cozy afternoon, perhaps even involving little helpers in the kitchen for the rolling and decorating fun.
What makes this recipe a definite must-try? Beyond the sheer deliciousness, it’s the versatility and the joy it brings. Imagine the smile on someone’s face when they receive one of these homemade gems. They are incredibly satisfying yet light enough that you’ll always want just one more. The effort might seem detailed, but each step is straightforward, building towards a stunning and incredibly rewarding final product. These Easy Pumpkin Cake Pops are truly a game-changer for anyone looking for a delightful, bite-sized dessert that screams autumn without being overly complicated. They effortlessly combine elegance with homespun charm, making them perfect for almost any occasion.
Serving Suggestions & Creative Variations:
Once you’ve mastered the basic recipe, the possibilities for customization are endless! For serving, these pumpkin cake pops are spectacular on their own, perhaps with a warm cup of coffee or a spiced chai latte, making for an ideal afternoon pick-me-up or a sophisticated after-dinner treat. They also make fantastic party favors, individually wrapped with a pretty ribbon, or an impressive centerpiece on a dessert table for Thanksgiving, Halloween gatherings, or any fall-themed celebration. Don’t limit them to just parties; they’re wonderful for lunchboxes, potlucks, or simply as a special homemade snack to brighten any day.
If you’re feeling adventurous, here are some delightful variations to explore:
- Different Glazes: While the classic chocolate coating is superb, consider dipping some in a luscious cream cheese frosting for an extra layer of tangy sweetness. A white chocolate glaze infused with a tiny drop of orange food coloring can create a vibrant, festive look. Or, for a sophisticated touch, a dark chocolate ganache dip would provide a beautiful contrast to the sweet pumpkin cake.
- Exciting Toppings: Beyond traditional sprinkles, try rolling some in finely chopped pecans, walnuts, or even toasted coconut flakes for added texture. A light dusting of cinnamon sugar or pumpkin pie spice immediately after dipping adds a warm, aromatic finish. You could also drizzle contrasting melted chocolate (e.g., white chocolate drizzle on a dark chocolate-coated pop) for an artistic flair.
- Spice it Up: If you love a bolder spice profile, feel free to increase the amount of pumpkin pie spice in the cake mix, or add a pinch of ground ginger, cloves, or allspice to truly make the flavors sing.
- Internal Surprises: For an extra layer of indulgence, you could gently press a small piece of candied ginger or a mini chocolate chip into the center of each cake ball before rolling.
I genuinely hope that you’re feeling inspired and excited to give these wonderful little treats a try. Don’t be intimidated by the idea of making cake pops; the process is incredibly rewarding, and the end result is something truly special that you’ve made with your own hands. There’s a unique satisfaction that comes from creating something so delightful from scratch, and I promise you, these pumpkin cake pops will not disappoint.
Share Your Experience!
Once you’ve whipped up your batch of pumpkin cake pops, I would absolutely love to hear about your experience! Did you try any of the variations? Do you have any brilliant tips or tricks you discovered along the way? Please, don’t hesitate to share your thoughts in the comments section below. I adore seeing your creations! If you share photos on social media, be sure to tag me or use the hashtag #EasyPumpkinCakePops so I can admire your beautiful work. Your feedback and creativity inspire me and our entire community of home bakers. These cake pops are more than just a dessert; they’re a little sphere of pure joy, perfect for sharing, celebrating, and creating lasting, delicious memories. Happy baking!
People Also Ask:
How do I make pumpkin cake pops without a special mold?
Absolutely! You don’t need a special mold for these pumpkin cake pops, and in fact, most cake pop recipes don’t use one. The magic happens by baking a regular pumpkin cake (or even using a store-bought one for ultimate ease!), allowing it to cool completely, and then crumbling it into fine crumbs. You’ll then mix these crumbs with a small amount of frosting until the mixture is pliable and can be rolled into firm, uniform balls. The key here is getting the right consistency – not too wet, not too dry. Once rolled, these cake balls are chilled in the refrigerator or freezer until they are very firm. This chilling step is crucial as it helps them hold their shape and prevents them from falling apart when dipped. After chilling, simply insert a stick, dip them in melted candy coating, and decorate! It’s a wonderfully hands-on process that yields perfectly round, delicious treats every time.
Why are my cake pops falling apart or sliding off the stick?
This is a common frustration, but usually, it boils down to a few key factors that are easily corrected:
- Too Much Frosting: If your cake pop mixture is too wet, the balls won’t hold their shape well and will be more prone to falling apart or sliding. Use just enough frosting to bind the crumbs together.
- Not Enough Chilling: The cake balls must be thoroughly chilled and firm. If they are too warm or soft, they won’t adhere properly to the stick or will lose their shape in the warm coating.
- Warm Cake Balls + Warm Coating: A significant temperature difference can cause issues. Ensure your cake balls are very cold. When dipping, your melted coating should be warm enough to be liquid but not piping hot, as excessive heat can melt the cake ball.
- Insufficient Coating on the Stick: Always dip the tip of your cake pop stick into the melted candy coating before inserting it about halfway into the cake ball. This acts as an edible “glue” to secure the cake ball to the stick.
- Heavy Decorations: Adding too many heavy sprinkles or candies before the coating sets can weigh down the pop and cause it to slide.
Patience and proper chilling are your best friends here! Don’t rush the process, and you’ll achieve perfectly stable cake pops.
Can I make pumpkin cake pops ahead of time? How do I store them?
Absolutely! Cake pops are fantastic for making ahead, which makes them perfect for parties or holiday preparations. Here’s how you can do it:
- Undipped Cake Balls: You can roll your cake balls and store them in an airtight container in the refrigerator for up to 3-4 days. For longer storage, freeze the un-dipped cake balls on a baking sheet until firm, then transfer them to a freezer-safe bag or container for up to 1 month. Thaw them in the refrigerator before dipping.
- Dipped and Decorated Cake Pops: Once dipped and fully set, store them in an airtight container. At room temperature (if your home isn’t too warm or humid), they’ll stay fresh for 2-3 days. If you need them to last longer, or if your glaze contains dairy (like a cream cheese glaze), store them in the refrigerator for up to a week. If refrigerating, be aware that condensation may form when you bring them out to room temperature. To minimize this, you can place them in the container in the fridge, then take the container out of the fridge and let it come to room temperature unopened before serving.
Making them ahead saves a lot of stress, so definitely plan for it!
What’s the best type of pumpkin puree to use for this recipe?
For the best results in your Easy Pumpkin Cake Pops, you’ll want to use 100% pure canned pumpkin puree. It’s crucial to differentiate this from pumpkin pie filling. Pumpkin puree is just cooked, mashed pumpkin, typically with no added sugar or spices. Pumpkin pie filling, on the other hand, comes pre-spiced and pre-sweetened, which will throw off the flavor balance of the cake. Always check the label to ensure you’re getting pure pumpkin. You can usually find it in the baking aisle of your grocery store. Freshly roasted and pureed pumpkin can also be used, but ensure it’s well-drained to avoid adding too much moisture to your cake.
Can I use a box cake mix to make Easy Pumpkin Cake Pops?
Yes, absolutely! Using a box cake mix is a fantastic shortcut that makes these pumpkin cake pops even easier. You can use a yellow, vanilla, or even a spice cake mix as your base. Just prepare the cake mix according to the package directions, baking it in a standard baking pan. Once it’s baked and completely cooled, you can proceed with crumbling the cake and mixing it with frosting as described in the main recipe. If you use a yellow or vanilla mix, I highly recommend adding 1-2 teaspoons of pumpkin pie spice to the cake batter before baking to infuse it with those wonderful fall flavors. This option significantly cuts down on prep time without sacrificing flavor, making those Easy Pumpkin Cake Pops even more accessible for busy bakers!

Easy Pumpkin Cake Pops
Easy Pumpkin Cake Pops are a delightful autumn treat, combining festive pumpkin flavors with a charming, portable design. This simple recipe ensures even novice bakers can achieve stunning, bakery-quality results.
Ingredients
-
2 ½ cups (300g) all-purpose flour
-
2 tsp baking powder
-
1 tsp baking soda
-
2 tsp ground cinnamon
-
1 tsp ground ginger
-
½ tsp ground nutmeg
-
¼ tsp ground cloves
-
½ tsp salt
-
1 ½ cups (300g) granulated sugar
-
½ cup (100g) light brown sugar
-
¾ cup (180ml) vegetable oil
-
2 large eggs
-
1 tsp vanilla extract (for cake)
-
1 (15-ounce / 425g) can pure pumpkin puree
-
4 ounces (113g) cream cheese, softened
-
¼ cup (56g) unsalted butter, softened
-
1 ½ cups (180g) powdered sugar
-
½ tsp vanilla extract (for frosting)
-
1-2 tbsp milk or heavy cream (optional)
-
24 ounces (680g) orange candy melts
-
6 ounces (170g) white candy melts
-
1-2 tbsp paramount crystals or vegetable shortening (optional)
-
Fall-themed sprinkles, edible glitter (optional)
Instructions
-
Step 1
Preheat oven to 350°F (175°C). Grease and flour a 9×13 inch baking pan, optionally lining with parchment paper. -
Step 2
In a large bowl, sift together flour, baking powder, baking soda, cinnamon, ginger, nutmeg, cloves, and salt. Whisk well and set aside. -
Step 3
In a separate large bowl, whisk granulated sugar, light brown sugar, and vegetable oil for 1-2 minutes until combined. -
Step 4
Whisk in the 2 large eggs, one at a time, then stir in 1 tsp vanilla extract. -
Step 5
Add the entire can of pure pumpkin puree to the wet mixture and stir until completely smooth. -
Step 6
Gradually add the dry ingredient mixture to the wet pumpkin mixture, mixing on low speed or by hand just until combined. Do not overmix. -
Step 7
Pour batter evenly into the prepared pan. Bake for 30-35 minutes, or until a wooden skewer inserted into the center comes out clean. -
Step 8
Remove cake from oven and cool in the pan for 15-20 minutes. Then invert onto a wire rack, remove pan and parchment, and allow to cool completely to room temperature (1-2 hours). This step is crucial for proper cake pop dough. -
Step 9
While cake cools, prepare cream cheese frosting: In a medium bowl, beat softened cream cheese and unsalted butter until light and fluffy. Gradually add sifted powdered sugar, then stir in ½ tsp vanilla extract. If too thick, add 1-2 tbsp milk or heavy cream for consistency. -
Step 10
Once the pumpkin cake is completely cool, crumble it by hand into fine crumbs in a very large mixing bowl, or pulse in a food processor until fine crumbs form. -
Step 11
Add cream cheese frosting to cake crumbs, starting with about half. Using your hands, mix and knead until the mixture is cohesive and can be easily rolled into a ball without crumbling or being too sticky. Add more frosting a tablespoon at a time if needed (you may not use all of it). -
Step 12
Line a baking sheet with parchment paper. Scoop out portions (approx. 1.5 tbsp) and roll firmly between your palms to form smooth, compact balls (1-1.5 inches in diameter). Place on the prepared baking sheet. This recipe yields about 40-50 cake pops. -
Step 13
Chill the formed cake balls in the refrigerator for at least 30 minutes, or in the freezer for 15-20 minutes, until firm. This is absolutely essential for proper dipping. -
Step 14
Melt orange candy melts in a tall, narrow, microwave-safe glass in 30-second intervals, stirring thoroughly until smooth and fluid. If too thick, stir in 1-2 tbsp paramount crystals or vegetable shortening to thin to a warm paint consistency. -
Step 15
Set up your dipping station with melted candy, cake pop sticks, chilled cake balls, and a styrofoam block or cake pop stand. -
Step 16
{‘@type’: ‘HowToStep’, ‘text’: “Dip about ¼ inch of a cake pop stick tip into the melted candy coating, then immediately insert the coated tip into the center of a chilled cake ball, pushing it about halfway through. The candy acts as a ‘glue’.”} -
Step 17
{‘@type’: ‘HowToStep’, ‘text’: “Place the cake pops (with sticks inserted) back onto the baking sheet and chill for another 5-10 minutes to allow the candy ‘glue’ to set completely.”} -
Step 18
Retrieve a few cake pops from the fridge/freezer at a time. Hold by the stick and submerge the entire cake ball into the melted orange candy coating. Swirl gently for full coverage, then tap the stick gently against the rim of the glass to remove excess coating. Work quickly. -
Step 19
Immediately insert the dipped cake pop stick into a styrofoam block or cake pop stand to allow the coating to set completely. Do not lay them flat. The coating should harden within minutes at room temperature, or faster in the refrigerator (5-10 minutes). -
Step 20
Once the orange coating is completely set, melt the white candy melts using the same method as the orange. Thin if needed. -
Step 21
Decorate by drizzling white candy over the orange cake pops with a fork, spoon, or piping bag. If adding sprinkles, do so immediately after dipping the orange coating before it sets. -
Step 22
Allow any additional coatings or drizzles to set completely. A brief chill in the refrigerator can speed this up. -
Step 23
Store fully set and decorated cake pops in an airtight container at room temperature for 2-3 days, or in the refrigerator for up to a week. If refrigerated, let them come to room temperature for 15-20 minutes before serving for best texture and flavor.
Important Information
Nutrition Facts (Per Serving)
It is important to consider this information as approximate and not to use it as definitive health advice.
Allergy Information
Please check ingredients for potential allergens and consult a health professional if in doubt.

Leave a Comment