
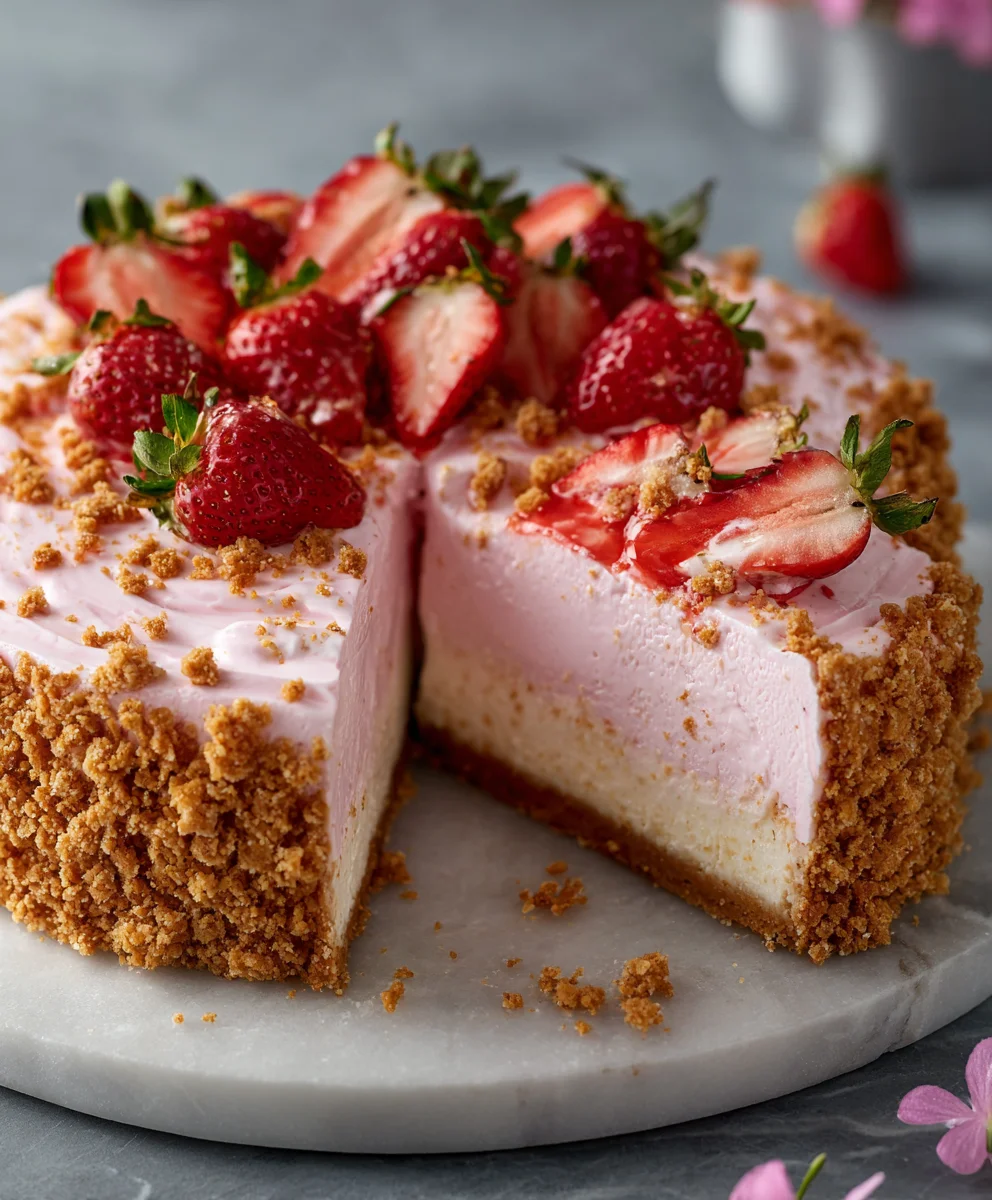
Pink Strawberry Crunch Cheesecake is more than just a dessert; it’s a celebration of vibrant flavors and playful textures, a true masterpiece that captivates both the eye and the palate. Imagine sinking your fork into a dessert that doesn’t just satisfy your sweet tooth, but also transports you to a world of creamy indulgence, tangy strawberry bliss, and an irresistible, delightful crunch. This isn’t merely another cheesecake recipe; it’s an invitation to experience a symphony of sensations.
While the rich history of cheesecakes dates back to ancient Greece, evolving through Roman times to become the beloved classic we know today, our unique creation takes inspiration from more modern, nostalgic treats. We’ve married the timeless elegance of a velvety smooth cheesecake with the joyful, textural delight of a strawberry crunch, reminiscent of cherished childhood ice cream bars, but elevated to sophisticated heights. It’s this innovative combination that makes our Pink Strawberry Crunch Cheesecake such a show-stopping sensation.
Why You’ll Adore This Dessert
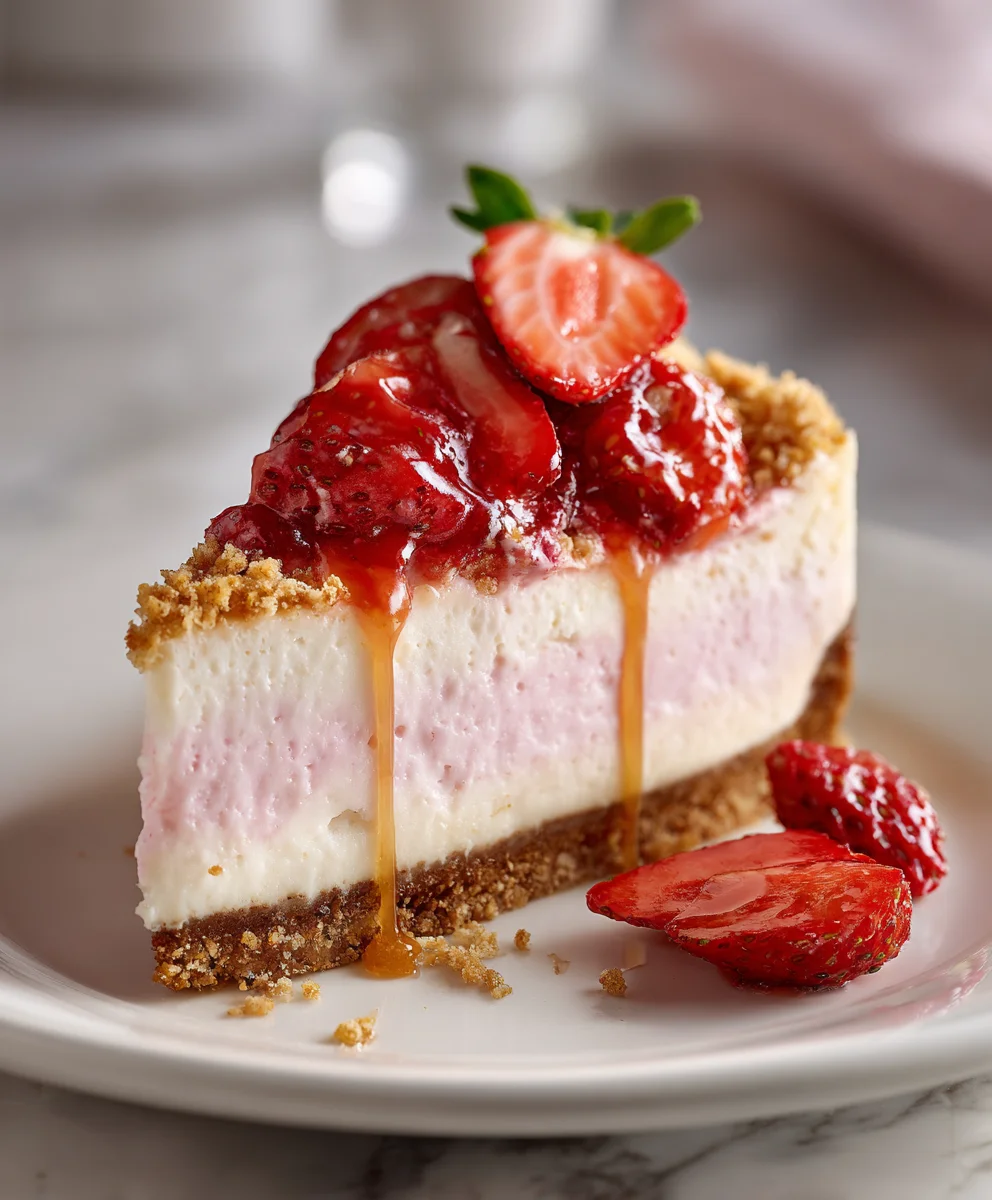
People everywhere are falling in love with this dish for countless reasons. It’s the perfect harmony of tangy, sweet strawberries swirling through a luxuriously creamy filling, all resting on a crisp crust and crowned with that utterly addictive, crumbly, pink strawberry crunch topping. Every single bite offers a compelling contrast: the cool, smooth richness against the satisfying, sugary crispness. It’s a visually stunning dessert, perfect for special occasions, or simply to brighten an ordinary day with an extraordinary treat. Prepare to create a dessert that will undoubtedly become a new favorite.

Ingredients:
-
For the Graham Cracker Crust:
- 1 ½ cups (about 10-12 full sheets) graham cracker crumbs (finely crushed)
- ¼ cup granulated sugar
- ½ teaspoon ground cinnamon (optional, but adds a lovely warmth)
- 6 tablespoons unsalted butter, melted
-
For the Pink Strawberry Crunch Cheesecake Filling:
- 32 ounces (four 8-ounce blocks) full-fat cream cheese, softened to room temperature
- 1 ½ cups granulated sugar
- ¼ cup sour cream, full-fat, at room temperature
- 2 teaspoons pure vanilla extract
- ½ teaspoon fine sea salt
- 2 large eggs, at room temperature
- 1 large egg yolk, at room temperature (for extra richness)
- ½ cup strawberry puree (made from fresh or frozen strawberries, blended until smooth and strained for no seeds)
- 1-2 drops red or pink food coloring (optional, for a more vibrant pink hue)
-
For the Pink Strawberry Crunch Topping:
- 2 cups (about 20-24 cookies) Golden Oreo crumbs or vanilla wafer crumbs
- ½ cup freeze-dried strawberries, crushed into a fine powder and some larger bits
- ½ cup unsalted butter, melted
- 2 tablespoons granulated sugar
- 1 tablespoon strawberry gelatin powder (like Jell-O brand, for extra flavor and color, optional)
-
For Garnish (Optional):
- Fresh strawberries, sliced or halved
- Whipped cream
Preparing the Graham Cracker Crust
- Preheat and Prep: Begin by preheating your oven to 350°F (175°C). Lightly grease a 9-inch springform pan. If you’re planning to use a water bath (highly recommended for a crack-free cheesecake), wrap the outside of your springform pan tightly with several layers of heavy-duty aluminum foil to prevent any water from seeping in. This step is crucial for cheesecake success!
- Crush the Graham Crackers: In a medium bowl, combine the finely crushed graham cracker crumbs, granulated sugar, and ground cinnamon (if using). To get perfectly fine crumbs, you can either place the graham crackers in a zip-top bag and crush them with a rolling pin or use a food processor for a quicker, more consistent result.
- Combine with Butter: Pour the melted unsalted butter over the cracker mixture. Stir well with a fork or spatula until all the crumbs are evenly moistened and resemble wet sand. It’s important that every crumb is coated to ensure the crust holds together.
- Press into Pan: Transfer the buttered graham cracker crumbs into the prepared springform pan. Using the bottom of a measuring cup or your fingers, press the mixture firmly and evenly onto the bottom of the pan. Make sure to create a compact, flat layer. If you desire a crust that extends up the sides, press about ½ inch up the perimeter as well.
- Pre-bake the Crust: Bake the crust in the preheated oven for 8-10 minutes. This pre-baking step helps to set the crust, making it sturdy and preventing it from becoming soggy once the filling is added. After baking, remove the pan from the oven and let it cool completely on a wire rack while you prepare the cheesecake filling. You can even place it in the freezer for 10-15 minutes to speed up the cooling process.
Crafting the Silky Pink Strawberry Crunch Cheesecake Filling
- Prepare for Water Bath (if using): While the crust cools, if you are using a water bath, heat a kettle of water on the stove. This will be added to a larger pan later. Reduce your oven temperature to 325°F (160°C).
- Soften Cream Cheese: In the bowl of a stand mixer fitted with the paddle attachment (or a large bowl with an electric hand mixer), beat the softened full-fat cream cheese on medium-low speed for about 2-3 minutes. It is absolutely essential that your cream cheese is at room temperature to achieve a smooth, lump-free filling. Beat until it’s incredibly smooth and creamy, scraping down the sides of the bowl frequently.
- Add Sugars and Flavorings: Gradually add the granulated sugar to the cream cheese, beating on low speed until just combined and smooth, about 2-3 minutes. Be careful not to overmix at this stage, as incorporating too much air can lead to cracks in your cheesecake.
- Incorporate Sour Cream and Extracts: Add the room temperature sour cream, pure vanilla extract, and fine sea salt. Mix on low speed until just combined. The sour cream adds a wonderful tanginess and helps to create that signature creamy texture of a classic cheesecake.
- Prepare Strawberry Puree: If you haven’t already, prepare your strawberry puree. If using fresh strawberries, wash and hull them, then blend until completely smooth. Strain the puree through a fine-mesh sieve to remove any seeds, ensuring a perfectly smooth filling. If using frozen, thaw them first, then blend and strain.
- Add Strawberry Puree and Color: Gently fold in the strained strawberry puree until evenly distributed. If you desire a more vivid pink color for your “Pink Strawberry Crunch Cheesecake,” now is the time to add 1-2 drops of red or pink food coloring. Mix just until the color is consistent throughout the batter.
- Mix in Eggs Gradually: In a separate small bowl, lightly whisk the two large eggs and the additional egg yolk together. With the mixer on the lowest speed, slowly pour the egg mixture into the cream cheese batter, mixing just until they are fully incorporated. Do not overmix! Overmixing the eggs introduces too much air, which can cause the cheesecake to puff up during baking and then collapse and crack as it cools. Scrape down the sides of the bowl once more to ensure everything is fully combined.
- Pour into Crust: Pour the smooth cheesecake batter over the cooled graham cracker crust in the springform pan. Gently tap the pan on the counter a few times to release any large air bubbles that may be trapped within the batter. This also helps to level the surface.
- Prepare Water Bath (Baking): Place the foil-wrapped springform pan inside a larger roasting pan. Carefully pour the hot water from your kettle into the roasting pan, ensuring the water level comes about halfway up the sides of the springform pan. The water bath provides a moist environment, which helps the cheesecake bake evenly, prevents cracks, and yields an incredibly creamy texture.
- Bake the Cheesecake: Carefully transfer the roasting pan with the cheesecake to the preheated 325°F (160°C) oven. Bake for approximately 60-75 minutes. The cheesecake is done when the edges are set, but the very center (about a 2-3 inch circle) still jiggles slightly when the pan is gently shaken. It will continue to set as it cools.
- Cool Gradually (Crucial Step): Once baked, turn off the oven but leave the cheesecake inside with the oven door propped open slightly (a wooden spoon works well) for 1 hour. This slow cooling prevents sudden temperature changes that can lead to cracks.
- Refrigerate: After the hour in the oven, carefully remove the springform pan from the water bath (remove the foil) and transfer it to a wire rack to cool completely at room temperature for another 1-2 hours. Once it has reached room temperature, cover the cheesecake loosely with plastic wrap and refrigerate for at least 6-8 hours, or preferably overnight. Proper chilling time is vital for the cheesecake to fully set and achieve its perfect texture. Don’t rush this step for the best “Pink Strawberry Crunch Cheesecake”!
Creating the Irresistible Pink Strawberry Crunch Topping
- Prepare Cookie Crumbs: In a food processor, pulse the Golden Oreo cookies (or vanilla wafers) until they form coarse crumbs. You want a mix of fine crumbs and slightly larger pieces for texture. If you don’t have a food processor, place them in a sturdy zip-top bag and crush them with a rolling pin.
- Process Freeze-Dried Strawberries: Add the freeze-dried strawberries to the food processor (or crush them separately in a bag). Pulse until they turn into a fine powder with some small, crunchy bits remaining. This provides intense strawberry flavor and a beautiful pink hue.
- Combine Crunch Ingredients: In a medium bowl, combine the Golden Oreo crumbs, crushed freeze-dried strawberries, granulated sugar, and strawberry gelatin powder (if using). The gelatin powder significantly boosts the strawberry flavor and enhances the pink color. Stir everything together until well mixed.
- Add Melted Butter: Pour the melted unsalted butter over the dry crunch mixture. Stir thoroughly with a fork or spatula until all the crumbs are evenly coated and moistened. The mixture should clump together slightly when pressed.
- Optional: Bake for Extra Crunch: For an even crispier crunch topping, spread the mixture evenly on a baking sheet lined with parchment paper. Bake in a preheated oven at 300°F (150°C) for about 8-10 minutes, stirring halfway through. Keep a close eye on it to prevent burning. Remove from the oven and let it cool completely. It will crisp up further as it cools. If you prefer a softer crunch, you can skip this baking step.
Assembling Your Pink Strawberry Crunch Cheesecake
- Release from Pan: Once the “Pink Strawberry Crunch Cheesecake” is thoroughly chilled and set, carefully run a thin, sharp knife around the edge of the springform pan before unlatching and removing the ring. This helps prevent the cheesecake from sticking and tearing.
- Apply the Crunch Topping: Generously sprinkle the prepared pink strawberry crunch topping over the top of the chilled cheesecake. You can cover the entire surface or leave a border if you plan to pipe whipped cream around the edge. Gently press the crunch into the surface of the cheesecake so it adheres.
- Garnish (Optional): If desired, prepare fresh whipped cream (beat heavy cream with powdered sugar and vanilla until stiff peaks form) and pipe swirls or dollops around the perimeter or in the center. Arrange fresh strawberry slices or halves on top of the crunch for a beautiful presentation and added fresh fruit flavor.
- Serve and Store: Slice the “Pink Strawberry Crunch Cheesecake” with a sharp, warm knife (wipe the knife clean between slices for perfect cuts). Serve immediately. Store any leftover cheesecake in an airtight container in the refrigerator for up to 5-7 days. This cheesecake is best enjoyed cold, allowing the flavors and textures to truly shine!
Conclusion:
And there you have it, my friends! We’ve journeyed together through the delightful process of creating what I genuinely believe will become your new favorite dessert. This isn’t just any cheesecake; it’s a celebration of textures and flavors, a symphony of creamy, sweet, tangy, and wonderfully crunchy elements that come together in perfect harmony. From the moment you take that first bite, I promise you’ll understand why I’m so utterly smitten with this recipe. It’s the kind of dessert that doesn’t just satisfy a sweet craving; it elevates the entire experience, turning an ordinary moment into something truly special. The vibrant pink hue is just the beginning of its charm; its real magic lies in how every component complements the other, creating a truly unforgettable culinary adventure.
Why is this Pink Strawberry Crunch Cheesecake an absolute must-try for everyone? Well, beyond its undeniable beauty, it offers a remarkable balance that’s often hard to achieve. The smooth, luxurious creaminess of the cheesecake base melts in your mouth, providing that classic, comforting richness we all adore. But what truly sets it apart, and what I’m most excited for you to experience, is that incredible strawberry crunch topping. It adds a playful, unexpected texture that contrasts beautifully with the cheesecake’s velvety softness, making each forkful an exciting revelation. The fresh strawberry flavor, whether from a vibrant puree or delightful chunks, brings a natural sweetness and a hint of tartness that cuts through the richness, ensuring every bite is as refreshing as it is indulgent. It’s elegant enough for a special occasion, yet comforting enough for a cozy night in, making it incredibly versatile for any gathering or even a personal treat.
Serving Suggestions & Delightful Variations
Once your masterpiece is chilled to perfection, ready to be devoured, there are myriad ways to present and enjoy this spectacular dessert. For a classic presentation, simply slice and serve it cold, perhaps with a dollop of freshly whipped cream and a few extra fresh strawberry slices on the side. The visual appeal alone is enough to impress! For an extra touch of sophistication, consider drizzling a little white chocolate ganache over each slice just before serving, or sprinkle a few edible glitter flakes for a truly magical touch. If you’re hosting a party, you could even create individual mini cheesecakes in small jars or ramekins, topping each with the crunch and a fresh berry, making them perfectly portioned and easy to serve.
Feeling adventurous? The beauty of this recipe lies in its adaptability. While the strawberry is the star, don’t hesitate to experiment! You could easily swap out the strawberry puree for raspberry or mixed berry for a different fruity twist. Imagine a vibrant Raspberry Crunch Cheesecake with a slightly tangier profile, or a Blueberry Crunch Cheesecake for a different color palette. For the crust, while we’ve opted for a classic, a crushed shortbread cookie crust or even a chocolate cookie crust would add a delightful new dimension. You could also play with the crunch topping itself – perhaps adding finely chopped pistachios for a nutty element, or a sprinkle of shredded coconut for a tropical vibe. Don’t be afraid to make this recipe your own; it’s incredibly forgiving and eager to embrace your creative spirit.
Now, it’s your turn! I genuinely can’t wait for you to bring this recipe to life in your own kitchen. There’s something truly satisfying about baking, especially when the result is as stunning and delicious as this Pink Strawberry Crunch Cheesecake. So, gather your ingredients, put on your favorite apron, and embark on this wonderful baking adventure. Once you’ve whipped up your own perfect slice of heaven, I would absolutely love to hear all about your experience. Please, don’t be shy! Share your photos, your triumphs, your clever variations, and your tasting notes in the comments below or tag me on social media. Your feedback and creativity inspire me and our wonderful community of food lovers. Let’s celebrate the joy of homemade desserts together. Happy baking!
Frequently Asked Questions (FAQs)
How long does Pink Strawberry Crunch Cheesecake last in the fridge?
Properly stored in an airtight container, your delightful cheesecake will maintain its freshness and incredible flavor for about 4-5 days in the refrigerator. After that, the crunch topping might start to soften slightly, but it will still be delicious!
Can I freeze Pink Strawberry Crunch Cheesecake?
Absolutely! This cheesecake freezes beautifully. For best results, freeze the cheesecake whole (without the crunch topping, if possible, adding it just before serving for maximum crispness) or in individual slices. Wrap it tightly in plastic wrap, then an additional layer of aluminum foil. It can be frozen for up to 1-2 months. Thaw overnight in the refrigerator before serving.
What if I don’t have fresh strawberries?
No problem at all! You can easily use frozen strawberries for the puree. Just ensure they are thawed completely before blending, and you might need to simmer the puree slightly longer to reduce any excess water. For the crunch topping, fresh strawberries are ideal for texture, but if unavailable, you can omit them or use a good quality strawberry jam as a substitute within the crunch mixture, adjusting sweetness as needed.
Can I make this gluten-free?
Yes, definitely! To make this Pink Strawberry Crunch Cheesecake gluten-free, simply use gluten-free graham crackers (or your preferred gluten-free cookie) for the crust. Ensure all other ingredients, like extracts, are certified gluten-free. The rest of the recipe naturally accommodates a gluten-free diet.
Can I make this cheesecake ahead of time?
This recipe is perfect for making ahead! In fact, cheesecake benefits greatly from extended chilling time. You can prepare the entire cheesecake (without the crunch topping for optimal crispness) up to 2-3 days in advance. Store it covered in the refrigerator. Add the strawberry crunch topping a few hours before serving to ensure it remains wonderfully crisp.
How do I prevent cracks in my cheesecake?
Cracks in cheesecake are common but can often be avoided with a few tips:
- Don’t overmix: Overmixing adds air, which expands during baking and contracts during cooling, causing cracks. Mix just until combined.
- Room temperature ingredients: Ensure cream cheese and eggs are at room temperature for a smooth batter.
- Water bath: A water bath creates a humid baking environment, preventing the edges from baking faster than the center and reducing cracking.
- Slow cooling: After baking, turn off the oven, prop open the door, and let the cheesecake cool in the oven for about an hour. Then transfer it to a wire rack for another hour before chilling. Avoid sudden temperature changes.
Pink Strawberry Crunch Cheesecake
Pink Strawberry Crunch Cheesecake is a celebration of vibrant flavors and playful textures. This no-bake treat combines the timeless elegance of a velvety smooth cheesecake with the joyful, textural delight of a strawberry crunch, reminiscent of cherished childhood ice cream bars, elevated to sophisticated heights.
Ingredients
-
For the Graham Cracker Crust:
-
1 ½ cups graham cracker crumbs
-
¼ cup granulated sugar
-
½ teaspoon ground cinnamon (optional)
-
6 tablespoons unsalted butter, melted
-
For the Pink Strawberry Crunch Cheesecake Filling:
-
32 oz (four 8-oz blocks) full-fat cream cheese, softened
-
1 ½ cups granulated sugar
-
¼ cup full-fat sour cream, room temperature
-
2 teaspoons pure vanilla extract
-
½ teaspoon fine sea salt
-
2 large eggs, room temperature
-
1 large egg yolk, room temperature
-
½ cup strawberry puree (strained)
-
1-2 drops red or pink food coloring (optional)
-
For the Pink Strawberry Crunch Topping:
-
2 cups Golden Oreo crumbs or vanilla wafer crumbs
-
½ cup freeze-dried strawberries, crushed
-
½ cup unsalted butter, melted
-
2 tablespoons granulated sugar
-
1 tablespoon strawberry gelatin powder (optional)
-
For Garnish (Optional):
-
Fresh strawberries, sliced
-
Whipped cream
Instructions
-
Step 1
Preheat oven to 350°F (175°C). Lightly grease a 9-inch springform pan; wrap outside with foil if using a water bath. In a bowl, combine graham cracker crumbs, sugar, and cinnamon (if using). Pour in melted butter and mix until moistened. Press firmly onto the bottom (and ½ inch up sides) of the pan. Bake for 8-10 minutes, then cool completely. -
Step 2
Reduce oven to 325°F (160°C). Prepare hot water for a water bath. In a stand mixer, beat softened cream cheese until smooth (2-3 min). Gradually add sugar, beating on low until combined (2-3 min); do not overmix. Mix in sour cream, vanilla, and salt. Gently fold in strained strawberry puree and optional food coloring until consistent. -
Step 3
Lightly whisk eggs and egg yolk. On the lowest speed, slowly pour into batter, mixing just until incorporated; do not overmix. Pour batter over cooled crust. Place foil-wrapped pan in a roasting pan; pour hot water halfway up springform. Bake 60-75 minutes. Edges should be set, center slightly jiggles. -
Step 4
Turn off oven, prop door open, and leave cheesecake inside for 1 hour. Remove from water bath, cool on wire rack to room temperature (1-2 hours). Cover and refrigerate for at least 6-8 hours, or preferably overnight, to set completely. -
Step 5
In a food processor, pulse Golden Oreo crumbs and freeze-dried strawberries until a mix of fine powder and crunchy bits. Combine with granulated sugar and optional strawberry gelatin powder. Pour melted butter over mixture; stir until evenly coated. (Optional: For extra crispness, spread on a baking sheet, bake at 300°F (150°C) for 8-10 mins, stirring halfway. Cool completely). -
Step 6
Once cheesecake is chilled, run a thin knife around the edge before unlatching the springform pan. Generously sprinkle the pink strawberry crunch topping over the cheesecake, gently pressing to adhere. Garnish with fresh strawberries and whipped cream, if desired. Slice with a warm, clean knife. Serve cold and store leftovers in the refrigerator for 5-7 days.
Important Information
Nutrition Facts (Per Serving)
It is important to consider this information as approximate and not to use it as definitive health advice.
Allergy Information
Please check ingredients for potential allergens and consult a health professional if in doubt.

Leave a Comment