
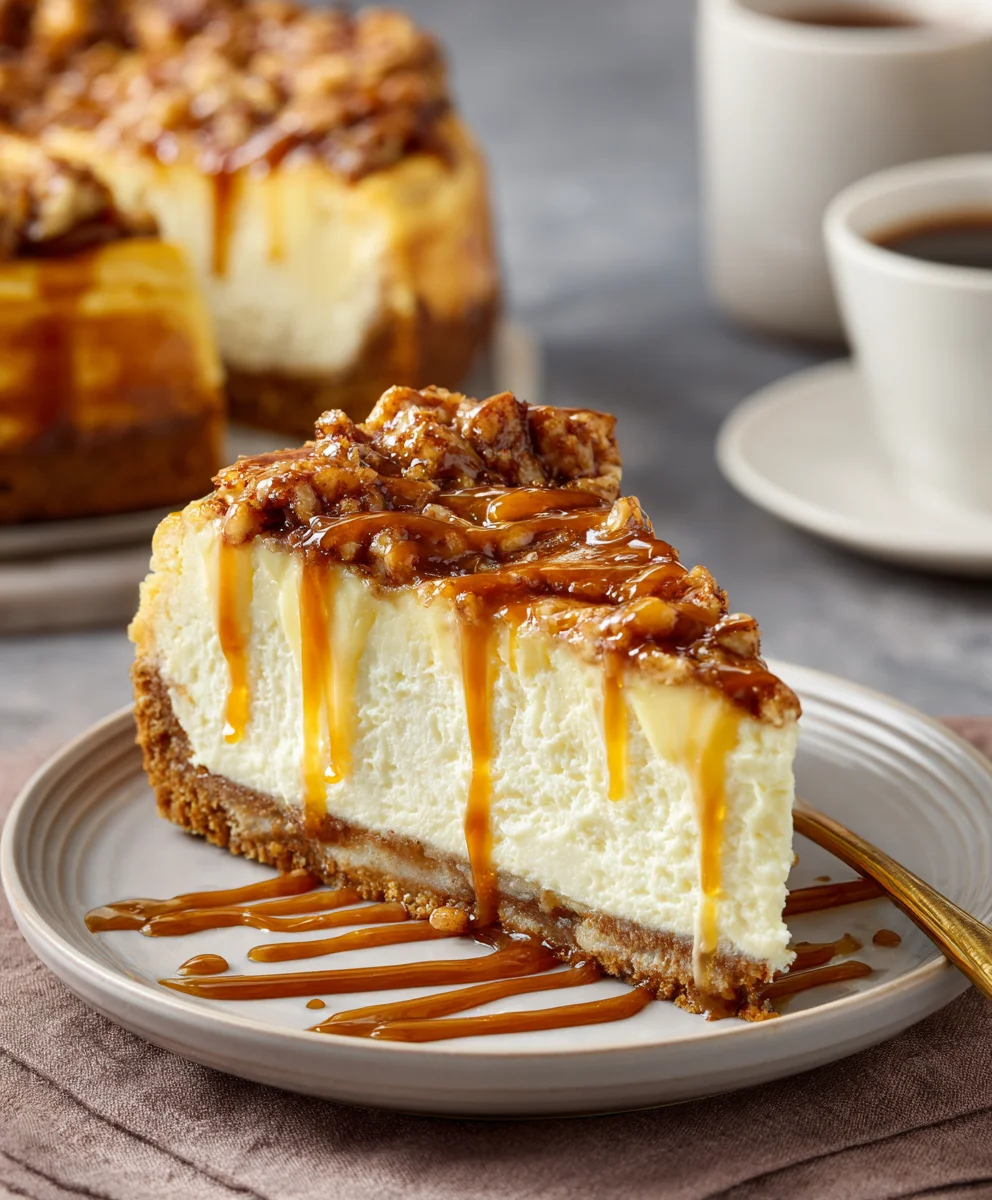
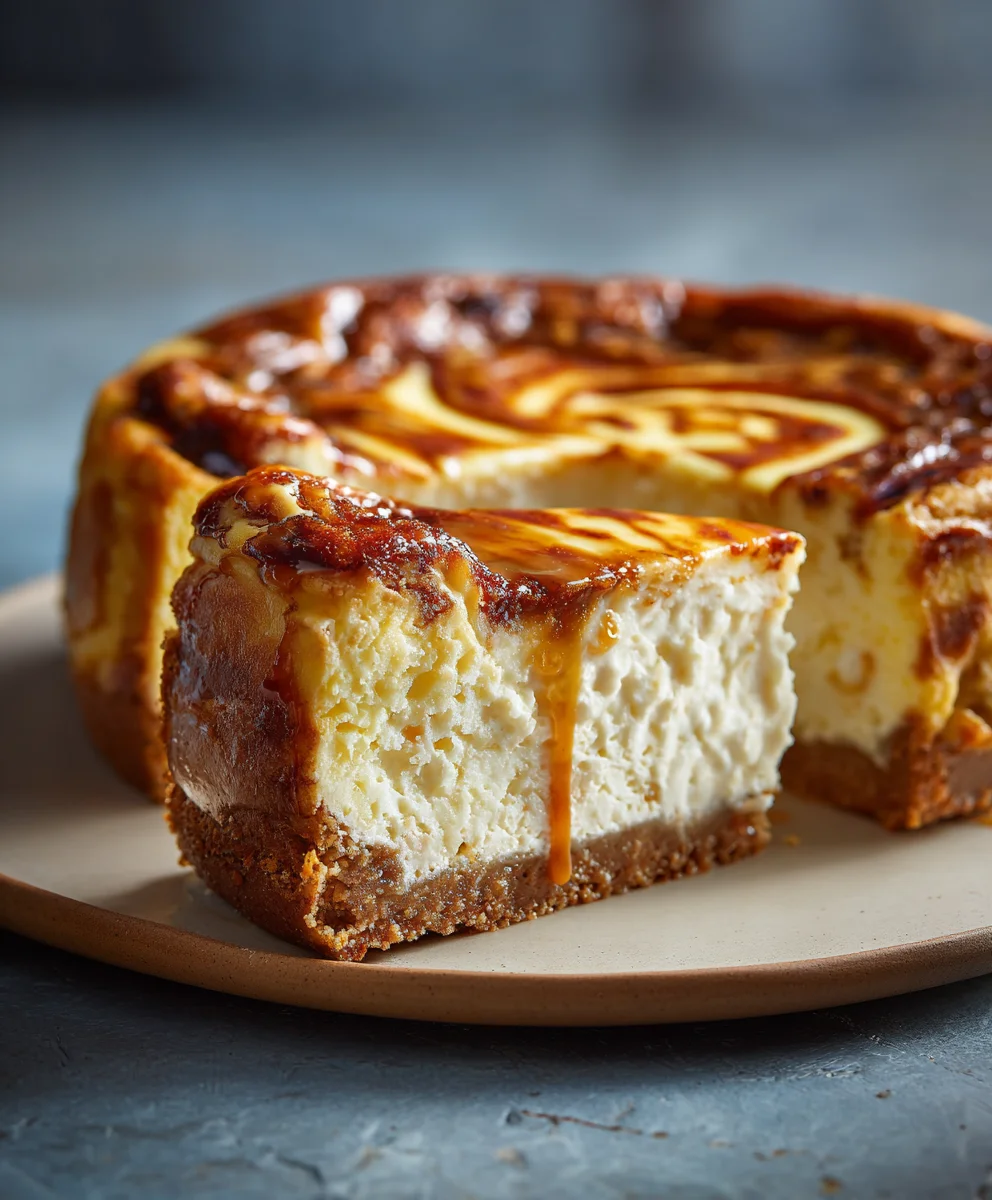
Honey Bun Cheesecake. What if I told you that two of your absolute favorite sweet treats could merge into one glorious, show-stopping dessert? Picture this: the comforting, cinnamony swirl of a classic honey bun, with its irresistible sticky glaze, gracefully united with the rich, velvety smooth indulgence of a perfectly baked cheesecake. It’s a culinary dream come true, transforming humble breakfast pastry nostalgia into a sophisticated, yet delightfully approachable, dessert experience.
While cheesecakes boast an ancient lineage, tracing back to the Greeks, and honey buns are a beloved American convenience store staple, this ingenious combination is a testament to modern dessert innovation – an ode to elevating comfort to an art form. I’ve personally fallen head over heels for the way the warm spices complement the cool, tangy cream cheese, creating a symphony of flavors and textures that is simply unparalleled. This isn’t just any dessert; it’s a celebration of comfort, creativity, and pure, unadulterated deliciousness.
Prepare yourself to create a dessert that will undoubtedly become legendary among your friends and family. This
Honey Bun Cheesecake
recipe is more than just a sweet treat; it’s an unforgettable experience, guaranteed to satisfy even the most discerning sweet tooth. You simply must try making this incredible
Honey Bun Cheesecake
.

Ingredients:
- For the Honey Bun Crust:
- 8-10 (approximately 12 oz total) store-bought honey buns, preferably the glazed variety
- 6 tablespoons (85g) unsalted butter, melted
- 1 tablespoon granulated sugar (optional, for extra sweetness if desired)
- ¼ teaspoon ground cinnamon
- ¼ teaspoon salt
- For the Cheesecake Filling:
- 4 (8-ounce) packages full-fat cream cheese, softened to room temperature
- 1 ¾ cups granulated sugar
- ¼ cup light brown sugar, packed
- 2 tablespoons all-purpose flour
- ½ cup full-fat sour cream, at room temperature
- ¼ cup heavy cream
- 2 teaspoons pure vanilla extract
- 1 teaspoon ground cinnamon
- ¼ teaspoon salt
- 4 large eggs, at room temperature
- 1 large egg yolk, at room temperature
- For the Cinnamon-Honey Swirl:
- 2 tablespoons unsalted butter, melted
- ¼ cup light brown sugar, packed
- 1 tablespoon honey
- 1 teaspoon ground cinnamon
- Pinch of salt
- For the Honey Glaze Topping:
- 1 ½ cups powdered sugar, sifted
- 3 tablespoons milk (whole milk or half-and-half works best)
- 2 tablespoons honey
- ½ teaspoon pure vanilla extract
- Optional Garnish:
- Additional crumbled honey bun pieces
- A light dusting of ground cinnamon
- Extra drizzle of honey
For the Honey Bun Crust:
- Prepare Your Pan: First things first, grab your 9-inch springform pan. I always like to grease the bottom and sides thoroughly with butter or non-stick spray. Then, for extra non-stick insurance and easier removal later, I’ll cut a round of parchment paper to fit the bottom of the pan and place it inside. For cheesecakes that will be baked in a water bath (which ours will be, because it’s the secret to a perfect creamy texture and no cracks!), it’s absolutely crucial to wrap the outside of your springform pan with several layers of heavy-duty aluminum foil. Make sure it goes all the way up the sides to prevent any water from seeping in. Trust me on this; a soggy crust is nobody’s friend!
- Crush the Honey Buns: Now for the star of our crust – the honey buns! You’ll want to either use a food processor for this or, if you don’t have one, a large zip-top bag and a rolling pin works just as well. Tear the honey buns into smaller pieces and pulse them in the food processor until they form fine, moist crumbs. If you’re using the bag and rolling pin method, place the torn pieces in the bag, seal it, and crush them until you have fine crumbs. The goal here is a texture similar to graham cracker crumbs, but with all that glorious honey bun flavor. This might take a few minutes, but it’s worth it for the ultimate “Honey Bun Cheesecake” experience.
- Mix the Crust Ingredients: In a medium bowl, combine the honey bun crumbs, melted butter, optional granulated sugar (I sometimes add it if I want an extra touch of sweetness, but honey buns are pretty sweet on their own!), ground cinnamon, and salt. Stir everything together until the crumbs are evenly moistened. The mixture should feel like wet sand and hold together when you press it between your fingers. This ensures a sturdy, flavorful base for our cheesecake.
- Press into the Pan: Pour the crumb mixture into your prepared springform pan. Using the bottom of a flat-bottomed glass or a measuring cup, firmly and evenly press the mixture over the bottom of the pan. You want a compact, level crust. Don’t press it up the sides; we’re just focusing on the base for this recipe. Once pressed, place the pan in the freezer for at least 15-20 minutes while you prepare the filling. This helps the crust set and prevents it from crumbling when the filling is added.
For the Cheesecake Filling:
- Preheat and Prep: Preheat your oven to 325°F (160°C). This is a critical step for successful baking! Ensure your cream cheese, eggs, sour cream, and egg yolk are all at room temperature. This is incredibly important for achieving a smooth, lump-free cheesecake batter. Cold ingredients will not emulsify properly, leading to a lumpy texture.
- Cream the Cream Cheese and Sugars: In the bowl of a stand mixer fitted with the paddle attachment (or using a large bowl and an electric hand mixer), beat the softened cream cheese on medium speed for about 2-3 minutes, until it’s completely smooth and creamy. Make sure there are no lumps at all. Then, gradually add the granulated sugar, light brown sugar, and flour. Continue beating on medium-low speed for another 2-3 minutes, scraping down the sides of the bowl frequently with a rubber spatula, until the mixture is light and fluffy and the sugars are fully incorporated. The flour acts as a stabilizer, helping to prevent cracks in our cheesecake.
- Add Wet Ingredients (Except Eggs): Reduce the mixer speed to low. Add the sour cream, heavy cream, vanilla extract, ground cinnamon, and salt. Mix until just combined, again making sure to scrape down the sides of the bowl to ensure everything is evenly incorporated. We want to avoid overmixing at this stage.
- Incorporate the Eggs: Here’s where we need to be extra gentle. Add the eggs one at a time, mixing on very low speed just until each egg is incorporated before adding the next. Then, add the single egg yolk, mixing just until it’s combined. The key here is not to overmix! Overmixing once the eggs are added introduces too much air into the batter, which can cause the cheesecake to puff up too much during baking and then collapse, leading to cracks. After the last egg is just combined, give the bowl one final scrape around the sides and bottom with your spatula to ensure uniformity.
For the Cinnamon-Honey Swirl:
- Combine Swirl Ingredients: In a small bowl, whisk together the melted butter, light brown sugar, honey, ground cinnamon, and pinch of salt until well combined and smooth. This creates a wonderfully fragrant and sticky swirl that will bake beautifully into the cheesecake, echoing those classic honey bun flavors. Set this aside briefly while we assemble the cheesecake.
Assembling and Baking the Honey Bun Cheesecake:
- Pour the Filling: Retrieve your chilled springform pan with the honey bun crust from the freezer. Carefully pour the creamy cheesecake filling over the crust. Gently tap the pan on the counter a few times to release any large air bubbles. This step also contributes to a smoother, crack-free finish.
- Add the Swirl: Now for the fun part! Dollop spoonfuls of the cinnamon-honey swirl mixture over the top of the cheesecake filling. Don’t worry about being too precise; rustic swirls look great! Once you’ve added all the dollops, take a thin knife, a skewer, or even a toothpick, and gently swirl the mixture into the cheesecake batter. Try not to go too deep into the batter, or you risk disturbing the crust. You’re aiming for a beautiful marbled effect, resembling the swirls in a classic honey bun.
- Prepare the Water Bath: Place the foil-wrapped springform pan inside a larger roasting pan. Carefully pour hot water into the roasting pan until it comes about halfway up the sides of the springform pan. The water bath creates a moist, even baking environment, which is paramount for a perfectly smooth and creamy cheesecake. It prevents the edges from baking too quickly and cracking, and ensures the center cooks evenly.
-
Bake the Cheesecake: Carefully transfer the entire roasting pan with the cheesecake into your preheated 325°F (160°C) oven. Bake for approximately 60-75 minutes. The exact baking time can vary depending on your oven, so keep an eye on it.
How to tell if your Honey Bun Cheesecake is done:
The cheesecake is ready when the edges are set and slightly puffed, but the center (about a 2-3 inch circle in the middle) still has a slight jiggle to it when you gently shake the pan. Do not overbake! Overbaking is a common cause of cracks.
- Cooling Process – Phase 1 (In the Oven): Once the cheesecake is baked to perfection, turn off the oven. Leave the oven door ajar (you can prop it open with a wooden spoon) and let the cheesecake cool in the water bath inside the oven for 1 hour. This slow cooling prevents sudden temperature changes, which can also lead to cracking. This is another one of my little secrets for a perfect cheesecake!
- Cooling Process – Phase 2 (Room Temperature): After 1 hour in the oven, carefully remove the springform pan from the water bath (be very careful with the hot water!) and place it on a wire rack. Remove the aluminum foil wrapping at this stage. Allow the cheesecake to cool completely to room temperature, which will take another 2-3 hours.
- Cooling Process – Phase 3 (Chilling): Once the cheesecake has reached room temperature, cover it loosely with plastic wrap (being careful not to let the plastic wrap touch the top of the cheesecake) and transfer it to the refrigerator. Chill for at least 6-8 hours, but ideally overnight. This chilling step is non-negotiable! It allows the cheesecake to fully set and firm up, ensuring perfect slices and maximum flavor. Patience truly is a virtue when making cheesecake.
For the Honey Glaze Topping:
- Prepare the Glaze: Once your Honey Bun Cheesecake is thoroughly chilled and you’re ready to serve, you can prepare the glaze. In a medium bowl, whisk together the sifted powdered sugar, milk, honey, and vanilla extract until the mixture is smooth and has a pourable consistency. If it’s too thick, add a tiny bit more milk, a half-teaspoon at a time. If it’s too thin, add a little more sifted powdered sugar. You want a glaze that drizzles nicely but isn’t watery.
- Apply the Glaze: Carefully remove the sides of the springform pan from your chilled cheesecake. You can run a thin knife around the edge first if you wish, to ensure clean release. Gently pour or drizzle the honey glaze evenly over the top of the cheesecake. Let some of it drip alluringly down the sides.
Chilling and Serving:
- Final Chill (Optional): If you have time, let the glazed cheesecake sit in the refrigerator for another 15-30 minutes to allow the glaze to set slightly. This is optional, but it gives a slightly firmer glaze.
- Slice and Garnish: When you’re ready to serve this glorious “Honey Bun Cheesecake”, dip a sharp knife in hot water and wipe it clean between each slice for the cleanest cuts. This makes a huge difference in presentation. Garnish each slice with additional crumbled honey bun pieces, a light dusting of cinnamon, or an extra drizzle of honey if you’re feeling extra indulgent. This cheesecake is truly a showstopper, and it tastes even better than it looks! Store any leftover cheesecake covered in the refrigerator for up to 5 days. I guarantee it won’t last that long!
Conclusion:
And there you have it, my friends! We’ve reached the sweet finale of our culinary journey together, and I truly hope you’re feeling as excited as I am about this incredible creation. This isn’t just any dessert; it’s a celebration of comfort, nostalgia, and pure, unadulterated indulgence. The way the soft, cinnamon-swirled honey bun crust cradles that impossibly creamy, perfectly spiced cheesecake filling is nothing short of a revelation. Each bite is a symphony of textures and flavors – the gentle chewiness of the crust, the velvety smooth cheesecake, and that iconic sweet glaze that ties it all together with a delightful sticky finish. It’s rich, it’s comforting, and it utterly delivers on the promise of its name, combining two beloved classics into one show-stopping treat.
I genuinely believe this is a must-try recipe for anyone who loves baking, cheesecake, or simply enjoys treating themselves and their loved ones to something truly special. It’s perfect for impressing guests at a dinner party, bringing to a potluck (be warned, it’ll disappear fast!), or simply elevating a quiet evening at home into an extraordinary one. The satisfaction of pulling this masterpiece from your oven and seeing the sheer delight on people’s faces as they take their first bite is immeasurable. It’s a dessert that tells a story, evokes happy memories, and creates new ones with every forkful.
Serving Suggestions & Delightful Variations:
While this cheesecake is absolutely divine on its own, there are so many ways to elevate your experience or put your own personal spin on it. For a classic presentation, simply serve it chilled, perhaps with a dusting of powdered sugar or a fresh sprig of mint for a touch of elegance. But why stop there?
- Whipped Cream Wonderland: A generous dollop of freshly whipped cream, lightly sweetened and perhaps with a hint of vanilla extract, provides a beautiful, airy contrast to the rich density of the cheesecake.
- Berry Bliss: A medley of fresh berries – think vibrant strawberries, tart raspberries, or juicy blueberries – adds a burst of freshness and a lovely tang that cuts through the sweetness beautifully.
- Caramel or Chocolate Drizzle: For the ultimate indulgence, a warm drizzle of homemade caramel sauce or a rich chocolate ganache can take this dessert from amazing to absolutely unforgettable.
- Coffee Companion: This cheesecake pairs exquisitely with a strong cup of coffee, an espresso, or even a glass of chilled milk for a truly comforting experience.
- Spice it Up: Feel free to experiment with the spices in your cheesecake filling. A pinch of nutmeg or allspice alongside the cinnamon can add another layer of warmth and complexity.
- Nutty Crunch: For those who love a bit of crunch, consider adding a sprinkle of toasted pecans or walnuts over the top just before serving, or even incorporate them into the crust.
- Miniature Marvels: For individual servings or portion control, you could adapt this recipe to make mini Honey Bun Cheesecakes using a muffin tin with paper liners. Adjust baking times accordingly!
My greatest hope is that you’ll take the plunge and give this recipe a try. Don’t be intimidated by the steps; I promise the reward is well worth the effort. There’s a special kind of magic that happens in the kitchen when you create something so delicious from scratch, and this Honey Bun Cheesecake is truly a testament to that magic. I can’t wait for you to experience the joy of baking it and, more importantly, the sheer pleasure of tasting it. Once you do, please, please, please come back and tell me all about it! Share your photos, your triumphs, your serving suggestions, or any variations you came up with in the comments below. Your feedback and experiences mean the world to me and help our little baking community grow. Happy baking, my friends, and prepare to fall head over heels for your new favorite dessert!
Frequently Asked Questions (FAQs):
How do I prevent my cheesecake from cracking?
Cracking is a common concern with cheesecakes! The key is to bake it gently and avoid sudden temperature changes. A water bath (bain-marie) is highly recommended as it provides moist, even heat. Also, don’t overbake; the center should still have a slight jiggle. After baking, turn off the oven, prop the door open slightly, and let the cheesecake cool gradually inside the oven for about an hour before removing it to cool completely on a wire rack.
Can I make this Honey Bun Cheesecake ahead of time?
Absolutely! Cheesecake is an excellent make-ahead dessert. In fact, it often tastes even better the next day after the flavors have had a chance to meld and deepen. You can prepare and bake the cheesecake 1-2 days in advance. Once fully cooled, cover it loosely with plastic wrap and store it in the refrigerator until you’re ready to serve.
How should I store leftover cheesecake?
Store any leftover Honey Bun Cheesecake in an airtight container or tightly wrapped in plastic wrap in the refrigerator. It will stay fresh and delicious for 4-5 days. For longer storage, you can freeze individual slices (or the whole cheesecake) for up to 1 month. Wrap tightly in plastic wrap, then aluminum foil, and thaw in the refrigerator overnight before serving.
What kind of honey buns should I use for the crust?
For the best results, I recommend using individually packaged, glazed honey buns (like those found in the snack cake aisle) rather than larger bakery-style ones, as their texture and sugar content are perfect for forming the crust. Any popular brand will work wonderfully. You want them to be soft and moist to create that ideal sticky, flavorful base.
Can I make a gluten-free version of this recipe?
Yes, you can! For a gluten-free version, simply substitute gluten-free honey buns (check specialty food stores or online) for the crust. Ensure all other ingredients, such as your cream cheese and flavorings, are certified gluten-free. The baking process and proportions should remain the same.
Do I need a springform pan?
While not strictly mandatory, a springform pan is highly recommended for cheesecakes. Its removable sides make it incredibly easy to release the cheesecake without damaging its beautiful structure. If you don’t have one, you can use a regular round cake pan lined with parchment paper that extends over the sides, allowing you to lift the cooled cheesecake out.
Honey Bun Cheesecake: Sticky Glaze & Creamy Delight
A show-stopping dessert merging the comforting, cinnamony swirl of a classic honey bun with its irresistible sticky glaze, united with the rich, velvety smooth indulgence of a perfectly baked cheesecake. A celebration of comfort, creativity, and pure deliciousness.
Ingredients
-
8-10 (approx. 12 oz) glazed honey buns
-
6 tablespoons (85g) unsalted butter, melted
-
1 tablespoon granulated sugar (optional)
-
¼ teaspoon ground cinnamon
-
¼ teaspoon salt
-
4 (8-ounce) packages full-fat cream cheese, softened
-
1 ¾ cups granulated sugar
-
¼ cup light brown sugar, packed
-
2 tablespoons all-purpose flour
-
½ cup full-fat sour cream, room temperature
-
¼ cup heavy cream
-
2 teaspoons pure vanilla extract
-
1 teaspoon ground cinnamon
-
¼ teaspoon salt
-
4 large eggs, room temperature
-
1 large egg yolk, room temperature
-
2 tablespoons unsalted butter, melted (for swirl)
-
¼ cup light brown sugar, packed (for swirl)
-
1 tablespoon honey (for swirl)
-
1 teaspoon ground cinnamon (for swirl)
-
Pinch of salt (for swirl)
-
1 ½ cups powdered sugar, sifted (for glaze)
-
3 tablespoons milk (for glaze)
-
2 tablespoons honey (for glaze)
-
½ teaspoon pure vanilla extract (for glaze)
-
Additional crumbled honey bun pieces (optional garnish)
-
A light dusting of ground cinnamon (optional garnish)
-
Extra drizzle of honey (optional garnish)
Instructions
-
Step 1
Grease a 9-inch springform pan, line bottom with parchment, and wrap outside with heavy-duty foil. Crush honey buns into fine crumbs. Combine crumbs with melted butter, optional sugar, cinnamon, and salt. Press mixture firmly into the pan bottom. Freeze for 15-20 minutes. -
Step 2
Preheat oven to 325°F (160°C). Ensure cream cheese, eggs, sour cream, and egg yolk are at room temperature. Beat softened cream cheese until smooth (2-3 min). Add granulated sugar, brown sugar, and flour; beat 2-3 min, scraping bowl. Reduce speed to low. Add sour cream, heavy cream, vanilla, cinnamon, and salt; mix until just combined. Add eggs one at a time, then egg yolk, mixing on very low speed until just incorporated. Do not overmix. -
Step 3
Whisk melted butter, light brown sugar, honey, ground cinnamon, and pinch of salt until smooth. -
Step 4
Pour filling over chilled crust. Tap pan to release air bubbles. Dollop cinnamon-honey swirl over filling and gently swirl with a knife or skewer. Place springform pan in a larger roasting pan. Pour hot water into roasting pan halfway up the sides of the springform pan. -
Step 5
Bake at 325°F (160°C) for 60-75 minutes. Cheesecake is ready when edges are set but the center (about a 2-3 inch circle) still has a slight jiggle. Do not overbake. -
Step 6
Turn off oven, leave door ajar. Let cheesecake cool in the water bath inside the oven for 1 hour. Remove from water bath, unwrap foil, and cool completely on a wire rack (2-3 hours). Cover loosely and chill in the refrigerator for at least 6-8 hours, ideally overnight. -
Step 7
Once cheesecake is thoroughly chilled, whisk sifted powdered sugar, milk, honey, and vanilla extract until smooth and pourable. Adjust consistency if needed. Carefully remove the sides of the springform pan. Pour or drizzle the honey glaze evenly over the top of the cheesecake. -
Step 8
Optional: Chill glazed cheesecake for another 15-30 minutes for the glaze to set. When ready to serve, dip a sharp knife in hot water and wipe clean between each slice for cleanest cuts. Garnish with optional crumbled honey bun pieces, cinnamon, or extra honey. Store any leftovers covered in the refrigerator for up to 5 days.
Important Information
Nutrition Facts (Per Serving)
It is important to consider this information as approximate and not to use it as definitive health advice.
Allergy Information
Please check ingredients for potential allergens and consult a health professional if in doubt.
Leave a Comment