
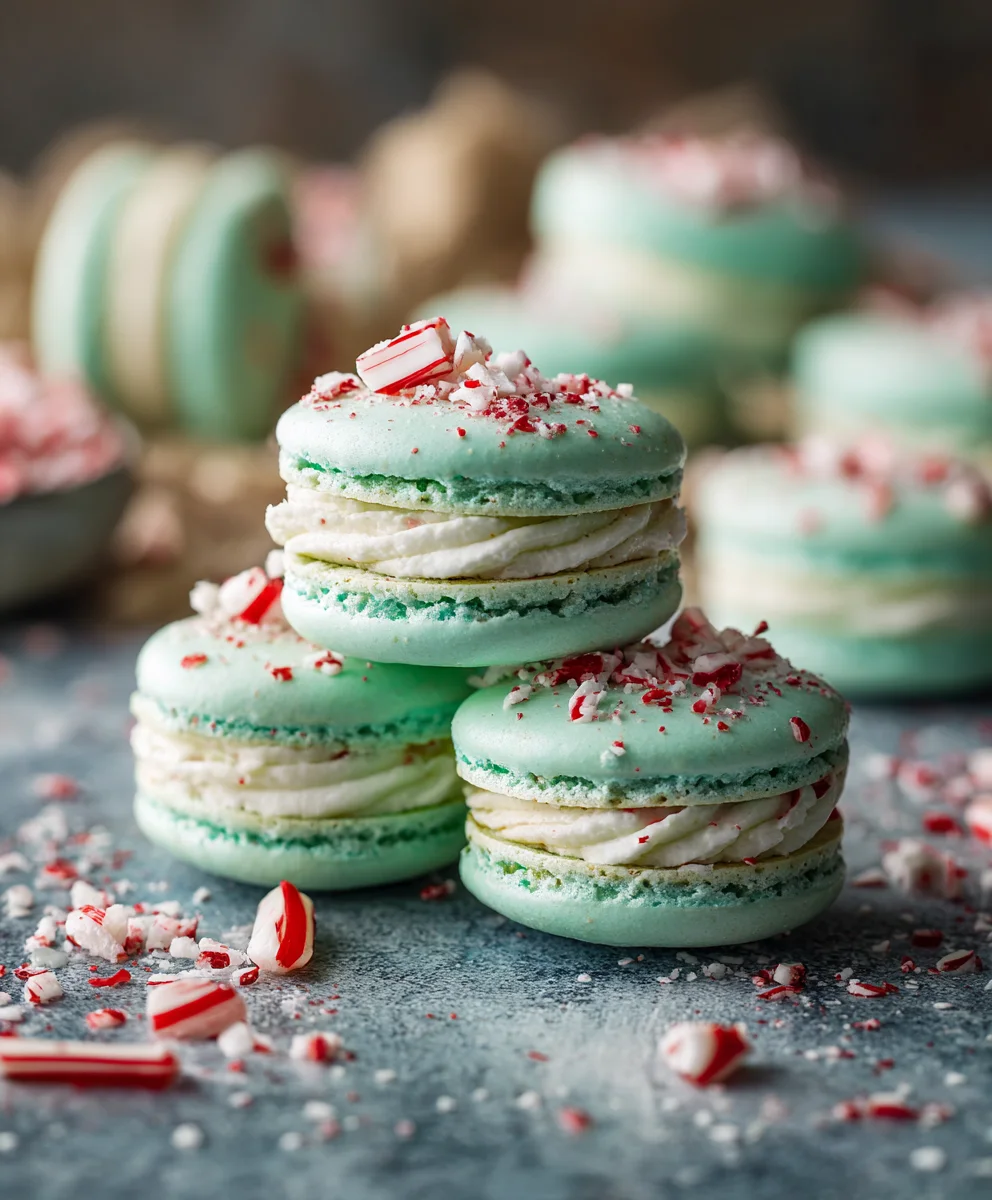
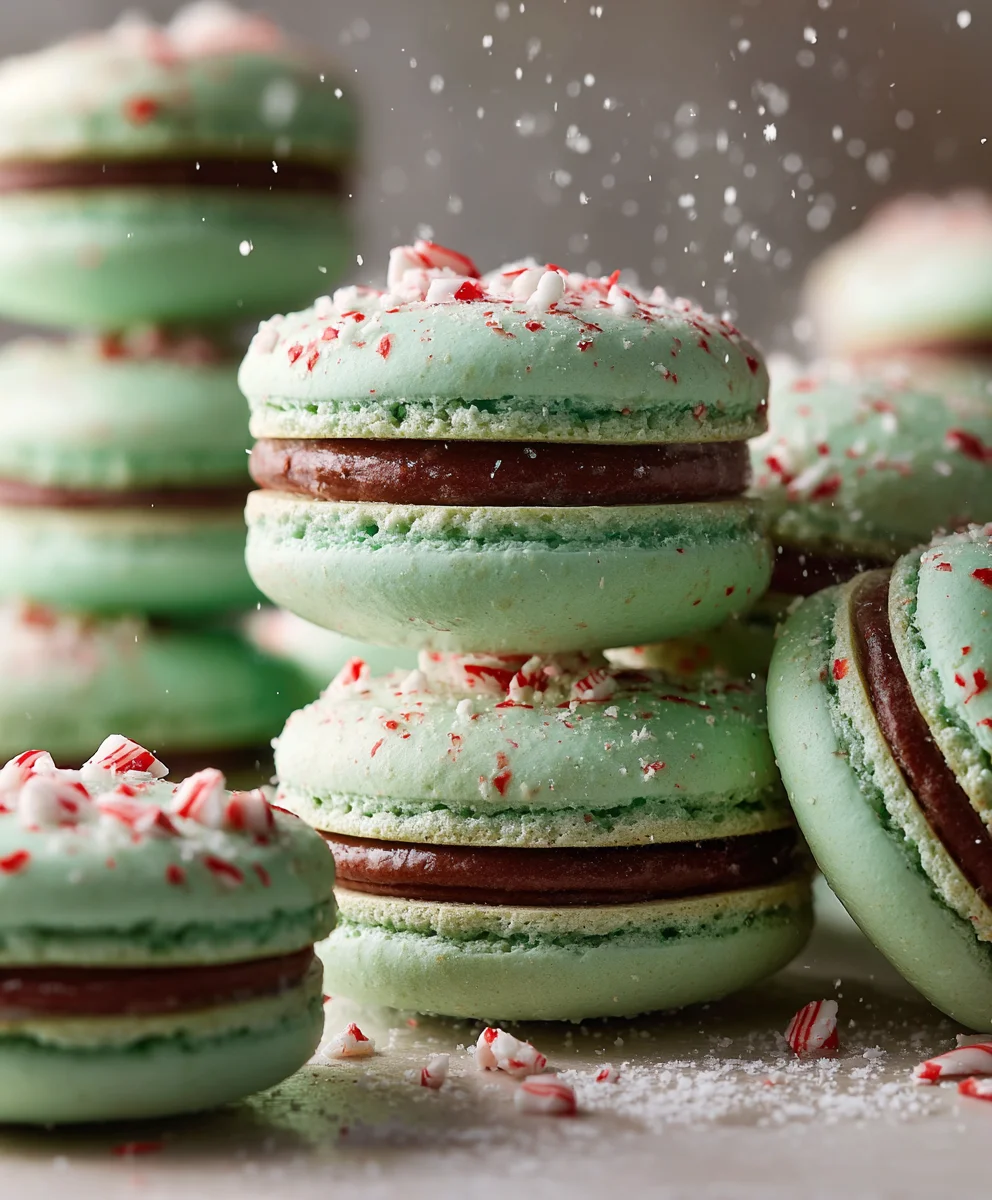
Peppermint Macarons are more than just a delightful treat; they are a miniature masterpiece, promising a sophisticated and refreshing twist on a classic. Originating from Italian meringue-based cookies before finding their iconic, delicate form in French patisseries, macarons have always held a special place in the world of confections. While traditional flavors like vanilla and chocolate reign supreme, the holiday season invites a truly magical and invigorating adaptation. This is where our festive iteration truly shines. Imagine the crisp, delicate shell giving way to a wonderfully chewy almond interior, bursting with a cool, invigorating peppermint essence. This unique combination, often enhanced with a luscious white chocolate ganache or a velvety buttercream, offers a symphony of textures and flavors that is utterly irresistible. The vibrant color, the signature ‘feet,’ and the exquisite balance of sweet and minty notes make Peppermint Macarons a beloved showstopper for any gathering or a special indulgence just for you. They embody elegance and joy, transforming any occasion into something truly memorable. If you’ve ever dreamt of crafting these beautiful confections, you’re in the perfect place to begin your journey.

Ingredients:
-
For the Peppermint Macaron Shells:
- 100g (approx. 1 cup) aged egg whites (from 3 large eggs), at room temperature
- 90g (approx. 1/2 cup – 1 tbsp) granulated sugar
- 110g (approx. 1 cup) almond flour, finely ground
- 110g (approx. 1 cup) powdered sugar (confectioners’ sugar)
- 1/4 teaspoon cream of tartar (optional, but highly recommended for meringue stability)
- 1/2 teaspoon peppermint extract (optional, for subtle peppermint in the shells)
- Red or pink gel food coloring (a few drops, for desired color)
-
For the Peppermint White Chocolate Ganache Filling:
- 150g (approx. 5.3 oz) good quality white chocolate, finely chopped or in chips
- 75ml (approx. 1/3 cup) heavy cream (35% fat or higher)
- 1/2 teaspoon peppermint extract (or to taste, adjust based on strength)
- Optional: 1-2 drops red gel food coloring for a pink tint
-
For Decoration:
- 2-3 candy canes or an equal amount of hard peppermint candies, crushed
- Optional: Melted white chocolate for drizzling
Preparing the Macaron Shells: Precision and Patience
Making Peppermint Macarons can feel like a delicate dance, but with careful attention to detail and a sprinkle of patience, you’ll be incredibly proud of your beautiful, airy shells. The key here is accurate measurements and understanding each step’s purpose. Let’s get started on those vibrant, festive shells!
-
Prepare Your Dry Ingredients:
First, we need to create our “tant pour tant” – the equal parts almond flour and powdered sugar. In a medium bowl, combine your 110g of almond flour and 110g of powdered sugar. Now, here’s a crucial step for achieving those perfectly smooth macaron tops: sift this mixture together at least twice. I often sift it three times! Sifting removes any lumps from the powdered sugar and ensures there are no large bits of almond flour, which could cause bumpy shells. It also helps to aerate the mixture, contributing to a lighter texture. Set this super-fine blend aside.
-
Whip the Meringue: The Heart of the Macaron:
This is where the magic really begins. Ensure your mixing bowl (preferably stand mixer with a whisk attachment) and whisk are impeccably clean and free of any grease. Any trace of fat can prevent your egg whites from whipping properly. Place your 100g of room temperature aged egg whites into the clean bowl. Room temperature egg whites whip up with more volume and stability than cold ones. If you haven’t “aged” your egg whites (let them sit out covered overnight or for a few hours), don’t fret too much, but it can help. Begin whipping the egg whites on medium speed until they become foamy, like bubble bath. At this point, add your 1/4 teaspoon of cream of tartar (if using). The cream of tartar is an acidic stabilizer that helps strengthen the egg white structure, resulting in a more stable and voluminous meringue. Continue whipping until soft peaks form.
Once you have soft peaks, gradually start adding your 90g of granulated sugar, about a tablespoon at a time, while the mixer is still running on medium-high speed. Do not rush this step! Adding the sugar slowly allows it to fully dissolve into the egg whites, creating a smooth, glossy, and stable meringue. Once all the sugar has been added, increase the speed to high and continue whipping until you achieve stiff, glossy peaks. When you lift the whisk, the meringue should hold its shape firmly and have a beautiful sheen. If you want a subtle peppermint flavor in your shells, add the 1/2 teaspoon of peppermint extract and your red/pink gel food coloring during the last minute of whipping. Be careful with liquid extracts and food colorings, as too much can destabilize the meringue; gel food coloring is always preferred. The color should be slightly more intense than your desired final shade, as it will lighten a bit when mixed with the dry ingredients.
-
The Macaronage: The Art of Folding:
Now for arguably the most critical step: macaronage. This is the process of folding the dry ingredients into the meringue until the batter reaches the perfect consistency. Add about half of your sifted almond flour/powdered sugar mixture to your meringue. Using a large rubber spatula, gently begin to fold the dry ingredients into the meringue using a “J” motion: scrape down the side of the bowl, sweep across the bottom, and then fold it back over the top. Rotate the bowl as you go. Once the first half is mostly incorporated, add the remaining dry mixture and continue folding.
This is where precision is paramount. You are aiming for a consistency often described as “lava-like” or “ribbon stage.” When you lift your spatula, the batter should fall off in a slow, continuous ribbon that eventually melts back into itself within 15-20 seconds. Undermixing will result in lumpy shells with no “feet” (the ruffled base), while overmixing will create a runny batter that spreads too much, has no feet, and can lead to hollow shells. It’s a delicate balance! Scrape down the sides of the bowl frequently to ensure everything is evenly incorporated. A good way to test is to take a small dollop of batter and drop it back into the bowl; if the peaks disappear and it flattens within that 15-20 second window, it’s ready. Stop folding as soon as you reach this stage – even a few extra folds can be too much.
-
Piping the Shells: Creating Uniformity:
Prepare a piping bag fitted with a round tip (I use a Wilton 1A or Ateco 805). Carefully transfer your macaron batter into the piping bag. I find it easiest to place the piping bag into a tall glass and fold the edges over to keep it stable and clean. Line a baking sheet with a silicone mat (like Silpat) or parchment paper. If using parchment paper, you might want to print a macaron template (approximately 1.5-inch circles) and place it underneath to help you pipe uniform shells. I highly recommend silicone mats for consistent results.
Hold the piping bag vertically, about 1/2 inch above the baking mat. Apply even, consistent pressure to pipe out circles of batter. Stop squeezing and quickly flick your wrist to the side to create a clean break. Try to make all your shells roughly the same size for easier pairing later. Leave about 1-2 inches of space between each macaron. Once you’ve piped all your shells on a tray, firmly tap the baking sheet on your countertop 2-3 times. Rotate the tray and tap it again. This helps to release any trapped air bubbles, which can cause cracks on the surface of your shells. You can also use a toothpick to pop any visible bubbles for an even smoother top. Repeat for any remaining batter.
-
Drying (Resting) the Shells: Developing a Skin:
This step is often overlooked but is crucial for achieving those signature “feet.” Leave your piped macaron shells to rest at room temperature for anywhere from 30 minutes to 2 hours, or even longer, depending on the humidity in your environment. The goal is for a “skin” to form on the surface of the shells. How do you know when they’re ready? Gently touch the surface of a macaron shell with your fingertip; if it’s no longer sticky and feels dry to the touch, they are ready to bake. This skin prevents the air from escaping through the top during baking, forcing it out through the bottom, which creates the beautiful ruffled feet. If it’s very humid where you are, this step might take longer, or you might even need to use a dehumidifier or fan.
-
Baking the Macaron Shells: The Final Heat:
Preheat your oven to 300°F (150°C) with a rack in the middle position. Make sure your oven is accurately calibrated; an oven thermometer is a great investment for macaron baking. Bake one tray at a time for 12-16 minutes. Baking times can vary significantly between ovens, so get to know yours. After about 6-8 minutes, you should start to see the “feet” developing around the base of the shells. This is a wonderful moment! If you notice uneven baking, you can rotate the tray halfway through the baking time.
To check for doneness, gently try to wiggle a macaron shell. If it’s stable and doesn’t move much from its “foot,” it’s likely done. If it wiggles excessively, it needs a few more minutes. Over-baking can make them brittle, while under-baking can make them soft and stick to the mat. Once baked, remove the baking sheet from the oven and slide the silicone mat (with the macarons still on it) onto a wire rack to cool completely. Do not attempt to remove the macarons from the mat until they are completely cool, or they will stick and break. Patience is key here!
Preparing the Peppermint White Chocolate Ganache Filling: Creamy Indulgence
While your macaron shells are cooling, let’s whip up a delightful, creamy peppermint white chocolate ganache that will perfectly complement the delicate shells. This filling is incredibly easy to make and tastes absolutely divine, providing that iconic festive flavor for your Peppermint Macarons.
-
Melt the White Chocolate and Cream:
Finely chop your good quality white chocolate and place it in a heatproof bowl. The finer the chop, the faster and more evenly it will melt. In a small saucepan, heat your heavy cream over medium heat until it just begins to simmer around the edges – do not boil it. Once simmering, immediately pour the hot cream over the chopped white chocolate. Let it sit undisturbed for 2-3 minutes; this allows the residual heat from the cream to melt the chocolate evenly.
-
Emulsify and Flavor:
After the resting period, gently stir the mixture starting from the center of the bowl, slowly working your way outwards. Continue stirring until the mixture is completely smooth and glossy, forming a beautiful ganache. If there are any stubborn lumps, you can gently microwave it for 10-15 seconds and stir again, or place the bowl over a pot of simmering water (bain-marie method) for a minute or two, stirring constantly. Once smooth, stir in your 1/2 teaspoon of peppermint extract. Taste and adjust if you desire a stronger peppermint kick. If you want a pretty pink ganache, add 1-2 drops of red gel food coloring and stir until evenly distributed.
-
Chill and Thicken:
Cover the bowl with plastic wrap, pressing it directly onto the surface of the ganache to prevent a skin from forming. Place the ganache in the refrigerator for at least 2-3 hours, or until it has thickened to a pipeable consistency. It should be firm enough to hold its shape but still spreadable. If you’re in a hurry, you can pop it in the freezer for about 30-45 minutes, stirring every 10-15 minutes to ensure even cooling and prevent it from freezing solid. The consistency is key for piping a neat filling.
Assembling and Maturing Your Peppermint Macarons: The Grand Finale
With your perfectly baked shells and rich, peppermint-infused ganache ready, it’s time to bring these festive delights together. This is where your individual Peppermint Macarons come to life!
-
Prepare for Assembly:
Take your cooled macaron shells and gently peel them off the silicone mats. You should have a collection of beautiful, footed shells. Lay them out and carefully match them up by size and shape. This ensures that when you sandwich them, they look uniform and pretty. Transfer your chilled ganache filling into another piping bag fitted with a round tip (a Wilton 12 or similar small round tip works well here).
Take your candy canes or peppermint candies and crush them. You can do this by placing them in a Ziploc bag and gently pounding them with a rolling pin or the bottom of a heavy pan. Don’t make them too fine; some small chunks add wonderful texture and visual appeal.
-
Fill and Decorate:
Take one matched macaron shell, holding it flat side up. Pipe a generous dollop of peppermint white chocolate ganache onto the flat side of one shell, leaving a small border around the edge. You want enough filling to create a nice bulge, but not so much that it oozes out excessively when pressed. Gently place the matching shell on top, twisting ever so slightly to adhere and evenly distribute the filling. Repeat this process for all your shells.
For an extra festive touch, roll the edges of the assembled macarons in the crushed peppermint candies, so the filling acts as “glue.” You can also melt a small amount of white chocolate and drizzle it over the tops of the finished macarons for an elegant flourish. These small details really elevate the presentation of your Peppermint Macarons.
-
Maturing (Resting) the Macarons: Enhancing Flavor and Texture:
This is a non-negotiable step for truly perfect macarons. While they are delicious right after assembly, macarons need time to “mature” or “rest” in the refrigerator. Place your assembled Peppermint Macarons in an airtight container and refrigerate them for at least 12-24 hours. During this time, the moisture from the filling will migrate into the shells, softening them slightly and melding the flavors together. This results in that wonderfully chewy-soft texture that is characteristic of a perfect macaron. They will transform from slightly crisp to delightfully tender.
Before serving, allow them to come to room temperature for about 15-30 minutes for the best texture and flavor. They will keep well in an airtight container in the refrigerator for up to 5-7 days, or they can be frozen for up to 1 month (thaw in the refrigerator overnight).
Congratulations! You’ve created a batch of beautiful, delicious, and festive Peppermint Macarons. Enjoy the fruits of your labor!
Conclusion:
After guiding you through the intricate yet immensely rewarding process of crafting these delightful treats, I truly hope you feel inspired and ready to embark on your own macaron adventure. This recipe for Peppermint Macarons isn’t just about baking; it’s about creating a moment of pure culinary magic in your kitchen. Imagine the delicate crunch of the perfect macaron shell giving way to a wonderfully chewy interior, all infused with that refreshing burst of peppermint that dances beautifully with the sweet, creamy filling. It’s a flavor profile that evokes warmth, cheer, and a touch of nostalgic holiday charm, making them absolutely irresistible.
I understand that the world of macarons can seem daunting at first glance, but I promise you, the effort is worth every single step. There’s an unparalleled sense of accomplishment that comes with piping those perfect little circles and watching the characteristic ‘feet’ rise in the oven. These aren’t just any ordinary cookie; they are a sophisticated confection that showcases your dedication and passion for baking. The vibrant colors, the elegant presentation, and the unique flavor make these Peppermint Macarons an absolute showstopper, guaranteed to impress anyone lucky enough to try one. They are a celebration of flavor and texture, a testament to the fact that sometimes, the most exquisite things require a little patience and love.
Why These Peppermint Macarons Are an Absolute Must-Try:
- Unforgettable Flavor Combination: The cool, invigorating essence of peppermint perfectly balances the sweetness of the macaron, creating a truly refreshing and indulgent experience. It’s a sophisticated twist on a classic, making them stand out from the usual fare.
- Perfect for Any Occasion: While they shine brightly during the holiday season, their unique appeal makes them fantastic for dinner parties, brunches, or simply as a special treat for yourself and your loved ones. They add an elegant touch to any dessert spread.
- The Joy of Handmade: There’s deep satisfaction in creating something so beautiful and delicious from scratch. Each batch is a labor of love, and that care translates into a truly superior product that store-bought options simply can’t match.
- Impressive Presentation: Their vibrant colors and delicate structure make them incredibly photogenic and a fantastic conversation starter. They look like they came straight from a high-end patisserie, yet you made them in your own home!
Once you’ve mastered these beauties, the possibilities for enjoyment are endless! For serving suggestions, I love to arrange them on a festive platter alongside other holiday treats – think shortbread cookies, chocolate truffles, or a beautiful fruit tart. They make a stunning centerpiece for any dessert table, inviting guests to marvel at their beauty before savoring their exquisite taste. Pair them with a warm cup of hot chocolate topped with whipped cream for the ultimate cozy winter indulgence, or a fragrant herbal tea to truly highlight their delicate flavor. They also make truly thoughtful and impressive homemade gifts; package a few in a beautiful box with a ribbon, and you’ve got a present that speaks volumes about your care and effort.
Feeling adventurous and want to try some variations? While this classic Peppermint Macarons recipe is divine as is, don’t hesitate to experiment! You could try incorporating a rich dark chocolate ganache as a filling instead of buttercream for a more intense chocolate-mint experience. Or, for an extra festive touch, crush some candy canes and gently sprinkle them over the piped macaron shells just before baking – the visual appeal and extra crunch will be delightful. Another idea is to swirl a tiny bit of red food coloring into a portion of the white batter before piping to create beautiful marbled shells, or even use green food coloring for a different aesthetic. If you’re feeling extra festive, consider adding a hint of almond extract to your shells for a slightly different undertone, or even an eggnog-flavored buttercream for a truly unique holiday fusion! The foundation we’ve built together is robust, allowing for plenty of creative exploration.
Now it’s your turn! I genuinely hope this guide has demystified the process and empowered you to try making these spectacular Peppermint Macarons for yourself. Don’t be afraid to dive in; even if your first batch isn’t absolutely perfect, every attempt is a step closer to mastery. Baking is a journey of learning and discovery, and the rewards are so sweet. I’m incredibly eager to hear about your experiences. Please, please, please share your triumphs and even your minor mishaps in the comments below! What was your favorite part of the process? Did you try any of the variations? We’re a community of bakers, and your insights are valuable to everyone. And if you capture a photo of your beautiful creations, don’t forget to tag me on social media – I absolutely love seeing what you bake! Happy baking, and may your kitchen be filled with the delightful aroma of homemade macarons!
Frequently Asked Questions About Peppermint Macarons:
Q: What causes macarons to crack or have no “feet”?
A: Macaron cracking or lack of “feet” (the ruffled edge at the base) is often due to insufficient resting time, uneven oven temperature, or overmixing/undermixing the batter. The resting period, known as “croutage,” allows a skin to form, which helps the macaron rise evenly. Ensure your oven temperature is consistent, and always use an oven thermometer. Macaronage, the mixing process, is crucial; overmixing creates a runny batter, while undermixing results in a lumpy one.
Q: How should I store Peppermint Macarons to keep them fresh?
A: For optimal freshness, store your Peppermint Macarons in an airtight container in the refrigerator for up to a week. The flavor and texture often improve after a day or two in the fridge as the filling softens the shell slightly. If you want to store them longer, they freeze beautifully for up to a month. Thaw them in the refrigerator overnight before bringing them to room temperature for serving.
Q: Can I make the macaron shells ahead of time and fill them later?
A: Absolutely! You can bake the macaron shells several days in advance. Once completely cooled, store them in an airtight container at room temperature. For longer storage, freeze them unfilled. This is a great time-saver, especially when preparing for an event. Just make sure to bring them to room temperature before filling.
Q: What’s the best way to get a strong, natural peppermint flavor in the filling?
A: To achieve a robust and authentic peppermint flavor in your filling, I recommend using a high-quality pure peppermint extract. Start with a small amount and taste as you go, adding more until you reach your desired intensity. Avoid “mint” extracts, which can sometimes have a toothpaste-like flavor. For an extra boost of natural flavor and a touch of color, you can also finely crush a few natural peppermint candies (like candy canes) and incorporate them into the buttercream or sprinkle on top.
Q: My macarons are hollow inside. What went wrong?
A: Hollow macarons are a common challenge! This can be caused by several factors: overwhipping your meringue (creating too much air), insufficient macaronage (the batter is too thick), baking at too high a temperature, or not tapping the baking sheet enough to release air bubbles before resting. Experiment with your meringue stiffness and ensure your batter has the right “lava” consistency when dropped from the spatula.
Perfect Peppermint Macarons: Minty & Sweet Holiday Dessert
Perfect Peppermint Macarons: Delicate shells with chewy almond interiors burst with invigorating peppermint, enhanced by a luscious white chocolate ganache. A sophisticated, refreshing twist on a classic, ideal for holiday gatherings.
Ingredients
-
100g aged egg whites (from 3 large eggs), at room temperature
-
90g granulated sugar
-
110g finely ground almond flour
-
110g powdered sugar (confectioners’ sugar)
-
1/4 tsp cream of tartar (optional)
-
1/2 tsp peppermint extract (optional, for shells)
-
Red or pink gel food coloring (a few drops)
-
150g good quality white chocolate, finely chopped or in chips
-
75ml heavy cream (35% fat or higher)
-
1/2 tsp peppermint extract (or to taste, for ganache)
-
1-2 drops red gel food coloring (optional, for ganache)
-
2-3 candy canes or hard peppermint candies, crushed
-
Melted white chocolate (optional, for drizzling)
Instructions
-
Step 1
Sift 110g almond flour and 110g powdered sugar together at least twice; set aside. -
Step 2
Whip 100g room temperature aged egg whites until foamy. Add 1/4 tsp cream of tartar (optional). Gradually add 90g granulated sugar, whipping to stiff, glossy peaks. Incorporate 1/2 tsp peppermint extract (optional) and gel food coloring in the last minute. -
Step 3
{‘@type’: ‘HowToStep’, ‘text’: “Gently fold the sifted dry ingredients into the meringue in two additions until the batter flows like ‘lava’ or reaches the ‘ribbon stage’ (melts back into itself within 15-20 seconds). Avoid overmixing.”} -
Step 4
Pipe 1.5-inch circles onto silicone-lined baking sheets using a round tip. Firmly tap trays 2-3 times to release air bubbles. -
Step 5
Let piped shells rest at room temperature for 30 minutes to 2 hours (depending on humidity) until a non-sticky skin forms on the surface. -
Step 6
{‘@type’: ‘HowToStep’, ‘text’: “Preheat oven to 300°F (150°C). Bake shells one tray at a time for 12-16 minutes until ‘feet’ develop and shells are stable. Cool completely on a wire rack before removing.”} -
Step 7
For the ganache: Place 150g chopped white chocolate in a heatproof bowl. Heat 75ml heavy cream to a simmer, then pour over the chocolate. Let sit for 2-3 minutes. -
Step 8
Stir the ganache from the center outwards until smooth and glossy. Stir in 1/2 tsp peppermint extract and 1-2 drops of red gel food coloring (optional). -
Step 9
Cover the ganache and refrigerate for 2-3 hours until thickened to a pipeable consistency. -
Step 10
Match cooled macaron shells by size. Crush candy canes. Transfer chilled ganache to a piping bag. -
Step 11
Pipe a dollop of ganache onto one shell and top with a matching shell. Roll edges in crushed peppermint candies for decoration. Optionally, drizzle with melted white chocolate. -
Step 12
Refrigerate assembled macarons in an airtight container for at least 12-24 hours to mature. Allow to come to room temperature for 15-30 minutes before serving. Store in refrigerator for up to 5-7 days or freeze for up to 1 month.
Important Information
Nutrition Facts (Per Serving)
It is important to consider this information as approximate and not to use it as definitive health advice.
Allergy Information
Please check ingredients for potential allergens and consult a health professional if in doubt.

Leave a Comment