
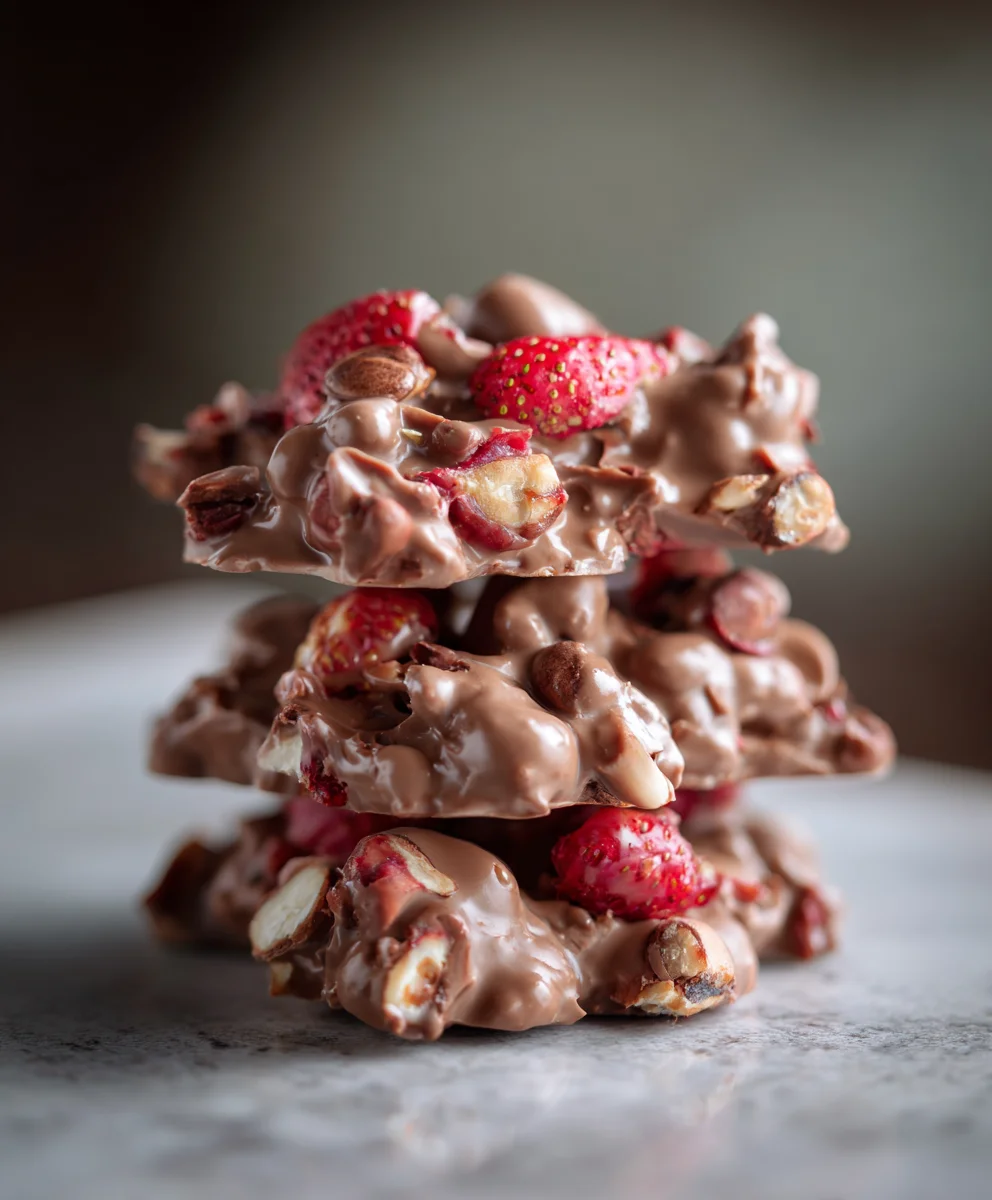
Chocolate Strawberry Yogurt Clusters have taken the snack world by storm, and for good reason! If you’re searching for a delightful, refreshing, and surprisingly simple treat that satisfies both your sweet cravings and your desire for something wholesome, you’ve found your next obsession. I remember first seeing these little gems pop up on my feed and thinking, “Could something so easy truly be that good?” The answer, as I quickly discovered, is a resounding yes!
A Modern Treat with Irresistible Appeal
These clusters are a modern culinary marvel, born from a desire for convenient, guilt-free indulgence, often popularized through viral trends that celebrate smart and delicious eating. They offer a perfect blend of creamy, tangy yogurt, the sweet burst of fresh strawberries, all enveloped in a delightful, snappy chocolate shell. It’s a harmonious symphony of flavors and textures in every single bite – cool, juicy, and wonderfully rich. People adore this dish not only for its incredible taste and satisfying mouthfeel but also for its sheer convenience. With minimal prep and absolutely no baking required, whipping up a batch of these exquisite Chocolate Strawberry Yogurt Clusters becomes an effortlessly enjoyable kitchen endeavor, perfect for a quick snack, a light dessert, or even a clever breakfast component. Trust me, once you try them, they’ll become a delightful staple in your rotation!

Ingredients:
- For the Strawberry Yogurt Clusters:
- 1 ½ cups (approximately 250g) fresh strawberries, hulled and quartered
- 2 cups (480g) plain whole milk Greek yogurt. I always opt for whole milk because it lends a wonderfully creamy texture and prevents the clusters from becoming too icy once frozen.
- 2 tablespoons (30g) maple syrup or honey, or to taste. This is completely optional, depending on the sweetness of your strawberries and your personal preference. I often find a little extra sweetness balances the tang of the yogurt perfectly.
- 1 teaspoon pure vanilla extract (optional, but I love the depth it adds)
- For the Chocolate Coating:
- 1 ½ cups (250g) high-quality chocolate chips or chopped baking chocolate. I usually go for semi-sweet or dark chocolate (around 60-70% cacao) as it creates a beautiful contrast with the sweet and tangy yogurt, but milk chocolate works beautifully if you prefer a sweeter finish.
- 1-2 teaspoons refined coconut oil or shortening. This is my secret ingredient for a super smooth, glossy chocolate coating that sets perfectly with a satisfying snap!
- Optional Garnishes (for an extra flourish!):
- A pinch of flaky sea salt
- Finely chopped nuts (pistachios, almonds)
- Mini chocolate chips
Equipment You’ll Need:
- Large mixing bowl
- Fork or potato masher (for strawberries)
- Baking sheet (standard half-sheet size works best)
- Parchment paper (essential for non-stick freezing!)
- Spoon or small cookie scoop
- Small microwave-safe bowl or a double boiler setup (for melting chocolate)
- Spatula or spoon (for stirring chocolate)
- Fork or dipping tools (for coating clusters)
- Airtight freezer-safe container for storage
Phase 1: Preparing the Strawberry Yogurt Mixture for Your Chocolate Strawberry Yogurt Clusters
-
Prepare Your Strawberries with Care:
First things first, let’s get those beautiful strawberries ready! I like to gently wash my strawberries under cool running water, making sure to remove any dirt or debris. After washing, gently pat them dry with a clean kitchen towel or paper towels. This step is important because any excess moisture can affect the texture of our yogurt clusters later on. Once dry, hull the strawberries by carefully removing the green leafy tops and the small white core. You can do this with a small paring knife or a handy strawberry huller if you have one.
-
Mash or Dice Your Strawberries to Perfection:
Now, for the fun part: preparing the strawberries for mixing! You have a couple of options here, and the choice depends on the texture you desire in your finished Chocolate Strawberry Yogurt Clusters. If you love distinct pieces of fruit throughout, I recommend finely dicing your hulled strawberries into small, ¼-inch pieces. This will give you lovely bursts of strawberry flavor and texture in every bite. Alternatively, if you prefer a smoother, more integrated strawberry flavor, you can gently mash them with a fork or a potato masher. I personally lean towards a gentle mash, leaving some small chunks intact, as I find it strikes the perfect balance between a smooth consistency and delightful pockets of strawberry goodness. Transfer your prepared strawberries into a large mixing bowl.
-
Combine with Creamy Greek Yogurt and Flavor Boosters:
To the bowl with your mashed or diced strawberries, add the two cups of plain whole milk Greek yogurt. As I mentioned in the ingredients, opting for whole milk Greek yogurt is a game-changer for these clusters. Its higher fat content contributes to a much creamier, less icy frozen treat compared to low-fat or non-fat varieties. Next, if you’re using it, drizzle in your chosen sweetener – whether it’s two tablespoons of maple syrup or honey. I always suggest tasting your strawberries first; if they’re particularly sweet, you might need less, or even no added sweetener at all. Finally, stir in the optional, but highly recommended, one teaspoon of pure vanilla extract. The vanilla really enhances the overall flavor profile, adding a warm, aromatic note that complements the strawberries beautifully.
-
Gently Fold and Taste:
With all your ingredients in the bowl, use a spatula or a sturdy spoon to gently fold everything together. Mix until the strawberries are evenly distributed throughout the yogurt. Be careful not to overmix, as we want to maintain some of that lovely strawberry texture. Once combined, take a small spoonful and taste it. This is your chance to adjust the sweetness or add a tiny splash more vanilla if you feel it needs it. Remember, flavors can dull slightly when frozen, so a little extra oomph now can make a big difference in the final product. This perfectly blended mixture is the heart of your incredible Chocolate Strawberry Yogurt Clusters!
Phase 2: Forming and Freezing the Yogurt Clusters
-
Prepare Your Freezing Surface:
Line a standard baking sheet with parchment paper. I can’t stress enough how important parchment paper is for this step; it’s absolutely crucial for preventing the yogurt clusters from sticking to the pan once they’re frozen. Trust me, trying to pry frozen yogurt directly off a metal sheet is an exercise in frustration! Ensure the parchment paper lies flat and covers the entire surface of the baking sheet.
-
Portion Out Your Clusters:
Now comes the satisfying part of shaping our clusters! Using a regular tablespoon, or a small cookie scoop for more uniform portions, carefully drop dollops of your strawberry yogurt mixture onto the prepared parchment-lined baking sheet. I aim for clusters that are roughly 1.5 to 2 inches in diameter and about half an inch thick. This size is ideal for single-serving bites and ensures they freeze relatively quickly and evenly. Make sure to leave a little space, about an inch, between each dollop. This prevents them from freezing together, making them easier to separate later. You’ll likely fill one standard baking sheet, but if you have extra mixture, use a second lined sheet.
-
The All-Important Freezing Process:
Carefully transfer the baking sheet, with your neatly arranged yogurt clusters, to the freezer. Find a spot where the sheet can lie flat and undisturbed. This initial freezing step is absolutely critical for the success of your Chocolate Strawberry Yogurt Clusters. They need to be completely solid before you attempt to coat them in chocolate. I recommend freezing them for a minimum of 2-3 hours. However, for the best results and easiest handling, I often leave them in the freezer for at least 4 hours, or even overnight. You’ll know they’re ready when they are rock-solid and don’t yield at all when you gently press on them. If they’re not fully frozen, they will collapse or melt rapidly when they come into contact with the warm melted chocolate, which is something we definitely want to avoid! Patience here truly pays off.
Phase 3: Preparing the Chocolate Coating
-
Choose Your Chocolate Wisely:
The type of chocolate you choose will significantly impact the flavor and texture of your finished Chocolate Strawberry Yogurt Clusters. I typically reach for a high-quality semi-sweet or dark chocolate (around 60-70% cacao) in chip or chopped bar form. This provides a lovely bittersweet counterpoint to the sweet and tangy strawberry yogurt. However, if you have a sweeter palate, milk chocolate can also be incredibly delicious, creating a more decadent treat. White chocolate could also be an adventurous choice for a different aesthetic and flavor profile. Whatever you choose, ensure it’s a good quality baking chocolate for the best melting and setting results.
-
Mastering the Chocolate Melting Process:
Melting chocolate can feel intimidating, but I promise it’s quite straightforward with a few simple techniques. The goal is to melt it gently and evenly to prevent scorching. You have two excellent methods at your disposal:
-
Microwave Method (My Go-To for Speed):
Place your chocolate chips or chopped chocolate into a microwave-safe bowl. Add 1-2 teaspoons of refined coconut oil or shortening (this is key for a smooth, dippable consistency and a great ‘snap’ when set). Microwave on high for 30 seconds. Remove the bowl and stir vigorously with a rubber spatula or spoon, even if the chocolate doesn’t look melted – it’s still cooking from residual heat. Return to the microwave for another 15-20 seconds, then stir again. Repeat in 10-15 second intervals, stirring well after each, until the chocolate is smooth and completely melted. Be extremely careful not to overheat it, as chocolate burns very easily in the microwave. If it looks thick or clumpy, that’s usually a sign of overheating. Stop microwaving when there are still a few small lumps, and just keep stirring; the residual heat will melt them.
-
Double Boiler Method (For the Gently Inclined):
This method offers more control and is wonderful for larger batches or if you’re nervous about the microwave. Fill a small saucepan with about an inch or two of water and bring it to a gentle simmer over medium-low heat. Place a heatproof bowl (glass or metal) over the saucepan, ensuring the bottom of the bowl does not touch the simmering water. Add your chocolate chips or chopped chocolate and the 1-2 teaspoons of refined coconut oil or shortening to the bowl. Stir continuously with a spatula as the chocolate slowly melts from the steam heat. This process is slower but virtually guarantees no burning. Once smooth and glossy, remove the bowl from the heat. This method consistently gives me the most beautifully tempered and smooth chocolate.
-
-
Achieve the Perfect Coating Consistency:
Once your chocolate is fully melted and smooth, give it a final good stir. It should be glossy and free-flowing but not watery. The added coconut oil or shortening helps achieve this ideal consistency, making it much easier to coat our frozen clusters evenly. If your chocolate feels too thick, you can add another half teaspoon of coconut oil and stir it in. If it’s too thin, unfortunately, there’s not much to do but let it cool slightly (but not seize!) or add a little more chocolate and re-melt. The perfect consistency is crucial for creating those irresistible Chocolate Strawberry Yogurt Clusters!
Phase 4: Coating and Final Freezing for Your Chocolate Strawberry Yogurt Clusters
-
Retrieve Your Frozen Clusters and Prepare for Dipping:
This step requires a little speed and precision. Go to your freezer and retrieve the thoroughly frozen strawberry yogurt clusters. It’s best to work with only a few at a time, keeping the rest in the freezer to maintain their solid state. Remember, the colder they are, the less likely they are to melt when they hit the warm chocolate. Place the baking sheet with the melted chocolate near your workspace, ensuring it’s easily accessible.
-
The Art of Coating: Dipping or Drizzling:
Now for the exciting part – transforming these frozen yogurt bites into glorious Chocolate Strawberry Yogurt Clusters! You have a couple of options for applying the chocolate, each yielding a slightly different look and feel:
-
Full Chocolate Dip (My Favorite!):
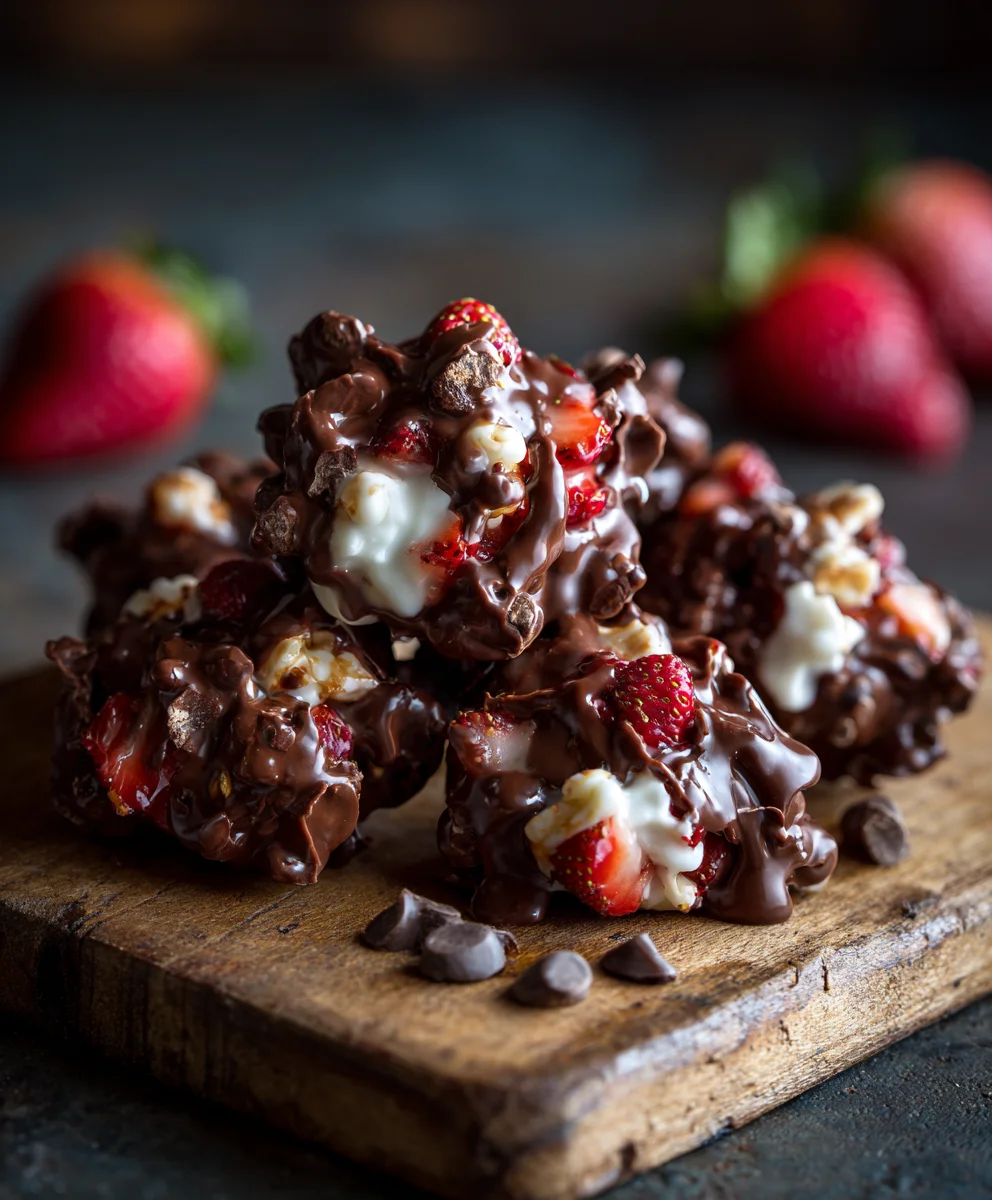
Using a fork or a specialized dipping tool, carefully pick up one fully frozen yogurt cluster. Submerge it completely into your melted chocolate, ensuring it’s fully coated. Lift the cluster out of the chocolate, allowing any excess to drip back into the bowl. A gentle tap against the side of the bowl can help remove extra chocolate, preventing puddles. This method creates a satisfyingly thick chocolate shell that cracks beautifully when you bite into it.
-
Partial Chocolate Dip or Drizzle:
If you prefer a lighter touch, you can dip only half of the cluster into the chocolate, or simply drizzle the melted chocolate generously over the top of each cluster using a spoon. For a more controlled drizzle, you could transfer the melted chocolate into a piping bag or a Ziploc bag with a tiny corner snipped off. This method still provides that delightful chocolate flavor but allows more of the yogurt and strawberry to show through, which can be quite pretty. I sometimes use this method if I’m adding other garnishes like flaky sea salt, as it provides a perfect surface for them to adhere to.
-
-
Optional Garnishes (Add a Touch of Flair!):
If you’re using any of the optional garnishes, this is the moment to apply them! Immediately after coating each cluster in chocolate, while the chocolate is still wet and pliable, sprinkle a tiny pinch of flaky sea salt, a few mini chocolate chips, or some finely chopped nuts over the top. The warm chocolate will act as an adhesive, securing your chosen toppings in place before it sets. This not only adds visual appeal but also introduces an extra layer of flavor and texture to your Chocolate Strawberry Yogurt Clusters.
-
The Final Freeze for Perfection:
As you coat each cluster, place it back onto the original parchment-lined baking sheet. Make sure to keep them slightly separated to prevent them from freezing together once the chocolate sets. Once all your clusters are coated and adorned, carefully return the baking sheet to the freezer. This final freeze is crucial for the chocolate to set completely, creating that crisp, firm shell around the creamy frozen yogurt. I recommend freezing them for another 30-60 minutes, or until the chocolate is completely firm and non-tacky to the touch. You’ll know they are perfectly ready when you can easily pick them up without any chocolate smudging on your fingers.
Storing Your Delicious Chocolate Strawberry Yogurt Clusters
-
Transfer to an Airtight Container:
Once your Chocolate Strawberry Yogurt Clusters are fully frozen and the chocolate coating is completely set, it’s time to transfer them from the baking sheet to a more permanent home in the freezer. I highly recommend using an airtight freezer-safe container or a heavy-duty freezer bag (like a Ziploc bag). This is paramount for preventing freezer burn, which can compromise both the taste and texture of your lovely treats over time.
-
Layering for Longevity:
When packing your clusters, I find it incredibly helpful to layer them with small squares of parchment paper in between each layer. This simple trick ensures that the clusters don’t stick together during prolonged freezing, making it easy to grab just one or two whenever a craving strikes. If you’re using a freezer bag, you can simply arrange them in a single layer or gently stack them with parchment paper in between if space is tight.
-
Optimal Storage Duration:
These delightful Chocolate Strawberry Yogurt Clusters will keep wonderfully in the freezer for up to 2-3 weeks. Beyond that, while still safe to eat, you might notice a slight decline in texture or freshness, although they’ll likely still be quite enjoyable! The sooner you enjoy them, the better, but rest assured they are designed for convenient, longer-term storage.
-
Serving Suggestions:
My favorite way to enjoy these clusters is straight from the freezer! They are designed to be eaten cold and firm, offering a refreshing, creamy, and chocolaty bite. There’s no need to thaw them; the texture is absolutely perfect when they are solidly frozen. They make a fantastic healthy-ish snack, a guilt-free dessert, or even a refreshing treat on a warm day. I love how the creamy, tangy yogurt perfectly contrasts with the crisp, slightly bitter chocolate, with those lovely pockets of sweet strawberry flavor shining through. Get ready to fall in love with your new favorite frozen treat!
Conclusion:
And there you have it, friends! We’ve journeyed through the simple steps to create what I genuinely believe will become one of your most cherished go-to treats. This isn’t just another snack recipe; it’s a testament to how effortlessly you can combine wholesome ingredients to create something truly exceptional. The creamy, cool tang of the yogurt, the vibrant burst of fresh, sweet strawberries, and that irresistible hint of rich, melted chocolate – it all comes together in perfect harmony. These aren’t merely delicious; they’re a delightful revelation, offering a guilt-free indulgence that satisfies your sweet tooth without compromising on your well-being.
I find them to be an absolute lifesaver on those busy afternoons when I crave something substantial and satisfying, yet quick and easy to grab. They’re perfect for meal prepping a week’s worth of healthy snacks, ensuring you always have a delightful bite within reach. Imagine coming home after a long day, opening the freezer, and discovering a batch of these shimmering, frozen gems waiting just for you. It’s a small moment of pure joy, a reward that truly feels earned. The simplicity of the preparation belies the complexity of the flavors, making this recipe a true winner in my culinary playbook. It proves that you don’t need elaborate techniques or exotic ingredients to create something truly memorable and utterly delicious. Every bite is a delightful surprise, a balance of textures and temperatures that will leave you wanting just one more.
Elevate Your Clusters: Serving Suggestions and Creative Variations
While the classic iteration of these clusters is undeniably superb, the real magic lies in their incredible versatility. Don’t be afraid to unleash your inner culinary artist and experiment! For an added layer of satisfying crunch and healthy fats, consider sprinkling a handful of finely chopped nuts – think toasted almonds for a subtle sweetness, or perhaps walnuts for a more robust, earthy note – over your clusters just before they hit the freezer. This simple addition can transform the texture beautifully, adding another dimension to each bite. If you’re a fan of tropical flavors, a dusting of shredded coconut, either toasted or raw, would introduce a wonderful aroma and chewy texture. Or, for those who love a bit of savory contrast, a tiny pinch of flaky sea salt sprinkled over the melted chocolate can elevate the entire experience, creating that popular salted chocolate dynamic that is simply irresistible.
The fun doesn’t stop there! Feel free to swap out the strawberries for other berries that tickle your fancy. Juicy blueberries, tart raspberries, or even a mix of all three would be equally delightful, each offering its unique flavor profile and vibrant color. If you’re feeling particularly adventurous, thin slices of banana could also be incorporated for a more substantial cluster. For an extra boost of protein, Greek yogurt is a fantastic choice, providing a thicker, creamier base. Or, for a dairy-free option, coconut or almond-based yogurts work wonderfully, ensuring everyone can enjoy this fantastic treat. Think beyond just a snack, too! These can be crumbled over a bowl of overnight oats for a breakfast boost, or even served alongside a scoop of your favorite vanilla bean ice cream for a lighter, refreshing dessert option. They’re also fantastic as a vibrant, colorful addition to a brunch spread, adding a touch of elegance to any gathering. The sheer adaptability of these Chocolate Strawberry Yogurt Clusters is truly one of their most appealing features; they’re a blank canvas awaiting your creative touch.
Your Turn: Try, Enjoy, and Share!
Now that you have all the tips and tricks, I truly hope you’re feeling inspired, even excited, to whip up a batch of these glorious clusters in your own kitchen. They are genuinely one of my favorite discoveries for a quick, satisfying, and refreshingly healthy treat that never fails to impress. Don’t just take my word for it; experience the pure joy and simplicity of creating them yourself. The process is so straightforward, and the results are incredibly rewarding, transforming a few basic ingredients into something extraordinary. This recipe is designed to be accessible to everyone, regardless of your cooking experience, promising a delicious outcome every single time.
Once you’ve tried them, I would absolutely love to hear about your experience! Did you stick to the original recipe, finding perfection in its simplicity, or did you venture into new flavor combinations with different fruits or toppings? What did your family or friends think of these delightful creations? Did they disappear from the freezer faster than you expected? Please share your photos, your tips, your triumphs, and any modifications you made in the comments below. Your culinary adventures and insights inspire me and the rest of our wonderful community, and I’m always eager to see how you make these recipes your own. So, go ahead, grab your ingredients, and embark on this delicious journey. Happy cooking, and even happier snacking! These delightful Chocolate Strawberry Yogurt Clusters are waiting to become your new favorite freezer staple, bringing a smile to your face with every frosty, flavorful bite.
Chocolate Strawberry Yogurt Clusters: Sweet & Healthy Snack
A delightful, refreshing, and simple treat that satisfies sweet cravings and desire for something wholesome. These clusters offer a perfect blend of creamy, tangy yogurt, sweet fresh strawberries, all enveloped in a snappy chocolate shell. Minimal prep and no baking required.
Ingredients
-
1 ½ cups fresh strawberries, hulled & quartered
-
2 cups plain whole milk Greek yogurt
-
2 tbsp maple syrup or honey (optional)
-
1 tsp pure vanilla extract (optional)
-
1 ½ cups semi-sweet or dark chocolate chips
-
1-2 tsp refined coconut oil or shortening
-
Optional: Pinch of flaky sea salt
-
Optional: Finely chopped nuts
-
Optional: Mini chocolate chips
Instructions
-
Step 1
Wash, hull, and mash or finely dice strawberries. Combine in a large bowl with Greek yogurt, optional maple syrup/honey, and vanilla extract. Gently fold until evenly mixed, then taste and adjust sweetness if desired. -
Step 2
Line a standard baking sheet with parchment paper. Using a tablespoon or small cookie scoop, drop 1.5-2 inch dollops of the strawberry yogurt mixture onto the sheet, leaving about an inch of space between each. -
Step 3
Transfer the baking sheet to the freezer. Freeze for a minimum of 2-3 hours, or preferably 4 hours or overnight, until the yogurt clusters are completely rock-solid. -
Step 4
In a microwave-safe bowl or double boiler, melt chocolate chips with 1-2 teaspoons of refined coconut oil or shortening. If microwaving, heat in 15-30 second intervals, stirring well after each, until smooth and glossy. If using a double boiler, stir continuously until melted. -
Step 5
Retrieve a few frozen yogurt clusters from the freezer at a time. Using a fork or dipping tool, submerge each cluster completely into the melted chocolate, allowing any excess to drip back into the bowl. Alternatively, drizzle chocolate generously over each cluster. -
Step 6
Immediately after coating each cluster, and while the chocolate is still wet, sprinkle with any optional garnishes such as flaky sea salt, finely chopped nuts, or mini chocolate chips. -
Step 7
Place the coated clusters back onto the parchment-lined baking sheet, keeping them slightly separated. Return the baking sheet to the freezer for another 30-60 minutes, or until the chocolate coating is completely firm and set. -
Step 8
Once fully frozen and set, transfer the Chocolate Strawberry Yogurt Clusters to an airtight freezer-safe container or heavy-duty freezer bag, layering with small squares of parchment paper between layers to prevent sticking. Store in the freezer for up to 2-3 weeks. Serve directly from the freezer.
Important Information
Nutrition Facts (Per Serving)
It is important to consider this information as approximate and not to use it as definitive health advice.
Allergy Information
Please check ingredients for potential allergens and consult a health professional if in doubt.


Leave a Comment