
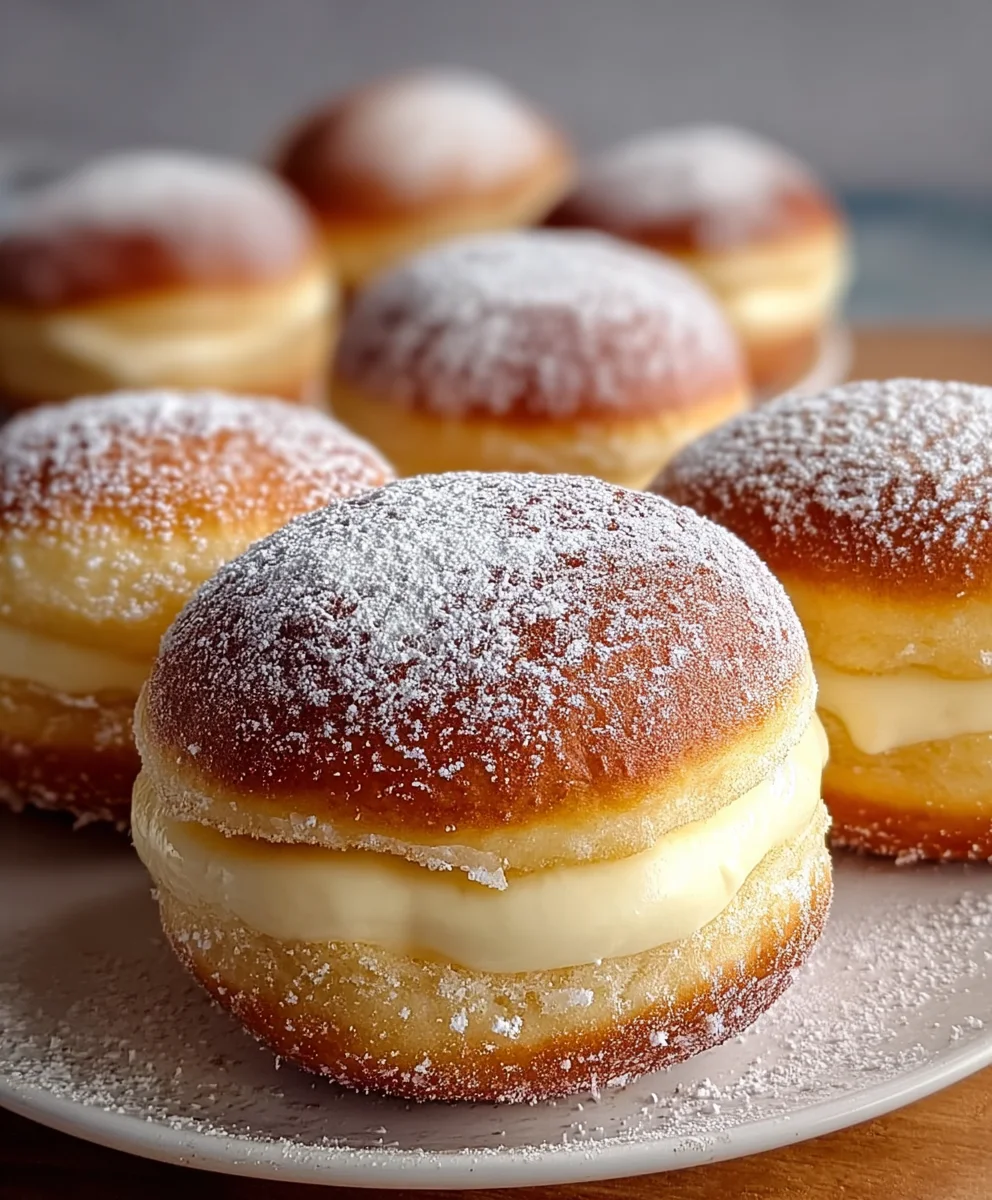
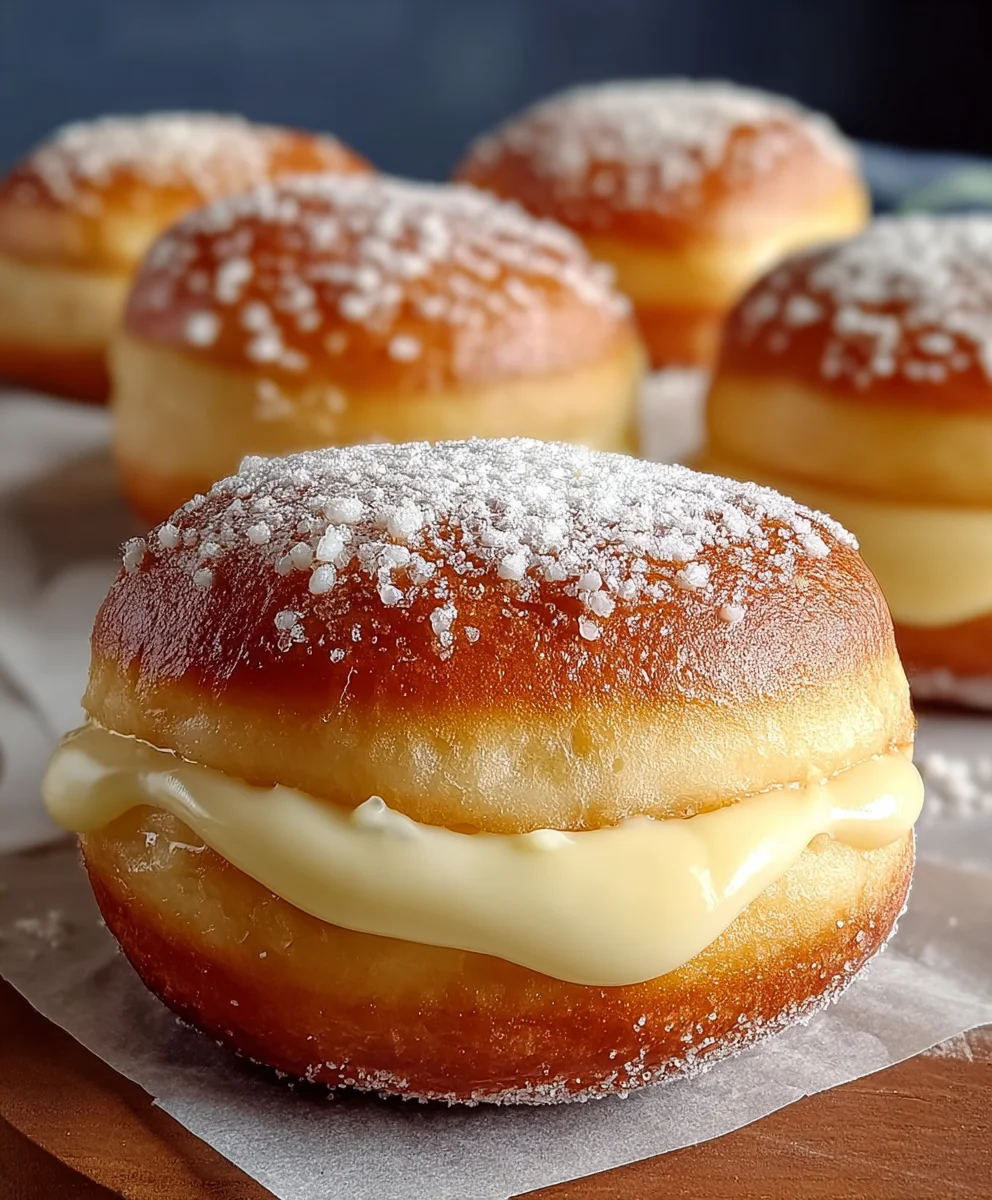
Bavarian Cream Donuts hold a special place in the hearts of dessert enthusiasts, and for very good reason. Imagine biting into a perfectly golden, airy yeast donut, its delicate crust giving way to a cloud-like interior, only to discover it’s generously filled with a smooth, velvety Bavarian cream. It’s an experience that transcends a mere snack; it’s a moment of pure, unadulterated bliss.
While the “Bavarian” in its name might suggest German origins, the classic pastry cream, Crème Bavaroise, actually boasts a French heritage, later embraced and perfected across Europe. This delightful fusion of European pastry techniques results in a dessert that is both sophisticated and deeply comforting. People adore these donuts not just for their rich, custardy filling and tender dough, but for the perfect balance of sweetness and texture they offer.
The contrast between the light, fluffy donut and the decadent, chilled cream is simply irresistible.
I am absolutely thrilled to guide you through creating your very own batch of these incredible Bavarian Cream Donuts, ensuring every bite is a testament to homemade deliciousness and an experience your taste buds won’t soon forget.

Ingredients:
- For the Donut Dough:
- 1 cup (240ml) whole milk, warmed to 105-115°F (40-46°C)
- 2 ¼ teaspoons (7g) active dry yeast (one standard packet)
- ¼ cup (50g) granulated sugar, plus 1 teaspoon for yeast
- 1 teaspoon pure vanilla extract
- 2 large eggs, at room temperature
- ½ cup (113g) unsalted butter, melted and cooled slightly
- 4 ½ cups (540g) all-purpose flour, plus more for dusting
- 1 teaspoon salt
- Vegetable oil or canola oil, for frying (about 8-10 cups, depending on your pot)
- For the Bavarian Cream Filling:
- ¾ cup (150g) granulated sugar
- ¼ cup (30g) cornstarch
- ¼ teaspoon salt
- 2 cups (480ml) whole milk
- 5 large egg yolks
- 2 tablespoons unsalted butter, cut into small pieces
- 1 teaspoon pure vanilla extract
- 1 cup (240ml) heavy cream, chilled
- 2 tablespoons powdered sugar, for whipped cream (optional)
- For the Coating (Optional):
- 2 cups (400g) granulated sugar, or powdered sugar for dusting
Preparing the Golden Donut Dough
My journey to creating the perfect Bavarian Cream Donuts always begins with the dough. It’s the foundation, and getting it right ensures a light, airy, and truly delightful experience. This is a classic brioche-style dough, enriched with butter and eggs, making it incredibly tender. Let’s get started!
Activating the Yeast: The Spark of Life
- In the bowl of your stand mixer, fitted with the dough hook attachment, pour in the warmed whole milk. It’s crucial that your milk is at the right temperature – too hot and it kills the yeast, too cold and it won’t activate properly. Think of it as a warm bath for the yeast!
- Sprinkle the active dry yeast and 1 teaspoon of granulated sugar over the milk. Give it a gentle stir. Let this mixture sit for about 5-10 minutes. You’re looking for a frothy, foamy layer to appear on the surface; this is your sign that the yeast is alive and ready to work its magic. If it doesn’t foam, your yeast might be old, or your milk wasn’t the right temperature, and you’ll need to start this step again.
Mixing and Kneading: Building Strength and Elasticity
- Once your yeast is active, add the remaining ¼ cup (50g) of granulated sugar, vanilla extract, and the two large eggs to the yeast mixture. Whisk them gently with a fork to combine everything evenly.
- Pour in the slightly cooled, melted unsalted butter. It’s important that the butter isn’t hot, as this can also harm the yeast.
- Next, add 4 ½ cups (540g) of all-purpose flour and the 1 teaspoon of salt to the wet ingredients in the mixer bowl.
- With the dough hook attached, start mixing on low speed for about 2 minutes, until the flour is mostly incorporated and a shaggy dough forms.
- Increase the speed to medium-low and continue to knead the dough for 8-10 minutes. This is a critical step for developing the gluten, which gives your donuts their signature chewy yet tender texture. The dough will be quite sticky at first, but as it kneads, it will gradually pull away from the sides of the bowl and become smooth, elastic, and less sticky to the touch. It might still be a little tacky, and that’s perfectly fine. Do not be tempted to add too much extra flour during kneading, as this can make your donuts dense.
First Rise (Bulk Fermentation): Letting the Dough Bloom
- Lightly grease a large bowl with a little vegetable oil. Transfer the kneaded dough into the greased bowl, turning it once to coat the top with oil. This prevents a dry skin from forming.
- Cover the bowl tightly with plastic wrap or a clean kitchen towel.
- Place the bowl in a warm, draft-free place to rise for 1 to 1 ½ hours, or until the dough has doubled in size. The exact time will depend on the warmth of your kitchen. A slightly warmer spot (like a turned-off oven with the light on) can speed things up, but avoid anything too hot.
Shaping the Donuts: Crafting Uniformity
- Once the dough has doubled, gently punch it down to release the air.
- Lightly flour a clean work surface. Turn the dough out onto the floured surface.
- Using a rolling pin, roll the dough out to an even thickness of about ½ inch (1.25 cm). It’s important for the thickness to be consistent so your donuts fry evenly.
- Using a 3-inch (7.5 cm) round cookie cutter (or a glass with a sharp rim), cut out as many donut rounds as you can. Avoid twisting the cutter as you press down, as this can seal the edges and prevent them from rising properly when fried.
- Gather the scraps of dough, gently re-knead them once or twice (just enough to bring them together), and let them rest for 5-10 minutes before re-rolling and cutting out more donuts. This rest allows the gluten to relax, making the dough easier to roll.
Second Rise (Proofing): The Final Puff
- Line two baking sheets with parchment paper. Lightly dust the parchment paper with a little flour to prevent sticking.
- Carefully transfer the cut donut rounds onto the prepared baking sheets, leaving about 2 inches of space between each donut, as they will expand again.
- Loosely cover the baking sheets with plastic wrap or a clean kitchen towel.
- Let the donuts rise in a warm, draft-free place for another 30-45 minutes, or until they look visibly puffy and have increased in size by about 50%. This second rise is crucial for light, airy Bavarian Cream Donuts. If you gently poke one with a floured finger, the indent should spring back slowly; if it springs back quickly, they need more time; if it stays indented, they are over-proofed.
Crafting the Velvety Bavarian Cream Filling
While our donut dough is performing its magic, we can dive into creating the luscious Bavarian cream. This rich, smooth, and utterly delicious custard is what truly defines our Bavarian Cream Donuts. It requires a little patience, but the result is so worth it!
The Custard Base: Rich and Smooth
- In a medium saucepan, whisk together ¾ cup (150g) of granulated sugar, ¼ cup (30g) of cornstarch, and ¼ teaspoon of salt. Make sure there are no lumps; this ensures a smooth custard.
- Gradually whisk in 2 cups (480ml) of whole milk until well combined.
- In a separate medium bowl, lightly whisk the 5 large egg yolks.
- Place the saucepan over medium heat, continually whisking, especially at the bottom of the pan to prevent scorching. Bring the mixture to a gentle simmer. It will start to thicken slightly.
- Once simmering and slightly thickened, temper the egg yolks. This is a very important step to prevent your yolks from scrambling. Slowly pour about half a cup of the hot milk mixture into the whisked egg yolks, whisking constantly as you pour. This gradually raises the temperature of the yolks.
- Now, pour the warmed egg yolk mixture back into the saucepan with the remaining hot milk mixture, whisking vigorously.
- Continue to cook over medium heat, whisking constantly, for another 2-4 minutes. The mixture will thicken considerably, reaching a pudding-like consistency. It should be thick enough to coat the back of a spoon. If you see it bubble and “plop,” you’re almost there!
- Remove the saucepan from the heat. Stir in the 2 tablespoons of unsalted butter (cut into small pieces) and 1 teaspoon of pure vanilla extract until the butter is completely melted and incorporated.
Chilling and Finishing the Cream: The Perfect Texture
- Pour the hot Bavarian cream custard into a clean, shallow bowl or dish.
- Press a piece of plastic wrap directly onto the surface of the custard to prevent a skin from forming as it cools.
- Refrigerate the custard for at least 3-4 hours, or preferably overnight, until it is completely chilled and firm. This chilling time is essential for the cream to set properly and achieve the right consistency.
- Once thoroughly chilled, remove the plastic wrap. Give the cold custard a good whisk with a hand mixer or a stand mixer with the whisk attachment on medium speed for about 1-2 minutes until it becomes smooth and creamy again. It will have stiffened in the fridge, and this step loosens it up.
- In a separate, very clean bowl, whip the 1 cup (240ml) of chilled heavy cream with 2 tablespoons of powdered sugar (if using, for a little extra sweetness) until it forms stiff peaks. Be careful not to over-whip it into butter!
- Gently fold the whipped cream into the smoothed Bavarian cream custard in two additions, using a rubber spatula. Use a light hand to keep the cream airy. This step transforms the dense custard into a light, fluffy, and truly irresistible Bavarian cream.
- Transfer the finished Bavarian cream to a piping bag fitted with a long, thin piping tip (a Bismark tip is ideal for filling donuts, or just a small round tip). Set aside at room temperature while you fry the donuts.
Frying the Bavarian Cream Donuts: Golden Perfection
Now for the exciting part – frying our beautiful donut dough until it’s golden brown and ready to be filled! This step requires a little attention to detail, but with the right oil temperature, you’ll achieve perfectly cooked donuts.
- In a large, heavy-bottomed pot or Dutch oven, pour in enough vegetable or canola oil to reach a depth of about 3-4 inches (8-10 cm).
- Attach a deep-fry thermometer to the side of the pot. Heat the oil over medium heat until it reaches a consistent temperature of 350°F (175°C). It is absolutely crucial to maintain this temperature; too cool and the donuts will be greasy, too hot and they will brown too quickly on the outside while remaining raw on the inside.
- Carefully lift 2-3 of the risen donuts off the parchment paper and gently slide them into the hot oil. Do not overcrowd the pot, as this will lower the oil temperature and lead to uneven cooking. Work in batches.
- Fry the donuts for 1-2 minutes per side, or until they are deeply golden brown and puffed up. Use a slotted spoon or spider to carefully flip them.
- Once both sides are golden brown, remove the donuts from the oil using the slotted spoon, allowing any excess oil to drip off.
- Transfer the fried donuts to a wire rack set over a baking sheet lined with paper towels. This allows them to drain further and cool slightly.
- Continue frying the remaining donuts in batches, making sure to monitor and adjust the oil temperature between batches. It may fluctuate, so keep a close eye on your thermometer.
- Let the fried donuts cool for about 10-15 minutes on the wire rack before moving on to filling them. They should still be warm but easy enough to handle.
Coating and Assembling the Bavarian Cream Donuts: The Grand Finale
We’re almost there! With our perfectly fried donuts and exquisite Bavarian cream ready, it’s time to bring everything together for the ultimate Bavarian Cream Donut experience.
Adding the Sweet Exterior (Optional)
- If you’re opting for a granulated sugar coating, pour 2 cups of granulated sugar into a shallow dish or a brown paper bag.
- While the donuts are still warm (but not hot enough to melt the sugar instantly), gently toss or roll each donut in the sugar until it’s evenly coated. The warmth helps the sugar adhere beautifully. For a less intense sweetness, a simple dusting of powdered sugar after filling also works wonderfully.
- If you prefer a glaze, you could whisk powdered sugar with a splash of milk or water and dip them, but for true Bavarian Cream Donuts, a simple sugar coating or dusting is often preferred to let the cream shine.
Filling with Bavarian Cream: The Heart of the Donut
- Once your donuts are coated (or simply cooled), it’s time to fill them. With a small, sharp knife or a skewer, poke a hole into the side of each donut. Aim to create a pocket inside without going all the way through the other side. This creates a cavity for our glorious cream.
- Take your piping bag filled with the Bavarian cream. Insert the piping tip into the hole you just made in the donut.
- Gently squeeze the piping bag, filling the donut until you feel it plump up and become heavier. You might even see the cream just barely start to emerge from the entry point. Be generous, but don’t overfill to the point of bursting.
- Repeat this process for all the remaining Bavarian Cream Donuts.
- Serve your freshly filled Bavarian Cream Donuts immediately for the best experience. If you have any leftovers, they are best stored in an airtight container in the refrigerator for up to 2-3 days, though the donuts are truly at their peak when fresh!
Conclusion:
And so, we arrive at the sweet conclusion of our culinary journey. I genuinely hope you’ve enjoyed delving into the intricacies of this delightful recipe as much as I’ve enjoyed sharing it with you. There are countless desserts out there, but every now and then, you stumble upon one that truly stands out, transforming a simple ingredient list into something truly magical. This is precisely what I believe this recipe achieves. It’s more than just a collection of steps; it’s an invitation to create a moment of pure, unadulterated bliss in your own kitchen. I truly believe this recipe is a must-try for anyone who appreciates the finer things in life, especially when those things are deliciously sweet and homemade. The sheer joy of biting into something so tender, so rich, and so utterly satisfying is an experience everyone deserves to savor.
What makes this particular treat so irresistible, you might ask? It’s the harmonious blend of textures and flavors. Imagine: a pillow-soft, airy dough, fried to a perfect golden hue, creating a delicate crust that yields effortlessly. Then, the surprise within – a generous filling of the creamiest, most luscious custard, bursting with that unmistakable vanilla aroma. It’s not just a donut; it’s a testament to the art of baking. Each component plays its part perfectly, from the subtle sweetness of the dough to the decadent richness of the cream, culminating in a symphony of taste that will have you reaching for another before you’ve even finished the first. The experience of making them from scratch adds an extra layer of satisfaction; there’s a unique pride that comes with creating something so exceptional with your own hands. This isn’t just a dessert; it’s a celebration of flavor and texture, a truly memorable treat that elevates the humble donut to an art form. The effort involved is absolutely worth it for the incredible reward you’ll reap.
Serving Suggestions & Creative Variations to Elevate Your Experience
Now that you’ve mastered the art of creating these exquisite treats, let’s talk about how to best enjoy them and perhaps even experiment a little. Traditionally, they are a magnificent companion to a robust cup of coffee or a comforting mug of tea, making for an ideal breakfast indulgence or a delightful afternoon snack. For a truly decadent dessert experience, consider serving them alongside a scoop of high-quality vanilla bean ice cream or a dollop of freshly whipped cream, perhaps with a scattering of seasonal berries like raspberries or strawberries for a touch of fresh tartness to cut through the richness. Imagine a plate with one of these beauties, glistening with a dusting of powdered sugar, nestled beside a small bowl of berry coulis – absolutely divine!
Feeling adventurous? While the classic recipe is perfect as is, there’s always room for personal touches. You could experiment with different glazes: a simple vanilla bean glaze would enhance the existing flavors, or perhaps a chocolate ganache for those who adore the combination of chocolate and cream. A hint of orange zest or a touch of cinnamon in the dough could introduce a new aromatic dimension. For an adult-friendly version, consider adding a tiny splash of a complementary liqueur, like Grand Marnier or a coffee liqueur, to the cream filling for an extra layer of sophistication. Imagine them with a light sprinkle of toasted coconut flakes or finely chopped nuts for added texture. These variations aren’t meant to replace the original, but rather to inspire you to make this recipe truly your own, tailoring it to your personal preferences and the occasion.
Your Culinary Adventure Awaits!
So, what are you waiting for? I wholeheartedly encourage you to roll up your sleeves, gather your ingredients, and embark on this delicious baking adventure. There’s a profound satisfaction that comes from creating something truly special from scratch, and I promise you, the smiles and appreciative murmurs you’ll receive when you present these beautiful homemade confections will be your greatest reward. Don’t be intimidated by the process; baking is an art that rewards patience and a willingness to learn. Each step brings you closer to that incredible first bite. I truly believe that mastering these Bavarian Cream Donuts will be a rewarding experience, not just for your taste buds, but for your soul as well. It’s about the joy of creation, the aroma filling your home, and the shared pleasure of a truly magnificent treat. Once you’ve made them, you’ll understand exactly why I’m so passionate about this recipe.
I would absolutely love to hear about your experience! Did you stick to the classic recipe, or did you venture into some exciting variations? What did your family and friends think? Please don’t hesitate to share your thoughts, tips, and even photos of your glorious creations. There’s a wonderful community of home bakers out there, and your insights are incredibly valuable. Let’s celebrate the joy of baking together. Happy baking, my friends, and may your kitchens always be filled with the most wonderful aromas!
Classic Bavarian Cream Donuts
Bavarian Cream Doughnuts are the ultimate indulgence with their soft, pillowy dough and rich vanilla-cream filling. Whether enjoyed as a dessert or an all-day snack, these homemade treats pair perfectly with a hot cup of coffee or tea. While unfilled donuts can be frozen, filled ones don’t freeze well due to the cream. Best eaten fresh within 1-2 days.
Ingredients
-
1 cup (240ml) whole milk, warmed
-
2 ¼ tsp (7g) active dry yeast
-
¼ cup (50g) granulated sugar, plus 1 tsp
-
1 tsp pure vanilla extract
-
2 large eggs, room temperature
-
½ cup (113g) unsalted butter, melted
-
4 ½ cups (540g) all-purpose flour
-
1 tsp salt
-
8-10 cups vegetable oil, for frying
-
¾ cup (150g) granulated sugar (for filling)
-
¼ cup (30g) cornstarch
-
¼ tsp salt (for filling)
-
2 cups (480ml) whole milk (for filling)
-
5 large egg yolks
-
2 tbsp unsalted butter, cut into pieces (for filling)
-
1 tsp pure vanilla extract (for filling)
-
1 cup (240ml) heavy cream, chilled
-
2 tbsp powdered sugar (optional, for whipped cream)
-
2 cups (400g) granulated sugar OR powdered sugar (optional, for coating)
Instructions
-
Step 1
In a stand mixer bowl, combine warm milk, yeast, and 1 tsp sugar. Let sit 5-10 mins until frothy. -
Step 2
Add remaining ¼ cup sugar, vanilla, eggs, and melted butter to yeast mixture. Add flour and 1 tsp salt. Mix on low, then knead on medium-low for 8-10 mins until dough is smooth and elastic. -
Step 3
Lightly grease a large bowl, transfer dough, turn to coat. Cover and let rise in a warm, draft-free place for 1-1 ½ hours until doubled. -
Step 4
Gently punch down dough. Roll out to ½ inch thickness on a lightly floured surface. Cut rounds with a 3-inch cutter. Re-roll scraps and cut more. -
Step 5
Place cut donuts on parchment-lined, floured baking sheets, spaced 2 inches apart. Loosely cover and let rise 30-45 mins until puffy (increased by 50%). -
Step 6
In a medium saucepan, whisk ¾ cup sugar, cornstarch, and ¼ tsp salt. Gradually whisk in 2 cups milk. Lightly whisk egg yolks in a separate bowl. -
Step 7
Heat milk mixture over medium, whisking, to a gentle simmer. Slowly pour ½ cup hot milk mixture into egg yolks, whisking constantly. Pour tempered yolks back into saucepan, whisking vigorously. Cook 2-4 mins more, whisking, until thickened like pudding. Remove from heat, stir in 2 tbsp butter and 1 tsp vanilla. -
Step 8
Pour hot custard into a shallow bowl. Press plastic wrap directly onto surface. Refrigerate 3-4 hours or overnight until completely chilled and firm. -
Step 9
Once chilled, whisk custard with a hand mixer until smooth. In a separate bowl, whip chilled heavy cream with optional powdered sugar until stiff peaks form. Gently fold whipped cream into custard in two additions. Transfer to a piping bag with a long, thin tip. -
Step 10
Heat 3-4 inches of oil in a heavy-bottomed pot to 350°F (175°C). Fry 2-3 donuts at a time for 1-2 mins per side, until golden brown and puffed. Remove to a wire rack over paper towels to drain and cool for 10-15 mins. -
Step 11
While still warm, roll donuts in granulated sugar or dust with powdered sugar. -
Step 12
Poke a hole into the side of each donut with a small knife or skewer. Insert piping tip and gently squeeze Bavarian cream into donut until plump. -
Step 13
Serve freshly filled Bavarian Cream Donuts immediately. Store leftovers in an airtight container in the refrigerator for up to 2-3 days.
Important Information
Nutrition Facts (Per Serving)
It is important to consider this information as approximate and not to use it as definitive health advice.
Allergy Information
Please check ingredients for potential allergens and consult a health professional if in doubt.

Leave a Comment