
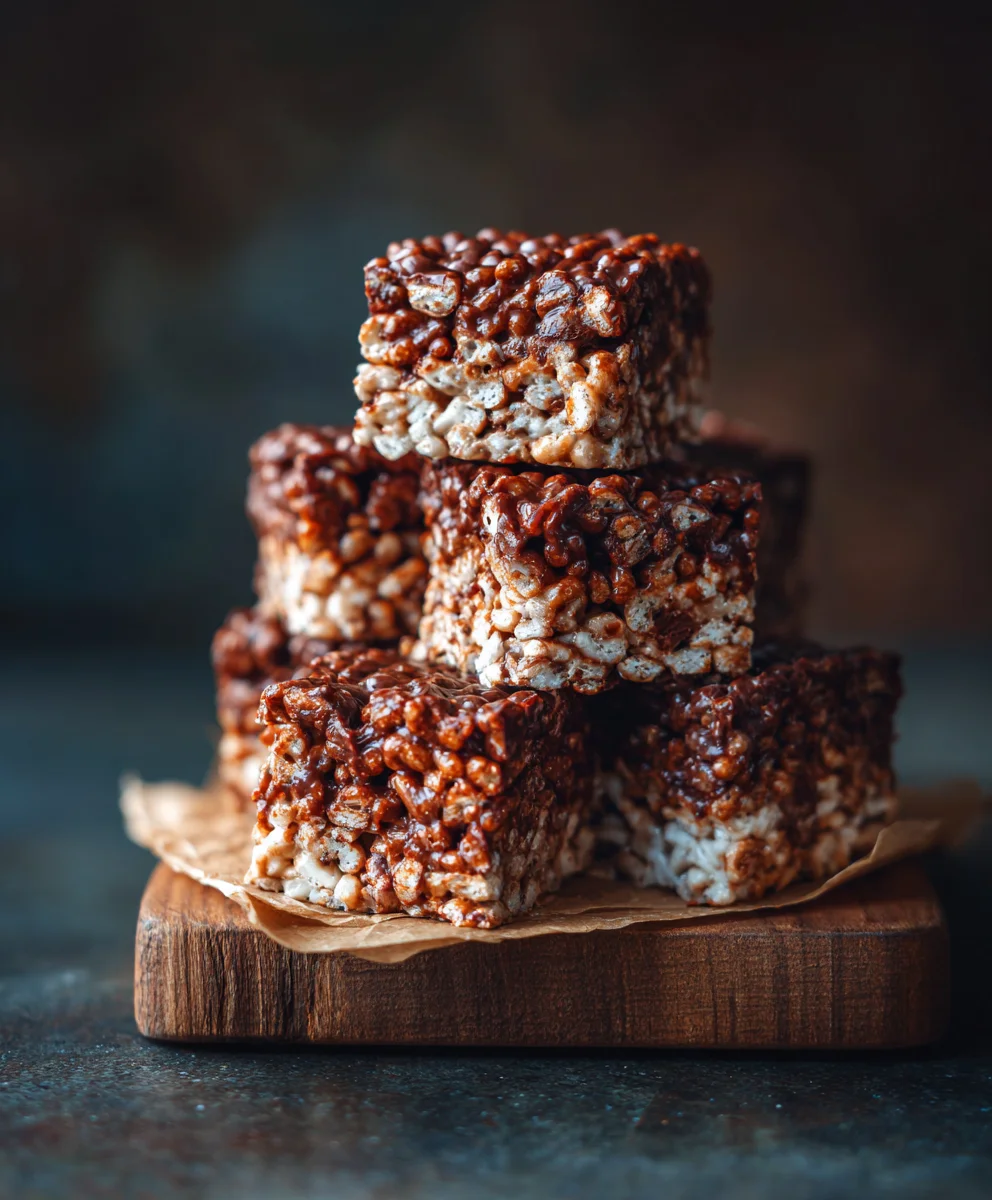
Chocolate Peanut Butter Rice Krispie – the very mention conjures up a nostalgic delight, doesn’t it? Who could possibly resist the perfect trifecta of rich chocolate, creamy peanut butter, and satisfyingly crisp rice cereal? This beloved treat transcends mere dessert status; it’s a testament to simple ingredients creating profound joy. Since the 1930s, the humble Rice Krispie treat has been a staple in American homes, but the brilliant addition of chocolate and peanut butter elevates it into an iconic comfort food, a guaranteed showstopper at any potluck or party. These no-bake wonders epitomize effortless deliciousness that truly stands the test of time.
What I love most about this particular rendition is the incredible harmony of flavors and textures. The deep, slightly bitter notes of cocoa perfectly complement the savory, nutty richness of peanut butter, while the airy, crunchy rice cereal provides that essential counterpoint to the sticky, chewy binder. It’s the ultimate sweet-and-salty, crunchy-and-chewy experience. Moreover, its no-bake simplicity makes it an absolute dream for busy schedules, coming together quickly without the need for an oven. This delightful Chocolate Peanut Butter Rice Krispie masterpiece is more than just a recipe; it’s an invitation to pure, unadulterated bliss for all ages.

Ingredients:
- Unsalted Butter: 1/2 cup (113 grams), plus an additional teaspoon or two for greasing the pan. Using unsalted butter gives us precise control over the overall saltiness of our delicious treats.
- Mini Marshmallows: 10 ounces (approximately 5 to 6 cups loosely packed). Mini marshmallows melt much more smoothly and quickly than larger ones, ensuring a perfect, even consistency for our sticky base.
- Creamy Peanut Butter: 1 cup (250 grams). I always opt for creamy peanut butter for that classic, smooth texture. While natural peanut butter can work, its oil separation might alter the consistency slightly, so a classic shelf-stable creamy variety is usually best for these Chocolate Peanut Butter Rice Krispie delights.
- Pure Vanilla Extract: 1 teaspoon. A good quality vanilla extract enhances all the flavors, bringing a subtle warmth to the peanut butter base.
- Rice Krispies Cereal: 6 cups. The star of our crispy base! Ensure it’s fresh for maximum crunch.
- Semi-Sweet Chocolate Chips: 12 ounces (340 grams). High-quality semi-sweet chips will provide that rich, decadent chocolate layer that perfectly complements the peanut butter.
- Powdered Sugar (Confectioners’ Sugar): 1/2 cup (60 grams), sifted. Sifting helps prevent lumps in our smooth chocolate topping, giving it a professional finish.
- Whole Milk or Heavy Cream: 1/4 cup (60 milliliters). This adds creaminess and helps achieve the ideal pourable consistency for our chocolate ganache-like layer.
- Pinch of Sea Salt: Optional, but highly recommended for the chocolate topping. Just a tiny pinch truly elevates the chocolate flavor and balances the sweetness.
Equipment You’ll Need:
- 9×13 Inch Baking Pan: This standard size is perfect for creating a good thickness for your Chocolate Peanut Butter Rice Krispie bars.
- Parchment Paper: Absolutely essential for easy removal and clean-up. Don’t skip this step!
- Large Heat-Safe Mixing Bowl: For combining the marshmallow mixture with the Rice Krispies. Make sure it’s big enough to handle 6 cups of cereal comfortably.
- Medium Heavy-Bottomed Saucepan: Ideal for melting butter and marshmallows without scorching.
- Rubber Spatula: Great for scraping, stirring, and pressing the mixture into the pan.
- Whisk: To ensure a perfectly smooth and lump-free chocolate topping.
- Measuring Cups and Spoons: For accurate ingredient proportions, which are key to a successful recipe.
- Small Microwave-Safe Bowl or Double Boiler Setup: For melting the chocolate chips gently.
- Pastry Brush (optional): For lightly greasing the parchment paper.
Preparing the Peanut Butter Rice Krispie Base:
-
Prepare Your Baking Pan for Success:
First things first, we need to get our pan ready. Take your 9×13 inch baking pan and line it generously with parchment paper. I like to leave an overhang on two sides, creating little “handles” that will make lifting the entire block of treats out of the pan a breeze later on. Once lined, lightly grease the bottom and sides of the parchment paper with a small amount of butter or a neutral cooking spray. This extra step ensures that even the stickiest parts of our Chocolate Peanut Butter Rice Krispie base won’t cling, guaranteeing a pristine release and perfect edges. Setting up your pan properly from the start is a small effort that pays huge dividends in the end. -
Gently Melt the Butter:
Now, grab your medium, heavy-bottomed saucepan. Add the 1/2 cup of unsalted butter to it. Place the saucepan over low to medium-low heat. We want to melt the butter slowly and gently, stirring it constantly with your rubber spatula, until it’s fully liquid. It’s crucial not to let the butter brown or sizzle too intensely; we’re aiming for melted, not browned, as browned butter can impart a nutty flavor that might compete with our primary peanut butter notes. Keeping the heat low prevents scorching and ensures a smooth foundation for our treats. This initial step is vital for the texture of our Krispie base. -
Introduce and Melt the Marshmallows:
Once the butter is completely melted, it’s time to add the 10 ounces of mini marshmallows to the saucepan. Continue to stir them over that same low heat. This step requires patience and consistent stirring. The marshmallows will slowly begin to soften, clump together, and then gradually melt into a smooth, gooey, ethereal mixture. Keep stirring until there are no visible lumps of marshmallows remaining and you have a beautifully cohesive, sticky, and glossy white concoction. This process usually takes about 5-7 minutes. Do not rush this step by increasing the heat, as burnt marshmallows will impart a bitter flavor that will ruin the delicate sweetness of our Chocolate Peanut Butter Rice Krispie base. -
Integrate the Peanut Butter and Vanilla:
As soon as the marshmallows are completely melted and smooth, immediately remove the saucepan from the heat. This is important to prevent the mixture from becoming too tough. Stir in the 1 cup of creamy peanut butter and the 1 teaspoon of pure vanilla extract. Continue to stir vigorously with your spatula until the peanut butter is fully incorporated into the marshmallow mixture. You’ll notice the mixture transforms into a lovely, uniform, golden-brown color, and it will be incredibly fragrant. The heat from the melted marshmallows is usually enough to fully dissolve and blend the peanut butter without needing additional cooking. This step adds that signature, irresistible peanut butter flavor that we all love in these treats. -
Gently Fold in the Rice Krispies Cereal:
Now, quickly transfer the warm, gooey peanut butter-marshmallow mixture into your large heat-safe mixing bowl. Immediately add the 6 cups of Rice Krispies cereal to the bowl. Using your rubber spatula, gently but efficiently fold the cereal into the sticky mixture. The goal here is to coat every single Krispie without crushing them. Work quickly but carefully; the mixture will start to cool and become harder to work with the longer it sits. Be mindful not to overmix, as this can also lead to a dense, rather than light and crispy, base. We want light, airy, and evenly coated Krispies that form the perfect foundation for our Chocolate Peanut Butter Rice Krispie bars. -
Press the Base into the Prepared Pan:
Once the Rice Krispies are uniformly coated, immediately transfer the entire mixture into your prepared 9×13 inch baking pan. Using your rubber spatula, or even better, a piece of wax paper or parchment paper lightly greased with butter, gently and evenly press the mixture into the pan. You want it to be compact enough to hold its shape, but avoid pressing down too hard, which can result in overly dense and hard treats. The idea is a firm, even layer that creates a consistent thickness across the entire pan. Distribute it edge-to-edge for neat, uniform bars. Once pressed, allow the base to cool slightly at room temperature while we prepare our chocolate topping. This cooling period helps the base set and prevents it from melting the chocolate too quickly.
Crafting the Rich Chocolate Topping:
-
Melt the Semi-Sweet Chocolate Chips:
There are two great methods for melting your semi-sweet chocolate chips for this glorious Chocolate Peanut Butter Rice Krispie topping.- Microwave Method: Place the 12 ounces of semi-sweet chocolate chips in a small microwave-safe bowl. Heat on high power in 30-second intervals, stirring thoroughly after each interval. Chocolate retains its shape even when melted, so stirring is essential to check its consistency. Continue heating and stirring until the chocolate is mostly melted and smooth. Be extremely careful not to overheat, as chocolate can scorch quickly and become unusable. It’s better to have a few small lumps and stir them out with residual heat.
- Double Boiler Method: If you prefer a stovetop approach or don’t have a microwave, create a double boiler. Fill a small saucepan with about an inch or two of water and bring it to a gentle simmer. Place a heat-safe bowl (ensure it’s larger than the saucepan, so it rests on the rim and doesn’t touch the water) on top of the saucepan. Add the chocolate chips to the bowl. The steam from the simmering water will gently melt the chocolate. Stir occasionally until completely smooth and glossy. This method offers very controlled, even melting.
Whichever method you choose, the goal is a perfectly smooth, luscious, and pourable chocolate.
-
Whisk in Powdered Sugar and Milk/Cream:
Once your chocolate is beautifully melted and smooth, immediately add the 1/2 cup of sifted powdered sugar and the 1/4 cup of whole milk or heavy cream directly into the melted chocolate. Using a whisk, mix vigorously until all the ingredients are fully combined and you have a gloriously smooth, thick, and pourable chocolate ganache-like topping. The powdered sugar adds a touch of sweetness and helps to thicken the topping to the perfect consistency, while the milk or cream provides that velvety texture we’re after. This mixture should be rich, shiny, and free of any lumps. -
Enhance with a Pinch of Sea Salt (Optional but Recommended):
This is a little secret ingredient that truly elevates the chocolate experience. Add a small pinch of sea salt (about 1/8 to 1/4 teaspoon) to your chocolate topping and whisk it in thoroughly. The salt won’t make your topping taste salty, but it will work wonders by enhancing the natural sweetness of the chocolate and making its deep, complex flavors pop. It creates a beautiful balance that contrasts wonderfully with the sweet and nutty peanut butter base, making our Chocolate Peanut Butter Rice Krispie treats even more irresistible.
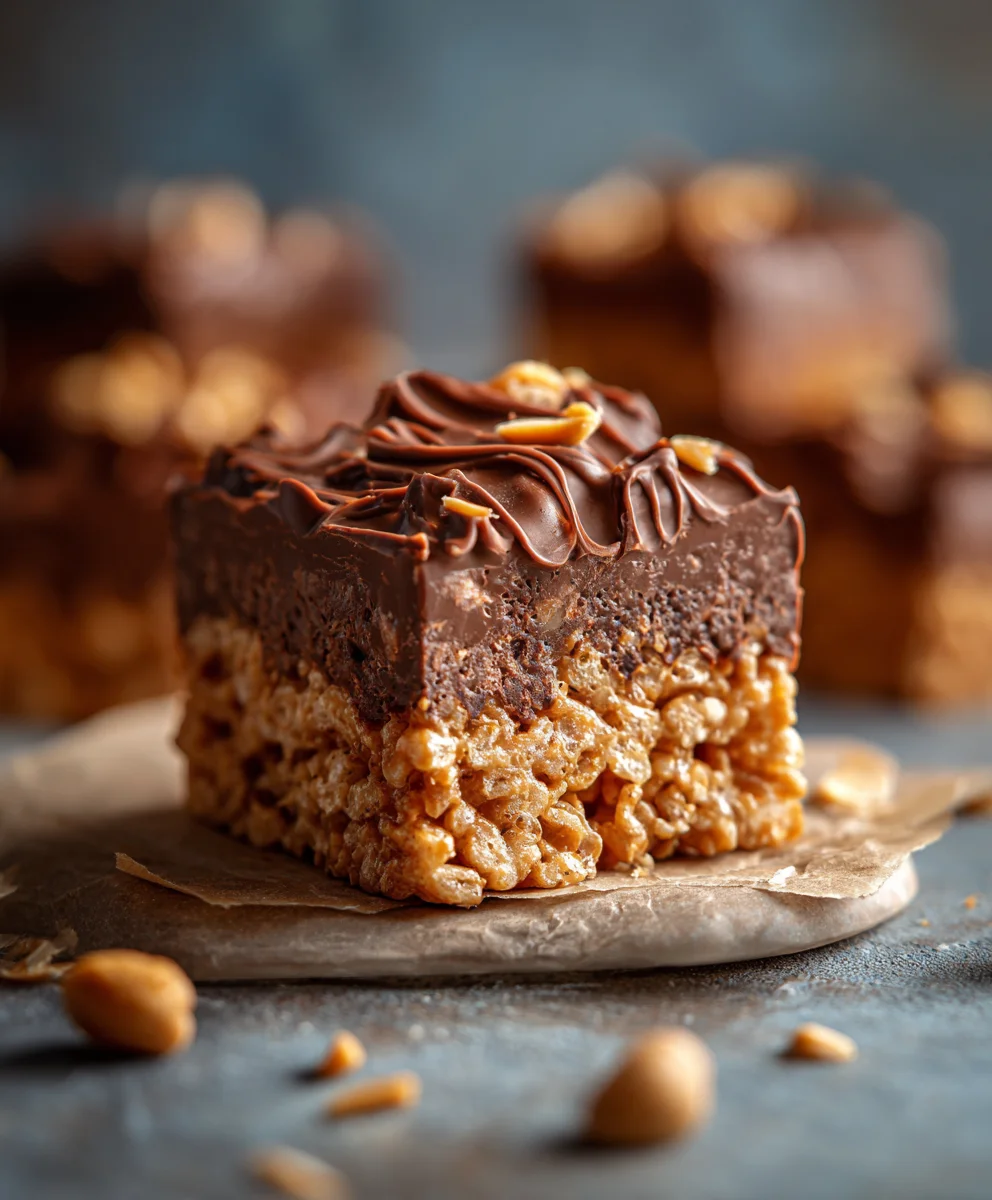
Assembling and Setting Your Chocolate Peanut Butter Rice Krispie Treats:
-
Pour and Spread the Chocolate Topping:
With your peanut butter Rice Krispie base having cooled slightly (it shouldn’t be piping hot, just warm to the touch), and your chocolate topping being perfectly smooth and pourable, it’s time for the grand finale of assembly. Carefully pour the entire chocolate mixture evenly over the peanut butter Rice Krispie base in the pan. Using your rubber spatula or an offset spatula, gently spread the chocolate all the way to the edges, creating a uniform, glossy layer across the entire surface. Work relatively quickly here, as the chocolate will start to set as it cools. Ensure every inch of the peanut butter base is covered with this luscious, dark chocolate. This beautiful chocolate cap is what truly defines these iconic Chocolate Peanut Butter Rice Krispie delights. -
Allow Your Treats to Set:
Now comes the hardest part: waiting! You have a couple of options for setting your treats:- Room Temperature: If you’re not in a rush, you can simply leave the pan on your counter at room temperature. Depending on your kitchen’s temperature, this can take anywhere from 2 to 4 hours for the chocolate to firm up completely. The advantage here is that the treats will be softer and chewier when set at room temperature.
- Refrigerator: For a quicker set, or if your kitchen is particularly warm, place the pan in the refrigerator. The chocolate topping will firm up much faster, usually within 1 to 2 hours. Be aware that chilling can make the treats a bit firmer and chewier overall, but it’s an excellent option when time is of the essence, or for a crisper snap to the chocolate layer. Ensure the treats are fully set before moving on to cutting.
Regardless of the method, the chocolate layer needs to be firm to the touch, and not sticky, before you can cut into them.
-
Cutting and Serving Your Perfect Treats:
Once your magnificent Chocolate Peanut Butter Rice Krispie creation is completely set, it’s time to cut and enjoy! Use the parchment paper overhang as handles to carefully lift the entire slab of treats out of the baking pan and onto a sturdy cutting board. This makes cutting much easier and cleaner. Using a large, sharp knife, trim off the edges if you desire perfectly straight lines (and enjoy those delicious scraps!). Then, cut the slab into your preferred size and shape – squares, rectangles, or even smaller bite-sized pieces for a party. I find that wiping your knife clean with a warm, damp cloth between cuts helps achieve cleaner lines, especially through the chocolate layer. Serve immediately, or store them for later enjoyment. These are truly a crowd-pleaser!
Tips for the Perfect Chocolate Peanut Butter Rice Krispie Experience:
-
Don’t Overcook the Marshmallows:
This is a golden rule for any Rice Krispie treat recipe. Overheating or overcooking the marshmallows will cause them to become tough and hard once cooled, resulting in a dense and difficult-to-chew treat. We’re aiming for melted and smooth, not caramelized. Keep that heat low and remove it from the stove as soon as they’re fully incorporated. This ensures that light, airy, and wonderfully chewy texture for our Chocolate Peanut Butter Rice Krispie base. -
Freshness Matters for Cereal:
Always use fresh Rice Krispies cereal. Stale cereal will result in a chewy, rather than crispy, base. The whole point of a Rice Krispie treat is that delightful snap and crunch, so starting with a fresh box makes a world of difference. A stale cereal can absorb moisture and lose its structural integrity, diminishing the iconic texture of our treats. -
Gentle Pressing is Key:
When pressing the Rice Krispie mixture into the pan, be firm but gentle. Over-compressing the mixture will lead to very hard, dense bars that are less enjoyable to eat. We want them to hold together, but still retain a bit of that light and airy quality. Using greased parchment or wax paper to press down can help apply even pressure without sticking, creating a consistently textured bar. -
Choose Your Peanut Butter Wisely:
While I recommend creamy, shelf-stable peanut butter for consistency, feel free to experiment with your favorite brand. Just be aware that natural peanut butter, especially those with oil separation, might require extra stirring to fully incorporate, and its texture might slightly alter the final base. However, if you love the flavor of a specific natural peanut butter, go for it! Just ensure it’s well mixed before adding to the marshmallow goo. -
Storage for Optimal Freshness:
To keep your Chocolate Peanut Butter Rice Krispie treats at their best, store them in an airtight container at room temperature. They are generally best enjoyed within 3-4 days. Storing them in the refrigerator can make them very hard, so if you do refrigerate them, let them come to room temperature for about 15-30 minutes before serving for the best texture. This allows the chocolate and the base to soften slightly, bringing back that perfect chewiness. -
Personalize Your Topping:
While the semi-sweet chocolate topping is divine as is, feel free to add a personal touch. A sprinkle of flaky sea salt on top of the wet chocolate layer just after pouring creates a beautiful sweet-and-salty contrast. You could also drizzle a little extra melted peanut butter or white chocolate over the set topping for an artistic flourish, or even sprinkle some mini chocolate chips or chopped peanuts for added texture and visual appeal. Make these Chocolate Peanut Butter Rice Krispie treats uniquely yours!
Conclusion:
And there you have it, my friends! We’ve reached the sweet finale of our delicious journey, and I genuinely hope you’re feeling inspired, perhaps even a little hungry, to whip up a batch of these extraordinary treats. If there’s one recipe I could implore you to try from my culinary collection, it would undoubtedly be this one. Why, you ask? Because it transcends the typical dessert; it’s a symphony of textures and flavors that dance on your palate, offering that perfect balance of salty, sweet, creamy, and crunchy in every single bite. It’s a nostalgic nod to childhood favorites, elevated with a sophistication that makes it suitable for any age or occasion.
I’ve always been a firm believer that the best recipes are those that bring joy without bringing stress, and this certainly fits the bill. Forget about complicated baking techniques, preheating ovens, or endless lists of obscure ingredients. This particular creation is about embracing simplicity and letting the magic of classic combinations shine through. It’s a testament to the power of a few humble ingredients coming together to create something truly spectacular. When you’re looking for a dessert that delivers on taste, ease, and sheer crowd-pleasing power, this is your go-to. It’s the kind of treat that disappears from the platter almost as quickly as it appears, leaving everyone wondering when you’ll be making it again, eager for another taste of its irresistible charm. It truly embodies the spirit of effortless deliciousness.
Serving Suggestions to Elevate Your Experience
While these bars are absolutely divine straight out of the pan, I love thinking about little ways to make them even more special, depending on the occasion or your personal preference. For a truly irresistible experience, I often suggest serving them slightly chilled, as this allows the chocolate and peanut butter layers to firm up beautifully, creating a satisfying snap as you bite in. This also helps to prevent them from becoming too soft on warmer days. You could, of course, also serve them at room temperature for a softer, melt-in-your-mouth texture that highlights the inherent creaminess of the layers. Consider dusting them with a touch of unsweetened cocoa powder or a delicate sprinkle of flaky sea salt just before serving to add a professional touch and an extra layer of flavor complexity that really makes the sweet notes pop. For a fun, playful vibe, especially if you’re making them for a party or a gathering with kids (or adults who are kids at heart!), a scattering of colorful sprinkles on top of the wet chocolate layer before it sets adds instant visual appeal and a bit of festive cheer. Imagine them arranged on a beautiful serving platter, perhaps alongside a scoop of premium vanilla bean ice cream, creating a delightful contrast of warm and cold, soft and crunchy. They’re also fantastic as a lunchbox treat, a quick grab-and-go snack, or an afternoon pick-me-up with a comforting cup of coffee or a cold glass of milk. The possibilities for enjoying these delicious squares are truly endless, making them incredibly versatile.
Creative Variations to Make It Your Own
One of the things I adore most about this recipe is its incredible versatility and how easily it lends itself to customization. While the classic version is perfect in its own right, don’t ever hesitate to experiment and put your own unique spin on it. If you’re a dark chocolate enthusiast, for instance, try swapping out the milk chocolate for a richer, more intense flavor – perhaps a 70% cacao bar for a more sophisticated profile. For those who prefer a touch of white chocolate, a delicate drizzle over the top of the set chocolate layer would be absolutely divine, adding another layer of sweetness and striking visual interest. Nut butter fanatics could easily experiment with almond butter or cashew butter for a slightly different, yet equally delicious, flavor profile – just make sure they’re creamy and not too oily for the best texture. Want to add an extra layer of indulgence and textural excitement? Stir in a handful of mini marshmallows or crushed pretzels into the Rice Krispie mixture for even more delightful texture and a wonderfully salty crunch that complements the sweetness. A tiny pinch of cayenne pepper in the chocolate layer could offer a subtle, intriguing warmth that’s surprisingly good, while a teaspoon of instant espresso powder can deepen and intensify the chocolate notes without actually adding a coffee flavor. You could even form them into individual balls instead of bars for a convenient, bite-sized treat, perfect for holiday platters, party favors, or portion control (if you can manage it!). The core principles of this Chocolate Peanut Butter Rice Krispie recipe are so robust and forgiving that it truly welcomes all sorts of creativity. Think of it as a delicious canvas ready for your culinary artistry and imagination.
Your Turn!
Now, it’s over to you! I genuinely hope you feel empowered and excited to try this recipe in your own kitchen very soon. I promise you, the smiles, the satisfied sighs, and the compliments from anyone who tastes them will be your greatest reward. Don’t just take my word for it; experience the magic of this easy, delightful dessert for yourself. And please, please, please – when you do make them, I would absolutely love to hear all about your experience. Did you stick to the classic version, or did you venture into one of the variations I suggested, or perhaps even come up with your own brilliant twist? What was your favorite part of making them? How did your friends and family react to this irresistible treat? Share your photos, your triumphs, and even your “what if” ideas in the comments section below. Your feedback and creativity inspire not just me, but our entire wonderful community of fellow food lovers and home bakers. Let’s celebrate the joy of simple, irresistible treats together, creating delicious memories along the way. Happy making, and I can’t wait to hear all about your delicious adventure!
Ultimate Chocolate Peanut Butter Rice Krispie Treats
An ultimate no-bake treat combining rich chocolate, creamy peanut butter, and crisp rice cereal. This iconic comfort food is an effortless delight, perfect for any occasion and guaranteed to bring profound joy.
Ingredients
-
1/2 cup (113g) unsalted butter, plus extra for greasing
-
10 ounces (5-6 cups) mini marshmallows
-
1 cup (250g) creamy peanut butter
-
1 teaspoon pure vanilla extract
-
6 cups Rice Krispies cereal
-
12 ounces (340g) semi-sweet chocolate chips
-
1/2 cup (60g) sifted powdered sugar
-
1/4 cup (60ml) whole milk or heavy cream
-
Pinch of sea salt (optional)
Instructions
-
Step 1
Line a 9×13 inch baking pan with parchment paper, leaving an overhang on two sides for handles. Lightly grease the parchment paper with butter or cooking spray. -
Step 2
In a medium, heavy-bottomed saucepan, melt 1/2 cup unsalted butter over low heat. Add 10 ounces of mini marshmallows and stir constantly until completely melted and smooth (about 5-7 minutes). Do not let them brown. -
Step 3
Remove the saucepan from heat. Immediately stir in 1 cup creamy peanut butter and 1 teaspoon pure vanilla extract until fully incorporated and the mixture is uniform and fragrant. -
Step 4
Quickly transfer the warm peanut butter-marshmallow mixture to a large heat-safe mixing bowl. Add 6 cups of Rice Krispies cereal and gently fold with a rubber spatula until the cereal is evenly coated. -
Step 5
Immediately transfer the coated cereal into the prepared baking pan. Using a buttered spatula or a piece of greased parchment paper, gently and evenly press the mixture into the pan to form a compact layer. Allow the base to cool slightly at room temperature. -
Step 6
Melt 12 ounces of semi-sweet chocolate chips using either a microwave (in 30-second intervals, stirring) or a double boiler, until smooth and glossy. Be careful not to overheat. -
Step 7
Into the melted chocolate, whisk in 1/2 cup sifted powdered sugar and 1/4 cup whole milk or heavy cream until the mixture is smooth, thick, and pourable. Optionally, whisk in a pinch of sea salt (1/8-1/4 teaspoon) to enhance the chocolate flavor. -
Step 8
Pour the prepared chocolate topping evenly over the slightly cooled Rice Krispie base, spreading it to the edges with a spatula. Allow the treats to set at room temperature (2-4 hours) or in the refrigerator (1-2 hours) until the chocolate topping is firm to the touch. -
Step 9
Once fully set, use the parchment paper overhang to lift the entire slab of treats onto a cutting board. Using a large, sharp knife (wiping clean between cuts), cut into your desired size and shape. Serve immediately or store in an airtight container.
Important Information
Nutrition Facts (Per Serving)
It is important to consider this information as approximate and not to use it as definitive health advice.
Allergy Information
Please check ingredients for potential allergens and consult a health professional if in doubt.

Leave a Comment