
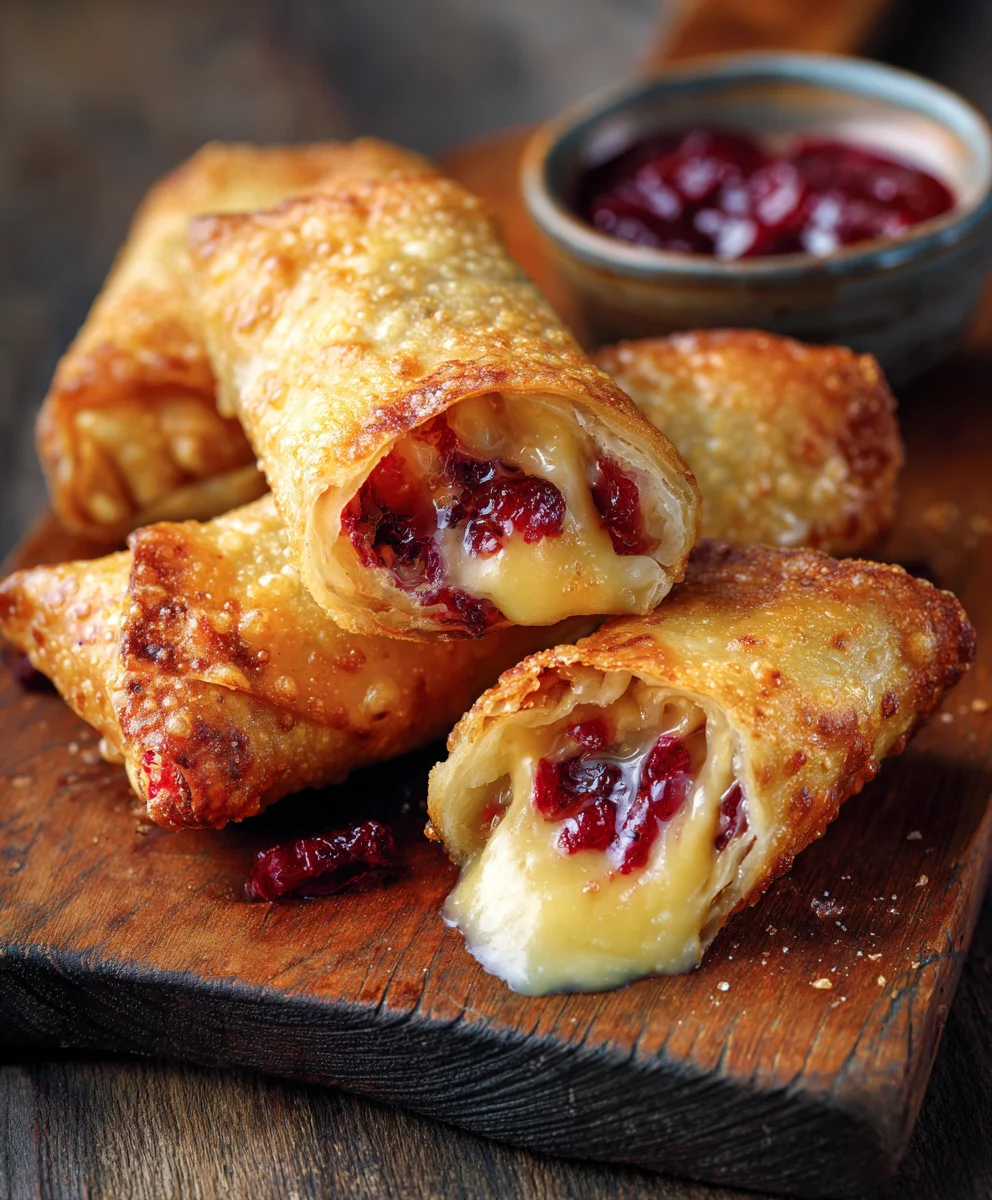
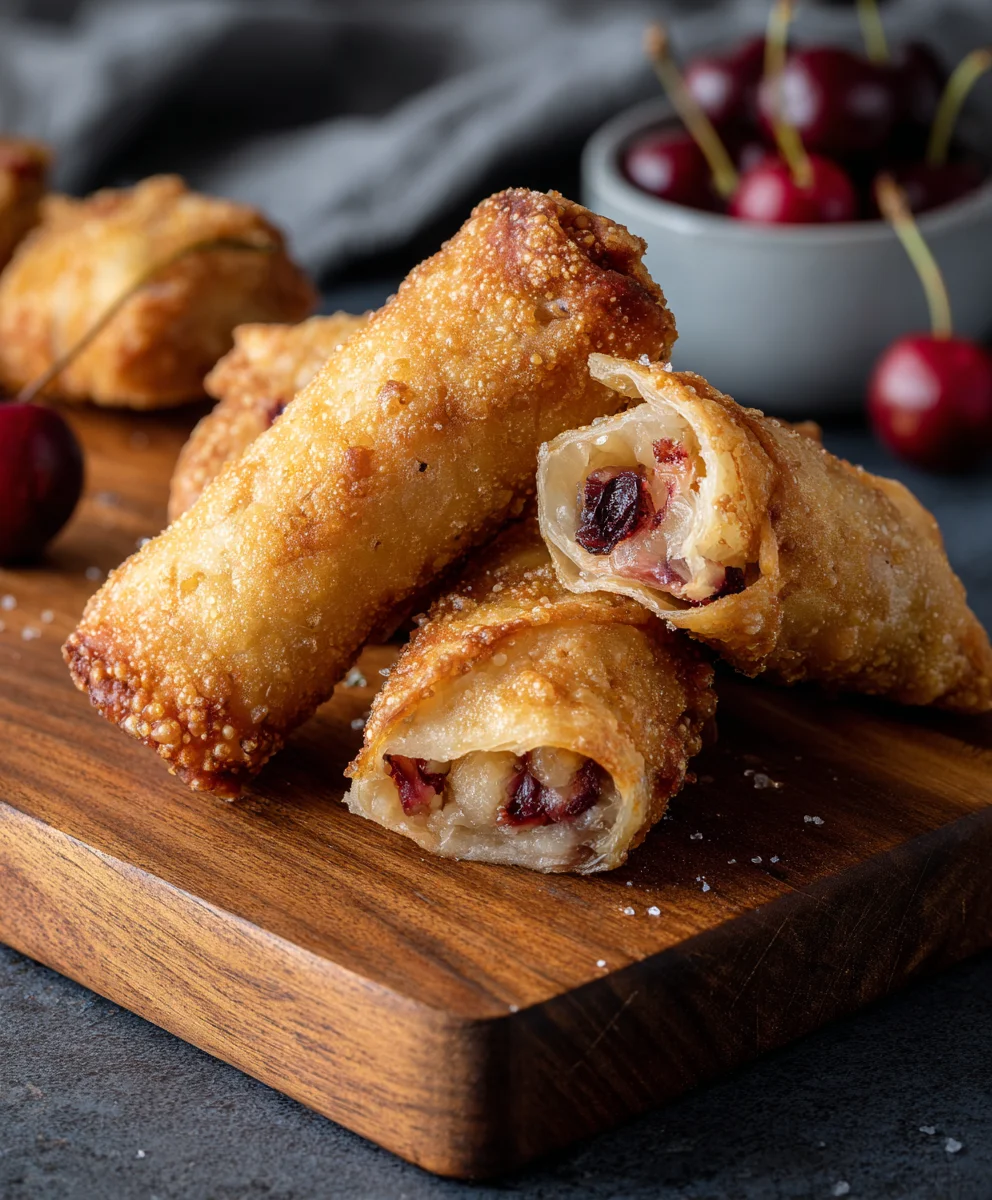
Crispy Cherry Cheesecake Delights Air Fryer Egg Rolls – prepare to have your dessert expectations completely redefined! I am absolutely thrilled to share a recipe that masterfully blends the beloved, creamy indulgence of cherry cheesecake with the satisfying crunch of a perfectly air-fried egg roll wrapper. Imagine biting into a golden-brown, bubbly exterior, only to discover a warm, luscious filling of sweet and tart cherries swirled through rich, tangy cream cheese – a symphony of textures and flavors that truly captivates the senses.
While the humble egg roll wrapper is traditionally associated with savory East Asian appetizers, its incredible versatility shines brightly in this innovative dessert. This dish represents a delightful fusion, taking inspiration from classic American comfort food and presenting it in an exciting, handheld format. People adore this creation not just for its surprising textural contrast – that incredible crispy shell against the smooth, decadent interior – but also for its sheer convenience. Thanks to the air fryer, achieving that deep-fried crispness without the oil and fuss is simpler than ever, making these Crispy Cherry Cheesecake Delights Air Fryer Egg Rolls perfect for entertaining, a unique treat for family, or simply when you crave something extraordinary yet easy.

Ingredients:
- For the Creamy Cheesecake Filling:
- 12 ounces (about 1 ½ packages) full-fat cream cheese, softened to room temperature. This step is crucial for a smooth, lump-free filling!
- ½ cup granulated sugar, fine texture preferred for quick dissolving.
- 1 large egg yolk, which contributes to the richness and helps stabilize the filling.
- 1 teaspoon pure vanilla extract, for that classic comforting aroma and taste.
- ½ teaspoon fresh lemon zest, finely grated, to brighten the overall flavor and cut through the richness.
- Pinch of salt, just a tiny bit to enhance all the other sweet flavors.
- For the Sweet Cherry Layer:
- 1 can (21 ounces) cherry pie filling, high-quality preferred. I often look for brands with whole or half cherries.
- ½ teaspoon almond extract (optional, but highly recommended as it beautifully complements cherry flavor).
- For the Crispy Egg Roll Shells:
- 1 package (approximately 16-20 count) square egg roll wrappers. Ensure they are fresh and pliable.
- 2 tablespoons unsalted butter, melted, for brushing to achieve that perfect golden crisp.
- 2 tablespoons granulated sugar, combined with 1 teaspoon ground cinnamon, for a delightful cinnamon-sugar dusting.
- A small bowl of water, for sealing the egg roll wrappers securely.
- Optional Garnishes & Serving Suggestions:
- Powdered sugar, for a delicate dusting.
- Whipped cream or vanilla ice cream.
- Fresh mint leaves, for a pop of color and freshness.
- A drizzle of chocolate sauce or additional cherry pie filling.
Preparation Phase: Crafting the Silky Cheesecake Filling
- Ensure Cream Cheese is Perfectly Softened: The journey to spectacular Crispy Cherry Cheesecake Delights begins with perfectly softened cream cheese. Take your cream cheese out of the refrigerator at least 1-2 hours before you plan to start. It should be pliable to the touch, not cold and firm. Attempting to mix cold cream cheese will result in a lumpy filling and an over-aerated texture, which we want to avoid for this specific application. If you’re short on time, you can carefully soften it in a microwave on low power for 10-15 second intervals, but be extremely cautious not to melt it.
- Begin Creaming the Cheese: In a medium-sized mixing bowl, or the bowl of a stand mixer fitted with the paddle attachment, add your softened cream cheese. Start mixing on low speed, gradually increasing to medium, for about 2-3 minutes until it’s incredibly smooth and creamy. Make sure to stop and scrape down the sides of the bowl frequently with a rubber spatula. This ensures every bit of cream cheese is incorporated and no lumps remain. We’re aiming for an almost whipped, yet dense, texture here.
- Incorporate the Sweetness and Flavorings: With the mixer still running on low, gradually add the ½ cup of granulated sugar. Continue to beat for another 2-3 minutes, scraping down the bowl as needed, until the sugar is fully dissolved and the mixture is light and fluffy. You shouldn’t feel any grittiness when you rub a small amount between your fingers.
- Add Egg Yolk and Extracts: Next, add the large egg yolk, pure vanilla extract, fresh lemon zest, and the pinch of salt. Mix on low speed just until everything is thoroughly combined, about 1 minute. Be careful not to overmix once the egg yolk is added, as we want to keep air incorporation to a minimum to maintain a dense, rich cheesecake filling that won’t puff up excessively during air frying. Scrape down the bowl one final time to ensure uniform consistency. Set this beautiful, velvety cheesecake filling aside.
- Prepare the Cherry Filling: Open your can of cherry pie filling. If you desire a slightly more intense cherry flavor or a thicker consistency, you can drain off a small amount of the excess syrup. However, for most canned pie fillings, it’s ready to use as is. Stir in the ½ teaspoon of almond extract now, if you’re using it. This subtle addition truly elevates the cherry flavor, adding a gourmet touch that I absolutely adore. Give it a good stir to distribute the almond extract evenly.
Assembling the Crispy Cherry Cheesecake Delights
- Set Up Your Assembly Line: Preparing your workstation efficiently will make the assembly process much smoother and quicker. Lay out your egg roll wrappers on a clean, dry surface. Have your bowl of cheesecake filling, bowl of cherry filling, melted butter, cinnamon sugar mix, and the small bowl of water close at hand. This is where the magic really starts to happen!
- Handle Wrappers with Care: Take one egg roll wrapper and place it on your work surface in a diamond shape, with a corner pointing towards you. It’s important to keep the remaining wrappers covered with a slightly damp paper towel to prevent them from drying out, which can make them crack and difficult to fold.
- Layer the Fillings: Scoop about 1 tablespoon of the cheesecake filling onto the center of the wrapper, closer to the corner pointing towards you, leaving a good 1 ½ to 2 inches of space from the edge. Flatten the cheesecake filling slightly into a rectangle or oval shape. Then, spoon about 1 tablespoon of the cherry pie filling directly on top of the cheesecake layer. Resist the urge to overfill! Overfilling is the most common mistake and will make your egg rolls difficult to seal and prone to bursting during cooking. It’s better to have a slightly smaller, perfectly sealed egg roll than a huge, messy one.
-
Master the Folding Technique: This is the key to creating perfectly sealed, crispy egg rolls.
- First Fold: Take the bottom corner (the one closest to you) and fold it up and over the filling, tucking it snugly under the filling. Pull it back towards you slightly to ensure a tight roll.
- Second Fold – Sides In: Next, fold in the left and right corners towards the center, overlapping them slightly. You should now have an envelope shape. Press down gently along the edges to seal them slightly.
- Third Fold – The Roll: Starting from the bottom (where you made your first fold), begin to roll the wrapper upwards, away from you, towards the top corner. Roll it as tightly and evenly as possible without tearing the wrapper. You want a compact cylinder.
- Sealing the Deal: Once you’ve rolled it almost to the top, dip your finger in the small bowl of water and lightly moisten the remaining top corner of the wrapper. This acts as a glue. Complete the roll, pressing firmly to seal the edge down. A good seal is paramount to prevent the filling from escaping during air frying.
- Repeat and Prepare for Air Frying: Place the finished egg roll, seam-side down, on a baking sheet lined with parchment paper. Continue this process with the remaining wrappers and fillings. You’ll likely get between 16 to 20 Crispy Cherry Cheesecake Delights, depending on the size of your wrappers and how generously you filled them.
- Butter and Cinnamon-Sugar Coating: Once all your egg rolls are assembled, melt the 2 tablespoons of unsalted butter. Using a pastry brush, lightly brush each egg roll on all sides with the melted butter. This butter layer is what will give them their beautiful golden color and contribute significantly to their irresistible crispiness. Immediately after brushing, sprinkle them generously with the cinnamon-sugar mixture. This adds a lovely sweet, spiced crust that is just divine.
Air Frying for Golden Perfection
- Preheat Your Air Fryer: Before you even think about putting your glorious creations in, preheat your air fryer to 375°F (190°C). Air fryers cook best when they are fully preheated, ensuring an even cook and maximum crispiness right from the start. This usually takes about 3-5 minutes, depending on your model. Do not skip preheating; it makes a big difference in the final texture!
- Arrange in the Basket: Carefully place the buttered and sugared egg rolls into the air fryer basket in a single layer. It is absolutely crucial not to overcrowd the basket. Air fryers work by circulating hot air, and if the basket is too full, the air can’t circulate properly, leading to unevenly cooked, soggy, rather than crispy, results. You will almost certainly need to cook these in multiple batches. I typically aim for 3-4 egg rolls per batch in my standard-sized air fryer.
- First Round of Air Frying: Air fry the egg rolls at 375°F (190°C) for 6 minutes. During this initial phase, the wrappers will start to turn a light golden color, and the filling inside will begin to warm up.
- Flip and Continue Frying: After 6 minutes, carefully open the air fryer basket. Using tongs, gently flip each egg roll to the other side. This ensures both sides get direct contact with the circulating hot air, leading to even browning and crispness. Close the basket and continue to air fry for another 4-6 minutes, or until the egg rolls are deeply golden brown and look incredibly crispy all over. Keep a close eye on them during the last few minutes, as air fryers can vary, and they can go from perfectly golden to slightly too dark very quickly. You’re looking for a rich, appetizing golden-brown hue.
- Remove and Repeat: Once your first batch of Crispy Cherry Cheesecake Delights is perfectly cooked, carefully remove them from the air fryer basket using tongs and transfer them to a wire cooling rack. This allows air to circulate around them, preventing the bottoms from becoming soggy and helping them maintain their crispness. Repeat the air frying process with the remaining batches, making sure to re-butter and re-cinnamon-sugar if they’ve been sitting for a while, and always cooking in a single layer.
Finishing Touches and Serving
- Allow a Moment to Cool: While it might be tempting to bite into these immediately (and trust me, I understand the impulse!), allow the Crispy Cherry Cheesecake Delights to cool on the wire rack for at least 5-10 minutes. The filling inside will be extremely hot and can cause burns if consumed too quickly. Plus, a brief cooling period helps the wrappers set into their ultimate crispy texture, and the flavors meld beautifully.
- Garnish and Serve: These beauties are absolutely fantastic served warm. For an extra touch of elegance and sweetness, you can dust them lightly with powdered sugar just before serving. They pair wonderfully with a dollop of fresh whipped cream, a scoop of vanilla bean ice cream, or even a small side of extra cherry pie filling for dipping. A few fresh mint leaves can also add a lovely visual contrast and a hint of freshness.
- Storage Instructions: While these “Crispy Cherry Cheesecake Delights Air Fryer Egg Rolls” are definitely best enjoyed fresh and warm, you can store any leftovers. Place them in an airtight container in the refrigerator for up to 2-3 days. To reheat and bring back some of their crispness, pop them back into the air fryer at 350°F (175°C) for 3-5 minutes, or until heated through and crispy again. The microwave will heat them, but they won’t be as crispy, so I highly recommend the air fryer for reheating!
Conclusion:
And there you have it, my friends! We’ve journeyed through the simple yet utterly magical steps to create what I genuinely believe will become your new favorite dessert sensation. If you’ve been on the fence about trying something truly unique and incredibly satisfying, let me assure you, this recipe for Crispy Cherry Cheesecake Delights Air Fryer Egg Rolls is an absolute game-changer that you simply cannot afford to miss. What makes these so undeniably special? It’s the ingenious combination of textures and flavors that dance together in perfect harmony. You get that wonderfully crisp, golden-brown wrapper from the air fryer, a testament to its efficiency and the brilliance of this cooking method. This delicate crunch then gives way to a warm, luscious, and creamy cheesecake filling, bursting with the sweet-tart goodness of cherries. It’s rich without being heavy, decadent yet surprisingly easy to prepare, and it offers a sophisticated twist on a classic dessert that will undoubtedly impress anyone lucky enough to try them. Forget the deep fryer; our air-fried version delivers all the crispiness you crave without the excess oil, making it a slightly guilt-free indulgence.
I truly feel that this recipe embodies the best of both worlds: the comforting familiarity of a cheesecake, reimagined with the exciting crunch of an egg roll. It’s a dessert that’s perfect for almost any occasion, whether you’re hosting a sophisticated dinner party, looking for a unique potluck contribution, or simply craving a special treat for a cozy night in. The aroma alone as these cook in your air fryer is enough to get your mouth watering, and trust me, the first bite will confirm all your delicious expectations. They’re a fantastic alternative to traditional fried desserts, offering a lighter touch without compromising on flavor or that satisfying texture we all love. I’ve made these for countless gatherings, and they are always the first to disappear from the dessert table, sparking conversations and earning rave reviews. This isn’t just a recipe; it’s an experience waiting to happen in your kitchen.
Elevate Your Delights: Serving Suggestions & Creative Variations
Now, while these Cherry Cheesecake Delights are absolutely phenomenal straight out of the air fryer, slightly cooled, there are so many ways to personalize and elevate them further, transforming them into an even grander culinary statement. For a classic presentation, a simple dusting of powdered sugar adds an elegant touch and a subtle sweetness that complements the cherry filling beautifully. But don’t stop there! Imagine a delicate drizzle of melted dark chocolate or a tangy raspberry coulis weaving across the plate, adding both visual appeal and an extra layer of flavor. A dollop of freshly whipped cream, perhaps infused with a hint of vanilla or almond extract, would provide a lovely, airy counterpoint to the rich filling. And for those who love to go all out, a small scoop of vanilla bean ice cream melting gently alongside these warm treats is pure bliss.
The beauty of this recipe also lies in its incredible versatility. While the cherry cheesecake filling is a star, feel free to let your imagination run wild with variations. How about a spiced apple pie filling for an autumnal twist? Or a zesty lemon cream cheese filling with blueberry accents for a burst of summer freshness? Peach, strawberry, or even a mixed berry medley would work wonderfully, simply by swapping out the cherry pie filling. You could also experiment with adding different extracts to your cream cheese mixture – a touch of almond, orange zest, or even a dash of cinnamon could introduce exciting new dimensions. For a truly decadent experience, sprinkle some mini chocolate chips or toasted pecans into your cream cheese mixture before rolling. The possibilities are truly endless, allowing you to tailor these treats to suit any season or personal preference. Don’t be afraid to experiment; that’s where some of the best culinary discoveries are made!
Your Turn to Create and Share!
So, what are you waiting for? I wholeheartedly encourage you to roll up your sleeves, gather your ingredients, and give these incredible Cherry Cheesecake Delights a try in your own air fryer. You’ll be amazed at how simple and rewarding the process is, and even more delighted by the incredible results. This is more than just a recipe; it’s an invitation to create something truly special, to share joy, and to perhaps even discover a new signature dessert for your repertoire. I promise you, the smiles and compliments you’ll receive will make every moment worthwhile. There’s a profound satisfaction that comes from creating delicious food with your own hands, especially when it turns out this spectacularly good.
Once you’ve experienced the sheer deliciousness of these delightful egg rolls, I would absolutely love to hear about it! Did you stick to the classic cherry, or did you venture into a new flavor combination? What serving suggestion did you find most appealing? Please share your experiences, your photos, and any creative twists you came up with in the comments section below. Your feedback and culinary adventures inspire me and countless other home cooks in our community. Let’s spread the word about these amazing Crispy Cherry Cheesecake Delights Air Fryer Egg Rolls and inspire more people to embrace the joy of delicious, homemade desserts. Happy cooking, and I can’t wait to see what you create!
Crispy Cherry Cheesecake Delights Air Fryer Egg Rolls
Prepare to redefine your dessert expectations with these Crispy Cherry Cheesecake Delights! This recipe masterfully blends the beloved, creamy indulgence of cherry cheesecake with the satisfying crunch of a perfectly air-fried egg roll wrapper. Imagine biting into a golden-brown, bubbly exterior, only to discover a warm, luscious filling of sweet and tart cherries swirled through rich, tangy cream cheese – a symphony of textures and flavors that truly captivates the senses, all made simple and healthier in an air fryer.
Ingredients
-
12 ounces full-fat cream cheese, softened
-
½ cup granulated sugar
-
1 large egg yolk
-
1 teaspoon pure vanilla extract
-
½ teaspoon fresh lemon zest
-
Pinch of salt
-
1 can (21 ounces) cherry pie filling
-
½ teaspoon almond extract (optional)
-
1 package (16-20 count) square egg roll wrappers
-
2 tablespoons unsalted butter, melted
-
2 tablespoons granulated sugar
-
1 teaspoon ground cinnamon
-
Water, for sealing
Instructions
-
Step 1
Ensure cream cheese is softened. In a bowl, cream softened cream cheese until smooth. Gradually beat in ½ cup sugar until dissolved. Add egg yolk, vanilla extract, lemon zest, and salt; mix just until combined. Set aside. -
Step 2
Open can of cherry pie filling. Stir in ½ teaspoon almond extract (if using). -
Step 3
Set up an assembly line with wrappers, fillings, melted butter, cinnamon-sugar, and water. Place one egg roll wrapper in a diamond shape. Scoop 1 tablespoon cheesecake filling onto the center (closer to you), flatten slightly, then spoon 1 tablespoon cherry pie filling on top. Do not overfill. -
Step 4
Fold the bottom corner over the filling, tucking it snugly. Fold in the left and right corners towards the center. Roll the wrapper tightly upwards towards the top corner. Moisten the top corner with water and press firmly to seal the edge. -
Step 5
Place assembled egg rolls on a parchment-lined sheet. Lightly brush each egg roll on all sides with melted butter. Sprinkle generously with the combined cinnamon-sugar mixture. -
Step 6
Preheat your air fryer to 375°F (190°C) for 3-5 minutes. -
Step 7
Place egg rolls in a single layer in the air fryer basket, ensuring not to overcrowd. Air fry at 375°F (190°C) for 6 minutes. -
Step 8
Carefully flip each egg roll. Continue to air fry for another 4-6 minutes, or until deeply golden brown and crispy. -
Step 9
Transfer cooked egg rolls to a wire cooling rack and let cool for 5-10 minutes before serving. Repeat frying with remaining batches. Serve warm, optionally dusted with powdered sugar, whipped cream, or ice cream. -
Step 10
Store leftovers in an airtight container in the refrigerator for 2-3 days. Reheat in the air fryer at 350°F (175°C) for 3-5 minutes to restore crispness.
Important Information
Nutrition Facts (Per Serving)
It is important to consider this information as approximate and not to use it as definitive health advice.
Allergy Information
Please check ingredients for potential allergens and consult a health professional if in doubt.

Leave a Comment