
Easy No Bake Peanut Butter Bars are, without a doubt, a dessert lover’s dream come true, offering pure indulgence with minimal effort. Imagine a rich, creamy, and utterly satisfying treat that requires no oven, no complex techniques, and yet delivers a burst of classic flavor that instantly transports you back to childhood. This beloved recipe stands as a testament to the fact that some of the most delicious creations are often the simplest.
These delightful bars hold a special place in the hearts of many, particularly in American home baking. They’ve long been a staple at potlucks, bake sales, and family gatherings, cherished for their irresistible combination of salty peanut butter and sweet chocolate. Their popularity surged precisely because they offer that comforting, nostalgic taste and texture without the fuss of traditional baking. It’s the perfect solution for satisfying a sweet tooth on a hot summer day or when you simply don’t have the time – or inclination – to fire up the oven.
Why We Adore These Quick Treats
What makes these Easy No Bake Peanut Butter Bars so universally adored? It’s the harmonious balance of flavors and textures. The dense, buttery peanut butter base melts in your mouth, perfectly complemented by a smooth, often fudgy, chocolate topping. The convenience factor is simply unparalleled; you can whip them up in a flash, chill, and serve, making them an ideal last-minute dessert or a fantastic make-ahead option. I find immense joy in sharing these because they bring smiles to every face, proving that sometimes, the easiest recipes are truly the most rewarding.

Ingredients:
- 2 cups (about 1.5 sleeves) finely crushed Graham Crackers: For the base of our scrumptious bars! I usually grab the classic honey variety, but cinnamon-flavored graham crackers can also add a delightful twist. You’ll want to crush these as finely as possible, almost to a sandy texture, to ensure a smooth and uniform crust. A food processor makes this task incredibly easy, but a zip-top bag and a rolling pin work perfectly too.
- 1/2 cup (1 stick) unsalted butter, melted: This magical ingredient binds our graham cracker crumbs together, creating a firm and flavorful foundation for our Easy No Bake Peanut Butter Bars. Using unsalted butter gives us more control over the overall saltiness of the dish, allowing us to add just a pinch where needed. Make sure it’s fully melted but not boiling hot.
- 1 cup powdered sugar (confectioners’ sugar): This superfine sugar is key to achieving that wonderfully smooth, melt-in-your-mouth texture in our peanut butter filling. It dissolves effortlessly, preventing any grainy surprises. I always give mine a quick sift before using to eliminate any lumps, ensuring a truly silky filling.
- 1 cup creamy peanut butter: The star of our show! I highly recommend using a conventional creamy peanut butter (like Jif or Skippy) for this recipe rather than natural peanut butter. Natural peanut butter tends to separate and can result in a greasier, less stable filling for your Easy No Bake Peanut Butter Bars. Make sure it’s at room temperature for easier mixing.
- 1/2 cup (1 stick) unsalted butter, softened: This butter is crucial for giving our peanut butter filling its rich flavor, smooth texture, and structure. Having it softened to room temperature is important so it creams properly with the peanut butter and powdered sugar, avoiding any lumps.
- 1 teaspoon vanilla extract: A little touch of vanilla goes a long way in enhancing the overall flavor profile, adding warmth and depth to both the peanut butter filling and subtly complementing the chocolate topping. Pure vanilla extract is always my preference for the best flavor.
- 1/4 teaspoon salt: Just a tiny pinch of salt in the peanut butter filling helps to balance the sweetness and really makes that rich peanut butter flavor pop! It’s an often-overlooked ingredient that makes a huge difference.
- 1 1/2 cups (about 9 ounces) semi-sweet chocolate chips: For our glorious, glossy chocolate topping! Semi-sweet chocolate provides the perfect balance of sweetness and rich cocoa flavor without being overly indulgent. You could also use milk chocolate for a sweeter profile or dark chocolate for a more intense flavor, depending on your preference.
- 2 tablespoons vegetable shortening OR coconut oil (refined, to avoid coconut flavor): This is my secret weapon for creating a chocolate topping that’s not only incredibly smooth and easy to spread but also sets beautifully with a lovely shine, and most importantly, won’t crack when you slice your Easy No Bake Peanut Butter Bars. Shortening works wonderfully, but refined coconut oil is a great alternative if you prefer to avoid shortening, just ensure it’s refined if you don’t want a coconut taste.
Equipment You’ll Need:
- 9×13 inch baking pan: This standard size is perfect for creating a nice batch of bars that aren’t too thin or too thick.
- Parchment paper: Absolutely essential for easy removal of your finished bars from the pan. I always line my pan with parchment paper, leaving an overhang on the sides, which acts as “handles” to lift the entire batch out.
- Large mixing bowl: You’ll need at least two, one for the crust and one for the peanut butter filling. I prefer glass or ceramic bowls.
- Medium mixing bowl: For preparing the chocolate topping.
- Food processor (optional, but highly recommended): For efficiently crushing graham crackers into fine crumbs. If you don’t have one, a sturdy zip-top bag and a rolling pin will do the trick – just be prepared for a bit of a workout!
- Rubber spatula or wooden spoon: For mixing and scraping down the sides of the bowls.
- Measuring cups and spoons: Precision is key in baking, even in no-bake recipes!
- Whisk (optional): For sifting powdered sugar or ensuring even mixing.
- Microwave-safe bowl or double boiler setup: For melting the chocolate and shortening.
- Spatula or offset spatula: For smoothly spreading the peanut butter filling and chocolate topping. An offset spatula makes this task a breeze, but a regular rubber spatula works well too.
- Sharp knife: For clean, precise cuts once the bars are thoroughly chilled.
Preparation Steps for Your Easy No Bake Peanut Butter Bars:
Phase 1: Preparing the Crust Layer
- Prepare Your Baking Pan: First things first, grab your 9×13 inch baking pan. For the absolute easiest removal of your finished Easy No Bake Peanut Butter Bars, I strongly recommend lining the pan with parchment paper. Allow the parchment paper to extend over the long sides of the pan, creating little “handles.” This will be incredibly helpful later when you want to lift the entire slab of bars out for cutting. You can lightly grease the pan first to help the parchment stick, but it’s not strictly necessary. A well-lined pan makes all the difference!
- Crush the Graham Crackers: Now, let’s get those graham cracker crumbs ready! If you have a food processor, this step is a breeze. Break the graham cracker sheets into a few pieces and pulse them until they are finely ground into uniform crumbs. You’re looking for a texture similar to fine sand – no large chunks, please! If you don’t have a food processor, simply place the graham crackers in a large, sturdy zip-top bag, seal it well, and use a rolling pin or the bottom of a heavy pan to crush them until they reach that fine crumb consistency. This might take a few minutes of patient crushing, but it’s worth it for a smooth crust.
- Melt the Butter for the Crust: In a microwave-safe bowl, melt your 1/2 cup (1 stick) of unsalted butter. You can do this in 20-30 second intervals, stirring in between, until it’s completely liquid. Be careful not to let it brown or get too hot; we just want it melted.
- Combine and Press the Crust: In a large mixing bowl, pour your finely crushed graham cracker crumbs. Add the melted butter to the crumbs. Using a rubber spatula or a wooden spoon, stir until the crumbs are completely moistened and evenly coated with the butter. It should resemble wet sand and hold together when you squeeze a small amount in your hand. Transfer this mixture into your prepared 9×13 inch baking pan.
- Form the Crust: Now for the important part: pressing the crust firmly and evenly into the bottom of the pan. I find the back of a flat-bottomed measuring cup or a sturdy drinking glass works wonders for this. Press down firmly and consistently across the entire surface to create a compact, even layer. Make sure the edges are just as well-packed as the center. A well-packed crust will ensure your Easy No Bake Peanut Butter Bars hold together beautifully when sliced. Once pressed, set the pan aside while we prepare the luscious peanut butter filling.
Phase 2: Creating the Irresistible Peanut Butter Filling
- Soften the Butter: Make sure your 1/2 cup (1 stick) of unsalted butter for the filling is properly softened to room temperature. This means it should be pliable and leave a slight indentation when pressed, but not melted. If it’s too cold, it won’t cream properly, and if it’s too warm, the filling might become greasy.
- Combine Filling Ingredients: In another large mixing bowl, add the softened unsalted butter, the 1 cup of creamy peanut butter, the 1 cup of powdered sugar (sifted, if you like to avoid lumps!), the 1 teaspoon of vanilla extract, and the 1/4 teaspoon of salt.
- Mix Until Smooth and Creamy: Using a sturdy rubber spatula or a wooden spoon, begin to mix all these ingredients together. At first, it might seem a bit stiff, but keep going! Mix thoroughly until everything is completely combined and you have a smooth, homogeneous, and creamy peanut butter mixture. You really want to ensure there are no streaks of butter or pockets of unmixed powdered sugar. This process might take a few minutes of dedicated stirring. The consistency should be thick, spreadable, and truly luscious. This is the heart of your Easy No Bake Peanut Butter Bars, so give it your full attention!
- Spread the Peanut Butter Layer: Once your peanut butter filling is perfectly smooth, evenly spread it over the graham cracker crust in the prepared pan. Use your rubber spatula or an offset spatula to gently but firmly spread the mixture from edge to edge, ensuring an even layer across the entire crust. Take your time to make it as level as possible; this will contribute to beautiful, uniform bars later on.
- Chill the Peanut Butter Layer: Place the pan with the crust and peanut butter filling into the refrigerator. Let it chill for at least 30 minutes. This chilling period is important for the peanut butter layer to firm up, making it easier to top with chocolate and preventing the layers from mixing too much when you add the warm topping.
Phase 3: Crafting the Luxurious Chocolate Topping
- Prepare for Melting: While your peanut butter layer is chilling, it’s time to get the chocolate topping ready. In a medium microwave-safe bowl, combine the 1 1/2 cups of semi-sweet chocolate chips and the 2 tablespoons of vegetable shortening (or refined coconut oil).
-
Melt the Chocolate: There are two excellent methods for melting the chocolate:
- Microwave Method (my preferred quick way): Heat the chocolate chips and shortening in the microwave in 30-second intervals, stirring thoroughly after each interval. It’s crucial not to overheat the chocolate, as this can cause it to seize or become grainy. Continue microwaving and stirring until the mixture is completely melted and beautifully smooth, glossy, and free of any lumps. This usually takes about 1.5 to 2 minutes total, depending on your microwave’s power.
- Double Boiler Method (gentle and controlled): If you prefer, you can melt the chocolate using a double boiler. Place the bowl of chocolate chips and shortening over a saucepan of simmering water (make sure the bottom of the bowl doesn’t touch the water). Stir constantly until the chocolate is fully melted and smooth. The gentle, indirect heat of this method is very forgiving.
The key is a smooth, flowing consistency. The shortening or coconut oil helps achieve this beautiful gloss and ensures the chocolate layer will be easy to cut without cracking.
- Pour and Spread the Chocolate Topping: Carefully remove your chilled pan from the refrigerator. Pour the melted chocolate mixture evenly over the chilled peanut butter layer.
- Achieve a Smooth Finish: Using your offset spatula or rubber spatula, gently and quickly spread the chocolate all the way to the edges of the pan, ensuring it forms a smooth, even layer. Work relatively quickly here, as the cold peanut butter layer will start to firm up the chocolate as soon as it touches. Aim for a consistently thick layer for the best appearance and texture.
Phase 4: Chilling and Serving Your Easy No Bake Peanut Butter Bars
- Final Chill Time: Once the chocolate topping is smoothly spread, it’s time for the final chill. Carefully place the pan back into the refrigerator. You’ll want to let it chill for a minimum of 2-3 hours, or even better, overnight. This extended chilling period is absolutely vital for all the layers to set completely, ensuring clean slices and preventing your Easy No Bake Peanut Butter Bars from being too messy or crumbly. The chocolate layer should be firm and solid to the touch.
- Remove from Pan: When the bars are completely firm, use the parchment paper overhang “handles” to gently lift the entire slab of Easy No Bake Peanut Butter Bars out of the baking pan and onto a clean cutting board. This step is a game-changer for clean cuts!
- Warm Your Knife (Pro Tip!): For the cleanest, most beautiful slices, I highly recommend warming your knife. You can do this by running a long, sharp knife under very hot water, then wiping it completely dry before each cut. This slight warmth helps the knife glide through the chocolate and peanut butter layers without dragging or cracking.
- Slice into Bars: Using your warmed, dry knife, trim off any uneven edges if desired. Then, carefully cut the slab into your desired bar size. I usually go for 2-inch squares or rectangles, which yield about 24 bars from a 9×13 inch pan. Wipe your knife clean and re-warm it after every few cuts for the neatest results. Don’t rush this step!
- Serve and Enjoy: Arrange your beautifully cut Easy No Bake Peanut Butter Bars on a serving platter. These are best enjoyed at room temperature for optimal flavor and texture, but if your kitchen is very warm, you might want to serve them directly from the fridge. Be prepared for them to disappear quickly!
Tips for Perfect Easy No Bake Peanut Butter Bars:
- Use Room Temperature Ingredients for Filling: Ensure both your creamy peanut butter and the softened butter for the filling are at true room temperature. This is incredibly important for achieving a smooth, well-emulsified filling without any lumps or separation. Cold ingredients will be harder to mix and may result in a stiff, crumbly filling.
- Crush Graham Crackers Finely: The finer your graham cracker crumbs, the more cohesive and uniform your crust will be. Large chunks can make the crust less stable and harder to slice cleanly. A food processor is your best friend here!
- Pack the Crust Firmly: Don’t be shy when pressing the graham cracker crust into the pan. A well-packed crust provides a sturdy foundation for your Easy No Bake Peanut Butter Bars and prevents crumbling when sliced. Use the bottom of a glass or a flat measuring cup to really compact it.
- Don’t Overheat the Chocolate: When melting the chocolate for the topping, heat it gently and slowly. Overheated chocolate can seize, becoming grainy and unusable. Stir frequently, especially if using a microwave, and remove it from the heat source just before it’s completely melted, allowing residual heat to finish the job.
- The Role of Shortening/Coconut Oil: The addition of shortening or refined coconut oil to the chocolate topping isn’t just for shine; it makes the chocolate layer more pliable once set. This flexibility prevents the chocolate from cracking and shattering when you slice your Easy No Bake Peanut Butter Bars, ensuring beautiful, neat edges every time.
- Chill, Chill, Chill: Patience is a virtue when making these bars. Adequate chilling time – at least 2-3 hours, but preferably overnight – is crucial for all the layers to firm up properly. This ensures easy lifting, clean cuts, and bars that hold their shape. Rushing the chilling process often leads to a messy, sticky situation.
- Warm Knife for Clean Slices: This simple trick makes a huge difference. Dipping your sharp knife in hot water and wiping it dry before each cut will help it glide smoothly through the chilled chocolate and peanut butter layers, giving you perfectly crisp and clean edges on every bar.
- Customize Your Topping: While delicious as is, feel free to get creative with your chocolate topping! A sprinkle of flaky sea salt immediately after spreading the chocolate adds a fantastic contrast. You could also add a drizzle of melted white chocolate, a sprinkle of mini chocolate chips, or even some chopped peanuts for extra texture and visual appeal.
Storage and Make-Ahead Advice:
- Refrigeration is Key: Due to the butter and peanut butter in the filling, these Easy No Bake Peanut Butter Bars are best stored in an airtight container in the refrigerator. This helps maintain their firm texture and extends their freshness. They can last beautifully in the fridge for up to 5-7 days.
- Layering for Storage: If you’re stacking the bars in a container, it’s a good idea to place small pieces of parchment paper between the layers to prevent them from sticking together, especially if your refrigerator is on the colder side or if the bars haven’t fully come to room temperature before serving.
- Serving Temperature: While stored in the fridge, I find these bars taste best when allowed to sit at room temperature for about 15-20 minutes before serving. This softens the peanut butter layer slightly, allowing its rich flavor and creamy texture to truly shine. However, on a very warm day, serving them straight from the fridge is also perfectly acceptable and refreshing!
- Freezing for Longer Storage: Yes, these Easy No Bake Peanut Butter Bars freeze wonderfully! Once the bars are completely set and cut into individual pieces, arrange them in a single layer on a baking sheet and flash freeze them for about an hour, or until solid. This prevents them from sticking together. Then, transfer the frozen bars to a freezer-safe airtight container or a heavy-duty freezer bag. They can be stored in the freezer for up to 2-3 months.
- Thawing Frozen Bars: To enjoy frozen bars, simply take out the desired number of bars and let them thaw in the refrigerator overnight, or at room temperature for about 30-60 minutes. They’ll be just as delicious as when they were freshly made! Freezing is a fantastic way to make a big batch of Easy No Bake Peanut Butter Bars ahead of time for parties or future cravings.
- Make-Ahead Convenience: This recipe is an absolute dream for make-ahead desserts. You can prepare the entire batch a day or two in advance, keep them chilled in the refrigerator, and then simply slice and serve when you’re ready. This makes them perfect for potlucks, parties, or just having a delightful treat on hand without any last-minute fuss. Enjoy the convenience and the deliciousness of these Easy No Bake Peanut Butter Bars!
Conclusion:
So, there you have it – the ultimate solution for those dessert cravings that strike without warning, or for when you need a show-stopping treat without the stress of traditional baking. These aren’t just any dessert; they are a testament to how incredible simplicity can be. I truly believe that once you whip up a batch of these, they’ll quickly become a cherished staple in your kitchen, just as they have in mine. The creamy peanut butter base, perfectly balanced with the rich, chocolatey topping, creates a symphony of flavors and textures that is simply irresistible. Forget about heating up your kitchen, fussing with precise oven temperatures, or waiting for things to cool down for what feels like an eternity. With this recipe, you get pure, unadulterated dessert joy with minimal effort. It’s the kind of treat that puts a smile on everyone’s face, from the pickiest eaters to the most seasoned dessert connoisseurs. Imagine the pure delight of sinking your teeth into a perfectly chilled square that offers a delightful chewiness followed by a melt-in-your-mouth experience. This isn’t just about satisfying a sweet tooth; it’s about creating moments of pure, simple pleasure. They are the perfect embodiment of comfort food, elevated by their sheer convenience and undeniable deliciousness. This recipe truly delivers on flavor without demanding hours of your time, making it an ideal choice for busy weeknights, spontaneous gatherings, or just a little self-indulgence.
Now, let’s talk about making these delightful creations even more personal and versatile. While they are absolutely divine served simply chilled straight from the fridge, consider a few enhancements to elevate your experience. For an extra touch of sophistication, a delicate sprinkle of flaky sea salt over the chocolate topping just before it sets is a game-changer; it brilliantly cuts through the sweetness and enhances the rich flavors, creating a truly gourmet feel. These bars are phenomenal alongside a warm cup of coffee or a tall glass of cold milk, making them ideal for an afternoon pick-me-up, a comforting dessert after dinner, or a late-night indulgence. Thinking about variations? The possibilities are truly endless! Feel free to experiment with different nut butters – almond butter or cashew butter can offer a slightly different, equally delicious profile, just ensure they are of a similar consistency to classic peanut butter. For a nut-free alternative, sunflower seed butter works wonderfully, maintaining that creamy texture and rich flavor. Don’t limit yourself to milk chocolate for the topping; a decadent dark chocolate will offer a more intense, sophisticated bite, while white chocolate or even a swirl of both can create a visually stunning and flavor-rich treat. You could also mix in peanut butter chips, butterscotch chips, or even a handful of mini marshmallows into the chocolate layer before it sets for added bursts of flavor and texture. Want to add more crunch? A sprinkle of crushed pretzels, chopped roasted peanuts, or graham cracker crumbs on top would be fantastic, providing a delightful textural contrast. For a festive touch, a scattering of colorful sprinkles makes them party-ready in an instant, perfect for birthdays or holidays. These bars are also fantastic crumbled over a scoop of vanilla ice cream for an ultimate dessert parfait, transforming them into an even grander indulgence. The adaptability of this recipe is truly one of its greatest strengths, allowing you to tailor it perfectly to your taste, dietary preferences, or the specific occasion.
I’m genuinely excited for you to give this recipe a whirl. I promise you, the joy of creating something so utterly delicious with such minimal effort is incredibly rewarding. There’s something uniquely satisfying about pulling out a tray of perfectly set, glistening bars, knowing you didn’t even have to turn on your oven. So, go ahead, gather your ingredients, clear a little space in your fridge, and get ready to create some magic. Once you’ve made your own batch of these incredible Easy No Bake Peanut Butter Bars, I would absolutely love to hear about your experience! Did you stick to the classic recipe, or did you try some of the exciting variations? What was your favorite part, or did you discover a new favorite topping? Please share your thoughts, tips, and photos in the comments section below – your insights are incredibly valuable and inspire other readers to try new things. And if you share your creations on social media, don’t forget to tag me so I can see your masterpieces! These bars are not just a dessert; they are an invitation to indulge in simplicity, a testament to the power of a few humble ingredients coming together to create something truly extraordinary. They are perfect for last-minute guests, potlucks, lunchbox treats, or simply as a comforting end to a long day. You truly can’t go wrong with a recipe this straightforward and utterly delightful. Make them, share them (if you can bear to!), and savor every single bite. Happy no-baking!

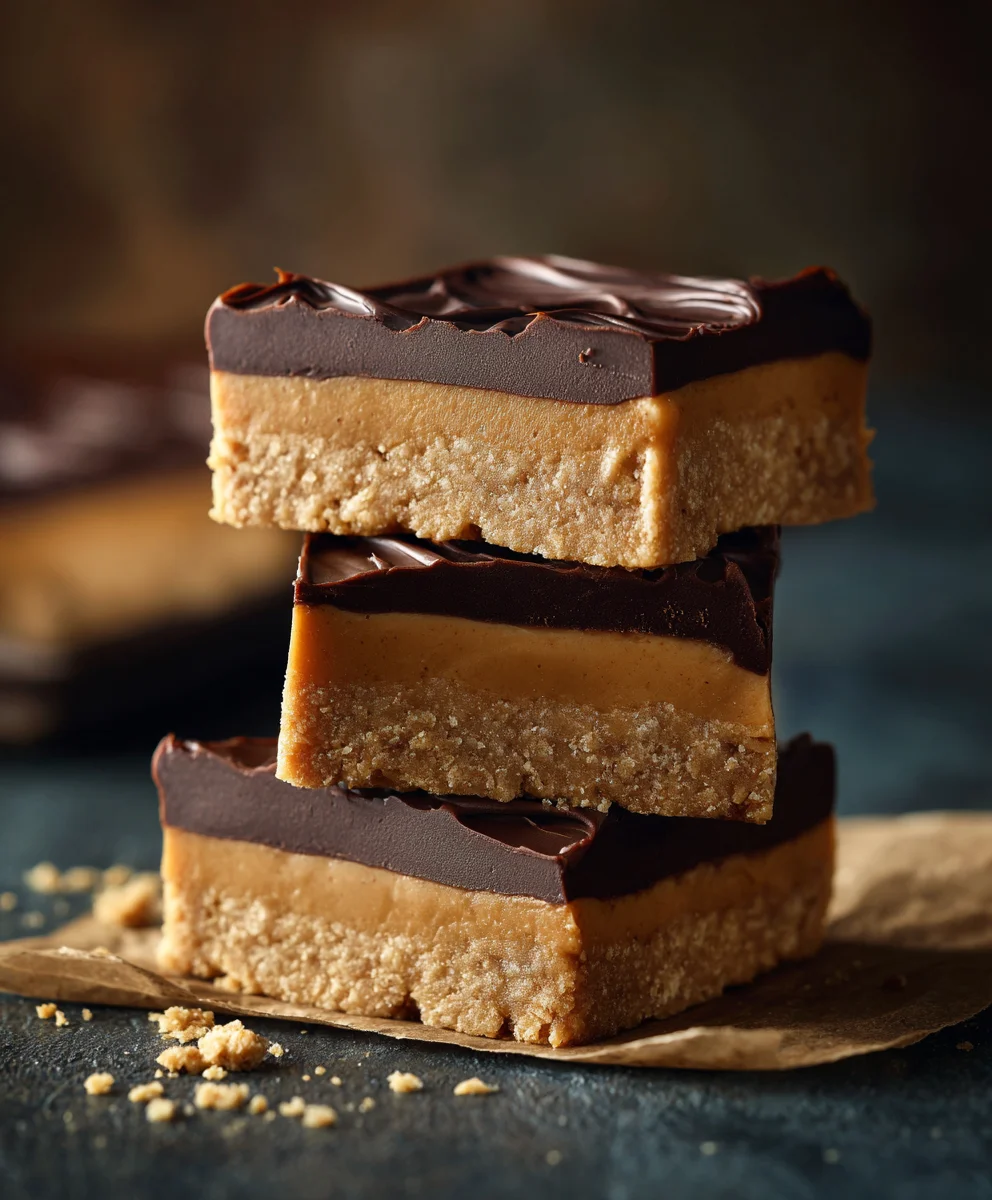
Easy No Bake Peanut Butter Bars
A delightful, no-bake dessert featuring a rich graham cracker crust, a creamy peanut butter filling, and a smooth chocolate topping. Perfect for satisfying sweet cravings with minimal effort and bringing nostalgic joy.
Ingredients
-
2 cups finely crushed Graham Crackers
-
1/2 cup unsalted butter, melted (for crust)
-
1 cup powdered sugar
-
1 cup creamy peanut butter
-
1/2 cup unsalted butter, softened (for filling)
-
1 tsp vanilla extract
-
1/4 tsp salt
-
1 1/2 cups semi-sweet chocolate chips
-
2 tbsp vegetable shortening or refined coconut oil
Instructions
-
Step 1
Line a 9×13 inch baking pan with parchment paper, leaving an overhang on the long sides. -
Step 2
In a large bowl, combine the 2 cups finely crushed graham crackers with 1/2 cup melted unsalted butter. Mix until evenly moistened. Press this mixture firmly and evenly into the bottom of the prepared pan to form the crust. -
Step 3
In another large mixing bowl, combine 1/2 cup softened unsalted butter, 1 cup creamy peanut butter, 1 cup powdered sugar, 1 tsp vanilla extract, and 1/4 tsp salt. Mix thoroughly with a spatula or spoon until the mixture is completely smooth, homogeneous, and creamy. -
Step 4
Evenly spread the peanut butter filling over the graham cracker crust. Chill the pan in the refrigerator for at least 30 minutes to allow the peanut butter layer to firm up. -
Step 5
While the bars are chilling, combine 1 1/2 cups semi-sweet chocolate chips and 2 tbsp vegetable shortening (or refined coconut oil) in a microwave-safe bowl. Melt in 30-second intervals, stirring thoroughly after each, until the mixture is completely smooth, glossy, and free of lumps. -
Step 6
Remove the chilled pan from the refrigerator. Pour the melted chocolate mixture evenly over the peanut butter layer. Quickly spread the chocolate to the edges, creating a smooth, even topping. -
Step 7
Return the pan to the refrigerator and chill for a minimum of 2-3 hours, or preferably overnight, until all layers are completely firm and the chocolate is solid to the touch. -
Step 8
Once fully chilled, use the parchment paper overhang to gently lift the entire slab of bars out of the pan and onto a clean cutting board. For clean slices, warm a long, sharp knife under hot water, wipe it completely dry, and then cut the slab into your desired bar size (e.g., 2-inch squares for about 24 bars). Re-warm and clean the knife after every few cuts. -
Step 9
Serve the Easy No Bake Peanut Butter Bars at room temperature for optimal flavor and texture, or directly from the fridge if preferred. Store any leftover bars in an airtight container in the refrigerator for up to 5-7 days or freeze for longer storage.
Important Information
Nutrition Facts (Per Serving)
It is important to consider this information as approximate and not to use it as definitive health advice.
Allergy Information
Please check ingredients for potential allergens and consult a health professional if in doubt.
Leave a Comment