
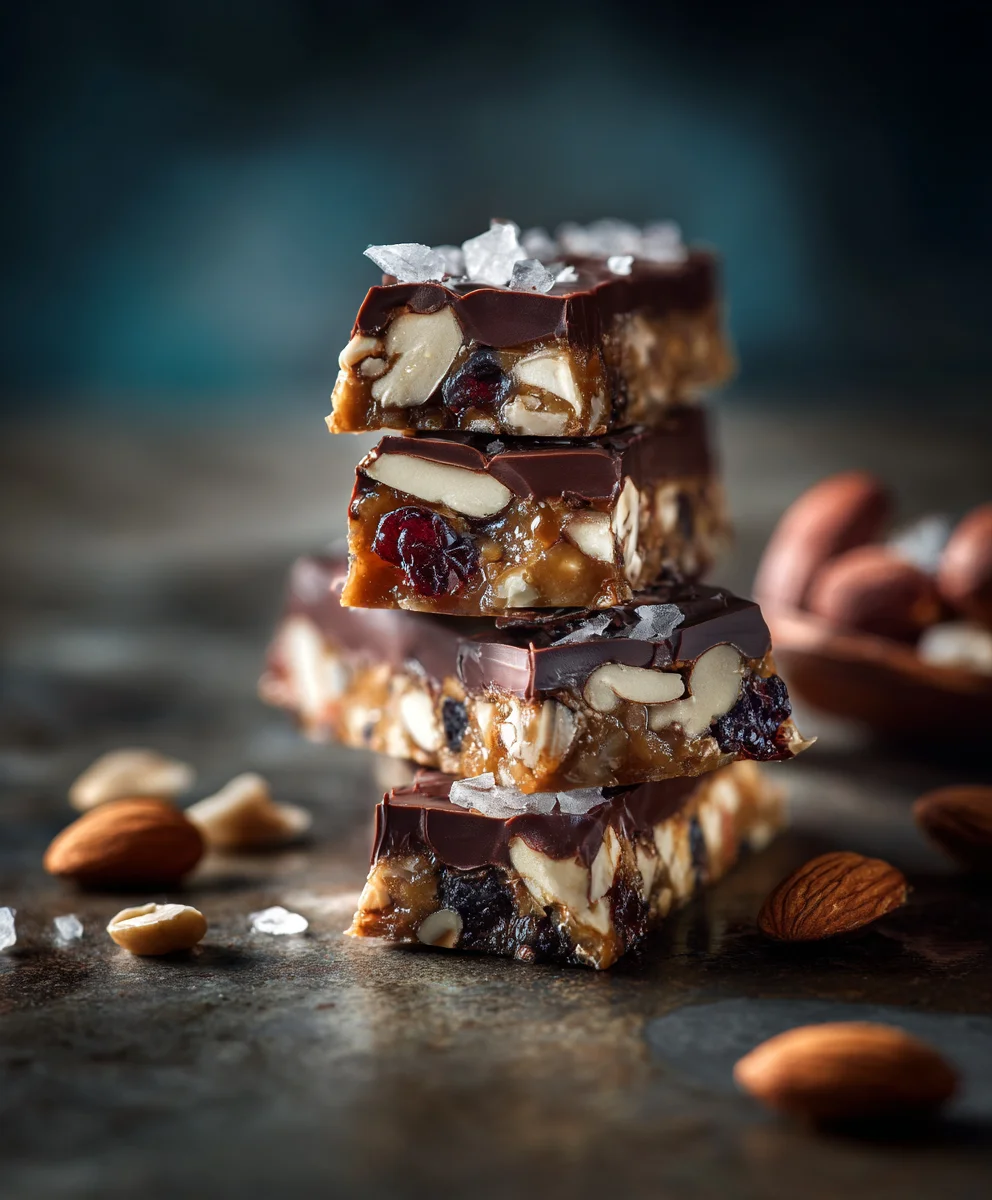
Dark Chocolate And Sea Salt Nut Bars are not just a snack; they are a delightful journey for your taste buds, combining the best of indulgence with wholesome goodness. Imagine a symphony of rich, slightly bitter dark chocolate melting over a medley of crunchy, toasted nuts, all perfectly balanced by the subtle sparkle of sea salt. This isn’t merely a treat; it’s an experience designed to satisfy your deepest cravings without compromise, offering a burst of flavor and energy in every bite.
The culinary world has long celebrated the exquisite harmony of sweet and salty, a pairing that elevates simple ingredients into gourmet sensations. While the concept of energy bars has evolved significantly with our busy lifestyles, the irresistible combination of dark chocolate and sea salt has captivated palates for decades, transforming basic ingredients into something truly special. This particular blend taps into that universal appreciation for sophisticated, yet accessible, homemade delights that nourish both body and soul.
Why Everyone Loves These Bars
I find that people absolutely adore these homemade Dark Chocolate And Sea Salt Nut Bars for so many compelling reasons. Their incredible taste profile—the perfect sweet, salty, and earthy combination—is undeniably addictive and leaves you wanting more. Beyond the complex flavor, the satisfying crunch of various nuts, beautifully contrasted with a chewy base and the smooth, decadent chocolate coating, offers an unparalleled textural delight. They are also remarkably convenient; serving as a perfect on-the-go energy boost, a fulfilling post-workout treat, or even a guilt-free dessert. It’s a snack that truly delivers on all fronts: delicious, nourishing, and incredibly satisfying, making it a cherished staple in any healthy yet indulgent lifestyle.

Ingredients:
- For the Nut Bar Base:
- 2 cups (about 240g) mixed nuts, unsalted (I love a combination of almonds, cashews, pecans, and walnuts, roughly chopped)
- 1 cup (about 90g) rolled oats (not instant oats)
- ½ cup (about 70g) pumpkin seeds, unsalted
- ¼ cup (about 30g) sunflower seeds, unsalted
- ¼ cup (about 30g) shredded unsweetened coconut
- 2 tablespoons chia seeds
- 1 teaspoon fine sea salt (for the bar mixture)
- ½ cup (about 120g) natural almond butter or cashew butter (make sure it’s smooth and drippy, not too thick, just nuts and salt as ingredients)
- ½ cup (about 120ml) pure maple syrup (or honey/agave nectar)
- ¼ cup (about 60ml) coconut oil, melted
- 1 teaspoon pure vanilla extract
- For the Dark Chocolate and Sea Salt Topping:
- 1 cup (about 170g) good quality dark chocolate chips or a chopped dark chocolate bar (I prefer 60-70% cacao for that perfect balance of bitterness and sweetness)
- 1-2 tablespoons coconut oil (optional, for a smoother chocolate ganache, but often not needed with good quality chocolate)
- ½ – 1 teaspoon flaky sea salt (such as Maldon, for sprinkling on top)
Preparing Our Workspace and Dry Ingredients
- Prepare Your Baking Pan: First things first, let’s get our pan ready. I always reach for an 8×8 inch (20×20 cm) square baking pan for these Dark Chocolate And Sea Salt Nut Bars. Line it generously with parchment paper, making sure to leave an overhang on all sides. This little trick is an absolute lifesaver later when you want to lift the entire slab out of the pan. Sometimes, I even lightly grease the pan with a tiny bit of coconut oil before laying down the parchment, just to ensure it sticks and doesn’t slide around while I’m pressing in the mixture. It makes the whole process smoother!
- Preheat the Oven: Go ahead and preheat your oven to 325°F (160°C). We’re aiming for a gentle bake that will set our bars without over-browning them.
- Roughly Chop the Nuts: Take your mixed nuts – those beautiful almonds, cashews, pecans, and walnuts – and give them a good, but not too fine, chop. I like to keep some pieces larger for texture, while others can be smaller. Think rustic, not pulverized. A food processor can do this quickly with a few pulses, but don’t overdo it, or you’ll end up with nut butter! If you’re using whole nuts, this step is crucial for an even distribution throughout your nut bars.
- Combine Dry Ingredients: In a large mixing bowl, combine all your “Nut Bar Base” dry ingredients. That’s your roughly chopped mixed nuts, rolled oats, pumpkin seeds, sunflower seeds, shredded unsweetened coconut, chia seeds, and the fine sea salt. Give everything a really good stir with a wooden spoon or a sturdy spatula. We want all these delicious components to be thoroughly mixed so that every bite of our Dark Chocolate And Sea Salt Nut Bars is bursting with flavor and crunch. Don’t underestimate the power of a good dry mix; it’s the foundation of your amazing bars!
Crafting the Sticky Binder
- Melt the Wet Ingredients: Now, in a medium saucepan, combine your natural almond butter (or cashew butter), pure maple syrup, and melted coconut oil. Place the saucepan over low heat. My goal here is not to cook them, but to gently warm them until everything is smooth and perfectly combined. Stir continuously with a whisk or a rubber spatula until you have a luscious, pourable, homogenous mixture. It should be warm, but not simmering or boiling. This step is key for creating that wonderful sticky binder that holds our nut bars together so beautifully.
- Remove from Heat and Add Vanilla: Once your wet ingredients are perfectly smooth and warm, remove the saucepan from the heat. Stir in the pure vanilla extract. That hint of vanilla adds such a lovely warmth and depth of flavor, complementing the nuts and preparing for the glorious dark chocolate to come. Give it a final stir to ensure the vanilla is well distributed.
- Combine Wet and Dry Mixtures: This is where the magic really starts to happen! Pour the entire warm, sticky wet mixture from your saucepan directly over the dry ingredients in the large mixing bowl. Now, it’s time for some serious mixing. Use your sturdy spoon or spatula and mix, mix, mix! You want every single nut, oat, and seed to be thoroughly coated with that beautiful sweet, sticky binder. Keep going until there are no dry spots left at the bottom of the bowl. This step is absolutely critical for ensuring your Dark Chocolate And Sea Salt Nut Bars hold together and don’t crumble when you cut them. It might take a few minutes of good, vigorous stirring, but trust me, it’s worth the effort.
Baking for Perfection
- Transfer and Press Firmly: Carefully spoon the entire sticky mixture into your prepared 8×8 inch baking pan. Now, here’s another secret for perfect, non-crumbly bars: you need to press it down very firmly. I mean, really put some muscle into it! I often use a piece of extra parchment paper on top of the mixture, and then use the bottom of a flat-bottomed glass or a measuring cup to press down evenly and consistently across the entire surface. You want to create a dense, compact, and perfectly even layer. The harder you press, the more cohesive your Dark Chocolate And Sea Salt Nut Bars will be. Pay special attention to the corners and edges to ensure they’re as compressed as the middle.
- Bake Until Golden: Carefully transfer your pan to the preheated oven. Bake for approximately 25-30 minutes. What we’re looking for is a lovely golden-brown color around the edges, and the center should feel firm when gently pressed. The baking process helps to further set the binding agents and lightly toast the nuts and oats, intensifying their flavors. Keep an eye on them towards the end of the baking time, as oven temperatures can vary.
- Cool Completely: Once baked, remove the pan from the oven. This next step is incredibly important for the integrity of your Dark Chocolate And Sea Salt Nut Bars. You must let them cool completely in the pan on a wire rack. I mean absolutely, utterly cool. Don’t rush this stage! Trying to add the chocolate or cut them while they’re still warm will result in a messy, crumbly disaster. Cooling allows the bars to fully set and firm up, making them perfect for the next indulgent layer. This usually takes at least 1-2 hours, sometimes longer depending on your kitchen’s temperature.
The Decadent Dark Chocolate and Sea Salt Finish
- Prepare the Dark Chocolate Topping: Once your nut bar base is completely cool, it’s time for the star of the show: the dark chocolate! There are a couple of ways to melt chocolate. My preferred method is using a double boiler: place your dark chocolate chips or chopped chocolate in a heatproof bowl set over a saucepan of simmering water, making sure the bottom of the bowl doesn’t touch the water. Stir gently until the chocolate is smooth and glossy. If you prefer the microwave, place the chocolate in a microwave-safe bowl and heat in 30-second intervals, stirring well after each, until melted and smooth. If your chocolate seems a bit too thick, you can stir in 1-2 tablespoons of coconut oil to create a smoother, more spreadable ganache-like consistency, which I find works beautifully for these Dark Chocolate And Sea Salt Nut Bars.
- Pour and Spread the Chocolate: Once your chocolate is perfectly melted and smooth, carefully pour it over the completely cooled nut bar base in the pan. Using an offset spatula or the back of a spoon, gently spread the melted chocolate evenly across the entire surface of the bars, right to the edges. You want a nice, uniform layer of dark chocolate goodness.
- Sprinkle with Flaky Sea Salt: This is where the “sea salt” in Dark Chocolate And Sea Salt Nut Bars truly comes to life! Immediately after spreading the chocolate, grab your flaky sea salt (like Maldon). Generously, but not excessively, sprinkle the flaky sea salt over the wet chocolate. The flakes will adhere beautifully, providing that incredible contrast of sweet and salty, as well as a delightful textural crunch. I usually start with about ½ teaspoon and add more if I feel it needs it, ensuring good coverage.
- Chill to Set: Now, for another crucial chilling period. Place the pan with your newly topped bars into the refrigerator. Let them chill for at least 1-2 hours, or until the dark chocolate topping is completely firm and set. This step is non-negotiable! Trying to cut them before the chocolate is firm will result in a big, melty mess. Patience is a virtue when making these wonderful treats.
- Cut Into Bars: Once the chocolate is completely firm, carefully lift the entire slab of Dark Chocolate And Sea Salt Nut Bars out of the pan using the parchment paper overhangs. Place it on a clean cutting board. Now, for the cutting: I find that using a large, sharp knife that has been warmed under hot water (and then thoroughly dried!) makes for the cleanest cuts. Wipe the knife clean between each cut to prevent smearing. You can cut them into 12 generous bars, 16 smaller squares, or even bite-sized pieces, depending on your preference. I usually opt for 16 squares, as they are perfectly satisfying.
- Store and Enjoy: These delicious Dark Chocolate And Sea Salt Nut Bars are best stored in an airtight container in the refrigerator, where they will stay fresh for up to 1-2 weeks. You can also freeze them for longer storage (up to 2-3 months), just be sure to separate layers with parchment paper. They make a fantastic snack, a lovely dessert, or a wonderful energy boost anytime!
Conclusion:
And there you have it, my friends! We’ve journeyed through the simple steps, uncovered the magic of quality ingredients, and explored the sheer delight that awaits you. Honestly, if you’re searching for that perfect snack that effortlessly balances decadence with wholesome goodness, that satisfies a sweet craving without an ounce of guilt, and that comes together with remarkable ease, then this recipe is truly your culinary destiny. I truly believe these aren’t just any treat; they are a delightful experience, a small moment of pure bliss in every bite. The harmonious blend of textures – the satisfying crunch of nuts, the luxurious melt of dark chocolate, and the subtle, flaky surprise of sea salt – creates an unparalleled sensory journey that is both comforting and exhilarating. It’s the kind of treat that elevates an ordinary afternoon into something special, making it an absolute must-try for anyone who appreciates real flavor and simple elegance.
Why These Bars Will Become Your New Obsession
From the moment you take your first bite, you’ll understand why these bars are so special. It’s the impeccable balance: the rich, slightly bitter notes of premium dark chocolate perfectly complementing the earthy, nutty base, all brought to life by that critical sprinkle of sea salt. This isn’t just a sweet snack; it’s a sophisticated flavor profile that appeals to a wide range of palates. Plus, the ease of preparation is truly a game-changer. No complicated techniques, no obscure ingredients, just straightforward steps that yield spectacular results every single time. They’re perfect for meal prep, a quick grab-and-go breakfast, a post-workout refuel, or an elegant after-dinner treat. I’ve personally found them to be an absolute lifesaver during busy weeks, providing sustained energy and a much-needed moment of delicious indulgence. They also make an incredibly thoughtful homemade gift, beautifully packaged for friends, family, or colleagues.
Unleash Your Creativity: Serving Suggestions & Variations
While the classic recipe for these incredible
Dark Chocolate And Sea Salt Nut Bars
is undeniably perfect as is, I absolutely love to encourage you to make it your own! Imagine pairing one of these rich, chewy squares with a robust cup of freshly brewed coffee or a soothing herbal tea for a truly elevated snack time. They are equally delightful crumbled over a scoop of vanilla ice cream for an instant, gourmet dessert, or even as a unique topping for your morning yogurt or oatmeal. The possibilities are endless when it comes to serving! And let’s talk about variations – this recipe is a fantastic canvas for your culinary imagination. Feel free to experiment with different nut combinations: swap out some almonds for pecans, walnuts, or even pistachios for a different texture and flavor profile. A sprinkle of dried cranberries or chopped apricots can add a lovely tart counterpoint, while a touch of cinnamon or cardamom in the nut base can introduce a warm, spicy complexity. For an extra layer of indulgence, consider adding a drizzle of white chocolate or a scattering of toasted coconut flakes on top before the chocolate fully sets. You could even play with different types of chocolate – a milk chocolate drizzle alongside the dark for a sweeter note, or a sprinkle of chili flakes for a surprising spicy kick. Don’t be afraid to experiment; that’s where some of the best discoveries are made!
Your Turn: Try, Share, & Inspire!
Now, it’s your moment to shine! I genuinely hope this recipe has inspired you to step into your kitchen and create these amazing bars for yourself. I promise you, the joy of making them is only surpassed by the pleasure of eating them. Seriously, clear your schedule this weekend and give this recipe a go! Once you’ve whipped up your batch of these sensational treats, I absolutely cannot wait to hear all about your experience. Please, please, please come back here and leave a comment below to tell me how they turned out. Did you stick to the original, or did you put your own unique spin on it? Did your family devour them as quickly as mine does? I live for your feedback, your triumphs, and even your kitchen adventures! Don’t be shy – share your masterpieces with the world! Snap a photo, post it on your favorite social media platforms, and let everyone know about your delicious creation. Let’s spread the love for these incredibly satisfying and wonderfully simple treats far and wide. Happy baking, my friends!

Chewy Dark Chocolate & Sea Salt Nut Bars
These Chewy Dark Chocolate & Sea Salt Nut Bars are a perfect blend of rich dark chocolate, crunchy toasted nuts, and a hint of sea salt. Designed to satisfy cravings without compromise, they offer a delightful burst of flavor and energy in every bite. Ideal as an on-the-go snack, post-workout treat, or guilt-free dessert, these bars are delicious, nourishing, and incredibly satisfying.
Ingredients
-
2 cups (240g) mixed nuts, unsalted, roughly chopped
-
1 cup (90g) rolled oats
-
½ cup (70g) pumpkin seeds, unsalted
-
¼ cup (30g) sunflower seeds, unsalted
-
¼ cup (30g) shredded unsweetened coconut
-
2 tablespoons chia seeds
-
1 teaspoon fine sea salt
-
½ cup (120g) natural almond or cashew butter
-
½ cup (120ml) pure maple syrup
-
¼ cup (60ml) coconut oil, melted (for base)
-
1 teaspoon pure vanilla extract
-
1 cup (170g) dark chocolate chips (60-70% cacao)
-
1-2 tablespoons coconut oil (optional, for topping)
-
½ – 1 teaspoon flaky sea salt (for sprinkling)
Instructions
-
Step 1
Line an 8×8 inch baking pan with parchment paper, leaving an overhang. Preheat oven to 325°F (160°C). -
Step 2
In a large bowl, combine roughly chopped mixed nuts, rolled oats, pumpkin seeds, sunflower seeds, shredded unsweetened coconut, chia seeds, and fine sea salt. Mix well. -
Step 3
In a medium saucepan over low heat, combine natural almond or cashew butter, pure maple syrup, and melted coconut oil. Stir until smooth and warm. Remove from heat and stir in vanilla extract. -
Step 4
Pour the warm wet mixture over the dry ingredients. Stir thoroughly until everything is evenly coated. Transfer to the prepared pan and press down very firmly and evenly to create a compact layer. -
Step 5
Bake for 25-30 minutes until golden-brown and firm. Let cool completely in the pan on a wire rack for 1-2 hours before topping. -
Step 6
Once the base is cool, melt dark chocolate chips. Optionally, stir in 1-2 tablespoons coconut oil for a smoother consistency. -
Step 7
Pour melted chocolate over the cooled nut bar base and spread evenly. Immediately sprinkle with flaky sea salt. Chill in the refrigerator for 1-2 hours until the chocolate is completely firm. -
Step 8
Lift the slab using the parchment paper onto a cutting board. Using a warm, sharp knife, cut into 12-16 bars. Store in an airtight container in the refrigerator for up to 2 weeks, or freeze for longer.
Important Information
Nutrition Facts (Per Serving)
It is important to consider this information as approximate and not to use it as definitive health advice.
Allergy Information
Please check ingredients for potential allergens and consult a health professional if in doubt.


Leave a Comment