
?p=8353. What an intriguing designation for a culinary masterpiece, isn’t it? Prepare to embark on a delightful gastronomic journey as we unveil the secrets behind a dish that promises to transform your perception of home cooking. Imagine a plate filled with vibrant flavors, comforting textures, and an aroma that instantly transports you to a place of pure culinary joy. That, dear reader, is the essence of what we are exploring today.
While its numerical identifier might seem modern, the spirit of ?p=8353 is deeply rooted in traditions that celebrate simple, wholesome ingredients elevated to extraordinary heights. This isn’t just a meal; it’s a testament to how humble components, when treated with care and passion, can create something truly unforgettable. Perhaps its origins lie in a bustling market, a quiet family kitchen, or a chef’s sudden inspiration, but its universal appeal is undeniable across countless tables.
Why Everyone Falls in Love with This Dish
People adore this particular creation for countless reasons. It’s often praised for its incredible versatility, making it perfect for a cozy weeknight dinner or an impressive spread for guests. The balance of its rich, savory notes with subtle hints of freshness makes every bite a harmonious experience. Furthermore, the satisfaction of preparing ?p=8353 yourself, seeing the transformation from raw ingredients to a glorious meal, adds an unparalleled sense of accomplishment. It’s a dish that genuinely warms the soul and satisfies the palate, time and time again.

Ingredients:
- For the Rich Meat Ragu:
- 2 tablespoons olive oil, preferably extra virgin, for sautéing and building flavor.
- 1 large yellow onion, finely chopped – this forms the foundational sweetness for our sauce.
- 2 carrots, medium-sized, finely diced – adding another layer of sweetness and depth.
- 2 celery stalks, finely diced – essential for the classic soffritto base, contributing an earthy aroma.
- 2 cloves garlic, minced – because no Italian dish is complete without it, adding a pungent, aromatic kick.
- 1 pound ground beef, 80/20 lean-to-fat ratio – I find this provides the best balance of flavor and texture for a hearty ragu.
- 1 pound ground Italian sausage, mild or hot depending on your preference – for an incredible boost of spiced flavor. If you can find good quality bulk sausage, that’s ideal.
- 1/2 cup dry red wine (like Chianti or Merlot) – this isn’t just for deglazing; it adds a crucial layer of complex acidity and fruitiness.
- 1 (28-ounce) can crushed tomatoes – the foundation of our tomato base, offering a thick, rich texture.
- 1 (15-ounce) can tomato sauce – for additional liquid and tomato depth.
- 2 tablespoons tomato paste – intensely concentrated, it amplifies the savory umami notes of the sauce.
- 1/2 cup beef broth or stock – to loosen the sauce and provide a deeper, meatier flavor.
- 2 bay leaves – for a subtle, earthy aroma that infuses the sauce over a long simmer.
- 1 teaspoon dried oregano – a classic Italian herb, essential for that comforting flavor profile.
- 1/2 teaspoon dried basil – another pantry staple for a well-rounded Italian taste.
- 1/4 teaspoon red pepper flakes (optional, adjust to taste) – for a gentle warmth that makes the sauce more dynamic.
- Salt and freshly ground black pepper, to taste – seasoning throughout is key for building flavor.
- A handful of fresh parsley, chopped (for garnish, optional) – adds freshness and color at the end.
- For the Creamy Béchamel Sauce:
- 6 tablespoons unsalted butter – the fat base for our roux, contributing richness.
- 6 tablespoons all-purpose flour – combines with butter to form the roux, thickening the sauce.
- 4 cups whole milk, warmed – crucial for a smooth béchamel; warming it helps prevent lumps.
- 1/2 teaspoon salt – to season the sauce appropriately.
- 1/4 teaspoon freshly ground black pepper – adds a subtle kick.
- Pinch of freshly grated nutmeg – an absolute must for béchamel, it elevates the flavor profile with its warm, subtle spice.
- For Assembling the Lasagna:
- 12-15 lasagna noodles (oven-ready or traditional, cooked al dente according to package directions) – choose good quality noodles that hold up well to baking. I usually prefer traditional ones for texture.
- 15 ounces fresh mozzarella cheese, sliced or shredded – the star for that gooey, stretchy cheese pull.
- 1 cup freshly grated Parmesan cheese – for a sharp, salty finish and beautiful crust.
- 1/2 cup shredded fontina or provolone cheese (optional, but highly recommended for extra depth) – adds another dimension of flavor and creaminess.
Preparing the Rich Meat Ragu
This ragu is the soul of our lasagna, so taking your time here will truly pay off in the final dish. I like to think of this as building layers of flavor, starting from the very first sizzle.
- Sauté the Aromatics: In a large, heavy-bottomed pot or Dutch oven, heat the 2 tablespoons of olive oil over medium heat. Once shimmering, add the finely chopped onion, diced carrots, and diced celery. This trio, often called a “soffritto,” is the aromatic base for so many Italian dishes, and it’s where all that incredible savory-sweetness begins. Sauté gently, stirring occasionally, for about 8-10 minutes, or until the vegetables have softened considerably and the onion is translucent. We’re not looking for browning here, just a tender, fragrant base.
- Add the Garlic: Stir in the minced garlic and cook for just another minute until it’s fragrant. Be careful not to let it burn, as burnt garlic can turn bitter and ruin the delicate balance we’re building.
- Brown the Meats: Now it’s time for the stars of our ragu! Add the ground beef and ground Italian sausage to the pot. Break up the meat with a wooden spoon as it cooks. I aim for nice, small crumbles. Cook over medium-high heat, stirring frequently, until the meat is thoroughly browned and no pink remains. This browning step is absolutely crucial for developing deep, complex flavors through the Maillard reaction. Drain off any excess fat from the pot. Don’t skip this step! Too much grease can make your ragu oily.
- Deglaze with Wine: Pour in the 1/2 cup of dry red wine. Use your wooden spoon to scrape up any browned bits that are stuck to the bottom of the pot. This is where a tremendous amount of flavor resides, and the wine helps to release it. Let the wine simmer for about 3-5 minutes, allowing most of the alcohol to evaporate and its rich essence to concentrate. The aroma at this stage is just wonderful!
- Build the Tomato Base: Stir in the tomato paste, cooking it for a minute or two with the meat and vegetables. This toasts the paste, enhancing its sweetness and deepening its tomato flavor. Then, add the crushed tomatoes and tomato sauce. Give everything a good stir to combine.
- Simmer and Season: Pour in the beef broth, add the bay leaves, dried oregano, dried basil, and red pepper flakes (if using). Season generously with salt and freshly ground black pepper. Bring the sauce to a gentle simmer, then reduce the heat to low, cover the pot, and let it cook slowly for at least 1.5 to 2 hours. The longer it simmers, the more the flavors will meld and deepen. Stir occasionally to prevent sticking. I find that a long, slow simmer is what truly transforms a good sauce into a spectacular one.
- Final Touches: After simmering, remove the bay leaves. Taste the ragu and adjust the seasoning if necessary. You might find it needs a little more salt, pepper, or even a tiny pinch of sugar to balance the acidity of the tomatoes. The sauce should be rich, thick, and incredibly flavorful.
Crafting the Creamy Béchamel Sauce
Béchamel sauce is the unsung hero of a classic lasagna, providing a creamy, luscious counterpoint to the rich meat ragu. It’s surprisingly simple to make, but a few key steps ensure a perfectly smooth result.
- Melt the Butter: In a medium saucepan, melt the 6 tablespoons of unsalted butter over medium heat. Keep a close eye on it; we want it melted and bubbly, but not browned.
- Create the Roux: Once the butter is fully melted, sprinkle in the 6 tablespoons of all-purpose flour. Whisk continuously for 1-2 minutes until a smooth paste, called a roux, forms. It should be light blonde in color and smell a bit like toasted nuts. This roux is what will thicken our béchamel.
- Gradually Add Milk: This is the most crucial step for a lump-free béchamel. Slowly, in about 1/2 cup increments, pour the warmed whole milk into the roux, whisking vigorously after each addition to fully incorporate it before adding more. This gradual approach prevents lumps from forming. Continue whisking until all the milk has been added and the sauce begins to thicken. It might seem thin at first, but it will thicken as it heats.
- Simmer to Thicken: Bring the sauce to a gentle simmer over medium heat, continuing to whisk occasionally. Let it simmer for about 5-7 minutes, or until it coats the back of a spoon thickly. It should be smooth and velvety. If you find any small lumps, a quick pass with an immersion blender or through a fine-mesh sieve can fix them, though a careful whisking usually prevents them entirely.
- Season the Béchamel: Remove the saucepan from the heat. Stir in the 1/2 teaspoon of salt, 1/4 teaspoon of freshly ground black pepper, and the essential pinch of freshly grated nutmeg. Taste and adjust seasoning as needed. Your béchamel should be rich, savory, and delicately spiced.
Prepping the Lasagna Noodles
While the sauces are simmering, it’s a great time to get your noodles ready. The choice of noodle can slightly alter your prep time, but either way, we want them perfectly cooked to ensure the lasagna has the right bite.
- For Traditional Lasagna Noodles: Bring a large pot of heavily salted water to a rolling boil. Add the lasagna noodles, making sure not to overcrowd the pot. Cook according to package directions until they are al dente – meaning they’re still firm to the bite, as they’ll continue to cook in the oven. Overcooked noodles can make your lasagna mushy. Drain the noodles and immediately rinse them under cold water to prevent them from sticking together. Lay them flat on parchment paper or a clean kitchen towel to cool and dry slightly. I like to separate them well to avoid any sticking.
- For Oven-Ready Lasagna Noodles: If you’re using oven-ready noodles, you can typically skip the boiling step. Just ensure you have enough moisture in your ragu and béchamel to hydrate them during baking. Always check the specific package instructions, as brands can vary. While convenient, I personally find traditional noodles offer a slightly superior texture.
Assembling Your Lasagna Masterpiece
Now for the fun part! This is where all our hard work comes together. Proper layering is key for a well-structured and delicious lasagna. I usually grab a 9×13 inch baking dish; it’s the perfect size for this recipe.
- Preheat Oven and Prep Dish: Preheat your oven to 375°F (190°C). Lightly grease your 9×13 inch baking dish with a little olive oil or cooking spray. This prevents sticking and makes serving easier.
- First Layer – Béchamel Base: Spread a thin layer (about 1/2 cup) of the béchamel sauce evenly over the bottom of the prepared baking dish. This prevents the noodles from sticking and creates a wonderfully creamy foundation.
- First Noodle Layer: Arrange 3-4 lasagna noodles over the béchamel layer, slightly overlapping if necessary, to cover the bottom of the dish completely. You might need to break a noodle to fit the ends perfectly – don’t be afraid to customize!
- First Ragu Layer: Spread about 1.5 to 2 cups of the rich meat ragu evenly over the noodles. Make sure to get a good distribution of meat and sauce.
- First Cheese Layer: Sprinkle a generous amount of shredded fresh mozzarella over the ragu. Then, add a light dusting of grated Parmesan cheese. If you’re using fontina or provolone, this is where I would add some of that too, for extra cheesy goodness.
- Second Béchamel Layer: Drizzle or dollop about 1/2 cup of béchamel sauce over the cheese layer. This ensures moisture and creaminess throughout.
- Repeat the Layers: Continue layering in this order: noodles, ragu, mozzarella, Parmesan (and optional fontina/provolone), then béchamel. Repeat this sequence two more times, for a total of three full layers of ragu and cheese.
- Final Layer – The Grand Finale: After your third ragu and cheese layer, place the final layer of noodles on top. Then, pour the remaining béchamel sauce evenly over these top noodles, spreading it right to the edges. This creates a beautiful, creamy crown.
- Top with Cheese: Finish the lasagna by generously sprinkling the remaining shredded mozzarella and a very good amount of Parmesan cheese over the top. This will create that gorgeous, golden-brown crust we all love.
Baking and Resting for Perfection
The baking process is where all the flavors truly marry, and the cheese gets gloriously bubbly. Don’t rush the resting phase; it’s vital for a neat and delicious slice.
- Cover and Bake: Loosely cover the baking dish with aluminum foil. I like to spray the underside of the foil with a little cooking spray to prevent the cheese from sticking. Place the lasagna on a baking sheet (to catch any potential drips) and bake in the preheated oven for 25 minutes.
- Uncover and Brown: Remove the foil and continue baking for another 20-30 minutes, or until the top is golden brown, bubbly, and the cheese is beautifully melted and slightly caramelized. You might notice the edges bubbling up; this is a good sign that everything is heated through.
- The Essential Rest: This is arguably the most challenging but most important step for a perfect lasagna slice. Once out of the oven, let the lasagna rest on a wire rack for at least 15-20 minutes, or even up to 30 minutes. This resting period allows the layers to set and the sauces to redistribute, preventing a messy, falling-apart slice. Trust me, it’s worth the wait!
- Serve and Enjoy: Cut into generous squares and serve hot. Garnish with fresh parsley if desired.
A Note on Quality Ingredients
I cannot stress enough how much using good quality ingredients impacts the final taste of your lasagna. For the tomatoes, opt for San Marzano if you can find them; their natural sweetness and low acidity are unparalleled. When it comes to cheese, grating your own fresh Parmesan makes a world of difference compared to pre-grated varieties, which often contain anti-caking agents. Similarly, fresh mozzarella (the kind packed in water) melts beautifully and imparts a creamy texture that pre-shredded bags just can’t match. Even the quality of your olive oil or the freshness of your herbs will shine through. Think of each ingredient as a building block; the stronger the blocks, the sturdier and more delicious your culinary creation will be.
Making Ahead and Freezing Tips
Lasagna is truly one of those dishes that tastes even better the next day, and it’s fantastic for meal prep! If you want to make it ahead, you have a couple of options:
- Refrigerating Unbaked Lasagna: You can assemble the entire lasagna up to 24 hours in advance. Cover it tightly with plastic wrap and then foil, and store it in the refrigerator. When you’re ready to bake, let it sit at room temperature for about 30-60 minutes while your oven preheats, then bake as directed, possibly adding an extra 10-15 minutes to the covered baking time since it’s starting cold.
- Freezing Unbaked Lasagna: For longer storage, assemble the lasagna in a freezer-safe dish. Cover it very tightly with a layer of plastic wrap and then two layers of heavy-duty aluminum foil. Label it with the date. It will keep well in the freezer for up to 2-3 months. To bake from frozen, remove the plastic wrap, cover tightly with foil, and bake at 375°F (190°C) for about 1 hour and 30 minutes to 1 hour and 45 minutes, then uncover and bake for another 20-30 minutes until bubbly and golden. This method takes a bit longer, but it’s incredibly convenient for a future busy weeknight.
- Freezing Baked Lasagna: If you have leftovers or want to freeze portions, let the baked lasagna cool completely. Cut it into individual servings, wrap each piece tightly in plastic wrap, and then in foil. Place them in freezer-safe bags or containers. Reheat in the oven or microwave until hot through.
I find that making a double batch of ragu is always a smart move. Use half for your lasagna today and freeze the other half for a quick pasta dinner later!
My Personal Touches for Ultimate Flavor
Over the years, I’ve developed a few little secrets that I believe really elevate my lasagna:
- A Dash of Balsamic: Sometimes, towards the end of the ragu’s simmering, I’ll add a tiny splash (about a teaspoon) of good quality balsamic vinegar. It adds an incredible depth and a hint of tang that brightens the entire sauce. It’s my secret weapon for balancing the richness.
- Fresh Herbs at the End: While dried herbs are great for simmering, a scattering of fresh basil and oregano (or even a mix of Italian parsley) stirred into the ragu just before assembly, or as a garnish, provides a burst of fresh flavor that dried herbs simply can’t replicate. The contrast is delightful.
- Homemade Broth: If you have the time, using homemade beef broth in your ragu instead of store-bought truly makes a noticeable difference. The depth of flavor is unparalleled and adds an extra layer of richness to your sauce.
- A Hint of Sugar: Depending on the acidity of your tomatoes, a small pinch of sugar (about half a teaspoon) added to the ragu can help balance the flavors and bring out the natural sweetness of the tomatoes. It’s not about making the sauce sweet, but about creating harmony.
- Cheese Mix Variety: Don’t be afraid to experiment with your cheese blend for the assembly. While mozzarella and Parmesan are classic, I sometimes add a layer of shredded provolone for a sharper, more piquant note, or even some ricotta mixed with an egg and a pinch of nutmeg for an extra creamy layer if I’m feeling adventurous and want a slightly different texture profile. For this recipe, I focused on a béchamel-based lasagna, but a ricotta layer can be a delightful variation!
These little adjustments are what make a recipe truly yours, allowing you to fine-tune the flavors to your exact preference. Don’t be afraid to experiment a little once you’ve mastered the basic technique!

Conclusion:
Well, my friends, we’ve reached the end of our culinary journey for today, but truly, this is just the beginning of your adventure! Having guided you through every step, I can honestly say that this isn’t just another recipe; it’s an invitation to experience something truly special in your kitchen. This dish, with its unparalleled depth of flavor and comforting embrace, is precisely why I believe it’s an absolute must-try for anyone seeking to create a meal that feels both gourmet and incredibly accessible. It’s the kind of recipe that consistently impresses, yet never demands hours of complicated techniques. The aroma alone, as it fills your home, is enough to tell you you’re in for a treat, a symphony of ingredients coming together in perfect harmony. I’ve seen firsthand the smiles it brings to the table, the satisfied sighs, and the immediate requests for “more, please!” It’s robust enough to satisfy the heartiest appetites, yet refined enough to feel like a special occasion meal, making it incredibly versatile for any event, from a quiet family dinner to a lively gathering with friends. The balance of textures, from crisp to tender, and the layers of taste are what truly elevate it beyond the ordinary, transforming simple components into something truly extraordinary.
Why This Recipe Will Become a Staple in Your Repertoire
What makes this particular creation stand out in a sea of recipes? It’s the ingenious combination of simple, fresh ingredients that, when prepared just so, unlock an explosion of taste. We’re talking about a dish that delivers maximum flavor with minimal fuss, a true kitchen hero for those busy weeknights or when you simply want to impress without the stress. The ease of preparation belies the sophisticated results, allowing even novice cooks to achieve professional-level deliciousness. And truly, when you experience the warmth and depth this recipe offers, you’ll understand why I’ve come to think of its unique charm, its distinctive signature, almost as ?p=8353 – a personal mark for its exceptional nature and the sheer joy it brings. It’s not just about filling your stomach; it’s about feeding your soul with truly wholesome, incredibly flavorful food that makes you feel good from the inside out. This isn’t just a meal; it’s an experience, a moment of culinary triumph that you’ll want to recreate again and again, becoming a cherished part of your family’s mealtime traditions.
Beyond the Plate: Serving & Creative Variations
Now, let’s talk about how to make this masterpiece uniquely yours. While utterly delicious on its own, this dish truly shines with a few thoughtful accompaniments. I highly recommend serving it alongside a crisp, fresh green salad with a light vinaigrette to cut through the richness and add a refreshing contrast. A warm, crusty baguette is also a fantastic addition, perfect for soaking up any leftover juices or sauces – trust me, you won’t want a single drop to go to waste! For a heartier meal, consider pairing it with fluffy quinoa, creamy mashed potatoes, or even a side of perfectly roasted asparagus. But don’t stop there; this recipe is incredibly adaptable!
Feeling adventurous? Try swapping out a key herb for a different aromatic – perhaps rosemary for thyme, or adding a touch of smoked paprika for an extra layer of warmth. You could also experiment with different vegetables in the mix; roasted Brussels sprouts, sweet potatoes, or even chunks of bell pepper would be delightful additions, each bringing their own unique flavor profile and texture. For those who enjoy a little heat, a pinch of red pepper flakes would add a wonderful kick. And if you’re looking to make it a vegetarian feast, many elements of this dish can be adapted beautifully with hearty root vegetables taking center stage, or even a robust plant-based protein. The possibilities are truly endless, limited only by your imagination and what you have on hand in your pantry. Don’t be afraid to make it your own; that’s the true joy of cooking!
Your Turn: Cook, Savor, and Share!
So, what are you waiting for? I’ve shared my passion for this incredible recipe with you, and now it’s your turn to bring it to life in your own kitchen. I truly believe that once you try it, you’ll understand exactly why I’m so enthusiastic about it. Gather your ingredients, put on your apron, and prepare to create something truly memorable. Don’t hesitate to dive in; the steps are straightforward, and the reward is immense. I absolutely cannot wait to hear about your experience! Did you stick to the recipe, or did you put your own unique spin on it? What serving suggestions did you try, and what variations did you discover? Please, share your culinary triumphs with me. Snap a photo, leave a comment, or tell us all about your creation. Your insights and experiences are invaluable, not just to me, but to our entire community of food lovers. Happy cooking, and I look forward to celebrating your delicious results!
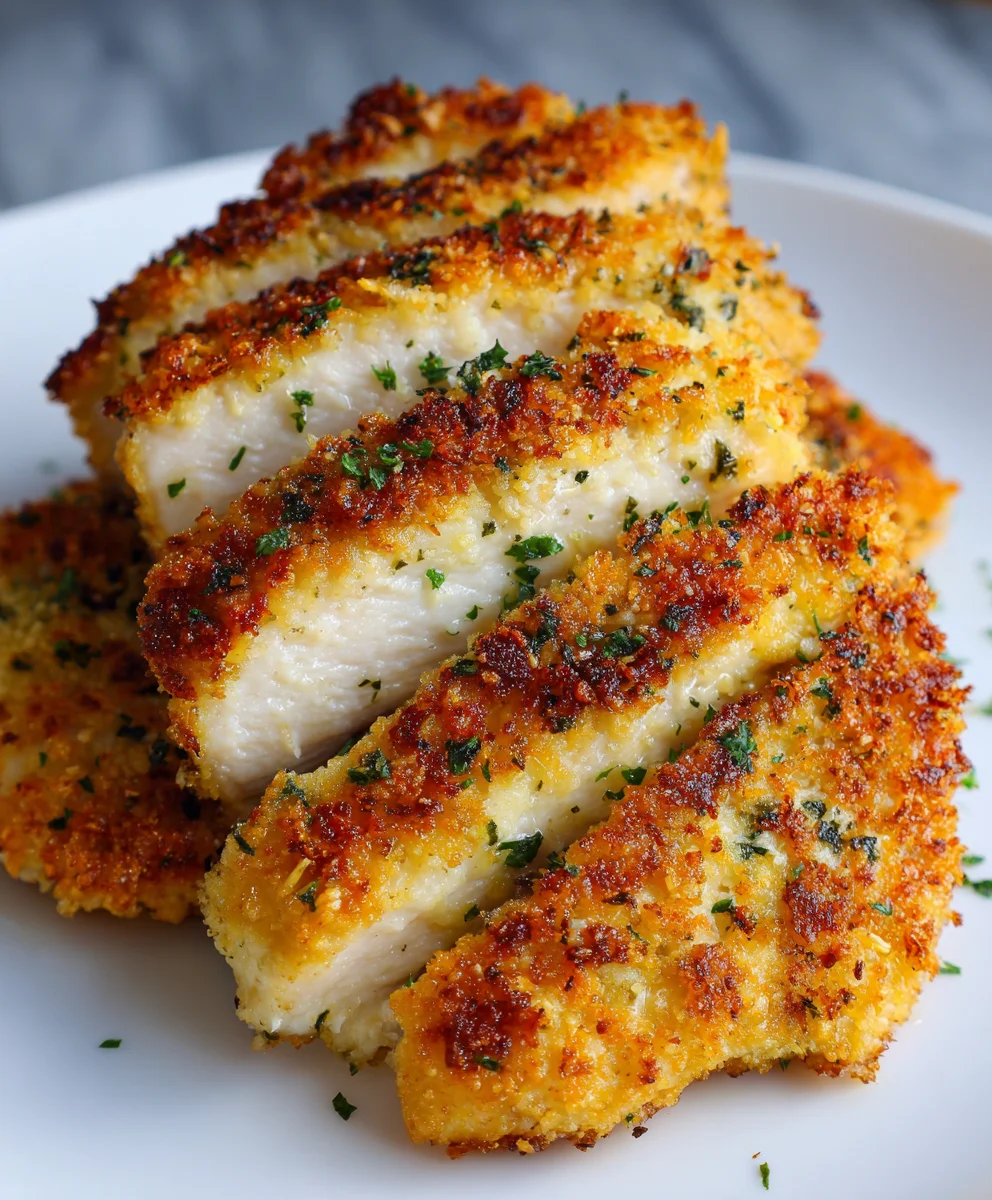
Crispy Baked Parmesan Chicken Breasts
This is the recipe referred to as ‘?p=8353’. Tender boneless chicken breasts coated in a savory, crispy crust of Parmesan cheese and panko breadcrumbs, then baked to golden perfection. A simple yet incredibly flavorful dish, perfect for a quick weeknight meal.
Ingredients
-
4 boneless, skinless chicken breasts (about 1.5 lbs)
-
2 cloves fresh garlic, minced
-
1 cup freshly grated Parmesan cheese
-
1 cup panko breadcrumbs
-
2 tsp Italian seasoning
-
1 tsp salt
-
1/2 tsp pepper
-
Olive oil spray
Instructions
-
Step 1
Preheat oven to 400°F (200°C). Line a baking sheet with foil or parchment, lightly sprayed with olive oil. -
Step 2
In a shallow dish, combine grated Parmesan, panko breadcrumbs, minced garlic, Italian seasoning, salt, and pepper. -
Step 3
Pat chicken breasts dry. If thick, pound to an even 3/4-inch thickness. -
Step 4
Lightly spray each side of the chicken breasts with olive oil spray. -
Step 5
Dredge each chicken breast in the breadcrumb mixture, pressing to coat thoroughly on all sides. -
Step 6
Place coated chicken on the prepared baking sheet. -
Step 7
Bake for 20-25 minutes, or until chicken is cooked through (internal temp 165°F/74°C) and the crust is golden and crispy. -
Step 8
Serve immediately.
Important Information
Nutrition Facts (Per Serving)
It is important to consider this information as approximate and not to use it as definitive health advice.
Allergy Information
Please check ingredients for potential allergens and consult a health professional if in doubt.


Leave a Comment