
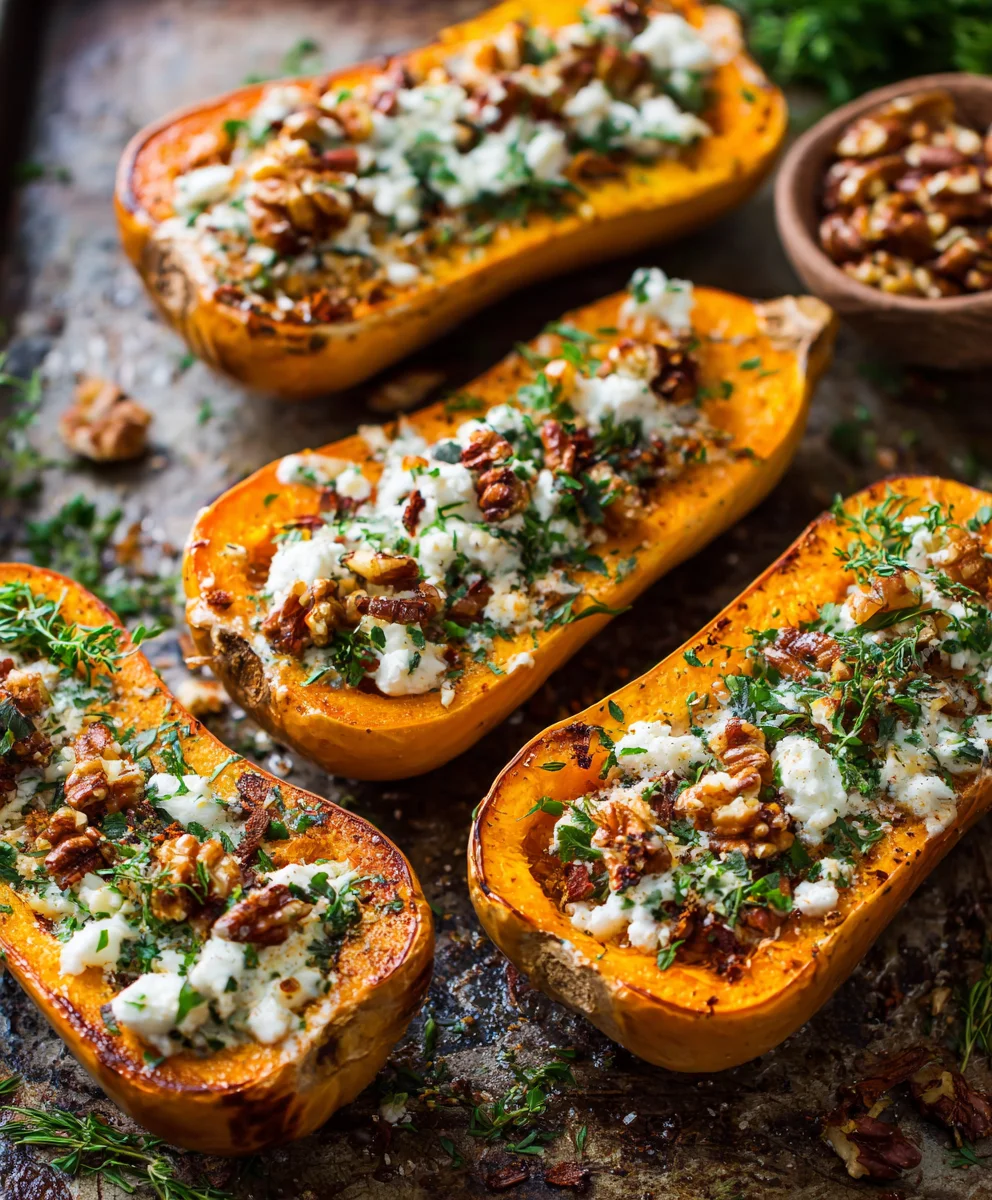
Stuffed Butternut Squash isn’t just a dish; it’s an edible embrace of autumn, a culinary masterpiece that seamlessly blends rustic charm with gourmet appeal. Imagine a golden-hued, tender squash, roasted to perfection, overflowing with a hearty, aromatic filling that promises warmth and satisfaction in every single bite. While the tradition of stuffing vegetables dates back through various cultures, celebrating seasonal abundance and creative cooking, the butternut squash has emerged as a particularly beloved canvas for this comforting method. Its naturally sweet, slightly nutty flavor, combined with a wonderfully creamy texture when cooked, provides the ideal counterpoint to a savory, robust stuffing.
People adore this dish for its incredible versatility, allowing for fillings ranging from ancient grains, herbs, and cranberries to spiced meats and cheese. It’s a complete meal in one beautifully presented package, making Stuffed Butternut Squash not only a comforting weeknight dinner but also an impressive centerpiece for any special occasion. I find myself returning to this recipe year after year, eager to experiment with new flavor combinations and delight in its comforting presence at my table.

Ingredients:
- For the Butternut Squash:
- 2 medium-sized butternut squash (approximately 2.5-3 pounds each), preferably ones that are more elongated and uniform in shape, as this makes them easier to stuff and serves beautifully.
- 2-3 tablespoons olive oil, plus extra for greasing the baking sheet.
- 1 teaspoon sea salt, or to taste.
- ½ teaspoon freshly ground black pepper, or to taste.
- A pinch of cinnamon or nutmeg (optional, but a wonderful complement to butternut squash).
- For the Savory-Sweet Filling:
- 1 cup uncooked quinoa (I prefer tri-color for visual appeal, but any type works beautifully), thoroughly rinsed under cold water until the water runs clear. Alternatively, you could use wild rice, farro, or even couscous for a different texture.
- 2 cups vegetable broth (for cooking the quinoa), plus an additional ¼ to ½ cup for sautéing and moistening the filling.
- 2 tablespoons olive oil, for sautéing.
- 1 medium yellow onion, finely diced (about 1.5 cups).
- 4 cloves garlic, minced with precision.
- 8 ounces cremini mushrooms, wiped clean and thinly sliced. You could also use shiitake or a mix of wild mushrooms for a more robust flavor profile.
- 5 ounces fresh baby spinach (about 5-6 cups packed), stems removed if they seem particularly thick.
- ½ cup dried cranberries or tart cherries, for a delightful chew and burst of sweetness.
- ½ cup pecans, roughly chopped (or walnuts, almonds, or even toasted pumpkin seeds for a nut-free option), toasted lightly for enhanced flavor.
- 1 tablespoon fresh rosemary, finely chopped. If using dried, use 1 teaspoon.
- 1 teaspoon dried sage. Fresh sage would be lovely too, about 1 tablespoon finely chopped.
- ½ teaspoon dried thyme.
- ½ teaspoon smoked paprika (optional, but adds a wonderful depth).
- Salt and freshly ground black pepper to taste, remember to season generously.
- 2 tablespoons fresh parsley, finely chopped, for garnish at the end.
- 4 ounces feta cheese, crumbled (or goat cheese for a creamier texture, or even a vegan alternative), optional, for mixing into the filling or sprinkling on top.
Phase 1: Preparing the Butternut Squash
The first step in creating this truly delightful Stuffed Butternut Squash is to prepare our star ingredient. This involves a bit of careful knife work, so take your time and ensure you have a stable surface.
- Preheat Your Oven and Prepare Baking Sheets: Begin by preheating your oven to 400°F (200°C). As it heats up, line one or two large baking sheets with parchment paper or a silicone baking mat. This will prevent sticking and make for easier cleanup later, which is always a bonus in my kitchen!
- Wash and Prepare the Butternut Squash: Give your butternut squash a thorough wash under cold running water. It’s important to remove any dirt or residue from the skin. Now comes the trickiest part: cutting it. Butternut squash can be quite firm, so use a sharp, heavy-duty chef’s knife. Carefully slice each squash in half lengthwise, from the stem to the base. A helpful tip: if your squash is wobbly, you can slice a very thin piece off the bottom or top to create a flat, stable surface before cutting it in half. This significantly reduces the risk of slippage.
- Scoop Out the Seeds: Once halved, use a spoon (a sturdy metal spoon or an ice cream scoop works best) to scoop out all the seeds and fibrous strands from the cavity of each squash half. You want to create a clean, smooth hollow, perfect for holding our delicious filling. Don’t worry about getting every tiny strand, but aim for a relatively clean cavity.
- Season the Squash: Place the scooped-out squash halves cut-side up on your prepared baking sheets. Drizzle 1-2 tablespoons of olive oil over the cut surfaces. Using your hands or a pastry brush, spread the oil evenly. Season generously with the sea salt, black pepper, and if you’re feeling adventurous, a pinch of cinnamon or nutmeg. These spices really bring out the natural sweetness of the butternut squash.
- Initial Roasting: Flip the squash halves so they are cut-side down on the baking sheet. This method helps to steam the squash slightly, making it wonderfully tender. Roast in the preheated oven for 30-40 minutes, or until the flesh is tender when pierced with a fork, but still holds its shape. You don’t want it mushy yet, as it will go back in the oven with the filling. The exact time will depend on the size of your squash. While it’s roasting, we’ll get started on our incredible filling.
Phase 2: Crafting the Savory-Sweet Filling
While our butternut squash is softening in the oven, let’s turn our attention to the heart of this dish: the rich, aromatic, and deeply satisfying filling. This phase involves a bit of multi-tasking, but it’s entirely manageable and incredibly rewarding as the aromas begin to fill your kitchen.
- Cook the Quinoa (or Chosen Grain): In a medium saucepan, combine the 1 cup of rinsed quinoa with 2 cups of vegetable broth. Bring to a boil over medium-high heat, then reduce the heat to low, cover, and simmer for 15 minutes, or until all the liquid has been absorbed and the quinoa is fluffy and translucent. Remove from heat and let it sit, covered, for another 5 minutes before fluffing with a fork. Set aside. If you’re using another grain, follow its specific cooking instructions.
- Prepare Your Aromatics: While the quinoa cooks, heat 2 tablespoons of olive oil in a large skillet or Dutch oven over medium heat. Once the oil is shimmering, add the finely diced yellow onion. Sauté, stirring occasionally, for 5-7 minutes until the onion softens and becomes translucent. You’ll notice the kitchen filling with a wonderful sweet aroma – that’s your cue!
- Add Garlic and Mushrooms: Add the minced garlic to the skillet and cook for another minute until fragrant. Be careful not to burn the garlic, as it can turn bitter. Immediately after, add the sliced cremini mushrooms. Increase the heat slightly to medium-high. Sauté the mushrooms for 8-10 minutes, stirring occasionally, until they release their liquid and begin to brown beautifully. This browning is key to developing deep, umami flavors in your filling.
- Introduce the Spinach and Spices: Once the mushrooms are nicely browned, add the fresh baby spinach to the skillet. It might seem like a lot of spinach, but it will wilt down significantly. Cook, stirring frequently, for 2-3 minutes, until the spinach has completely wilted. Now, stir in the chopped fresh rosemary, dried sage, dried thyme, and the optional smoked paprika. Cook for another minute, allowing the heat to release the essential oils and fragrant aromas of the herbs and spices.
- Combine All Filling Components: Remove the skillet from the heat. Add the cooked and fluffed quinoa, dried cranberries, and chopped pecans to the skillet with the sautéed vegetables. Gently fold everything together until well combined.
- Season and Taste: This is a crucial step! Season the filling generously with salt and freshly ground black pepper. Give it a good stir and then taste a small spoonful. Does it need more salt? A little more pepper? Perhaps a tiny splash of vegetable broth if it seems too dry? Adjust the seasonings to your preference. Remember, the butternut squash itself is seasoned, so you want the filling to be flavorful but not overwhelmingly salty. If you’re using crumbled feta or goat cheese, gently fold about half of it into the filling now. This will melt slightly and add a lovely creamy, tangy element.
Phase 3: Assembling and Final Roasting the Stuffed Butternut Squash
With our perfectly roasted squash and incredibly flavorful filling ready, it’s time to bring them together to create our magnificent Stuffed Butternut Squash. This is where the magic truly happens, transforming individual components into a cohesive, comforting dish.
- Prepare Squash for Stuffing: Carefully remove the partially roasted butternut squash halves from the oven. They should be tender but firm enough to handle without falling apart. If they’re still cut-side down, gently flip them over. You might notice some liquid in the cavities; you can carefully pour this out or leave a little for extra moisture.
- Stuff the Squash Halves: Spoon the prepared savory-sweet filling generously into the hollow of each butternut squash half. Mound the filling slightly, as it won’t expand much during the final bake. Don’t be shy – you want each bite to be packed with flavor and texture. Distribute the filling evenly among all the squash halves. If you have extra filling, you can serve it on the side or save it for another meal; it’s delicious on its own!
- Optional Cheese Topping: If desired, sprinkle the remaining crumbled feta (or goat cheese, or a sprinkle of grated Parmesan) over the top of the stuffed squash halves. The cheese will melt and get slightly golden and bubbly, adding another layer of flavor and appeal.
- Final Roasting: Return the stuffed butternut squash halves to the oven. Continue to roast for an additional 20-30 minutes, or until the squash is completely tender throughout (easily pierced with a fork), the filling is heated through, and the cheese (if used) is golden and bubbling. Keep an eye on it to prevent the filling from drying out too much. If the tops start to brown too quickly, you can loosely tent the squash with aluminum foil.
- Check for Doneness: The best way to know if your Stuffed Butternut Squash is ready is to test the tenderness of the squash flesh itself. Pierce it with a fork near the thickest part. If it slides in easily without resistance, it’s perfectly cooked. The edges of the squash should also be slightly caramelized and fragrant.
Phase 4: Serving Your Delicious Stuffed Butternut Squash
The moment has arrived! Your kitchen is undoubtedly filled with the most inviting aromas of roasted squash, sweet cranberries, earthy mushrooms, and aromatic herbs. Serving your beautifully prepared Stuffed Butternut Squash is the final step before enjoying this truly wholesome and satisfying meal.
- Rest Before Serving: Once the stuffed butternut squash is fully cooked, carefully remove the baking sheet from the oven. Let the squash rest on the baking sheet for 5-10 minutes before serving. This brief resting period allows the flavors to meld further and the squash to firm up slightly, making it easier to handle and preventing you from burning your mouth.
- Garnish and Present: Transfer the stuffed squash halves to individual plates. Before serving, sprinkle generously with the fresh chopped parsley. The vibrant green not only adds a beautiful pop of color but also a fresh, herbaceous note that brightens the entire dish. You can also add a final drizzle of good quality extra virgin olive oil if you wish for an extra layer of richness.
- Serving Suggestions: This Stuffed Butternut Squash is a meal in itself – hearty, flavorful, and incredibly satisfying. It makes an excellent vegetarian main course, or it can be a fantastic side dish for roasted chicken, turkey, or pork. It pairs wonderfully with a simple green salad dressed with a light vinaigrette, or a side of steamed green beans.
- Storage and Reheating: If you happen to have any leftovers (which is rare in my house!), they store beautifully. Allow the squash to cool completely, then transfer the halves to an airtight container. Refrigerate for up to 3-4 days. To reheat, you can place them back in a preheated oven at 350°F (175°C) for about 15-20 minutes until heated through, or gently warm them in the microwave, though the oven method will maintain a better texture. The flavors often deepen overnight, making it an even more delightful treat the next day!
Enjoy your homemade, hearty, and wonderfully flavorful Stuffed Butternut Squash! It’s a dish that embodies comfort, nutrition, and incredible taste, perfect for a cozy weeknight or an impressive holiday gathering.
Conclusion:
Well, my friends, we’ve journeyed through the steps of creating what I genuinely believe is one of the most heartwarming and utterly delicious dishes you’ll ever pull from your oven. This isn’t just another meal; it’s an experience, a celebration of vibrant flavors and comforting textures that will make your kitchen smell incredible and your taste buds sing. When I set out to perfect this recipe, my goal was to elevate the humble butternut squash into something extraordinary, something that feels both gourmet and incredibly accessible. And I truly feel we’ve achieved that. The blend of sweet, earthy squash with the savory, aromatic stuffing – whether it’s grains, herbs, or perhaps a hint of cheese – creates a symphony on the palate that’s surprisingly complex yet wonderfully balanced. It’s hearty enough to be a standalone main course, yet elegant enough to grace any special occasion, from a cozy autumn dinner party to a festive holiday spread. The inherent natural sweetness of the squash, when roasted to perfection, caramelizes beautifully, providing a delightful counterpoint to the rich, savory filling. It’s a dish that manages to be both light and incredibly satisfying, proving that healthy eating can be absolutely bursting with flavor. This Stuffed Butternut Squash recipe truly is a culinary triumph that deserves a spot in your regular rotation.
Elevate Your Meal: Serving Suggestions and Delicious Variations
One of the aspects I adore most about this recipe is its incredible versatility. While it shines brightly on its own, a thoughtful accompaniment can truly complete the picture. For a simple weeknight dinner, I love serving it alongside a crisp, green salad dressed with a light vinaigrette – the fresh, tangy notes cut through the richness beautifully. If you’re aiming for something a bit more substantial, particularly during colder months, consider a side of perfectly roasted Brussels sprouts or a generous helping of steamed green beans with slivered almonds. A dollop of creamy Greek yogurt or a sprinkle of freshly grated Parmesan cheese over the top just before serving can add an extra layer of richness and tang that is simply divine. For a truly decadent experience, a drizzle of balsamic glaze can enhance the sweet and savory notes even further.
But let’s talk about making this recipe uniquely yours. The beauty of a stuffed dish lies in its endless possibilities for customization. Don’t feel bound by the specific ingredients I’ve suggested for the stuffing; think of them as a fantastic starting point! For example, if you’re looking for an extra protein boost, consider adding crumbled cooked sausage – Italian sausage, either mild or spicy, works wonderfully – or ground turkey, seasoned with sage and thyme. Vegetarians might explore a medley of wild mushrooms, finely chopped walnuts, or even crumbled feta cheese mixed into the grain base. If you’re a fan of different grains, feel free to swap the wild rice or quinoa for farro, couscous, or even a robust barley. Lentils, especially French green lentils, can also make an excellent addition, contributing both texture and protein. For a spicier kick, a pinch of red pepper flakes or a dash of hot sauce in the stuffing mixture can really awaken the flavors. And for those navigating dietary restrictions, this recipe adapts beautifully: make it vegan by using vegetable broth, nutritional yeast instead of cheese (if any is called for in the main recipe), and a plant-based oil; gluten-free is easily achieved by ensuring all your stuffing ingredients are naturally gluten-free.
Thinking seasonally can also open up new avenues. In the autumn, apples or dried cranberries can add a wonderful sweetness and tartness to the stuffing. In the spring, fresh asparagus tips or peas could be gently folded in. The core idea is to embrace the creative spirit of cooking. Don’t be afraid to experiment with different herbs either – rosemary, sage, thyme, and parsley are classic companions to squash, but a touch of marjoram or even a hint of mint could offer an unexpected twist. The key is to taste as you go and adjust to your preferences, making each Stuffed Butternut Squash creation a reflection of your personal culinary style.
Your Kitchen, Your Masterpiece: Try It, Share It!
I truly hope this conclusion has conveyed my enthusiasm for this wonderful recipe. It’s a dish that consistently receives rave reviews, and for good reason. It’s comforting, it’s nutritious, and it’s surprisingly easy to master. There’s something incredibly satisfying about transforming simple, wholesome ingredients into a dish that looks as impressive as it tastes. I know that once you take that first bite, experiencing the tender, sweet squash yielding to the savory, flavorful filling, you’ll understand exactly what I mean. This recipe isn’t just about following instructions; it’s about the joy of creating something beautiful and delicious with your own hands, and then sharing that creation with the people you love. It’s a dish that embodies comfort and elegance, making it perfect for any occasion you choose to celebrate.
So, please, take this recipe, make it your own, and bring its warmth and flavor into your home. I am genuinely eager to hear about your culinary adventures. Did you add a unique ingredient to the stuffing? Did you serve it with a surprising side? Perhaps you found a new favorite way to prepare butternut squash that you want to share with the world? Your experiences and insights are invaluable, not just to me, but to the entire community of home cooks who visit this page looking for inspiration and delicious ideas. Please leave a comment below and tell me how your Stuffed Butternut Squash turned out! Share your photos on social media too, and feel free to tag me – I love seeing your beautiful creations! Let’s inspire each other to keep cooking, keep exploring, and keep sharing the deliciousness that makes our kitchens the heart of our homes.
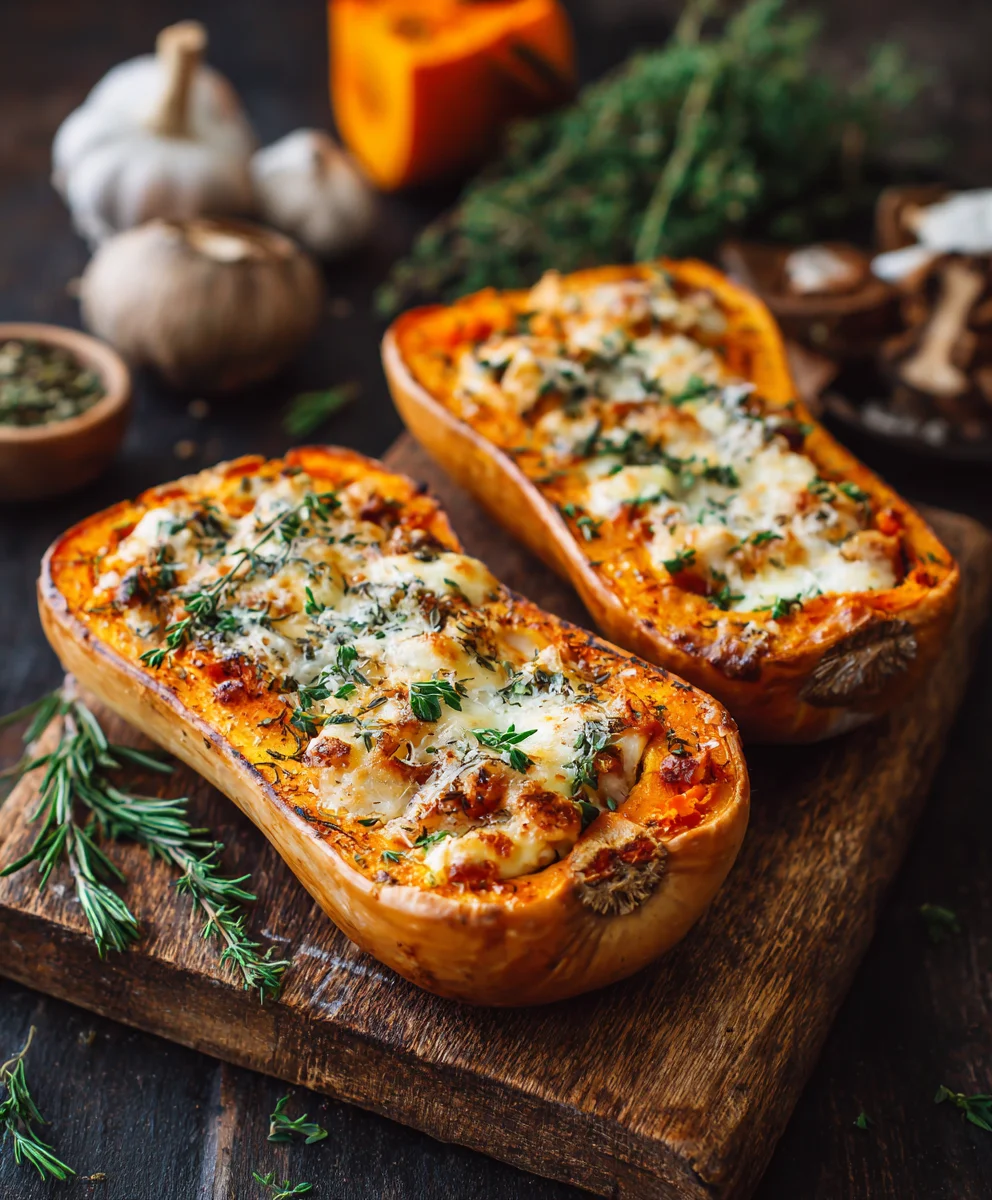
Hearty Stuffed Butternut Squash Dinner – Easy & Flavorful!
This Stuffed Butternut Squash with Spinach, Beef & Cheese is a cozy, savory dish perfect for Fall or Winter meals. The sweet roasted butternut squash is filled with a creamy mixture of cream cheese, Parmesan, sautéed spinach, and crispy beef, then baked to perfection. The combination of smoky beef and creamy cheese makes this dish comforting and flavorful, ideal for family dinners or holiday feasts. It’s a delicious and satisfying meal that blends natural sweetness with rich, savory notes.
Ingredients
-
2 medium butternut squash (2.5-3 lbs each)
-
2-3 tablespoons olive oil, plus extra for baking sheet
-
1 teaspoon sea salt
-
½ teaspoon freshly ground black pepper
-
Pinch of cinnamon or nutmeg (optional)
-
8 ounces beef bacon or beef strips, cooked until crispy and crumbled
-
5 ounces fresh baby spinach (about 5-6 cups packed)
-
4 cloves garlic, minced
-
4 ounces cream cheese, softened
-
½ cup grated Parmesan cheese
-
Salt and freshly ground black pepper to taste
-
2 tablespoons fresh parsley, finely chopped (for garnish)
Instructions
-
Step 1
Preheat oven to 400°F (200°C). Line one or two large baking sheets with parchment paper. Wash butternut squash, then carefully slice each in half lengthwise and scoop out seeds and fibrous strands. -
Step 2
Drizzle 1-2 tablespoons of olive oil over the cut surfaces of the squash. Season generously with 1 teaspoon sea salt, ½ teaspoon black pepper, and an optional pinch of cinnamon or nutmeg. Place squash halves cut-side down on the prepared baking sheets. Roast for 30-40 minutes, or until the flesh is tender but still holds its shape. -
Step 3
While the squash roasts, cook the beef bacon (or beef strips) in a skillet until crispy. Drain excess fat, crumble the beef bacon, and set aside. -
Step 4
In a large skillet, heat 2 tablespoons of olive oil over medium heat. Add the minced garlic and cook for 1 minute until fragrant. Add the fresh baby spinach and cook, stirring frequently, for 2-3 minutes until it has completely wilted. Remove from heat. -
Step 5
In a medium bowl, combine the softened cream cheese, grated Parmesan cheese, the sautéed spinach-garlic mixture, and most of the crumbled beef bacon (reserve some for topping if desired). Season the filling with salt and freshly ground black pepper to taste. Mix everything until well combined. -
Step 6
Carefully remove the partially roasted butternut squash halves from the oven and flip them cut-side up. Generously spoon the creamy spinach, beef, and cheese filling into the hollow of each squash half, mounding it slightly. -
Step 7
Optional: Sprinkle any reserved crumbled beef bacon or extra Parmesan cheese over the top of the stuffed squash. Return the stuffed butternut squash halves to the oven. Continue to roast for an additional 20-30 minutes, or until the squash is completely tender throughout and the filling is heated through and bubbly. If the tops begin to brown too quickly, you can loosely tent the squash with aluminum foil. -
Step 8
Remove from oven and let the stuffed squash rest on the baking sheet for 5-10 minutes before serving. Garnish generously with fresh chopped parsley. Serve warm. Leftovers can be stored in an airtight container in the refrigerator for up to 3-4 days and reheated in a 350°F (175°C) oven for 15-20 minutes or gently in the microwave.
Important Information
Nutrition Facts (Per Serving)
It is important to consider this information as approximate and not to use it as definitive health advice.
Allergy Information
Please check ingredients for potential allergens and consult a health professional if in doubt.


Leave a Comment