
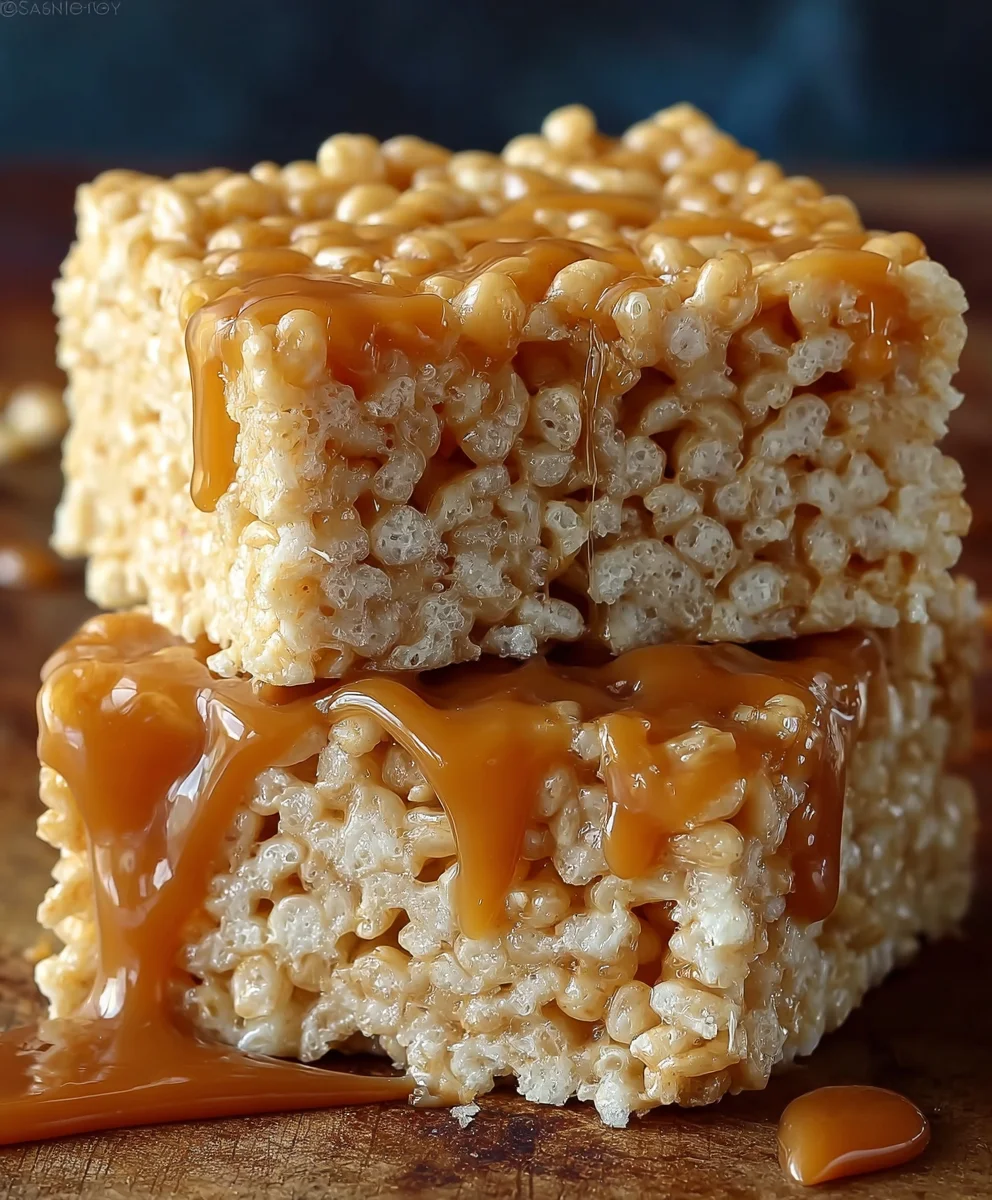
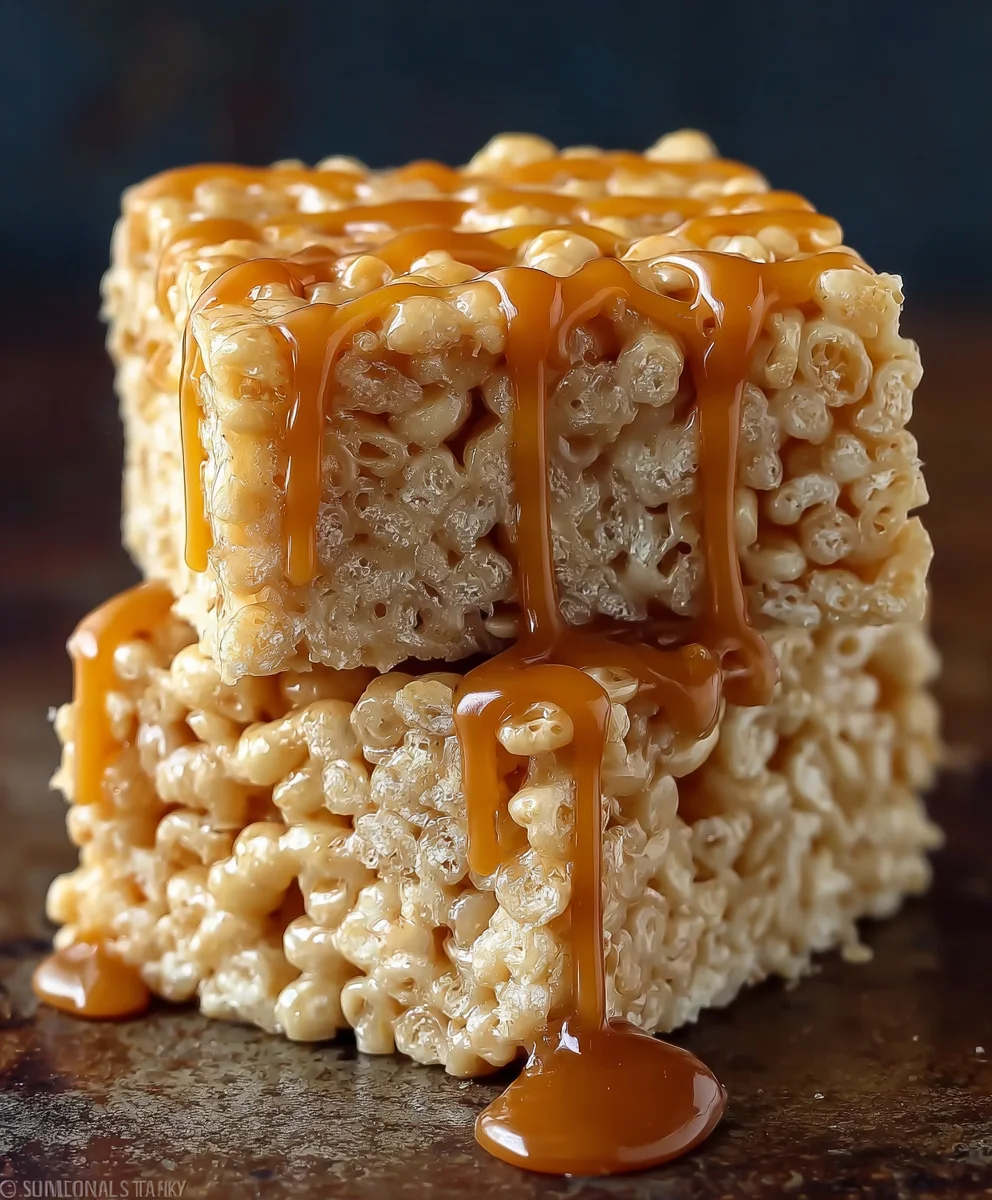
Salted Caramel Rice Krispie Treats Recipe – prepare to rediscover a childhood classic, reimagined with an irresistible gourmet twist! If you thought the original crispy treats couldn’t get any better, prepare to have your taste buds delightfully surprised. I’m absolutely thrilled to share a recipe that takes a beloved, nostalgic treat and elevates it to an entirely new level of decadence.
The humble Rice Krispie Treat, a delightful concoction born from the kitchens of Kellogg’s in the 1930s, has long been a staple of bake sales, potlucks, and happy childhood memories across America. Its simple brilliance lies in its perfect marriage of puffed rice cereal and gooey, buttery marshmallow. But what happens when you introduce the sophisticated, balanced notes of rich, salty caramel into this equation? You get an explosion of flavor and texture that is truly addictive.
People adore this particular Salted Caramel Rice Krispie Treats Recipe not just for its ease – it’s a no-bake wonder perfect for any occasion – but for the sheer delight it brings. The satisfying crunch of the cereal, the sticky chewiness of the marshmallow, the deep, buttery sweetness of the caramel, all perfectly offset by a hint of sea salt. It’s a symphony of sweet, salty, and crunchy that appeals to every palate, offering a grown-up twist on a timeless favorite. Get ready to make a batch that will disappear in minutes!

Ingredients:
- For the Salted Caramel:
- 1 cup (200g) granulated sugar
- 1/4 cup (60ml) water
- 1/2 cup (120ml) heavy cream, warmed slightly
- 4 tablespoons (56g) unsalted butter, cut into 4 pieces, at room temperature
- 1 teaspoon vanilla extract
- 1 teaspoon flaky sea salt, plus extra for sprinkling
- For the Rice Krispie Treats:
- 1/2 cup (113g) unsalted butter
- 1 (10-ounce/283g) bag mini marshmallows (about 5 1/2 cups)
- 10 cups Rice Krispies cereal
- 1/2 teaspoon vanilla extract
Preparing the Salted Caramel Sauce
Making homemade salted caramel can seem a little intimidating at first, but I promise you, with a bit of patience and attention, it’s incredibly rewarding and essential for the best Salted Caramel Rice Krispie Treats Recipe. This rich, buttery, and perfectly balanced caramel sauce is what truly elevates these classic treats.
- Prepare Your Equipment and Ingredients: Before you even think about putting the pan on the heat, make sure all your caramel ingredients are measured out and ready to go. Warm your heavy cream gently in a separate small saucepan or in the microwave; it should be warm, not hot or boiling. Cut your butter into pieces and have it at room temperature. This preparedness is key for successful caramel making, as once the sugar starts cooking, things move quickly! I like to have a whisk, a heat-proof spatula, and a bowl ready too.
- Combine Sugar and Water: In a heavy-bottomed, light-colored saucepan (a light-colored pan helps you see the color change of the sugar), combine the granulated sugar and water. Stir gently with a spoon just until the sugar is moistened. Try not to get sugar crystals on the sides of the pan. If you do, use a wet pastry brush to brush them down into the mixture. This step is crucial to prevent crystallization later on.
- Cook the Sugar Syrup: Place the saucepan over medium-high heat. Do not stir the mixture once it begins to boil. Simply let it cook, swirling the pan occasionally if needed to ensure even heating. Watch it very carefully. The syrup will first boil, then turn clear, and eventually start to take on a beautiful amber color. This process can take anywhere from 8 to 12 minutes, depending on your stovetop. Do not walk away from the stove during this time; it can go from perfect to burnt in a matter of seconds. We’re looking for a deep amber, almost copper, color – similar to an old penny.
- Add Warm Cream: Once the sugar syrup reaches that perfect deep amber color, immediately remove the pan from the heat. Carefully and slowly pour in the warmed heavy cream while continuously whisking. Be extremely cautious as the mixture will bubble up violently and release a lot of steam. This is normal, but it’s very hot, so keep your face and hands away from the pan. The sugar will seize up a bit, forming a hard clump; don’t worry, this is also normal.
- Incorporate Butter and Salt: Return the pan to very low heat. Add the pieces of room temperature butter, one at a time, whisking constantly until each piece is fully melted and incorporated before adding the next. Continue to whisk until the caramel is smooth and glossy. Remove from heat and stir in the vanilla extract and the flaky sea salt. The salt is absolutely vital here; it cuts through the sweetness and truly makes this a “salted” caramel.
- Cool the Caramel: Pour the finished salted caramel sauce into a heat-proof jar or bowl. Let it cool for at least 30 minutes at room temperature, or until it’s thick enough to drizzle but still pourable. It will continue to thicken as it cools. You’ll want it to be warm enough to easily incorporate into the marshmallows, but not scorching hot. This careful preparation of the salted caramel is the secret ingredient for our amazing Salted Caramel Rice Krispie Treats Recipe.
Preparing the Rice Krispie Treat Base
Now that our gorgeous salted caramel is cooling, we can move on to the classic Rice Krispie Treat base. This part is generally quicker, but still requires attention to detail to achieve that perfect gooey, yet structured, texture that we all love. Getting this right is fundamental to the success of our Salted Caramel Rice Krispie Treats Recipe.
- Prepare Your Pan: First things first, prepare your baking dish. I recommend a 9×13-inch baking pan for a good thickness. Line the pan with parchment paper or foil, leaving an overhang on the sides. This overhang will act as handles, making it much easier to lift the finished treats out of the pan. Lightly grease the parchment paper or foil with a bit of butter or non-stick cooking spray. This small step makes a huge difference when it comes to serving.
- Melt the Butter: In a very large pot or Dutch oven (the bigger the better, as you’ll be adding a lot of cereal later), melt the unsalted butter over low heat. It’s important to keep the heat low to prevent the butter from browning too quickly, which can change the flavor profile of your treats. We want golden, melted butter, not nutty brown butter for this particular recipe, as the caramel provides plenty of deep flavor.
- Add Marshmallows: Once the butter is fully melted, add the entire bag of mini marshmallows to the pot. Stir continuously with a heat-proof spatula or spoon until the marshmallows are completely melted and smooth. This step requires constant stirring to prevent the marshmallows from sticking to the bottom of the pot and burning. Keep the heat on low; patience here will result in a perfectly smooth marshmallow mixture, which is crucial for the consistency of your Salted Caramel Rice Krispie Treats.
- Stir in Vanilla Extract: As soon as the marshmallows are smooth and fully melted, remove the pot from the heat. Stir in the 1/2 teaspoon of vanilla extract. Vanilla adds a wonderful warmth and depth that complements the sweetness of the marshmallows and the richness of our caramel beautifully.
Assembling and Finishing Your Salted Caramel Rice Krispie Treats
This is where the magic truly happens, bringing together the rich salted caramel and the beloved Rice Krispie Treat base. Assembling these treats correctly ensures every bite is a delightful combination of textures and flavors, making this Salted Caramel Rice Krispie Treats Recipe truly stand out.
- Combine Marshmallow Mixture and Cereal: To the pot with the melted marshmallow and butter mixture, add the 10 cups of Rice Krispies cereal. Working quickly, gently fold the cereal into the marshmallow mixture using your spatula until the cereal is evenly coated. It’s important to be gentle to avoid crushing the cereal too much, as we want those satisfying crispy pops! Make sure to scrape the bottom and sides of the pot to ensure all the cereal gets coated.
- Incorporate the Salted Caramel: Now, for the star of the show! Drizzle about two-thirds of your prepared salted caramel sauce over the cereal and marshmallow mixture. Reserve the remaining one-third for drizzling on top later. Gently fold the caramel into the mixture. You want streaks of caramel throughout, not a fully uniform color, so don’t overmix. This creates beautiful pockets of intense caramel flavor in your Salted Caramel Rice Krispie Treats.
- Press into Prepared Pan: Transfer the mixture immediately into your prepared 9×13-inch baking pan. Using a buttered spatula, buttered hands, or a piece of wax paper, gently press the mixture evenly into the pan. The key here is to press gently but firmly enough to ensure the treats hold together. Over-compressing them will result in hard, dense treats, and we’re aiming for delightfully chewy ones. I find that using the back of a lightly greased metal spoon works wonderfully for an even surface.
- Drizzle and Garnish: Take the remaining one-third of your salted caramel sauce. If it has thickened too much, you can warm it gently in the microwave for 10-15 seconds to make it more pourable. Drizzle the caramel generously over the top of the pressed Rice Krispie Treats. For an extra touch of gourmet flair, sprinkle a little more flaky sea salt over the top of the caramel drizzle. This not only adds a beautiful visual element but also enhances that crucial sweet-salty balance in our Salted Caramel Rice Krispie Treats Recipe.
- Cool and Set: Allow the treats to cool completely at room temperature for at least 1 to 2 hours, or until they are fully set. You can also pop them in the refrigerator for about 30 minutes if you’re in a hurry, but I find room temperature setting yields a slightly softer, chewier texture. Once set, use the parchment paper or foil overhangs to lift the entire slab of treats out of the pan. Place it on a cutting board and cut into squares or rectangles of your desired size. I usually aim for 12-16 pieces.
Tips for the Perfect Salted Caramel Rice Krispie Treats
Creating truly exceptional Salted Caramel Rice Krispie Treats goes beyond just following the steps; it involves understanding some nuances that can elevate your dessert from good to absolutely unforgettable. I’ve learned a few tricks over the years that I’m happy to share!
-
Don’t Rush the Caramel:
Patience is truly a virtue when making caramel. Rushing the cooking process by turning up the heat too high can lead to burnt sugar or an unevenly cooked syrup. Keep the heat consistent and watch for that deep amber color. Undercooked caramel won’t have the rich depth of flavor, while overcooked caramel will be bitter. Trust your eyes and nose; a slight nutty aroma is good, a burnt smell is not.
-
Warm Your Cream:
I cannot stress this enough. Adding cold cream to hot sugar can cause the sugar to seize up severely and make it much harder to melt back down into a smooth sauce. Warming the cream to just above room temperature (it doesn’t need to be boiling, just warm to the touch) prevents this thermal shock and ensures a smoother, quicker incorporation.
-
Fresh Marshmallows are Key:
For the chewiest, most delightful Rice Krispie Treats, always use fresh marshmallows. Older, stale marshmallows tend to melt differently, resulting in a stiffer, less appealing texture. Mini marshmallows are generally preferred because they melt more quickly and evenly than larger ones.
-
Gentle Handling of Cereal:
When mixing the cereal into the marshmallow mixture, be gentle! Overmixing or pressing too hard during the incorporation phase can crush the delicate Rice Krispies, reducing their signature crispness. We want those satisfying pops and airy texture, which is a hallmark of a great Salted Caramel Rice Krispie Treats Recipe.
-
Don’t Over-Compress:
This is a common mistake. When pressing the mixture into the pan, use a gentle but firm hand. If you pack it down too tightly, your treats will turn out hard and dense instead of soft and chewy. A lightly buttered spatula or your fingertips (also buttered!) work perfectly for achieving an even, yet light, press.
-
The Importance of Flaky Sea Salt:
While regular table salt can be used in a pinch, flaky sea salt makes a significant difference. Its coarser texture provides delightful little pops of saltiness that truly enhance the caramel. Plus, sprinkled on top, it adds a beautiful gourmet touch to your finished Salted Caramel Rice Krispie Treats.
-
Temperature of Caramel for Drizzling:
When it comes time to drizzle the remaining caramel, ensure it’s still warm and pourable. If it’s too thick, a quick zap in the microwave (10-15 seconds at a time) will loosen it up nicely. You want beautiful, free-flowing drizzles, not globs.
Storage and Serving Suggestions
Once you’ve mastered this Salted Caramel Rice Krispie Treats Recipe, you’ll want to make sure they stay fresh and delicious for as long as possible! Here are my go-to tips for storage and some serving ideas to make them extra special.
-
Airtight is Best:
To keep your Rice Krispie Treats soft and chewy, store them in an airtight container at room temperature. Exposure to air is their enemy, as it will cause them to dry out and become hard. I like to place a piece of parchment paper between layers if stacking to prevent them from sticking together, especially with that delicious caramel drizzle on top.
-
Avoid the Refrigerator (Generally):
While it might be tempting to refrigerate them to make them set faster or to store them, I generally advise against it. Refrigeration can make Rice Krispie Treats quite hard and less enjoyable to eat. If you must chill them to set, bring them back to room temperature before serving for the best texture. If you live in a very warm climate and need to keep them cool, let them sit out for 10-15 minutes before serving.
-
Shelf Life:
These Salted Caramel Rice Krispie Treats are best enjoyed within 3-4 days of making them. While they can last a bit longer, their texture starts to change, and they lose some of that wonderful chewiness. Trust me, they usually don’t last that long anyway!
-
Serving Ideas:
These treats are fantastic on their own, but if you want to get a little fancy, consider serving them alongside a scoop of vanilla bean ice cream for an indulgent dessert. A light dusting of cocoa powder or a few chocolate shavings can also add a nice touch. For a party, arranging them on a nice platter with other small treats always looks inviting. They are perfect for potlucks, lunchboxes, or simply as an afternoon pick-me-up. Everyone I know absolutely adores these when I bring them out!
Conclusion:
And there you have it, friends! We’ve journeyed through the creation of what I truly believe is not just a dessert, but an experience. This isn’t merely another sweet treat; it’s a delightful symphony of textures and tastes that perfectly balances the familiar comfort of a classic with an elevated, sophisticated twist. If you’ve been searching for that perfect confection that hits all the right notes – chewy, crispy, sweet, and wonderfully salty – then your quest ends here. I can honestly say, with my hand on my heart, that this recipe is an absolute game-changer. It takes those nostalgic childhood memories and sprinkles them with a grown-up magic, making every single bite a moment to savor.
What truly sets this recipe apart, in my humble opinion, is the ingenious fusion of two beloved elements: the comforting crunch of a Rice Krispie treat and the luxurious depth of salted caramel. The sweetness is beautifully counteracted by that crucial pinch of sea salt, preventing it from being overly cloying and instead creating a dynamic flavor profile that keeps you reaching for another piece. It’s the kind of dessert that elicits gasps of delight and immediate requests for the recipe, even from those who claim they “don’t really have a sweet tooth.” Trust me, I’ve seen it happen. It’s surprisingly simple to execute, yet the result is undeniably impressive, making you look like a seasoned pastry chef without hours of effort. That’s a win-win in my book!
Elevate Your Serving Style:
Once your irresistible squares have set, the fun doesn’t have to stop! While they are absolutely divine enjoyed plain, there are countless ways to present and personalize them. For an immediate indulgence, serve them at room temperature, allowing the caramel to retain a beautiful chewiness. If you prefer a slightly firmer bite, a quick chill in the refrigerator can work wonders. Imagine pairing a square with a rich, hot cup of coffee or a tall, cold glass of milk for a comforting snack. For a truly decadent dessert, place a warm square alongside a scoop of vanilla bean ice cream, perhaps with an extra drizzle of homemade caramel sauce and a sprinkle of flaky sea salt. That, my friends, is pure bliss in a bowl!
Feeling creative? Don’t hesitate to experiment with variations. Consider folding in a handful of mini chocolate chips – dark chocolate for a sophisticated edge, or milk chocolate for an extra layer of sweetness – right after you’ve mixed in the cereal. A sprinkle of toasted pecans or walnuts on top before cooling can add a delightful nutty crunch. You could even swirl in a tablespoon of peanut butter into the caramel mixture for a peanut butter caramel twist! For a festive touch, cut them into smaller, bite-sized pieces and arrange them on a platter for your next gathering. They’re incredibly versatile and adapt beautifully to your culinary whims. Each small adjustment can lead to a new favorite version, proving just how adaptable and universally loved this treat truly is.
Your Kitchen Adventure Awaits!
Now, it’s your turn. I wholeheartedly encourage you to roll up your sleeves and give this Salted Caramel Rice Krispie Treats Recipe a try. Don’t let another day go by without experiencing the magic of that perfect sweet-and-salty balance combined with the satisfying crunch and chew. It’s a recipe that promises joy from start to finish – from the satisfying stir of the caramel to the first delightful bite. Whether you’re making them for a special occasion, a casual treat for yourself, or to share with loved ones, these treats are guaranteed to bring smiles.
I would absolutely adore hearing about your experience! Did you stick to the classic version, or did you venture into some exciting variations? What did your family and friends think? Please don’t be shy; share your triumphs, your photos, and your feedback in the comments section below. There’s nothing I love more than seeing how you bring these recipes to life in your own kitchens. Let’s create a community of happy bakers and even happier eaters. Go on, unleash your inner treat-maker – you won’t regret it!
Salted Caramel Rice Krispie Treats: Chewy & Easy Recipe
Rediscover a childhood classic reimagined with an irresistible gourmet twist! This no-bake Salted Caramel Rice Krispie Treats Recipe elevates a beloved nostalgic treat with deep, buttery sweetness, a hint of sea salt, and satisfying crunch.
Ingredients
-
1 cup (200g) granulated sugar
-
1/4 cup (60ml) water
-
1/2 cup (120ml) warm heavy cream
-
4 tbsp (56g) unsalted butter, room temp (for caramel)
-
1 tsp vanilla extract (for caramel)
-
1 tsp flaky sea salt, plus extra for sprinkling (for caramel)
-
1/2 cup (113g) unsalted butter (for treats)
-
1 (10oz/283g) bag mini marshmallows
-
10 cups Rice Krispies cereal
-
1/2 tsp vanilla extract (for treats)
-
1/2 cup prepared salted caramel sauce
Instructions
-
Step 1
Prepare all caramel ingredients. Warm 1/2 cup heavy cream. In a heavy-bottomed saucepan, combine 1 cup granulated sugar and 1/4 cup water. Stir gently until moistened, brushing down any sugar crystals on the sides of the pan. -
Step 2
Cook over medium-high heat without stirring (swirl occasionally) until the syrup turns a deep amber color, about 8-12 minutes. Do not walk away, as it can burn quickly. -
Step 3
Remove from heat. Slowly whisk in the warm heavy cream (mixture will bubble violently). Return to very low heat. Whisk in 4 tbsp unsalted butter, one piece at a time, until smooth. Remove from heat, then stir in 1 tsp vanilla extract and 1 tsp flaky sea salt. -
Step 4
Pour the finished salted caramel sauce into a heat-proof bowl. Let it cool for at least 30 minutes at room temperature, or until it’s thick but still pourable. Reserve 1/2 cup for the base and the remaining for drizzling. -
Step 5
Line a 9×13-inch baking pan with greased parchment paper or foil, leaving an overhang. In a very large pot over medium-low heat, melt 1/2 cup unsalted butter and 1/2 cup of the prepared salted caramel sauce. Stir constantly until completely melted and smooth. -
Step 6
Add the entire 10-ounce bag of mini marshmallows to the pot. Stir continuously over low heat until the marshmallows are completely melted and smooth. Remove from heat and stir in 1/2 tsp vanilla extract. -
Step 7
Add 10 cups of Rice Krispies cereal to the marshmallow mixture. Gently fold until the cereal is evenly coated. Transfer the mixture immediately into the prepared 9×13-inch pan. Using a buttered spatula or spoon, gently and evenly press the mixture into the pan. Do not over-compress, or treats will be hard. -
Step 8
Drizzle the remaining prepared salted caramel sauce generously over the top of the pressed Rice Krispie Treats (warm slightly if too thick). Sprinkle a little more flaky sea salt over the caramel drizzle. -
Step 9
Allow the treats to cool completely at room temperature for at least 1 to 2 hours, or until fully set. Lift the entire slab out of the pan using the parchment/foil overhangs, place on a cutting board, and cut into 12-16 squares or rectangles.
Important Information
Nutrition Facts (Per Serving)
It is important to consider this information as approximate and not to use it as definitive health advice.
Allergy Information
Please check ingredients for potential allergens and consult a health professional if in doubt.


Leave a Comment