
Chocolate Peanut Butter Pizza! What an intriguing concept, isn’t it? As an avid home baker, I’ve always been fascinated by dishes that playfully defy culinary conventions, and this delightful creation certainly fits the bill. Forget everything you thought you knew about dessert, because this isn’t just another sweet treat; it’s an experience. While traditional pizza boasts savory toppings and rich tomato sauces, our version takes a whimsical detour into the realm of pure indulgence, blending two of the most universally adored flavors on the planet.
Why This Unique Dessert Captivates Everyone
Why has this unconventional “pizza” garnered such a devoted following? Perhaps it’s the sheer genius of combining the creamy, slightly salty allure of peanut butter with the deep, comforting sweetness of chocolate, all spread generously over a delightful crust. It’s a symphony of tastes and textures that simply captivates the palate. This dish doesn’t claim centuries of history, but rather celebrates the modern spirit of culinary experimentation, born from the simple desire to unite beloved ingredients in an unexpectedly fun format. People adore the Chocolate Peanut Butter Pizza because it’s wonderfully customizable, incredibly satisfying, and brings an undeniable element of joy and surprise to any gathering, making it a truly memorable dessert.

Ingredients:
-
For the Chewy Brownie Crust:
- 1 cup (226g) unsalted butter, melted: I love using unsalted butter here because it gives me full control over the saltiness of our brownie base, ensuring it complements the sweet and savory notes of our toppings perfectly.
- 1 ½ cups (300g) granulated sugar: This provides the foundational sweetness for our crust, giving it that classic brownie appeal.
- ½ cup (100g) light brown sugar, packed: The addition of brown sugar brings a lovely moistness and a hint of molasses flavor, contributing to that desirable chewy texture we’re aiming for.
- 4 large eggs: These are crucial for binding our brownie crust together and adding to its rich, fudgy consistency. Make sure they are at room temperature for better emulsification.
- 2 teaspoons vanilla extract: A good quality vanilla extract enhances all the chocolate flavors beautifully, adding depth to our base.
- 1 ½ cups (180g) all-purpose flour: This is our main dry ingredient, giving structure to our brownie. Measuring it correctly, preferably by weight, is key for a consistent crust.
- ¾ cup (65g) unsweetened cocoa powder (Dutch-processed recommended): Dutch-processed cocoa powder will give us a darker, richer chocolate flavor without any bitterness, making our brownie crust incredibly decadent.
- 1 teaspoon baking powder: Just a touch of leavening to give our dense brownie a slight lift, preventing it from being too heavy.
- ½ teaspoon salt: Don’t skip the salt! It balances the sweetness and really brings out the chocolate flavor.
- 1 cup (170g) semi-sweet chocolate chips (optional, but highly recommended): These little pockets of melted chocolate add another layer of gooey goodness and extra chocolatey richness to our crust.
-
For the Velvety Peanut Butter Filling:
- 8 ounces (226g) cream cheese, softened: Full-fat cream cheese is my preference here, as it yields the creamiest, most luxurious filling. Make sure it’s at room temperature for easy blending.
- ½ cup (113g) unsalted butter, softened: Again, unsalted for control. The butter contributes to the rich, smooth texture and helps the filling set beautifully.
- 1 ½ cups (360g) creamy peanut butter: Use your favorite creamy peanut butter. I find classic brands like Jif or Skippy work wonderfully for their consistent texture and flavor. Avoid natural peanut butter that separates, as it can make the filling oily.
- 2 ½ cups (300g) powdered sugar, sifted: Sifting is important here to prevent lumps and ensure a perfectly smooth filling. This sweetens our peanut butter layer without adding a grainy texture.
- 1 teaspoon vanilla extract: A touch of vanilla enhances the sweet and nutty flavors.
- ¼ teaspoon salt: Just a pinch to really make that peanut butter flavor pop and cut through the richness.
- 2-4 tablespoons milk or heavy cream, as needed: This helps us achieve the perfect spreadable consistency. Start with two and add more as necessary.
-
For the Silky Chocolate Ganache:
- 1 ½ cups (255g) semi-sweet chocolate chips or finely chopped semi-sweet chocolate: High-quality chocolate makes a big difference in the final taste and shine of your ganache. You can use bittersweet for a less sweet ganache if you prefer.
- ¾ cup (180ml) heavy cream: The fat content in heavy cream is essential for a rich, stable ganache.
- 1 tablespoon light corn syrup (optional, but highly recommended for shine): This little trick helps the ganache achieve a beautiful, glossy finish and prevents crystallization.
- ½ teaspoon vanilla extract: Another touch of vanilla to complement the chocolate.
-
For the Toppings (Let’s Get Creative!):
- Miniature peanut butter cups, chopped or whole: An absolute must for any Chocolate Peanut Butter Pizza, in my opinion!
- Roasted peanuts, coarsely chopped: Adds a lovely crunch and intensifies the peanut flavor.
- Reese’s Pieces: For a pop of color and extra peanut butter candy goodness.
- Additional melted chocolate (milk, dark, or white) for drizzling: Perfect for an artistic flourish and extra chocolate appeal.
- Flaky sea salt: A sprinkle of flaky sea salt on top really elevates all the flavors, offering a sophisticated contrast to the sweetness.
Preparing the Chewy Brownie Crust
This brownie crust is the foundation of our magnificent Chocolate Peanut Butter Pizza, and getting it right is crucial for that perfect balance of fudginess and chewiness. Think of it as a giant, perfectly baked brownie, ready to hold all our delicious layers.
- Preheat Your Oven and Prepare Your Pan: First things first, let’s get that oven ready. Preheat your oven to 350°F (175°C). For our pizza, I usually opt for a 10 or 12-inch round springform pan, which makes removing the crust incredibly easy. Alternatively, a regular 12-inch pizza pan or even a round cake pan will work. Whichever you choose, make sure to generously grease it with butter or cooking spray. For springform or cake pans, I like to line the bottom with a circle of parchment paper, which helps immensely with removal and prevents sticking, guaranteeing a beautifully intact crust. If you’re using a pizza pan, just the greasing should suffice.
- Melt the Butter: In a large, microwave-safe bowl or a saucepan over low heat, melt your 1 cup of unsalted butter. We want it fully melted but not browned or boiling, as this can affect the texture of our brownies. If using the microwave, heat in 30-second intervals, stirring in between, until completely liquid.
- Combine Sugars with Melted Butter: Once the butter is melted, remove it from the heat if using a saucepan. Add the 1 ½ cups of granulated sugar and ½ cup of packed light brown sugar to the melted butter. Whisk these together vigorously for about 1 to 2 minutes. The mixture should become smooth and slightly glossy. This step is important because dissolving some of the sugar in the warm butter contributes to that desirable chewy brownie texture.
- Incorporate Eggs and Vanilla: Now, let’s add the eggs. Crack your 4 large eggs into the sugar and butter mixture, one at a time, whisking well after each addition. It’s important to fully incorporate each egg before adding the next. This creates a beautifully emulsified mixture that will lead to a fudgy, rather than cakey, brownie. After the eggs are fully mixed in, stir in the 2 teaspoons of vanilla extract. Keep whisking for another minute or so until the mixture looks thick, shiny, and pale golden. You’re building the structure and flavor here!
- Sift and Add Dry Ingredients: In a separate medium bowl, whisk together your 1 ½ cups of all-purpose flour, ¾ cup of unsweetened cocoa powder, 1 teaspoon of baking powder, and ½ teaspoon of salt. Sifting these dry ingredients isn’t strictly necessary if you whisk them very well, but it does help ensure there are no lumps of cocoa or flour and that everything is evenly distributed. Gradually add this dry mixture to your wet ingredients, folding gently with a rubber spatula until just combined. The key here is not to overmix! Overmixing develops the gluten in the flour too much, which can result in a tough, dry brownie. A few streaks of flour are perfectly acceptable.
- Fold in Chocolate Chips (Optional but Recommended): If you’re using them, gently fold in the 1 cup of semi-sweet chocolate chips now. These will melt into glorious pockets of chocolate within the crust, adding an extra layer of decadence.
- Spread into Prepared Pan: Pour your brownie batter into your prepared pan. Use your spatula to spread it evenly to the edges, ensuring the thickness is consistent across the entire “pizza” base. This helps in even baking.
- Bake to Perfection: Place the pan in your preheated oven. Bake for approximately 25-35 minutes. Baking times can vary quite a bit depending on your oven and the exact thickness of your batter, so keep an eye on it. You want the edges to look set and slightly firm, but the center should still be a little fudgy when gently shaken. A toothpick inserted into the center should come out with moist crumbs, not wet batter. If it comes out clean, you’ve likely overbaked it, which can lead to a drier crust. My preference is always for a slightly underbaked, fudgy center for this recipe!
- Cool Completely: This step is arguably the most important for success. Once baked, remove the brownie crust from the oven and place it on a wire rack to cool completely. And I mean completely! This can take anywhere from 1 to 2 hours, or even longer. Trying to spread the peanut butter filling on a warm crust will result in a melty mess, as the heat will cause the filling to soften and separate. Patience is a virtue, and it will pay off with a perfectly structured pizza. If you’re using a springform pan, you can release the sides once it’s mostly cool. If using a regular pan, make sure it’s fully cool before attempting to carefully invert and remove it, if desired, or simply build the pizza directly in the pan.
Crafting the Velvety Peanut Butter Filling
This peanut butter filling is the creamy, dreamy heart of our Chocolate Peanut Butter Pizza. It’s rich, luscious, and perfectly balanced, providing that quintessential sweet and savory peanut butter flavor that makes this dessert so irresistible. Achieving the right consistency is key – we want it smooth enough to spread easily but firm enough to hold its shape.
- Cream Butter and Cream Cheese: In a large mixing bowl, using an electric mixer (either a stand mixer with a paddle attachment or a handheld mixer), combine your 8 ounces of softened cream cheese and ½ cup of softened unsalted butter. Beat them together on medium speed for about 2-3 minutes, or until the mixture is incredibly light, fluffy, and completely smooth. Scrape down the sides of the bowl often with a rubber spatula to ensure everything is incorporated. This initial creaming sets the stage for a lump-free, velvety filling.
- Add the Peanut Butter: Now, add your 1 ½ cups of creamy peanut butter to the butter and cream cheese mixture. Continue beating on medium speed until the peanut butter is thoroughly combined and the mixture is uniform in color and texture. This usually takes another 1-2 minutes. Make sure there are no streaks of unmixed cream cheese or butter. The mixture will be quite thick at this stage.
- Gradually Incorporate Powdered Sugar: With the mixer on low speed, gradually add the 2 ½ cups of sifted powdered sugar, about ½ cup at a time. The reason we add it slowly and start on low speed is to prevent a powdered sugar cloud from engulfing your kitchen! Once all the sugar has been added, increase the speed to medium-high and beat for another 2-3 minutes. This aerates the filling, making it wonderfully light and smooth, almost like a frosting. Scrape down the sides of the bowl as needed.
- Stir in Vanilla and Salt: Once the filling is looking perfect, add the 1 teaspoon of vanilla extract and ¼ teaspoon of salt. Beat for just another 30 seconds or so to combine these flavor enhancers. The salt is crucial here, as it balances the sweetness and really brings out the nutty notes of the peanut butter.
- Adjust Consistency (If Needed): At this point, assess the consistency of your peanut butter filling. It should be thick, smooth, and easily spreadable, but not runny. If it seems too stiff, add milk or heavy cream, 1 tablespoon at a time, beating after each addition, until you reach your desired consistency. I typically use 2 to 3 tablespoons. Be careful not to add too much, as a runny filling will make assembly difficult and won’t hold up as well. If, by chance, it becomes too thin, you can try adding a bit more sifted powdered sugar, a tablespoon at a time, until it thickens up.
- Ready for Assembly: Your velvety peanut butter filling is now ready! You can cover the bowl with plastic wrap and chill it for 10-15 minutes if your kitchen is very warm and you want it a little firmer before spreading. However, if your ingredients were at the right room temperature and you’ve followed the steps, it should be perfectly spreadable immediately. This rich, smooth layer is going to be a delightful contrast to the chewy brownie crust and the rich chocolate ganache.
Making the Silky Chocolate Ganache
The chocolate ganache is the crowning glory of our Chocolate Peanut Butter Pizza, providing a rich, glossy, and intensely chocolatey layer. It’s surprisingly simple to make but delivers a luxurious finish. The key is to melt the chocolate gently and combine it smoothly with the warm cream.
- Prepare Your Chocolate: Place your 1 ½ cups of semi-sweet chocolate chips (or finely chopped chocolate) into a medium-sized, heat-proof bowl. Ensure the bowl is completely dry. Using high-quality chocolate here will truly elevate the flavor and texture of your ganache, giving it a much richer depth.
- Heat the Heavy Cream: In a small saucepan, gently heat the ¾ cup of heavy cream over medium heat. You want it to reach a simmer, where small bubbles just begin to form around the edges of the pan, but do not let it come to a rolling boil. Overheating the cream can scorch it and affect the taste. As soon as you see those tiny bubbles, remove the saucepan from the heat immediately.
- Pour Cream Over Chocolate and Let Rest: Carefully pour the hot cream directly over the chocolate in the bowl. Do not stir it yet! Let it sit undisturbed for about 5-7 minutes. This allows the hot cream to gently melt the chocolate, ensuring an incredibly smooth and lump-free ganache. This resting period is crucial for the chocolate to fully soften before you begin whisking.
- Whisk Until Smooth and Glossy: After the resting period, use a whisk and start stirring gently from the center of the bowl, slowly working your way outwards. Continue whisking until the mixture is completely smooth, glossy, and all the chocolate is fully melted and incorporated. It should transform into a beautiful, uniform dark brown liquid. If you notice any stubborn lumps, you can place the bowl over a pot of simmering water (creating a double boiler) for a minute or two, stirring constantly, until smooth. Be careful not to get any water into the chocolate.
- Add Corn Syrup and Vanilla (Optional but Recommended): Stir in the 1 tablespoon of light corn syrup (if using) and ½ teaspoon of vanilla extract. The corn syrup contributes a lovely sheen to the ganache and helps prevent it from crystallizing, making it look professional and enticing. The vanilla, as always, enhances the overall flavor profile. Whisk until fully combined.
- Cool to Spreading Consistency: Now, the ganache needs to cool slightly to reach the perfect spreadable consistency. If it’s too hot, it will be too runny and will melt your peanut butter layer. If it’s too cool, it will be too thick and hard to spread evenly. Let it sit at room temperature for about 15-30 minutes, stirring occasionally, until it has thickened to a consistency similar to warm honey or thick pancake syrup. It should be pourable but hold its shape when drizzled. You can speed up this process by placing the bowl in an ice bath, stirring constantly, but be very careful not to let it get too thick.
- Ready for Spreading: Your silky chocolate ganache is now ready to be spread over the peanut butter filling. It’s going to add that show-stopping chocolate finish that ties all the flavors of our Chocolate Peanut Butter Pizza together beautifully.
Assembling Your Ultimate Chocolate Peanut Butter Pizza
This is where all our hard work comes together! Assembling your Chocolate Peanut Butter Pizza is a fun and rewarding process. The key here is working with fully cooled components and being gentle as you layer to ensure a picture-perfect, delectable dessert.
- Ensure Crust is Fully Cooled: Before you even think about touching that peanut butter filling, double-check that your brownie crust is completely, utterly, absolutely cool. I cannot stress this enough! If it’s even slightly warm, your peanut butter filling will melt and slide, creating a runny, messy situation. If you prepared it in a springform pan, carefully release the sides and remove the parchment paper from the bottom. If you want to transfer it to a serving plate, do so gently now. I often build it right on a cake stand.
- Spread the Velvety Peanut Butter Filling: Using an offset spatula or the back of a spoon, carefully and evenly spread your prepared velvety peanut butter filling over the cooled brownie crust. Start from the center and gently push the filling towards the edges, leaving a small, clean border (about ¼ to ½ inch) if you desire a neater edge, or spread it right to the very edge for maximum peanut butter goodness. Aim for a consistent layer thickness all around. Take your time with this step to ensure a smooth, beautiful layer.
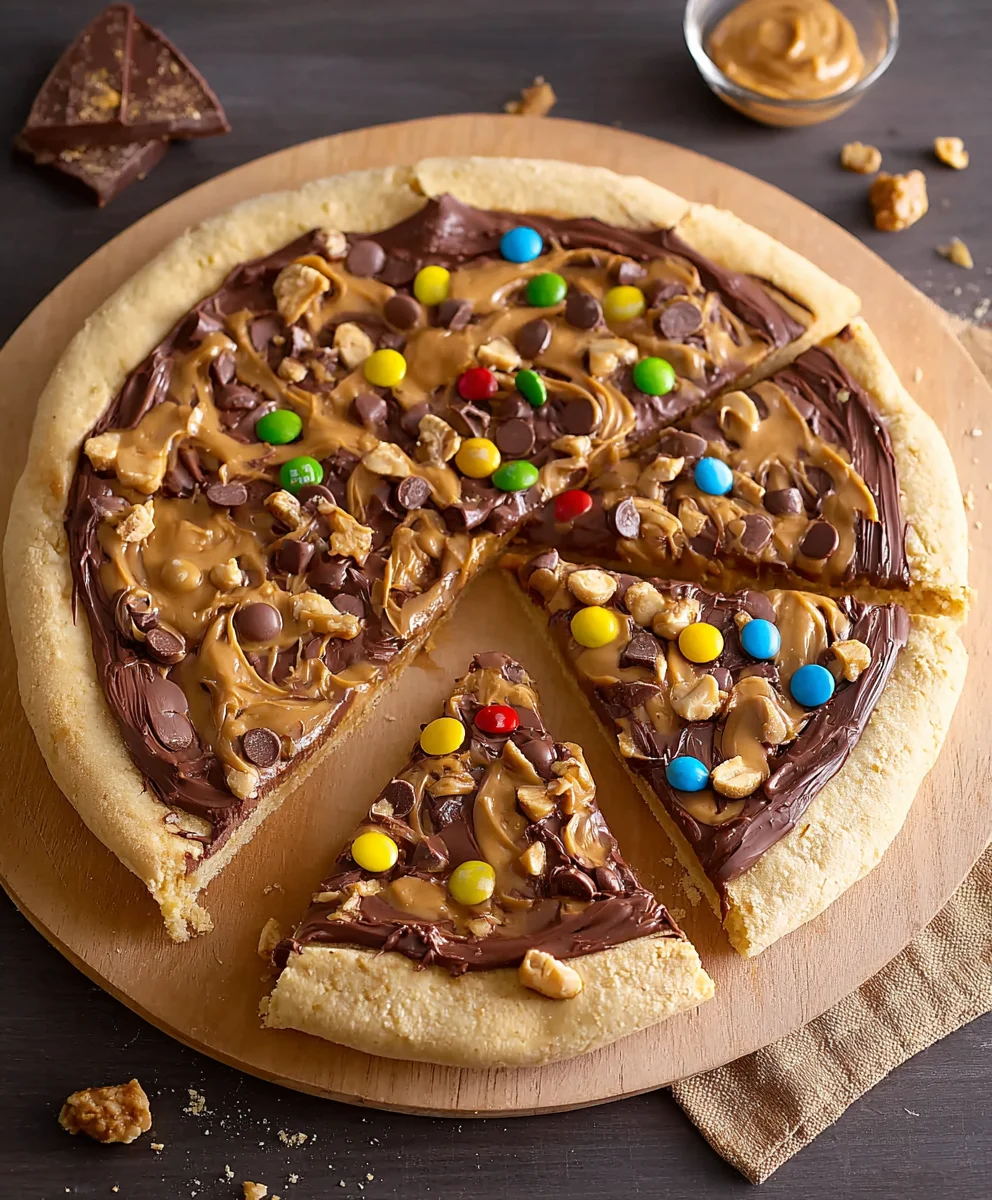
- Pour and Spread the Silky Chocolate Ganache: Once your peanut butter layer is smooth and even, it’s time for the chocolate ganache. Remember, we want the ganache to be cooled to a pourable but still somewhat thick consistency, like warm honey. Gently pour the ganache over the peanut butter filling, starting in the center and working your way outwards. Use your offset spatula or a knife to carefully spread the ganache evenly over the entire peanut butter layer, making sure it completely covers it. This layer will look so tempting!
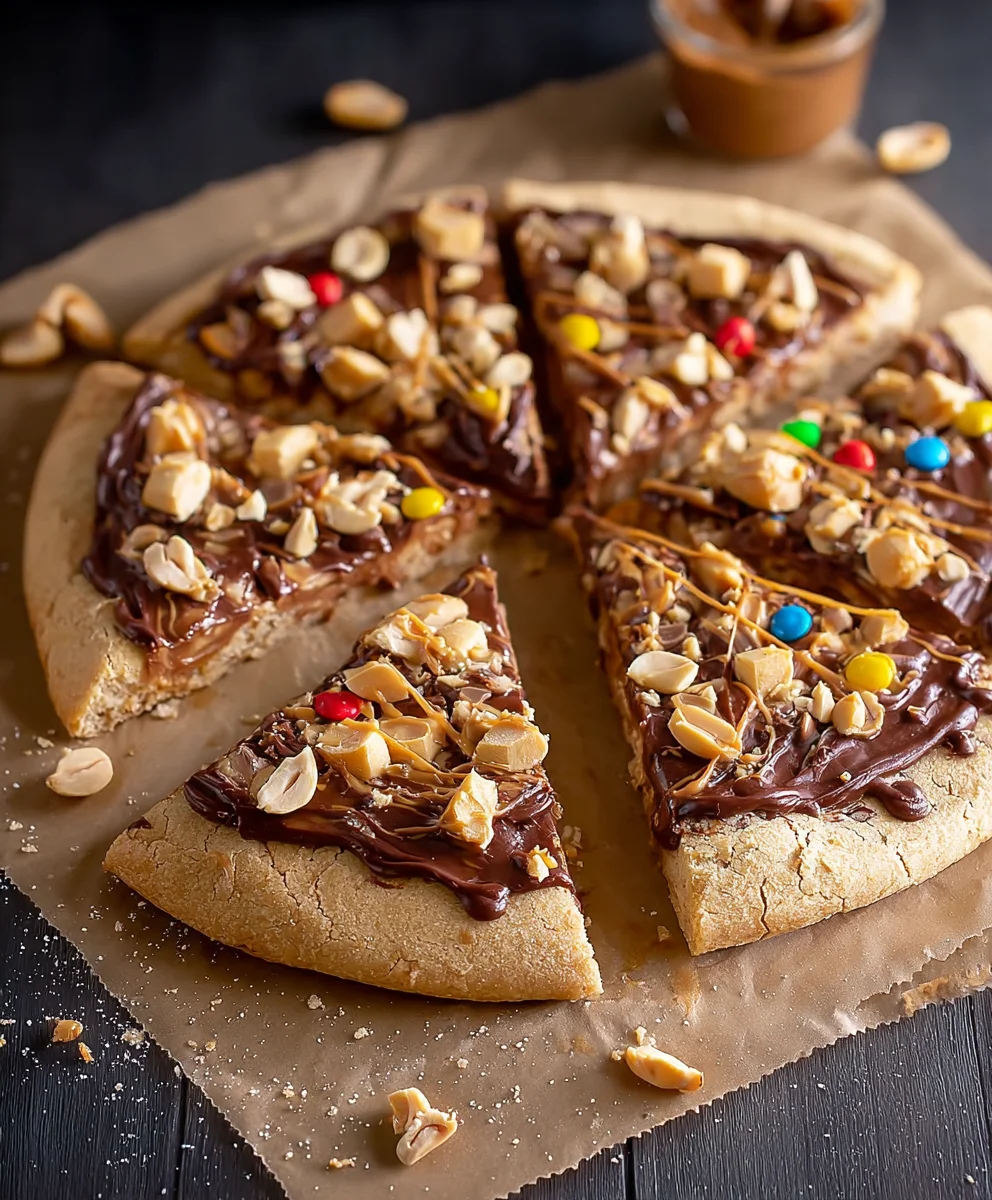
- Decorate with Your Favorite Toppings: Now for the fun part – decorating! While the chocolate ganache is still soft and unset, sprinkle your chosen toppings liberally over the surface. This is where you can truly make this Chocolate Peanut Butter Pizza your own. I love scattering chopped miniature peanut butter cups, a handful of chopped roasted peanuts for extra crunch, and a generous sprinkle of colorful Reese’s Pieces. If you’re using extra melted chocolate for drizzling, you can do that now using a fork or a piping bag with a very small hole to create a beautiful, artistic pattern over the set toppings. For that ultimate gourmet touch, finish with a sprinkle of flaky sea salt. The salt truly enhances the flavors and provides a wonderful textural contrast.
- Chill to Set: Once decorated, your magnificent Chocolate Peanut Butter Pizza needs to chill. Carefully transfer the entire pizza to the refrigerator. Allow it to chill for at least 2-4 hours, or ideally, overnight. This chilling time is essential for the peanut butter filling and the chocolate ganache to firm up properly, making it easy to slice and preventing it from becoming a gooey mess when served. It also allows the flavors to meld beautifully. You want those layers to be distinct and hold their shape when cut.
Serving and Storage Recommendations
You’ve done it! Your incredible Chocolate Peanut Butter Pizza is ready to be enjoyed. Here are a few tips to ensure it’s served at its absolute best and stored properly for maximum freshness.
- Slicing for Perfection: After chilling, remove your Chocolate Peanut Butter Pizza from the refrigerator about 15-20 minutes before you plan to serve it. This allows the ganache and filling to soften just slightly, making it easier to slice. For clean slices, use a sharp knife that has been run under hot water and wiped dry between each cut. This will create smooth, distinct edges without dragging the chocolate. I find a large chef’s knife or a long, thin slicing knife works best. You can cut it into traditional wedges, like a pizza, or into smaller squares if you’re serving a crowd.
- Serving Temperature: While it needs to be chilled to set, this pizza is often best served slightly below room temperature. The flavors of the chocolate and peanut butter are more pronounced when they’re not straight out of the fridge, allowing the textures to soften just enough to be wonderfully creamy and chewy. Avoid letting it sit out for too long, especially in a warm environment, as the ganache and filling can become too soft.
- Storing Leftovers: If you’re lucky enough to have any leftovers, store them in an airtight container in the refrigerator. This will keep the pizza fresh and prevent it from absorbing any other odors from your fridge. Properly stored, your Chocolate Peanut Butter Pizza will remain absolutely delicious for up to 5-7 days.
- Can You Freeze It? Absolutely! This Chocolate Peanut Butter Pizza freezes remarkably well. For longer storage, you can freeze individual slices or the entire pizza (if already in a freezer-safe pan). Wrap it tightly in plastic wrap, then an additional layer of aluminum foil to prevent freezer burn. It can be stored in the freezer for up to 1-2 months. When you’re ready to enjoy, simply transfer it to the refrigerator to thaw overnight, or let individual slices come to room temperature for about 30-60 minutes before serving. The texture will remain quite good, making it a fantastic make-ahead dessert!
- A Note on Richness: This is a very rich and decadent dessert, so small slices often go a long way! It’s perfect for celebrations, potlucks, or just a truly indulgent treat. Prepare to receive many compliments on this show-stopping Chocolate Peanut Butter Pizza!
Conclusion:
Reflecting on this delightful creation, I truly believe this isn’t just another dessert; it’s an experience, a journey into the heart of comfort food innovation. The unparalleled harmony of rich, decadent chocolate melting into the creamy, salty embrace of peanut butter, all atop a perfectly crisp and chewy crust, is simply revolutionary. I’ve made this countless times for friends, family, and even just for myself on a particularly indulgent Tuesday, and without fail, it vanishes in record time. It’s the kind of treat that elicits gasps of delight and immediate requests for the recipe, making you feel like a culinary wizard with minimal effort. The simplicity of preparation belies the sophisticated taste it delivers, making it an absolute must-try for both novice bakers and seasoned dessert enthusiasts alike. This isn’t just a dessert; it’s an edible celebration, a guaranteed crowd-pleaser that effortlessly blends familiar flavors into an exciting, novel form. It’s the ultimate antidote to a dreary day, a centerpiece for any festive gathering, and a testament to the fact that some of the best culinary inventions are born from pure, unadulterated joy.
Elevate Your Dessert Game with This Irresistible Treat
And let’s be honest, who can resist a slice of this incredible Chocolate Peanut Butter Pizza? It’s truly a showstopper, a conversation starter, and quite possibly, the most ingenious way to combine two beloved classics. This recipe isn’t just about following steps; it’s about unlocking a new level of dessert appreciation, one where simplicity meets sublime flavor to create something truly memorable. The way the chocolate ganache glistens, the peanut butter swirls peek through, and the crust holds it all together in perfect harmony – it’s a masterpiece waiting to be devoured. Each bite is a symphony of sweet and salty, soft and crisp, making it incredibly addictive in the best possible way. Trust me, once you experience the sheer delight of this dessert, you’ll wonder how you ever lived without it. It’s more than just a recipe; it’s an invitation to create joy, to share happiness, and to indulge in a moment of pure, unadulterated bliss.
Serving Suggestions and Creative Variations: Make It Your Own!
Now, let’s talk about making this already fantastic dessert even more incredible with a few serving suggestions and creative variations. Imagine serving it slightly warm, with a generous scoop of vanilla bean ice cream cascading down its chocolaty peaks, or perhaps a dollop of freshly whipped cream. For those who love a textural contrast, a delicate sprinkle of flaky sea salt just before serving beautifully elevates the flavors, bringing out the depth of the chocolate and the nuttiness of the peanut butter in a truly remarkable way. Don’t be shy about experimenting with additional toppings either! A handful of mini chocolate chips, chopped pretzels for an unexpected salty crunch, or even a playful drizzle of caramel sauce can transform each slice into something new and exciting every time. Feeling a bit more adventurous? Try adding some toasted coconut flakes for a tropical twist, a scattering of colorful M&M’s for a burst of color and extra sweetness, or even some chopped roasted peanuts for an added layer of texture and nutty flavor. You could also swirl in some white chocolate for a striking visual contrast and an extra layer of sweetness. For a fruitier note, a few sliced bananas or raspberries could be a delightful addition. This dessert is incredibly versatile, making it perfect for any occasion, from a casual family movie night to a sophisticated dinner party dessert spread, or even as a unique treat for a bake sale. The possibilities are truly endless, allowing you to personalize it to your heart’s content and impress everyone with your culinary creativity.
I genuinely hope you’re feeling inspired to roll up your sleeves and dive into the delicious world of this dessert. Trust me when I say, once you try this recipe, it will quickly become a beloved staple in your dessert repertoire. There’s nothing quite like the satisfaction of creating something so utterly delicious and watching the smiles spread across the faces of those who get to enjoy it. So, go ahead, gather your ingredients, and prepare for a truly spectacular treat that promises to delight every single time. And please, please, once you’ve whipped up your own magnificent masterpiece, don’t keep it a secret! I absolutely adore hearing about your culinary adventures. Share your triumphs, your clever variations, and your overall experience in the comments below. Your feedback and stories truly make this community vibrant and inspire us all to keep baking, experimenting, and sharing the joy of delicious food. I can’t wait to hear all about your amazing Chocolate Peanut Butter Pizza creations!
Decadent Chocolate Peanut Butter Pizza
This unique dessert playfully defies culinary conventions, blending creamy peanut butter with deep chocolate over a chewy brownie crust, topped with candies and nuts. It’s wonderfully customizable, incredibly satisfying, and brings joy to any gathering. My first attempt was made in a panic for a potluck, and it was the hit of the party!
Ingredients
-
1 cup (226g) unsalted butter, melted
-
1 ½ cups (300g) granulated sugar
-
½ cup (100g) light brown sugar, packed
-
4 large eggs, room temperature
-
2 tsp vanilla extract
-
1 ½ cups (180g) all-purpose flour
-
¾ cup (65g) Dutch-processed unsweetened cocoa powder
-
1 tsp baking powder
-
½ tsp salt
-
1 cup (170g) semi-sweet chocolate chips (optional)
-
8 oz (226g) cream cheese, softened
-
½ cup (113g) unsalted butter, softened
-
1 ½ cups (360g) creamy peanut butter
-
2 ½ cups (300g) powdered sugar, sifted
-
1 tsp vanilla extract
-
¼ tsp salt
-
2-4 tbsp milk or heavy cream, as needed
-
1 ½ cups (255g) semi-sweet chocolate chips
-
¾ cup (180ml) heavy cream
-
1 tbsp light corn syrup (optional)
-
½ tsp vanilla extract
-
Miniature peanut butter cups, cut in half
-
Coarsely chopped roasted peanuts
-
Reese’s Pieces
-
Melted chocolate (milk, dark, or white) for drizzling
-
Flaky sea salt
Instructions
-
Step 1
Preheat oven to 350°F (175°C). Grease a 10-12 inch round springform or pizza pan; line springform/cake pans with parchment. Melt 1 cup butter. Whisk with 1½ cups granulated sugar and ½ cup brown sugar for 1-2 minutes. -
Step 2
Whisk in 4 large eggs, one at a time, until fully incorporated. Stir in 2 tsp vanilla extract. Continue whisking for another minute until mixture is thick, shiny, and pale golden. -
Step 3
In a separate bowl, whisk 1½ cups all-purpose flour, ¾ cup Dutch-processed cocoa powder, 1 tsp baking powder, and ½ tsp salt. Gradually fold dry mixture into wet ingredients until just combined. Gently fold in 1 cup semi-sweet chocolate chips, if using. -
Step 4
Pour batter into the prepared pan and spread evenly. Bake for 25-35 minutes, until edges are set but the center is slightly fudgy (a toothpick should come out with moist crumbs). Cool completely on a wire rack for 1-2 hours before proceeding. -
Step 5
In a large bowl, beat 8 oz softened cream cheese and ½ cup softened unsalted butter with an electric mixer until light and fluffy (2-3 min). Add 1½ cups creamy peanut butter and beat until uniform. Gradually add 2½ cups sifted powdered sugar on low speed, then beat on medium-high for 2-3 minutes until light and smooth. Stir in 1 tsp vanilla extract and ¼ tsp salt. Add 2-4 tbsp milk or heavy cream, as needed, to reach a spreadable consistency. -
Step 6
Place 1½ cups semi-sweet chocolate chips in a heat-proof bowl. Heat ¾ cup heavy cream in a small saucepan until small bubbles form around the edges; remove from heat. Pour hot cream over chocolate and let sit for 5-7 minutes. Whisk gently from the center outwards until smooth and glossy. Stir in 1 tbsp light corn syrup (if using) and ½ tsp vanilla extract. Let cool at room temperature for 15-30 minutes, stirring occasionally, until it reaches a thick, pourable consistency (like warm honey). -
Step 7
Ensure the brownie crust is completely cool. Evenly spread the velvety peanut butter filling over the crust, leaving a small border or spreading to the edge. Gently pour the cooled chocolate ganache over the peanut butter layer and spread evenly to cover. While ganache is still soft, generously sprinkle with miniature peanut butter cups (cut in half), chopped roasted peanuts, and Reese’s Pieces. Drizzle with extra melted chocolate and sprinkle with flaky sea salt for an elevated touch. -
Step 8
Carefully transfer the assembled pizza to the refrigerator and chill for at least 2-4 hours, or ideally overnight, until all layers are firm. Remove from the fridge 15-20 minutes before serving for easier slicing. Use a hot, sharp knife wiped clean between cuts. Store leftovers in an airtight container in the refrigerator for 5-7 days. This pizza freezes well for 1-2 months; thaw overnight in the refrigerator.
Important Information
Nutrition Facts (Per Serving)
It is important to consider this information as approximate and not to use it as definitive health advice.
Allergy Information
Please check ingredients for potential allergens and consult a health professional if in doubt.

Leave a Comment