
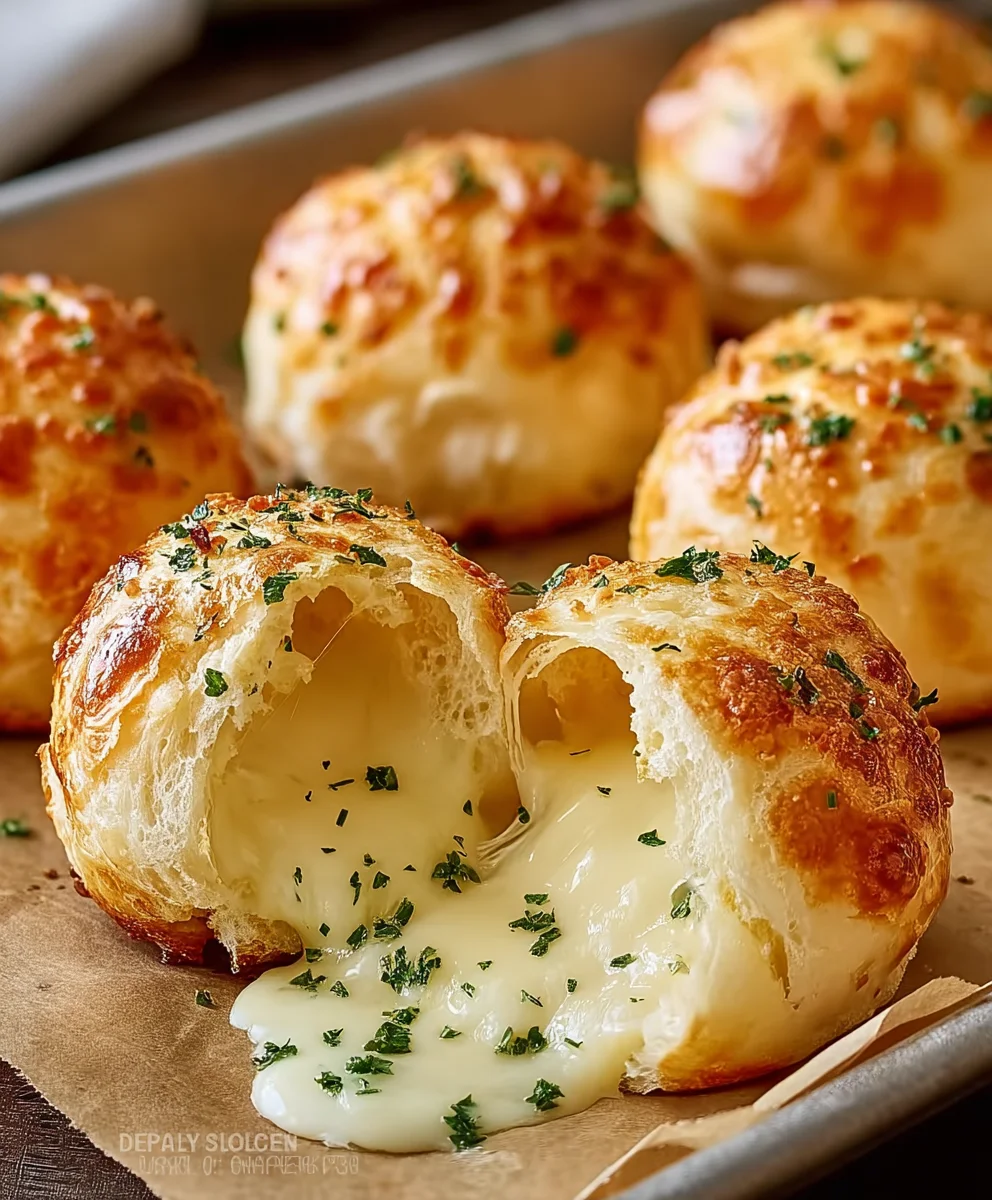
Pillsbury Biscuit Garlic Butter Cheese Bombs are quite simply a revelation, transforming humble ingredients into an extraordinary culinary experience. Imagine biting into a warm, golden-brown biscuit, its fluffy exterior giving way to a generous core of melted, gooey cheese, all enveloped in a fragrant, savory garlic butter coating. It’s an explosion of flavor and texture that captivates from the very first bite, promising pure comfort.
A Modern Classic for Every Occasion
While not steeped in centuries of culinary tradition, this delightful dish embodies the ingenious spirit of modern home cooking. It’s a clever evolution of classic garlic bread and cheesy pull-aparts, ingeniously utilizing ready-made biscuits to streamline the process, making gourmet-level comfort accessible to everyone. This dish has quickly become a beloved staple for casual gatherings, game nights, and family dinners, proving that simplicity can indeed be profoundly delicious and incredibly satisfying.
People adore this creation not just for its incredible taste—the savory punch of garlic, the rich smoothness of butter, and the irresistible stretch of melted cheese—but also for its delightful texture. The soft, airy biscuit provides the perfect contrast to the creamy, molten filling, creating a harmonious bite every time. Plus, the sheer ease of preparation makes it an instant favorite for busy weeknights or impromptu entertaining. When I whip up a batch of these Pillsbury Biscuit Garlic Butter Cheese Bombs, I know they’ll disappear in minutes, sparking joy and satisfied smiles around the table.

Ingredients:
- Two (2) cans (16.3 oz each) Pillsbury Grands! Flaky Layers Biscuits (or Southern Homestyle for a slightly denser texture)
- Eight (8) ounces fresh mozzarella cheese, either a block to cube yourself or pre-packaged fresh mozzarella pearls (bocconcini)
- One (1) stick (½ cup) unsalted butter
- Four (4) to five (5) cloves fresh garlic, minced very finely
- Two (2) tablespoons fresh parsley, finely chopped, plus extra for garnish
- One-half (½) cup grated Parmesan cheese (the finely grated kind is best for sticking to the biscuits)
- Optional: Marinara sauce for dipping
Preparing the Cheese Filling
- Prepare Your Mozzarella: If you’re using a block of fresh mozzarella, which I highly recommend for its superior melt and stretch, you’ll want to cut it into roughly ½-inch to ¾-inch cubes. The goal here is to get pieces that are substantial enough to provide a generous cheesy center but not so large that they become difficult to fully encase within a biscuit. Aim for about 20-24 pieces, ensuring each biscuit gets a good, satisfying chunk of cheese. If you’re using fresh mozzarella pearls (bocconcini), you might opt to use one larger pearl per biscuit, or two smaller ones, depending on their size. I find that a single, well-sized cube from a block of fresh mozzarella gives the most delightful cheese pull. This step is crucial for the very core of our Pillsbury Biscuit Garlic Butter Cheese Bombs.
- Set Aside: Once your mozzarella is perfectly portioned, set it aside on a small plate or in a bowl. Keeping it handy will make the assembly process much smoother and quicker, which is always a bonus when you’re eager to get these delicious bombs into the oven. We want to ensure everything is ready to go when the time comes to stuff those lovely biscuits.
Assembling the Biscuit Bombs
- Preheat Your Oven: First things first, let’s get that oven ready! Preheat your oven to 375°F (190°C). This temperature is ideal for baking Pillsbury Grands! biscuits, ensuring they puff up beautifully and cook through without burning. While the oven preheats, you can prepare your baking dish. I usually use a 9×13-inch baking dish, but a 9-inch round cake pan or even an 8×8-inch square pan can work if you don’t mind a slightly tighter arrangement of your delicious Pillsbury Biscuit Garlic Butter Cheese Bombs. Lightly grease your chosen baking dish with cooking spray or a thin layer of butter to prevent sticking.
- Open the Biscuits: Now for the fun part – popping open those cans of Pillsbury Grands! biscuits! Carefully separate each biscuit from the roll. You’ll have 8 biscuits per can, totaling 16 delicious biscuits ready for transformation. Lay them out on a clean surface or cutting board.
- Flatten Each Biscuit: This is a critical step for creating a perfect little pocket for our cheese. Take one biscuit and, using your hands or a rolling pin, gently flatten it into a circle. You want it to be thin enough to easily wrap around the cheese, but not so thin that it tears. Aim for a diameter of about 4-5 inches. The Pillsbury Grands! biscuits are wonderful for this because they have a good thickness and are quite pliable.
- Stuff with Mozzarella: Place one of your prepared mozzarella cubes (or pearls) right in the center of each flattened biscuit. Don’t be shy with the cheese; this is what makes these Pillsbury Biscuit Garlic Butter Cheese Bombs truly explode with flavor!
- Seal the Biscuits: Carefully bring the edges of the biscuit up and over the cheese, pinching them together firmly to seal. You want to create a tight little ball, ensuring no cheese can escape during baking. This step is extremely important! A good seal prevents the mozzarella from oozing out and creating a messy, less cheesy bomb. I like to roll the sealed biscuit between my palms a few times to make sure it’s perfectly round and the seam is secure. Repeat this process for all 16 biscuits. As you finish each one, place it seam-side down in your prepared baking dish. You might need to arrange them snugly together, which is totally fine; they will puff up and create a wonderful pull-apart effect.
Preparing the Garlic Butter Glaze
- Melt the Butter: In a small, microwave-safe bowl or a small saucepan, melt the stick of unsalted butter. You can do this in the microwave in 20-30 second intervals until fully melted, or gently over low heat on the stovetop. We want it completely liquid for even mixing.
- Mince the Garlic: While the butter melts, finely mince your four to five cloves of fresh garlic. I always say, the fresher the garlic, the better the flavor. If you love garlic as much as I do, don’t be afraid to add an extra clove! You can use a garlic press for speed, but I personally prefer the texture and robust flavor that comes from finely hand-mincing.
- Chop the Parsley: Finely chop your fresh parsley. This vibrant herb adds not only a pop of color but also a fresh, herbaceous note that beautifully complements the rich garlic butter and cheese.
- Combine the Glaze Ingredients: Once the butter is melted, add the minced garlic, chopped fresh parsley, and the ½ cup of grated Parmesan cheese to the butter. Stir everything together until it’s well combined. The Parmesan will add an extra layer of salty, umami flavor and help create a beautiful golden crust on our Pillsbury Biscuit Garlic Butter Cheese Bombs. This is going to be the flavor powerhouse that truly elevates these bombs!
Baking the Pillsbury Biscuit Garlic Butter Cheese Bombs
- Brush with Garlic Butter: Now for the mouth-watering part! Generously brush the tops and sides of each assembled biscuit bomb in your baking dish with the garlic butter mixture. Don’t be shy – you want a good coating on every single one. If you have any remaining garlic butter, you can drizzle it over the biscuits. This butter mixture is what gives these Pillsbury Biscuit Garlic Butter Cheese Bombs their incredible aroma and irresistible golden-brown finish.
- Bake to Golden Perfection: Place the baking dish into your preheated 375°F (190°C) oven. Bake for approximately 20-25 minutes, or until the biscuits are gloriously golden brown on top and cooked through. Keep an eye on them towards the end of the baking time, as oven temperatures can vary. You’ll know they’re done when they’re puffy, beautifully colored, and you can smell that incredible garlic, butter, and cheese aroma filling your kitchen! The visual cue of a deep golden brown is key here for perfect Pillsbury Biscuit Garlic Butter Cheese Bombs.
Finishing Touches and Serving
- Cool Slightly: Once out of the oven, let your Pillsbury Biscuit Garlic Butter Cheese Bombs cool in the baking dish for about 5-10 minutes. This short resting period allows the cheese to set slightly, making them easier to handle, and preventing you from burning your mouth on the molten hot cheese (trust me, I’ve been there!). It also makes them even more pull-apart friendly.
- Garnish and Serve: If you saved a little extra fresh parsley, now is the time to sprinkle it over the top for a final flourish of color and freshness. These Pillsbury Biscuit Garlic Butter Cheese Bombs are best served warm, straight from the oven.
- Enjoy with Dipping Sauce (Optional but Recommended!): They are absolutely divine on their own, but if you want to take them to the next level, serve them with a side of warm marinara sauce for dipping. The tangy marinara provides a wonderful contrast to the rich, savory garlic butter and gooey cheese. Just imagine pulling apart a warm, cheesy bomb, dipping it into a vibrant marinara, and enjoying that burst of flavor. This makes them perfect for parties, game nights, or just a truly satisfying snack for your family.
- Leftovers (if any!): While these are truly best fresh, if you happen to have any leftovers, store them in an airtight container at room temperature for up to 2 days or in the refrigerator for up to 4 days. Reheat gently in the microwave or a toaster oven until warmed through. They might not be quite as flaky as fresh, but they will still be delicious! But honestly, I doubt you’ll have any leftovers of these incredible Pillsbury Biscuit Garlic Butter Cheese Bombs. They tend to disappear remarkably fast!

Conclusion:
So, there you have it! We’ve journeyed through the simple steps of creating an absolutely irresistible snack, appetizer, or side dish that is guaranteed to become a staple in your kitchen. I’m genuinely thrilled for you to experience the magic that happens when humble ingredients come together to form something truly spectacular. This isn’t just another recipe; it’s an invitation to pure, unadulterated comfort food joy. Think about it: that moment when you pull apart a warm, golden-brown biscuit, and a luscious, molten river of cheese stretches out, all while the intoxicating aroma of garlic butter fills your home. It’s a sensory delight that instantly elevates any meal or gathering. This recipe shines because it delivers on so many fronts – it’s incredibly straightforward to prepare, making it perfect for busy weeknights or last-minute guests, yet it presents as something far more sophisticated and indulgent. The tender, flaky texture of the biscuit, enrobed in that savory garlic butter, perfectly complements the gooey, rich cheese center. It’s a harmonious symphony of flavors and textures that simply cannot be beaten. Trust me, once you make these, they won’t last long!
Now, let’s talk about how to make these wonders truly shine and how to adapt them to your heart’s content. While they are undeniably perfect straight out of the oven, perhaps with a sprinkle of fresh parsley for a pop of color, their versatility is truly boundless. For a fantastic appetizer, serve them warm on a platter at your next get-together. They disappear faster than you can say ‘cheese please!’ They are also an incredible accompaniment to a big bowl of hearty chili, a comforting lasagna, or even a simple grilled chicken breast, adding that much-needed carbohydrate comfort and flavor boost. Imagine them alongside a fresh, crisp salad; they balance out the lightness with their rich, savory goodness. Brunch? Absolutely! These make an outstanding addition to any brunch spread, perhaps alongside scrambled eggs and crispy bacon, offering a delightful savory counterpoint to sweeter options.
But wait, there’s more! The beauty of this recipe lies in its adaptability. Don’t be afraid to get creative and make it truly your own.
Cheese Bomb Variations to Explore:
- Cheese Enthusiast’s Dream: While mozzarella or cheddar are classic choices, consider experimenting with other cheeses. A combination of sharp cheddar and Monterey Jack offers a delightful melt and tang. Pepper Jack will introduce a subtle kick, while a smoked gouda could add a sophisticated, smoky depth. For an extra creamy interior, try a small cube of cream cheese nestled within the primary cheese – pure indulgence!
- Herbal Infusion: Elevate the garlic butter by adding finely chopped fresh herbs. Rosemary or thyme can bring an earthy, aromatic note, while chives or dill offer a fresh, oniony brightness. A sprinkle of dried Italian seasoning mix directly into the butter will also work wonders, infusing every bite with that classic herbaceous comfort.
- Spicy Kick: If you love a little heat, a pinch of red pepper flakes mixed into the garlic butter, or even a sliver of pickled jalapeño inside the biscuit with the cheese, will give these bombs an exciting zing that awakens the palate.
- Protein Power-Up: For a more substantial bite, consider adding finely crumbled, cooked bacon bits or diced ham along with the cheese before sealing the biscuit. Imagine that smoky, salty crunch alongside the gooey cheese and soft biscuit – pure bliss and a fantastic way to make them a mini meal!
- Dipping Delights: While delicious on their own, these bombs are also fantastic when paired with a dipping sauce. A classic warm marinara sauce is always a hit, but don’t shy away from ranch dressing, a creamy pesto dip, or even a sophisticated roasted red pepper aioli. For a truly indulgent experience, a small bowl of warm queso or a simple garlic aioli would be phenomenal, adding another layer of flavor and moisture.
Seriously, if you’re looking for a recipe that delivers big on flavor with minimal effort, you’ve found your match. I can’t emphasize enough how simple and rewarding it is to make these. These Pillsbury Biscuit Garlic Butter Cheese Bombs are not just a recipe; they’re an experience, a joyous culinary moment waiting to happen in your kitchen. They’re perfect for impressing guests without breaking a sweat, for a cozy family night, or simply for treating yourself to something wonderfully delicious after a long day.
Now, it’s your turn! I wholeheartedly encourage you to roll up your sleeves, gather your ingredients, and give this recipe a try this week. You won’t regret it, I promise. Once you’ve made them, I would absolutely love to hear all about your experience. Did you try a fun variation? What did your family or friends think? Did they vanish in minutes? Please, don’t keep your delicious stories to yourself! Share your thoughts, your photos, and your triumphs in the comments below. Let’s build a community of amazing home cooks who share the love for easy, cheesy, garlicky goodness. Happy baking, and get ready for a symphony of deliciousness!
Recipe
A delicious recipe
Ingredients
Instructions
Important Information
Nutrition Facts (Per Serving)
It is important to consider this information as approximate and not to use it as definitive health advice.
Allergy Information
Please check ingredients for potential allergens and consult a health professional if in doubt.

Leave a Comment