
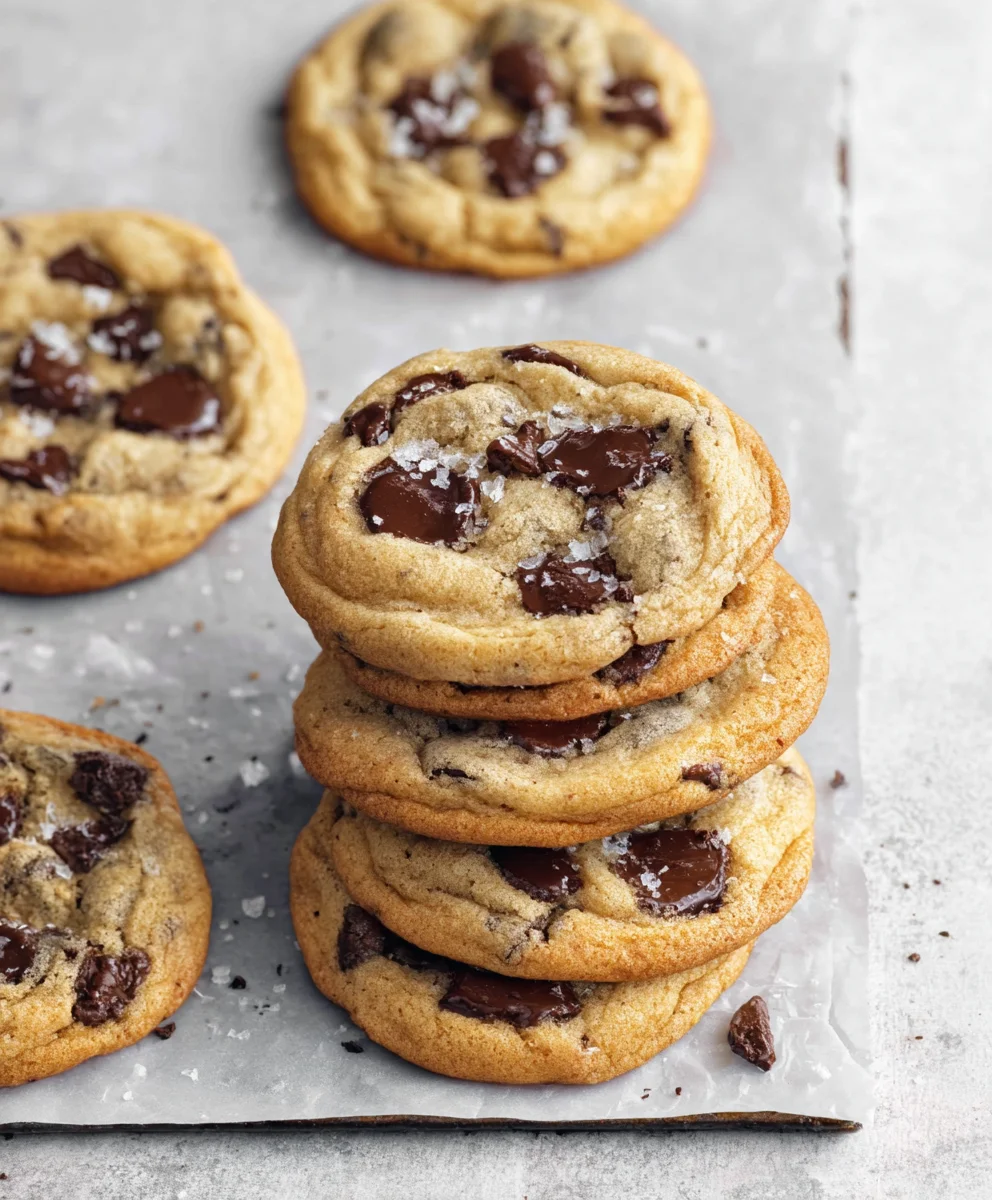
Best Chocolate Chip Cookies – a declaration that might seem bold, but one I stand by wholeheartedly. Have you ever yearned for that perfect bite: a cookie with irresistibly crisp edges, a gloriously chewy center, and pools of deeply melted chocolate that cling to every crumb? That quintessential warmth, the aroma filling your kitchen, and the sheer comfort of a freshly baked cookie is, for many, a nostalgic journey back to childhood. It’s more than just a dessert; it’s a hug in edible form, a universal symbol of happiness and home.
This beloved treat, with its iconic history dating back to Ruth Graves Wakefield’s ingenious creation at the Toll House Inn in the 1930s, has captivated palates for generations. What makes people consistently fall in love with these simple yet profound confections is the harmonious balance of sweet, salty, and the satisfying texture contrast. My quest for the ultimate version has been long and delightful, meticulously experimenting with ingredient ratios, chilling times, and baking temperatures to achieve what I confidently believe are the Best Chocolate Chip Cookies you will ever bake. I am so excited to share this meticulously perfected recipe with you, promising a batch that will impress, comfort, and undeniably become a treasured staple in your culinary repertoire.

Ingredients:
- 2 ¼ cups (270g) all-purpose flour
- 1 teaspoon baking soda
- 1 teaspoon fine sea salt
- 1 cup (226g) unsalted butter, softened to room temperature
- ¾ cup (150g) granulated sugar
- 1 cup (200g) packed light brown sugar (dark brown sugar can also be used for a deeper molasses flavor)
- 2 large eggs, at room temperature
- 2 teaspoons pure vanilla extract
- 1 ½ cups (about 250g) semi-sweet chocolate chips (or a mix of milk, dark chocolate chunks, and chips for varied texture and flavor)
- Optional: Flaky sea salt for sprinkling on top before baking
Instructions:
Preparing the Dough for the Best Chocolate Chip Cookies
Creating the perfect chocolate chip cookie dough is a delightful journey, and each step is crucial for achieving that ultimate balance of chewy, crispy, and utterly delicious. I find that taking my time with these initial steps really sets the stage for success, ensuring we get those Best Chocolate Chip Cookies everyone raves about.
- Whisk the Dry Ingredients: In a medium bowl, I gently whisk together the 2 ¼ cups of all-purpose flour, 1 teaspoon of baking soda, and 1 teaspoon of fine sea salt. Whisking ensures these dry ingredients are thoroughly combined and evenly distributed. This is important because the baking soda needs to be spread throughout the flour to help the cookies rise uniformly, and the salt balances the sweetness and enhances the overall flavor. I always make sure to level my flour by spooning it into the measuring cup and then sweeping a straight edge across the top, rather than scooping directly from the bag, which can compact the flour and lead to using too much. Too much flour can result in dry, cakey cookies, and we are aiming for those gloriously chewy Best Chocolate Chip Cookies.
- Cream the Butter and Sugars: In a large bowl, using an electric mixer (either a stand mixer with the paddle attachment or a hand-held mixer), I cream together the 1 cup of softened unsalted butter with ¾ cup of granulated sugar and 1 cup of packed light brown sugar. This step is fundamental for the texture of our Best Chocolate Chip Cookies. I beat them on medium-high speed for about 2 to 3 minutes, or until the mixture becomes light, fluffy, and visibly paler. During this process, tiny air pockets are incorporated into the butter and sugar, which contribute to the cookies’ tender texture and slight lift as they bake. The granulated sugar provides crispness, while the brown sugar adds moisture, chewiness, and that characteristic caramel note. Don’t rush this step; it’s a cornerstone for the ultimate cookie experience. I often scrape down the sides of the bowl once or twice to make sure everything is evenly mixed.
- Add the Eggs and Vanilla: Once the butter and sugars are perfectly creamed, I reduce the mixer speed to low and add the two large eggs, one at a time. After each egg is added, I make sure to mix just until it’s incorporated before adding the next. This allows each egg to emulsify properly with the butter mixture, preventing a curdled appearance. Then, I stir in the 2 teaspoons of pure vanilla extract. Using a good quality vanilla extract really makes a difference here, contributing to the rich, warm aroma and deep flavor profile of these Best Chocolate Chip Cookies. After the eggs and vanilla are in, I give the bowl another quick scrape down to ensure all ingredients are fully combined.
- Gradually Add Dry Ingredients: With the mixer on low speed, I gradually add the whisked dry ingredients to the wet ingredients, a third at a time. I mix only until just combined, being careful not to overmix. Overmixing flour develops gluten, which can lead to tough, dense cookies. We want tender, chewy cookies, so as soon as I see no more streaks of flour, I stop the mixer. It’s okay if there are a few small flour patches; they will disappear in the next step. This gentle approach ensures the delicate balance of our cookie dough remains intact, setting us up for those perfectly textured Best Chocolate Chip Cookies.
- Fold in the Chocolate Chips: Finally, it’s time for the star of the show! I remove the bowl from the mixer and, using a sturdy spatula or wooden spoon, I gently fold in the 1 ½ cups of chocolate chips. I like to use a mix of semi-sweet chocolate chips and some larger chocolate chunks for varying pockets of melted chocolate throughout the cookies. Some people prefer milk chocolate, others dark – feel free to use your favorite! The key is to distribute them evenly without overworking the dough. I stir just enough until the chocolate is incorporated. If you’re feeling fancy, this is the perfect moment to sprinkle a little flaky sea salt on top of the dough for an extra layer of flavor that truly elevates these to the status of Best Chocolate Chip Cookies. This salty touch surprisingly enhances the sweetness of the chocolate.
Chilling the Dough (Optional but Recommended for the Best Chocolate Chip Cookies)
While you can bake these cookies immediately, I’ve found that chilling the dough is a game-changer for achieving truly magnificent, dare I say, the Best Chocolate Chip Cookies. This step, though it requires patience, is well worth the wait. It deepens the flavor and improves the texture significantly. Don’t skip this if you want truly exceptional results!
- Wrap and Chill: Once the dough is mixed and the chocolate chips are folded in, I cover the bowl tightly with plastic wrap or transfer the dough to an airtight container. Then, I place it in the refrigerator to chill for at least 30 minutes, but ideally for 2 to 24 hours. I have even chilled dough for up to 72 hours with excellent results!
- Understanding the Magic of Chilling: Chilling the dough does several wonderful things for our Best Chocolate Chip Cookies. Firstly, it allows the dry ingredients, especially the flour, to fully hydrate. This reduces the raw flour taste and makes for a more developed, richer flavor. Secondly, the butter solidifies, which means the cookies spread less during baking, resulting in thicker, chewier cookies with a better structure. Lastly, chilling melds all the flavors together, creating a more complex and nuanced taste. It’s a little like letting a stew simmer – the flavors deepen and harmonize over time. If you’re in a hurry, even a 30-minute chill will make a noticeable difference, but for the absolute Best Chocolate Chip Cookies, aim for at least a few hours.
Baking the Best Chocolate Chip Cookies
The baking process is where all our careful preparation comes to fruition. Getting the oven temperature and timing just right is essential for those golden edges and perfectly soft centers that define the Best Chocolate Chip Cookies.
- Preheat Your Oven: About 15-20 minutes before you plan to bake, I preheat my oven to 375°F (190°C). It’s crucial to ensure the oven is fully preheated before placing the cookies inside. A consistent, hot oven temperature is key for even baking and proper spread. I also line my baking sheets with parchment paper or silicone baking mats. This prevents sticking, promotes even browning on the bottom, and makes cleanup incredibly easy. I avoid greasing the sheets directly as it can sometimes cause the cookies to spread too much.
- Portion the Dough: Once the dough is chilled and the oven is ready, I use a cookie scoop (a 1.5-tablespoon size is ideal for standard cookies) to portion out the dough. This ensures that all cookies are roughly the same size, which means they will bake evenly. If you don’t have a scoop, you can roll tablespoon-sized balls of dough with your hands. I place the scooped dough balls about 2 inches apart on the prepared baking sheets. Don’t overcrowd the sheets; typically, I bake 9-12 cookies per standard baking sheet, depending on their size. If I’m feeling extra fancy and want that professional bakery look, I sometimes press a few extra chocolate chips onto the tops of the dough balls just before baking – it makes the melted chocolate pop beautifully. And if I’m using flaky sea salt, this is the moment to sprinkle a tiny pinch on top of each dough ball for that delightful salty-sweet contrast that elevates these to the Best Chocolate Chip Cookies.
- Bake to Perfection: I place one baking sheet at a time into the preheated oven. I bake the cookies for 10-12 minutes. The exact baking time can vary depending on your oven and how crispy or chewy you prefer your cookies. I know they’re ready when the edges are set and lightly golden brown, but the centers still look slightly soft and puffy. This slight underbaking in the center is the secret to achieving that wonderfully chewy texture once they cool. For even baking, I often rotate the baking sheet halfway through the baking time (after about 5-6 minutes). If the edges are browning too quickly, or if the cookies are spreading more than I’d like, I might slightly adjust the temperature or baking time for subsequent batches. Every oven is a little different, so I recommend keeping a close eye on your first batch. Remember, a slightly underbaked cookie is usually a better cookie than an overbaked one!
Cooling and Serving Your Perfect Chocolate Chip Cookies
The final steps are just as important as the baking itself. Proper cooling ensures your Best Chocolate Chip Cookies set up perfectly, developing that irresistible texture we’ve worked so hard to achieve.
- Initial Cooling on Baking Sheet: Once the cookies come out of the oven, I leave them on the hot baking sheet for about 5 minutes. This is a crucial step! During this time, carry-over cooking occurs, allowing the centers to finish setting without becoming overbaked. The cookies will also firm up slightly, making them easier to transfer without breaking. They might seem very soft straight out of the oven, but don’t worry, they will continue to firm up as they cool. This short resting period on the hot sheet is a trick I’ve learned over the years that helps achieve that perfect balance of chewy and slightly crisp edges, making them truly the Best Chocolate Chip Cookies.
- Transfer to Wire Rack: After 5 minutes on the baking sheet, I carefully transfer the cookies to a wire cooling rack to cool completely. A thin, flat spatula works best for this. Cooling on a wire rack allows air to circulate all around the cookies, preventing the bottoms from becoming soggy due to trapped steam. This also helps them achieve their final, ideal texture. If you stack them before they are fully cooled, they can stick together and lose some of their crispness. I try to resist the urge to eat them all immediately, but let’s be honest, a warm, gooey chocolate chip cookie straight off the rack is one of life’s greatest pleasures!
- Enjoy and Store: Once fully cooled, your Best Chocolate Chip Cookies are ready to be devoured! They are absolutely irresistible when still slightly warm, with the chocolate chips delightfully melty. For storage, I keep them in an airtight container at room temperature for up to 3-4 days. While they are usually best enjoyed fresh, they remain wonderfully soft and delicious for several days. If you want to prolong their freshness, you can add half a slice of bread to the container; the cookies will absorb moisture from the bread, keeping them soft. For longer storage, you can freeze baked cookies in an airtight container or freezer bag for up to 3 months. To enjoy, simply thaw at room temperature or warm briefly in the microwave for that fresh-baked feel. You can also freeze portions of unbaked cookie dough and bake them from frozen (adding a minute or two to the baking time) whenever a craving strikes, ensuring you always have the Best Chocolate Chip Cookies on hand!
Conclusion:
Well, my friends, we’ve reached the sweet end of our journey through what I genuinely believe is one of the most delightful recipes you’ll ever encounter. This isn’t just any cookie recipe; it’s a meticulously crafted formula designed to deliver pure joy with every single bite. I poured my heart into perfecting these, ensuring that they embody everything a truly magnificent cookie should be: crisp at the edges, wonderfully chewy in the center, and bursting with rich, buttery, chocolatey goodness. There’s a subtle complexity in the flavor, a perfect balance of salt and sweet that elevates them beyond the ordinary. They are, in my humble opinion, the pinnacle of homemade treats, promising to satisfy even the most discerning sweet tooth. This recipe is a must-try not just because of its incredible taste and texture, but because it brings a tangible sense of warmth and comfort into your home. The aroma alone, as they bake to golden perfection, is enough to lift spirits and gather loved ones around the kitchen. It’s a classic for a reason, and I’m confident that once you experience the magic of these cookies, you’ll understand why they’re destined to become a beloved staple in your baking repertoire.
Elevate Your Cookie Experience: Serving Suggestions & Creative Twists
Now that you’ve mastered the art of baking these phenomenal cookies, let’s talk about how to truly make them shine. While they are utterly perfect on their own, fresh from the oven with gooey chocolate chips still melting, there are countless ways to enhance the experience. Imagine a warm cookie, slightly cooled, nestled next to a tall, frosty glass of milk – a timeless combination that never fails to please. For a more indulgent treat, try sandwiching a scoop of your favorite vanilla bean ice cream between two of these beauties; the contrast of warm, soft cookie and cold, creamy ice cream is simply divine. A dollop of whipped cream or a drizzle of homemade caramel sauce can also take them to another level of decadence. Coffee lovers, rejoice! These cookies pair exquisitely with a freshly brewed cup, the rich flavors complementing each other beautifully.
But why stop there? Let’s unleash our creativity! This base recipe is incredibly versatile, making it perfect for custom variations. Consider swapping out some of the chocolate chips for different kinds of chocolate – white chocolate chunks, milk chocolate, or even a mix of dark and semi-sweet for a more complex profile. For an added layer of texture and flavor, try incorporating toasted pecans, walnuts, or even a handful of crushed pretzels for a delightful salty-sweet crunch. A pinch of flaky sea salt sprinkled on top just before baking will really make the chocolate sing. If you’re feeling adventurous, a tiny dash of espresso powder or a hint of cayenne pepper can deepen the chocolate flavor or add an unexpected warmth. For a festive touch, mix in some holiday sprinkles or swap chocolate for dried cranberries and orange zest during seasonal celebrations. You could even crumble them over a bowl of yogurt or ice cream for a delightful topping. The possibilities are truly endless, and I encourage you to experiment and make this recipe uniquely yours.
Your Turn to Bake the Best Chocolate Chip Cookies!
My dearest bakers, the time has come for you to roll up your sleeves and embark on this delicious adventure. I promise you, the effort is minimal, and the rewards are absolutely immense. There’s something profoundly satisfying about creating something so wonderfully delicious from scratch, especially when it’s met with eager smiles and grateful compliments. I truly believe that with this recipe, you are equipped to make the Best Chocolate Chip Cookies anyone has ever tasted. Don’t be afraid to dive in; baking is an art, but it’s also a science that, when followed with a good recipe like this one, yields fantastic results every time. Picture the joy on the faces of your family and friends as they bite into these perfect cookies, the oohs and aahs that are sure to follow. This isn’t just about baking; it’s about creating memories, sharing warmth, and spreading happiness through the simple, yet profound, act of making something sweet. So, go ahead, gather your ingredients, preheat that oven, and get ready to experience a taste sensation that will undoubtedly become a treasured favorite. I absolutely cannot wait to hear about your baking success!
Once you’ve whipped up a batch, please don’t keep it to yourself! I would be absolutely thrilled if you would share your experiences with me. Did you try any of the variations? What was your favorite serving suggestion? Snap a photo, tell me about your baking journey, and let me know how much you and your loved ones enjoyed these incredible cookies. Your feedback and stories inspire me, and I love seeing how this recipe brings joy to kitchens everywhere. Happy baking, everyone! May your cookies be perfectly golden, delightfully chewy, and utterly irresistible!
Ultimate Best Chocolate Chip Cookies Recipe – Melt-in-Your-Mouth
Achieve the ultimate chocolate chip cookie with crisp edges, a chewy center, and gooey melted chocolate. This meticulously perfected recipe promises a comforting, impressive, and treasured staple cookie.
Ingredients
-
3/4 cup (168g) unsalted butter, softened
-
1 cup (200g) packed light brown sugar
-
1/4 cup (50g) granulated sugar
-
1 large egg + 1 large egg yolk, at room temperature
-
1 tablespoon pure vanilla extract
-
1 3/4 cup (220g) all-purpose flour
-
3/4 teaspoon baking soda
-
3/4 teaspoon kosher salt (plus flaky sea salt for sprinkling)
-
1 1/2 cups (255g) semi-sweet chocolate chips (or roughly chopped chocolate)
Instructions
-
Step 1
In a medium bowl, whisk together 1 3/4 cups (220g) all-purpose flour, 3/4 tsp baking soda, and 3/4 tsp kosher salt. -
Step 2
In a large bowl, cream 3/4 cup (168g) softened unsalted butter, 1 cup (200g) packed light brown sugar, and 1/4 cup (50g) granulated sugar with an electric mixer for 2-3 minutes until light and fluffy. -
Step 3
Reduce mixer speed to low. Beat in 1 large egg and 1 large egg yolk, one at a time, mixing until just combined. Stir in 1 tablespoon pure vanilla extract. -
Step 4
Gradually add the whisked dry ingredients to the wet mixture, mixing on low speed until just combined. Do not overmix. -
Step 5
Remove bowl from mixer. Gently fold in 1 1/2 cups (255g) semi-sweet chocolate chips until evenly distributed. Optional: Sprinkle dough with flaky sea salt. -
Step 6
Cover dough and chill in the refrigerator for at least 30 minutes, ideally 2-24 hours, for best flavor and texture. -
Step 7
Preheat oven to 375°F (190°C). Line baking sheets with parchment paper or silicone mats. -
Step 8
Scoop 1.5-tablespoon sized dough balls (9-12 per sheet) onto prepared baking sheets, 2 inches apart. Optional: Press extra chocolate chips onto tops of dough balls and sprinkle with flaky sea salt. Bake for 10-12 minutes, until edges are golden and centers are slightly soft. Rotate baking sheet halfway through. -
Step 9
Let cookies cool on the baking sheet for 5 minutes before transferring to a wire rack to cool completely. Enjoy warm or store in an airtight container at room temperature for 3-4 days. Baked cookies or dough can be frozen for longer storage.
Important Information
Nutrition Facts (Per Serving)
It is important to consider this information as approximate and not to use it as definitive health advice.
Allergy Information
Please check ingredients for potential allergens and consult a health professional if in doubt.


Leave a Comment