
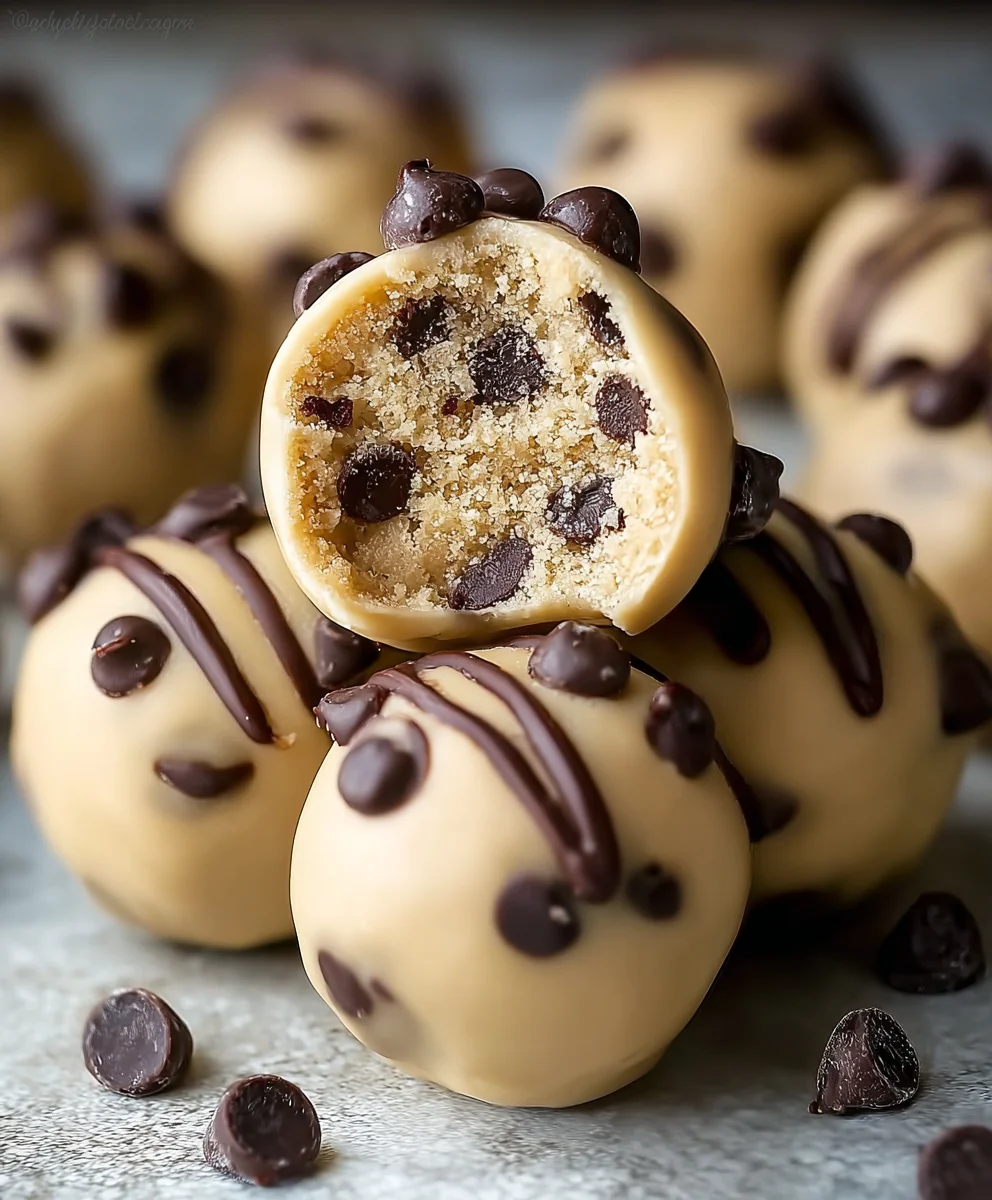
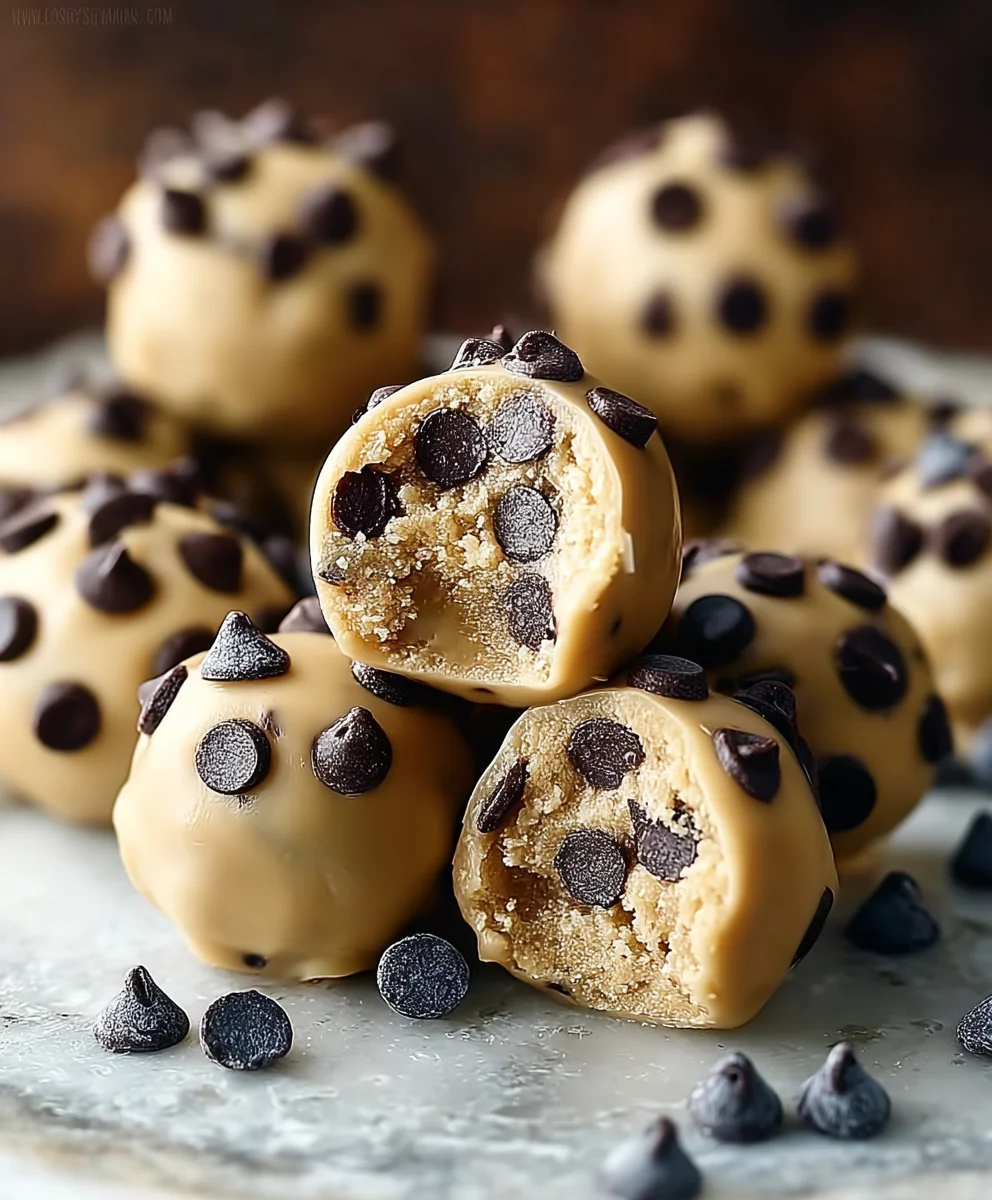
Chocolate Chip Cookie Dough Truffles are, without a doubt, a culinary revelation for anyone who has ever wrestled with the temptation of sampling raw cookie dough straight from the bowl. I know I have! Imagine indulging in that quintessential, comforting flavor – rich, sweet, and utterly irresistible – but perfectly safe to eat and elegantly enrobed in a smooth, decadent chocolate shell. This isn’t just a dessert; it’s a delightful journey back to childhood baking memories, reimagined for the discerning palate.
While the concept of a “truffle” boasts a sophisticated history rooted in classic French confectionery, dating back centuries, the delightful twist of incorporating cookie dough is a more modern, ingenious innovation. It beautifully merges our innate love for that unbaked, nostalgic taste with the luxurious presentation of a gourmet treat. It’s truly the best of both worlds.
I’ve found that these delightful confections are universally adored for a multitude of reasons. The magical texture combination – a crisp, snappy chocolate exterior yielding to a wonderfully chewy, sweet, and familiar cookie dough interior – is simply unparalleled. They offer the ultimate in convenience, requiring no oven time, making them an ideal, fuss-free dessert for any occasion, from an impromptu get-together to a sophisticated dinner party. Preparing and sharing these delicious Chocolate Chip Cookie Dough Truffles brings immense joy, and I am thrilled to guide you through creating your own batch of these irresistible bites.

Ingredients:
- 1/2 cup (1 stick) unsalted butter, softened to room temperature
- 1/2 cup granulated sugar
- 1/4 cup packed light brown sugar
- 2 tablespoons milk (whole milk or 2% works best)
- 1 teaspoon pure vanilla extract
- 1 1/4 cups all-purpose flour, heat-treated (see note below)
- 1/2 teaspoon salt
- 1 cup mini chocolate chips (or regular if you prefer larger chocolate pieces)
- 12 ounces melting chocolate or chocolate candy melts (milk chocolate, semi-sweet, or white chocolate all work wonderfully for your Chocolate Chip Cookie Dough Truffles)
- Optional: Sprinkles, extra mini chocolate chips, or a contrasting drizzle of melted chocolate for decoration
A Quick Note on Heat-Treating Flour for Edible Cookie Dough:
Because these delightful Chocolate Chip Cookie Dough Truffles are not baked, we need to ensure the flour is safe to consume raw. Raw flour can sometimes contain bacteria. There are two easy ways to heat-treat your flour:
- Microwave Method: Place the flour in a microwave-safe bowl. Microwave on high in 30-second intervals, stirring well after each, until the flour reaches an internal temperature of 160°F (71°C). This usually takes about 1-2 minutes total. Use a food thermometer to check. Once heated, let it cool completely before using.
- Oven Method: Spread the flour evenly on a baking sheet lined with parchment paper. Bake at 300°F (150°C) for 5-7 minutes, or until the flour reaches 160°F (71°C). Again, let it cool completely before incorporating it into your cookie dough mixture.
This step is crucial for safe consumption of your homemade Chocolate Chip Cookie Dough Truffles. Don’t skip it!
Preparing the Edible Cookie Dough Base for Your Chocolate Chip Cookie Dough Truffles
- Cream the Butter and Sugars: In a large mixing bowl, using an electric mixer (either a stand mixer with the paddle attachment or a hand mixer), cream together the softened unsalted butter, granulated sugar, and light brown sugar. Beat on medium speed for about 2-3 minutes, until the mixture is light, fluffy, and noticeably pale in color. This process incorporates air, which contributes to a wonderfully tender texture in your cookie dough truffles. Take your time here; a well-creamed base is the foundation for truly spectacular Chocolate Chip Cookie Dough Truffles.
- Add Wet Ingredients: Reduce the mixer speed to low. Carefully add the milk and pure vanilla extract to the creamed butter and sugar mixture. Continue to mix until these wet ingredients are just combined and fully incorporated. Be careful not to overmix at this stage; we simply want everything to come together smoothly. Scrape down the sides of the bowl with a rubber spatula to ensure all ingredients are evenly blended.
- Incorporate Dry Ingredients: Now, it’s time to add our heat-treated all-purpose flour and salt to the mixture. Add these dry ingredients in two additions, mixing on low speed after each addition until just combined. The key here is to mix until no streaks of flour are visible, but stop as soon as it comes together. Overmixing flour can develop gluten, which we want to avoid in these no-bake Chocolate Chip Cookie Dough Truffles to keep them soft and tender, not tough. The mixture will start to resemble a classic cookie dough consistency.
- Fold in the Chocolate Chips: Remove the bowl from the mixer. Using your rubber spatula, gently fold in the mini chocolate chips (or regular chocolate chips if that’s your preference). Stir just until the chocolate chips are evenly distributed throughout the edible cookie dough. We want every bite of our Chocolate Chip Cookie Dough Truffles to have a generous amount of chocolate goodness!
Forming the Chocolate Chip Cookie Dough Truffles
- Prepare for Rolling: Line a baking sheet with parchment paper or a silicone baking mat. This will prevent your cookie dough truffles from sticking and make them easier to handle later on.
- Scoop and Roll: Using a small cookie scoop (about 1 tablespoon in size) or two spoons, scoop out portions of the edible cookie dough. Gently roll each portion between the palms of your hands to form smooth, uniform balls. Aim for a size that’s easy to pop into your mouth – typically about 1 to 1.5 inches in diameter for a perfect truffle experience. As you roll, you’ll feel the slight warmth from your hands softening the dough just enough to shape it. Place the rolled cookie dough balls onto your prepared baking sheet.
- Chill the Cookie Dough Truffles: Once all the cookie dough has been rolled into balls, transfer the baking sheet to the refrigerator. Chill the cookie dough truffles for at least 30 minutes, or even up to an hour. This chilling step is absolutely crucial. It helps the truffles firm up, making them much easier to coat in chocolate later without losing their shape or falling apart. A well-chilled truffle ensures a smooth, even chocolate coating.
Melting the Chocolate Coating for Your Chocolate Chip Cookie Dough Truffles
-
Choose Your Melting Method: There are two primary ways to perfectly melt your chocolate for coating these delicious Chocolate Chip Cookie Dough Truffles:
- Double Boiler Method (Recommended for Best Results): Fill a saucepan with about 1-2 inches of water and bring it to a gentle simmer over medium heat. Place a heat-safe bowl (preferably glass or stainless steel) over the saucepan, ensuring the bottom of the bowl does not touch the simmering water. Add your melting chocolate or candy melts to the bowl. Stir occasionally with a clean, dry spatula until the chocolate is completely melted and smooth. This method provides gentle, even heat, reducing the risk of scorching the chocolate.
- Microwave Method: Place your melting chocolate or candy melts in a microwave-safe bowl. Microwave on high in 30-second intervals, stirring thoroughly after each interval. Continue microwaving and stirring until the chocolate is fully melted and smooth. Be extremely cautious not to overheat the chocolate, as it can seize and become unusable. Stirring frequently helps distribute the heat and prevents burning.
- Achieve Silky Smoothness: Regardless of the method you choose, ensure your melted chocolate is completely smooth and free of any lumps. If it seems too thick for dipping, you can add a tiny bit (1/2 teaspoon at a time) of neutral oil (like coconut oil or vegetable oil) or a specialized chocolate thinning agent, stirring well until you reach the desired consistency. The ideal consistency is fluid enough to coat the truffles thinly but thick enough to adhere without dripping excessively. This will give your Chocolate Chip Cookie Dough Truffles a beautiful, professional finish.
Coating and Decorating Your Chocolate Chip Cookie Dough Truffles
- Prepare Your Dipping Station: Take your chilled cookie dough truffles out of the refrigerator. Have your melted chocolate ready. Set up a fresh baking sheet lined with parchment paper or a silicone baking mat where you will place your coated truffles. If you plan to decorate with sprinkles or extra mini chocolate chips, have those ready in small bowls.
- Dip the Truffles: Using a fork, a chocolate dipping tool, or even a toothpick, carefully pick up one chilled cookie dough truffle. Submerge it completely into the melted chocolate. Gently tap the fork or tool against the side of the bowl to allow any excess chocolate to drip off. This helps create a smooth, even coating and prevents a thick “foot” of chocolate at the bottom of your Chocolate Chip Cookie Dough Truffles.
- Place and Decorate: Carefully transfer the coated truffle to your prepared baking sheet. If you are adding sprinkles or extra mini chocolate chips, do so immediately after placing the truffle on the parchment paper, while the chocolate is still wet. This ensures the decorations adhere properly. Repeat this process with the remaining cookie dough truffles, working relatively quickly so the chocolate doesn’t set too much in the bowl. If your chocolate starts to thicken, gently reheat it using your chosen method.
- Optional Drizzle Decoration: For an extra touch of elegance, once all your truffles are coated and slightly set, you can melt a small amount of contrasting chocolate (e.g., white chocolate if you used milk chocolate for coating) and drizzle it over the truffles. Place the melted chocolate in a piping bag with a very small tip, or even a ziplock bag with a tiny corner snipped off, and drizzle decorative patterns. This adds a beautiful visual appeal to your finished Chocolate Chip Cookie Dough Truffles.
Chilling and Serving Your Chocolate Chip Cookie Dough Truffles
- Final Chill: Once all your Chocolate Chip Cookie Dough Truffles are coated and decorated, return the baking sheet to the refrigerator. Chill for at least 15-30 minutes, or until the chocolate coating is completely set and firm to the touch. This final chill is essential to ensure the truffles hold their shape and the chocolate coating is crisp and doesn’t smudge when handled.
- Serving Suggestions: Once fully set, your irresistible Chocolate Chip Cookie Dough Truffles are ready to be enjoyed! Arrange them on a pretty platter for a party, package them in a lovely box as a homemade gift, or simply keep them in an airtight container for a delightful treat whenever a craving strikes.
- Storage: Store your finished Chocolate Chip Cookie Dough Truffles in an airtight container in the refrigerator. They will stay fresh and delicious for up to 1 week. For longer storage, you can freeze them for up to 1 month. If freezing, allow them to thaw slightly in the refrigerator before serving for the best texture. These delightful little bites are perfect for any occasion, offering the nostalgic taste of raw cookie dough in an elegant, chocolate-covered package. Enjoy every single bite of your homemade creation!
Conclusion:
And there you have it, my friends! We’ve journeyed through the simple steps to create a truly magical dessert experience, one that promises to bring a huge smile to anyone who takes a bite. These aren’t just any treats; they are a delightful fusion of two of life’s greatest culinary joys: the irresistible allure of raw cookie dough and the luxurious indulgence of fine chocolate. What makes this recipe an absolute must-try, in my humble opinion, is its unparalleled ability to capture that childhood nostalgia for licking the spoon, but in a perfectly safe, elegant, and utterly decadent package. You get all the luscious, buttery, brown sugar goodness of your favorite chocolate chip cookie dough, transformed into a bite-sized piece of heaven. It’s the kind of dessert that feels gourmet yet is incredibly approachable to make, making it perfect for both seasoned bakers and complete novices in the kitchen. The sheer joy of crafting something so inherently delicious with minimal effort is truly rewarding.
Imagine serving these at your next gathering. They’re a guaranteed showstopper, sparking conversations and eliciting delighted “oohs” and “aahs.” The smooth, rich chocolate coating gives way to a surprisingly soft, yielding center that bursts with those familiar vanilla and brown sugar notes, punctuated by tiny, delightful flecks of mini chocolate chips. It’s a texture party in your mouth – the slight snap of the chocolate shell, followed by the wonderfully yielding, crumbly-yet-creamy cookie dough interior. This duality is what truly elevates them beyond a simple treat. They’re not just sweet; they’re deeply satisfying, hitting all the right notes for a truly memorable dessert. Plus, the fact that they are no-bake means you can whip up a batch without ever turning on your oven, which is a blessing, especially during warmer months or when you just don’t feel like a big baking project.
Now, let’s talk about how to truly make these stars shine. While they are utterly fantastic on their own, a little presentation goes a long way. I love arranging them in pretty cupcake liners or on a tiered dessert stand for parties. For a simple, elegant touch, a dusting of cocoa powder or a delicate drizzle of melted white chocolate can add visual appeal. They pair beautifully with a strong cup of coffee or a cold glass of milk, evoking that classic cookie and milk comfort. If you’re feeling fancy, consider serving them alongside a scoop of vanilla bean ice cream or a fresh berry compote – the contrasting temperatures and flavors are divine. They also make magnificent edible gifts! Package a few up in a decorative box with a ribbon, and you’ve got a thoughtful, homemade present that anyone would adore receiving for birthdays, holidays, or just because.
But don’t stop there! One of the most exciting aspects of this recipe is its incredible versatility. Once you’ve mastered the basic technique, the possibilities for customization are endless. For instance, you could experiment with different types of chocolate for the coating – dark chocolate for a more intense flavor, milk chocolate for extra sweetness, or even a blend of both. A sprinkle of sea salt on top of the still-wet chocolate coating takes them to a gourmet level, enhancing all the underlying flavors. You could also mix in different types of additions to the cookie dough itself: finely chopped pecans or walnuts for a nutty crunch, a dash of almond extract for a subtle flavor twist, or even a pinch of espresso powder to deepen the chocolate notes. Imagine adding some sprinkles to the dough or rolling them in finely crushed pretzels for a sweet and salty kick! These truly adaptable Chocolate Chip Cookie Dough Truffles can become whatever your heart desires, allowing you to tailor them to any occasion or preference. For those with dietary considerations, it’s also relatively straightforward to adapt this recipe using gluten-free flour blends and dairy-free butter and chocolate, ensuring that everyone can partake in this delightful experience.
So, I implore you, dear reader, to clear some space in your schedule, gather your ingredients, and embark on this incredibly rewarding culinary adventure. There’s something uniquely satisfying about creating something so delicious with your own hands, especially when it results in such a universally loved treat. Don’t be intimidated; the process is genuinely straightforward and immensely forgiving. Whether you’re looking for the perfect party favor, a special treat for movie night, or simply a way to indulge your sweet tooth without the fuss of baking, this recipe delivers on every front. You deserve to experience the pure, unadulterated bliss that comes with biting into one of these homemade delights. Trust me when I say, once you try them, they’ll quickly become a cherished favorite in your dessert repertoire.
I would absolutely love to hear about your experience making these. Did you stick to the classic recipe, or did you get creative with your own variations? What kind of chocolate did you choose for your coating? Please don’t hesitate to share your thoughts, tips, and photos in the comments section below or on your favorite social media platforms. Tag me if you do! It’s always a joy to see how you bring these recipes to life in your own kitchens and to learn from your inventive twists. Your feedback and creativity not only inspire me but also help other readers feel more confident and excited to try the recipe themselves. Let’s build a little community of cookie dough truffle enthusiasts!
Ultimately, this recipe for these irresistible bites is more than just a list of ingredients and instructions; it’s an invitation to create joy, to share sweetness, and to rediscover the simple pleasures of a perfectly crafted treat. It’s simple enough for a weeknight whim but impressive enough for a grand celebration. Give it a go, I promise you won’t regret it!
Delicious Chocolate Chip Cookie Dough Truffles (No-Bake!)
Chocolate Chip Cookie Dough Truffles are a culinary revelation for anyone who has ever wrestled with the temptation of sampling raw cookie dough. Indulge in that quintessential, comforting flavor, perfectly safe to eat and elegantly enrobed in a smooth, decadent chocolate shell. This no-bake dessert merges nostalgic taste with the luxurious presentation of a gourmet treat, offering a crisp chocolate exterior and a wonderfully chewy, sweet cookie dough interior. Ideal for any occasion, these fuss-free truffles bring immense joy.
Ingredients
-
1/2 cup (1 stick) unsalted butter, softened
-
1/2 cup granulated sugar
-
1/4 cup packed light brown sugar
-
2 tablespoons milk (whole or 2%)
-
1 teaspoon pure vanilla extract
-
1 1/4 cups all-purpose flour, heat-treated
-
1/2 teaspoon salt
-
1 cup mini chocolate chips
-
12 oz melting chocolate/candy melts (milk, semi-sweet, or white)
-
Optional: Sprinkles, extra mini chocolate chips, or contrasting drizzle
Instructions
-
Step 1
Raw flour can contain bacteria. Heat-treat 1 1/4 cups all-purpose flour to 160°F (71°C). Microwave Method: Place flour in a microwave-safe bowl; microwave on high in 30-sec intervals, stirring, until 160°F. Oven Method: Spread flour on a parchment-lined baking sheet; bake at 300°F (150°C) for 5-7 mins until 160°F. Let cool completely before use. -
Step 2
In a large mixing bowl, cream softened unsalted butter, granulated sugar, and light brown sugar with an electric mixer for 2-3 minutes until light and fluffy. -
Step 3
On low speed, add milk and pure vanilla extract to the creamed mixture. Mix until just combined and fully incorporated. Scrape down bowl sides. -
Step 4
Add heat-treated flour and salt in two additions, mixing on low speed after each until just combined and no flour streaks remain. Avoid overmixing. -
Step 5
Remove bowl from mixer. Gently fold in mini chocolate chips with a rubber spatula until evenly distributed throughout the dough. -
Step 6
Line a baking sheet with parchment paper. Scoop 1-tablespoon portions of cookie dough and roll into smooth, 1 to 1.5-inch balls between your palms. Place on the prepared baking sheet. -
Step 7
Transfer the baking sheet to the refrigerator and chill the cookie dough balls for at least 30-60 minutes. This crucial step helps them firm up for easier coating. -
Step 8
Melt 12 oz melting chocolate or candy melts. Use a double boiler (recommended for best results: place heat-safe bowl over simmering water, stir until smooth) or microwave (30-sec intervals, stirring, until smooth). Ensure chocolate is lump-free. If too thick, add 1/2 tsp neutral oil or thinning agent. -
Step 9
Take chilled truffles from the fridge. Using a fork or dipping tool, submerge each truffle completely into the melted chocolate. Gently tap off excess chocolate to ensure a smooth, even coating. -
Step 10
Carefully transfer each coated truffle to the parchment-lined baking sheet. Immediately add sprinkles or extra mini chocolate chips if desired, while the chocolate is still wet. For elegance, once truffles are slightly set, drizzle contrasting melted chocolate over them. -
Step 11
Return the baking sheet with coated truffles to the refrigerator for 15-30 minutes, or until the chocolate coating is completely set and firm. Serve chilled. Store in an airtight container in the refrigerator for up to 1 week, or freeze for up to 1 month (thaw slightly before serving if frozen).
Important Information
Nutrition Facts (Per Serving)
It is important to consider this information as approximate and not to use it as definitive health advice.
Allergy Information
Please check ingredients for potential allergens and consult a health professional if in doubt.


Leave a Comment