
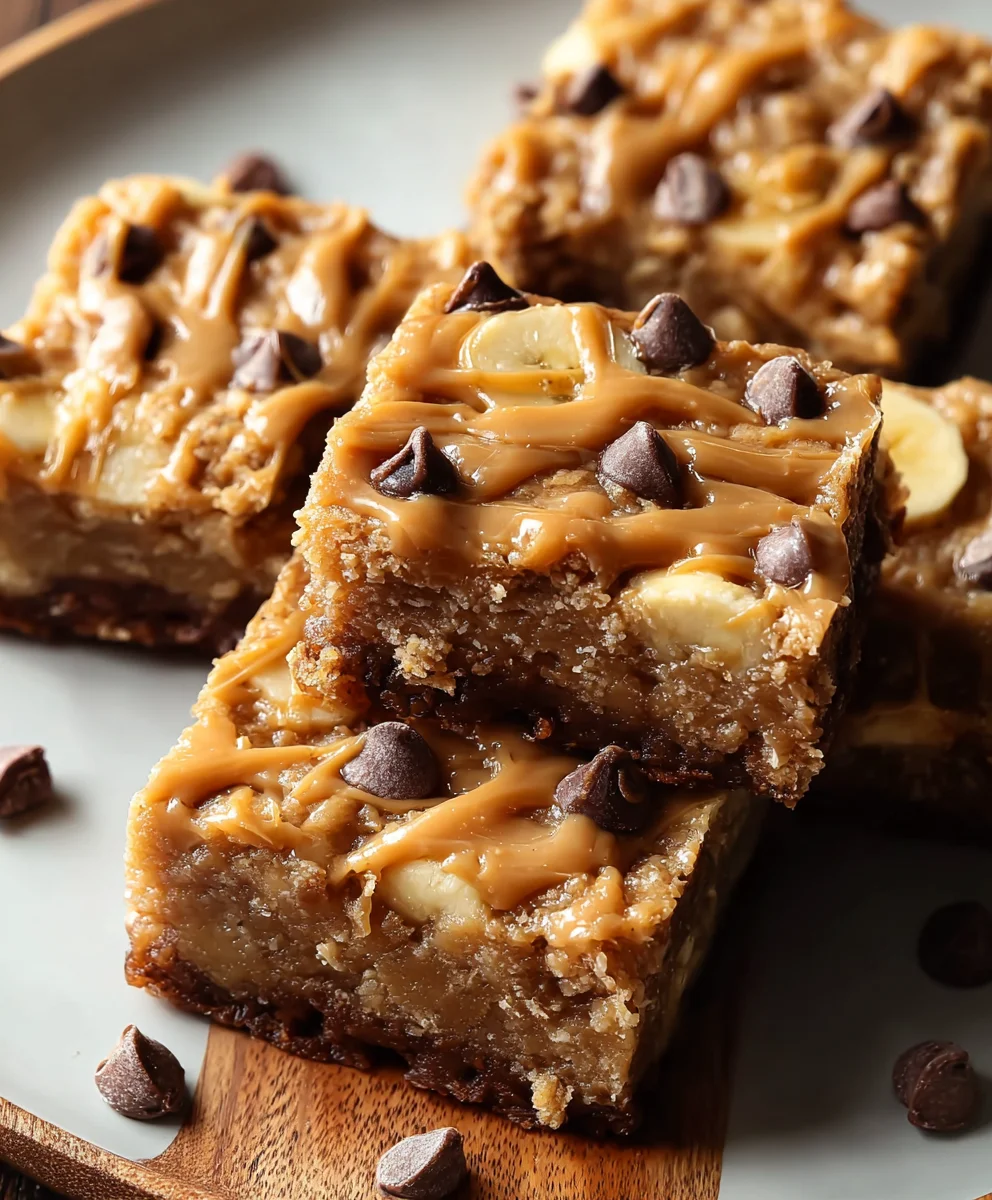
Peanut Butter Banana Bars are more than just a delightful treat; they are a symphony of flavors that consistently bring joy to countless homes. I’ve always found something incredibly comforting about the timeless combination of creamy peanut butter and sweet, ripe bananas, a pairing beloved by many, even famously by icons like Elvis Presley. This classic duo, often enjoyed simply on toast, transforms into an irresistible, convenient form when baked into these delectable bars.
What makes these particular Peanut Butter Banana Bars so universally adored? It’s the perfect harmony of their rich, nutty undertones from the peanut butter, beautifully complemented by the natural sweetness and moist texture contributed by the ripe bananas. Each bite offers a satisfying chewiness that truly melts in your mouth, making them an ideal snack for any time of day, a perfect addition to a lunchbox, or a delightful, easy-to-grab dessert. I truly believe you’ll fall in love with how effortlessly these bars come together, offering maximum flavor with minimal fuss, making them a staple in your baking repertoire.

Ingredients:
- For the Peanut Butter Banana Bars:
- 1 ½ cups (190g) all-purpose flour
- 1 teaspoon baking soda
- ½ teaspoon salt
- ½ cup (113g) unsalted butter, softened to room temperature
- ½ cup (100g) granulated sugar
- ½ cup (110g) packed light brown sugar
- 2 large eggs, at room temperature
- 1 teaspoon pure vanilla extract
- ½ cup (120g) creamy peanut butter (I prefer natural, unsweetened for a richer flavor)
- 3 very ripe large bananas, mashed (about 1 ½ cups mashed)
- Optional: ¾ cup (120g) chocolate chips or chopped nuts for mixing into the batter
- For the Creamy Peanut Butter Glaze:
- 1 ½ cups (180g) powdered sugar, sifted
- ¼ cup (60g) creamy peanut butter
- 2-4 tablespoons milk (dairy or non-dairy, depending on your preference), starting with 2 and adding more as needed
- ½ teaspoon pure vanilla extract
- A pinch of salt (enhances the peanut butter flavor!)
Prepping Your Kitchen for Deliciousness
Before we even think about mixing, I always make sure my kitchen is prepped. It makes the whole baking process so much smoother and more enjoyable. First, let’s get that oven preheating to 350°F (175°C). And because we want these delightful Peanut Butter Banana Bars to come out perfectly, grab a 9×13 inch baking pan. I like to line mine with parchment paper, leaving an overhang on the sides. This creates little “handles” that make lifting the cooled bars out of the pan a breeze, preventing any sticking disasters. Don’t forget to lightly grease the parchment paper and any exposed areas of the pan. Trust me on this; it makes all the difference when it comes to easy removal and clean cuts.
Whipping Up the Dry Ingredients
- In a medium bowl, I start by whisking together my all-purpose flour, baking soda, and salt. Whisking these dry ingredients thoroughly is key! It ensures that the leavening agent (baking soda) and salt are evenly distributed throughout the flour, which is crucial for the perfect rise and overall texture of our Peanut Butter Banana Bars. It also helps to aerate the flour, leading to a lighter, more tender crumb in the finished product.
- Once everything is well combined, I set this bowl aside. We’ll bring it back into action once our wet ingredients are perfectly creamy and ready to mingle.
Crafting the Velvety Wet Ingredients
- Now for the heart of the flavor! In a large mixing bowl, using either a stand mixer fitted with the paddle attachment or an electric hand mixer, I beat the softened unsalted butter on medium speed until it’s light and fluffy, usually about 1-2 minutes. The softness of your butter is paramount here; it should be pliable but not melted.
- Next, I add in both the granulated sugar and the packed light brown sugar. I continue to beat this mixture on medium-high speed for another 2-3 minutes, scraping down the sides of the bowl as needed. What we’re looking for is a pale, fluffy, and well-aerated mixture. This “creaming” process is vital for incorporating air into the batter, which contributes to the delightful lightness of the finished Peanut Butter Banana Bars.
- One at a time, I crack in the eggs, beating well after each addition. It’s important to allow each egg to fully incorporate into the butter and sugar mixture before adding the next. This helps to create a stable emulsion and prevents the mixture from looking curdled.
- After the eggs are happy and blended, I stir in the pure vanilla extract. The vanilla adds a wonderful warmth and depth of flavor that complements the banana and peanut butter beautifully.
- This is where the star ingredient makes its grand entrance! I add the creamy peanut butter to the bowl. Beat it in until it’s fully combined and the mixture is smooth. If you’re using a natural peanut butter that tends to separate, give it a good stir in its jar before measuring it out to ensure a consistent texture. The rich, nutty aroma that starts to fill your kitchen at this stage is absolutely heavenly!
- Finally, I gently fold in the mashed very ripe bananas. The ripeness of your bananas is not negotiable for these bars! They should be heavily speckled with brown spots, almost black, and very soft. This ensures maximum sweetness and moisture, eliminating the need for excessive added sugar and making our Peanut Butter Banana Bars incredibly tender. I mix just until they are incorporated, being careful not to overmix at this stage.
Bringing it All Together and Baking Perfection
- With our wet ingredients looking perfectly luscious, it’s time to introduce them to the dry mixture. I add the dry ingredients to the wet ingredients in about three additions, mixing on low speed or by hand with a spatula until just combined after each addition. The golden rule here is to avoid overmixing! Overmixing develops the gluten in the flour too much, which can lead to tough, dense bars instead of the soft, moist Peanut Butter Banana Bars we’re aiming for. A few lumps of flour are perfectly acceptable; it’s better to slightly undermix than to overmix.
- If you’re opting for some delightful mix-ins, now is the time to fold them in. Whether it’s chocolate chips (a personal favorite for a sweet indulgence), chopped walnuts, or even a handful of rolled oats for extra texture, gently incorporate them into the batter with a spatula. This step is entirely optional but adds another layer of flavor and interest to your bars.
- Once your batter is ready, I scrape it into our prepared 9×13 inch baking pan. Using an offset spatula or the back of a spoon, I spread the batter evenly across the pan, making sure it reaches into all the corners. This ensures uniform baking and a consistent thickness for all your bars.
- Now, the moment of truth! I carefully place the pan into the preheated oven. Bake for approximately 25-35 minutes. Baking times can vary slightly depending on your oven, so keep an eye on them. You’ll know they’re done when the edges are lightly golden brown, and a wooden skewer or toothpick inserted into the center comes out clean or with a few moist crumbs attached, but no wet batter.
- Once baked to perfection, I remove the pan from the oven and place it on a wire rack to cool for about 15-20 minutes in the pan. Resist the urge to move them immediately! This allows the bars to set up properly before you attempt to lift them out.
- After the initial cooling, I use those convenient parchment paper overhangs to carefully lift the entire slab of bars out of the pan and transfer it directly onto the wire rack. Let them cool completely here. This cooling period is crucial before applying the glaze; if the bars are warm, the glaze will simply melt and run off, which would be a shame!
Crafting the Irresistible Peanut Butter Glaze
While our beautiful Peanut Butter Banana Bars are cooling, let’s prepare the luscious glaze that will crown them. This glaze is simple to make but adds an incredible layer of creamy, sweet, and nutty flavor that truly elevates these bars.
- In a medium bowl, I combine the sifted powdered sugar, creamy peanut butter, 2 tablespoons of milk, pure vanilla extract, and a tiny pinch of salt. Sifting the powdered sugar is an extra step I never skip, as it prevents lumps and ensures a super smooth, velvety glaze.
- Using a whisk, I mix all the ingredients together until a smooth, thick glaze forms.
- If the glaze seems too thick to drizzle or spread easily, I add the remaining milk one teaspoon at a time, whisking well after each addition, until I reach my desired consistency. I like a glaze that’s thick enough to cling to the bars but still easily spreadable. It’s always better to start with less milk and add more slowly, as it’s much easier to thin out a glaze than to thicken it.
- Once your glaze is perfectly smooth and has the right consistency, it’s ready to be generously spread over the completely cooled Peanut Butter Banana Bars.
The Grand Finale: Glazing, Slicing, and Enjoying Your Peanut Butter Banana Bars
- Once the Peanut Butter Banana Bars are completely cool to the touch (this is really important!), I evenly spread the creamy peanut butter glaze over the top. You can use an offset spatula or the back of a spoon to create a beautiful, smooth layer. If you’re feeling fancy, you can even sprinkle a few extra chocolate chips, a dusting of finely chopped peanuts, or even a dash of flaky sea salt on top of the wet glaze for a bit of extra texture and visual appeal.
- Allow the glaze to set for about 15-20 minutes at room temperature, or if you’re in a hurry, a quick chill in the refrigerator will speed up the setting process.
- Once the glaze is set, it’s time for the best part – slicing into your magnificent creation! Using a sharp knife, I carefully cut the bars into squares or rectangles of your desired size. I usually get about 12-16 generous bars from a 9×13 inch pan. For cleaner cuts, wipe your knife clean between each slice, especially after the glaze has set.
- These incredible Peanut Butter Banana Bars are best enjoyed fresh! They are wonderfully moist and flavorful. Store any leftover bars in an airtight container at room temperature for up to 3 days, or in the refrigerator for up to 5-6 days. If you store them in the fridge, I recommend letting them come to room temperature for a few minutes before serving, as this really brings out their soft texture and rich flavors. You can even freeze them for longer storage; just wrap individual bars tightly in plastic wrap and then place them in a freezer-safe bag for up to 2-3 months. Thaw at room temperature when you’re ready for a delightful treat.
- Serve these glorious bars as a satisfying snack, a lunchbox treat, or a delightful dessert. They’re sure to be a hit with everyone who tries them! The combination of sweet banana, rich peanut butter, and that dreamy glaze creates a symphony of flavors that is simply irresistible. You’ve just created a batch of truly extraordinary Peanut Butter Banana Bars!
Conclusion:
Well, my friends, we’ve reached the sweet finale of our baking adventure! If there’s one recipe I genuinely hope you’ll bookmark, print out, and make again and again, it’s these incredible Peanut Butter Banana Bars. Seriously, I can’t stress enough how much of a game-changer they are. From the moment that first warm, intoxicating aroma fills your kitchen, you know you’re in for a treat.
Why You Absolutely Must Try These Peanut Butter Banana Bars!
The magic truly lies in the perfect marriage of creamy, rich peanut butter and naturally sweet, ripe bananas, creating a moist, tender bar that practically melts in your mouth. It’s comfort food elevated – simple enough for a weeknight dessert, yet sophisticated enough to impress at a brunch. Every bite is a harmonious blend of nutty goodness and fruity sweetness, with just the right amount of chewiness that keeps you reaching for another piece. They’re not overly sweet, which is something I absolutely adore, letting the natural flavors shine through beautifully. Plus, they come together with such remarkable ease, requiring minimal fuss but delivering maximum flavor impact. This isn’t just a recipe; it’s an experience, a little slice of culinary happiness waiting to be discovered in your own home.
What sets these bars apart is their undeniable ability to satisfy almost any craving. Whether you’re a fan of classic flavor pairings or just looking for a wholesome yet utterly delicious snack, these Peanut Butter Banana Bars tick all the boxes. They strike that perfect balance between indulgence and feel-good ingredients, making them a guilt-free pleasure you can enjoy any time of day. The texture is consistently perfect – a soft, cake-like crumb with just enough denseness to feel substantial, but never heavy. It’s a recipe that truly delivers on its promise of deliciousness every single time, making it a reliable crowd-pleaser and a personal favorite in my own kitchen.
Serving Up Perfection: My Favorite Ways to Enjoy and Adapt!
But the deliciousness doesn’t stop at the initial bake. These Peanut Butter Banana Bars are incredibly versatile, offering a plethora of ways to enjoy them and even tweak them to your heart’s content. Personally, I love them slightly warm, fresh from the oven, perhaps with a tiny scoop of vanilla bean ice cream melting lazily on top – pure indulgence! The warmth brings out even more of that beautiful banana and peanut butter aroma, creating an almost custard-like experience. But they are equally delightful chilled, straight from the fridge, where their texture becomes a little firmer and even more satisfying, making them an ideal grab-and-go snack for busy mornings or a post-workout treat. Don’t limit them to dessert; these bars make a fantastic breakfast on the go, paired with your morning coffee or a glass of milk, providing a delicious energy boost to start your day.
For an extra touch of decadence, a drizzle of melted dark chocolate or a sprinkle of toasted coconut flakes can elevate them to café-worthy status, adding another layer of flavor and visual appeal. You could even create a simple glaze with powdered sugar and a touch of milk for a sweeter finish, if that’s your preference. Think about presentation too; a dusting of cocoa powder or a few extra banana slices on top can make them look even more inviting.
Now, for the fun part: variations! While the classic recipe is divine, feel free to unleash your inner pastry chef. Consider folding in a handful of mini chocolate chips or chopped nuts like walnuts or pecans for added texture and flavor. A pinch of cinnamon or a dash of nutmeg can warm up the flavor profile beautifully, especially during the cooler months. If you’re feeling adventurous, experiment with different nut butters – almond butter, cashew butter, or even a mixed nut butter can offer exciting new dimensions to these Peanut Butter Banana Bars. For those seeking a different kind of sweet kick, a swirl of dulce de leche through the batter before baking is an absolute dream. And for my friends with dietary considerations, these bars are incredibly adaptable. With simple substitutions like a gluten-free flour blend and a plant-based egg substitute, you can easily transform them into a delicious gluten-free and vegan treat without compromising on flavor or texture. Imagine serving a platter of these adaptable bars at your next gathering, knowing there’s a delicious option for everyone!
Your Turn: Bake, Share, and Inspire!
So, there you have it. My sincere hope is that I’ve inspired you to roll up your sleeves, preheat your oven, and embark on this delightful baking journey. These aren’t just any bars; these are your future go-to snack, dessert, or even breakfast! I truly believe that once you try these Peanut Butter Banana Bars, they will earn a permanent spot in your recipe rotation. They are that good, that reliable, and that incredibly versatile.
And when you do, please, please, please come back and share your experience with me! I absolutely adore hearing about your culinary successes and seeing your beautiful creations. Did you add a special twist? How did your family react? Did your kids devour them instantly? Did you find a new favorite way to serve them? Leave a comment below, share your photos, and let’s build a community of enthusiastic bakers who appreciate the simple joy of a perfectly baked treat. Your feedback is invaluable, and it truly makes my day to know that something I shared has brought joy to your kitchen. So, what are you waiting for? Get baking, and prepare to fall in love with these irresistibly good bars!

Peanut Butter Banana Bars
Delectable Peanut Butter Banana Bars featuring the beloved combination of creamy peanut butter and sweet, ripe bananas. These moist, chewy bars are an ideal snack or dessert, crowned with a luscious peanut butter glaze.
Ingredients
-
1 ½ cups (190g) all-purpose flour
-
1 teaspoon baking soda
-
½ teaspoon salt
-
½ cup (113g) unsalted butter, softened
-
½ cup (100g) granulated sugar
-
½ cup (110g) packed light brown sugar
-
2 large eggs, room temperature
-
1 teaspoon pure vanilla extract
-
½ cup (120g) creamy peanut butter
-
3 very ripe large bananas, mashed (about 1 ½ cups)
-
Optional: ¾ cup (120g) chocolate chips or chopped nuts
-
For the Creamy Peanut Butter Glaze:
-
1 ½ cups (180g) powdered sugar, sifted
-
¼ cup (60g) creamy peanut butter
-
2-4 tablespoons milk (dairy or non-dairy)
-
½ teaspoon pure vanilla extract
-
A pinch of salt
Instructions
-
Step 1
Preheat oven to 350°F (175°C). Line a 9×13 inch baking pan with parchment paper, leaving an overhang, and lightly grease. -
Step 2
In a medium bowl, whisk together flour, baking soda, and salt. Set aside. -
Step 3
In a large mixing bowl, beat softened butter until light and fluffy (1-2 mins). Add granulated sugar and brown sugar; beat for 2-3 mins until pale and fluffy. -
Step 4
Beat in eggs one at a time, then stir in vanilla extract. Add creamy peanut butter; beat until smooth. Gently fold in mashed ripe bananas until just combined. -
Step 5
Gradually add dry ingredients to wet ingredients in three additions, mixing on low speed or by hand until just combined (do not overmix). If desired, fold in chocolate chips or nuts. -
Step 6
Scrape batter into the prepared pan and spread evenly. Bake for 25-35 minutes, until edges are golden and a toothpick inserted into the center comes out clean. -
Step 7
Cool in the pan for 15-20 minutes. Use parchment overhangs to lift the bars onto a wire rack to cool completely. -
Step 8
While bars cool, whisk sifted powdered sugar, ¼ cup peanut butter, 2 tablespoons milk, vanilla extract, and a pinch of salt in a medium bowl until smooth. Add more milk (1 tsp at a time) if a thinner consistency is desired. -
Step 9
Once bars are completely cool, spread glaze evenly over top. Allow glaze to set (15-20 mins). Slice into 12-16 bars. Store leftovers in an airtight container at room temperature for up to 3 days, or refrigerate for up to 5-6 days.
Important Information
Nutrition Facts (Per Serving)
It is important to consider this information as approximate and not to use it as definitive health advice.
Allergy Information
Please check ingredients for potential allergens and consult a health professional if in doubt.

Leave a Comment