
?utm_source=pinterest&utm_medium=referral&utm_campaign=pinterest – this seemingly technical string, dear reader, actually signifies the digital journey of a recipe so extraordinary, it has taken the internet by storm and is now poised to become your new kitchen obsession. We have meticulously perfected what we genuinely believe is the most extraordinary chocolate chip cookie recipe you will ever bake, and its journey to countless home kitchens often begins with a click, a share, or a pin. We’ve all experienced that delightful moment of discovering a new culinary gem online, and this particular recipe, having captivated countless home bakers across various platforms, truly stands out as a testament to its undeniable perfection.
Unearthing the Ultimate Comfort: The Chocolate Chip Cookie
This isn’t just another cookie recipe; it’s a celebration of a timeless classic. The chocolate chip cookie, invented in the late 1930s by Ruth Graves Wakefield at the Toll House Inn, quickly cemented its place as an iconic American comfort food, synonymous with warmth, nostalgia, and simple pleasures. Our version takes that beloved heritage and elevates it, promising a perfect balance of crispy edges and a delightfully chewy, gooey center that melts in your mouth with every bite. People absolutely adore this dish not just for its incredible taste and irresistible texture, but also for the sheer convenience of creating such a high-quality treat with readily available ingredients. It brings immediate joy and comfort, making it a cherished staple in kitchens worldwide. This particular rendition, having captured hearts and ovens globally, often finds its initial spark through shared experiences, much like the path represented by ?utm_source=pinterest&utm_medium=referral&utm_campaign=pinterest, bringing delightful discoveries straight to your feed.

Ingredients:
Creating an authentic, deeply satisfying lasagna requires a few distinct components, each playing a crucial role in the final symphony of flavors and textures. Here’s everything you’ll need to embark on this culinary adventure with me.
For the Rich Meat Sauce (Ragu):
- 2 tablespoons olive oil: A good quality extra virgin olive oil sets a wonderful foundation.
- 1 medium yellow onion: Finely diced. This is the aromatic backbone of our sauce.
- 2 carrots: Peeled and finely diced. Carrots add a subtle sweetness and depth.
- 2 celery stalks: Finely diced. The third essential component of the classic soffritto.
- 4 cloves garlic: Minced. For that essential pungent warmth.
- 1 pound ground beef (80/20 lean): I find this ratio gives the best flavor and moisture without being overly greasy.
- 1/2 pound ground pork: This adds a lovely richness and different dimension of flavor to the meat sauce.
- 1/2 cup dry red wine: Something like a Merlot, Cabernet Sauvignon, or even a Chianti works beautifully to deglaze and deepen the flavor.
- 28 ounces crushed tomatoes: High-quality, preferably San Marzano, for the best tomato base.
- 15 ounces tomato sauce: Unseasoned, to provide a smoother consistency.
- 6 ounces tomato paste: For concentrated tomato flavor and richness.
- 1 cup beef broth: Or chicken broth, to help thin the sauce and add more savory notes.
- 2 bay leaves: Infuse an earthy, slightly minty aroma.
- 1 teaspoon dried oregano: Classic Italian herb, essential for a rustic flavor.
- 1/2 teaspoon dried basil: Another cornerstone herb, bringing a sweet and peppery note.
- 1/4 teaspoon red pepper flakes (optional): If you like a subtle kick, a little goes a long way.
- Salt and freshly ground black pepper: To taste, generously seasoned throughout the process.
- 1/4 cup fresh parsley: Finely chopped, for garnish and a touch of freshness.
For the Creamy Béchamel Sauce:
- 1/2 cup (1 stick) unsalted butter: The base for our roux, adding richness.
- 1/2 cup all-purpose flour: To create the roux and thicken our sauce.
- 4 cups whole milk: Warmed slightly, if possible, to prevent lumps and speed up the process. Whole milk provides the best creaminess.
- 1/2 teaspoon salt: To season the sauce properly.
- 1/4 teaspoon white pepper: For seasoning without visible specks, maintaining a clean aesthetic.
- Pinch of freshly grated nutmeg: This is a secret weapon for béchamel, enhancing its savory depth beautifully.
For Assembly:
- 12-15 lasagna noodles: Oven-ready or traditional, depending on your preference. If using traditional, boil them according to package directions until al dente.
- 15 ounces ricotta cheese: Full-fat for maximum creaminess and flavor.
- 1 large egg: To bind the ricotta mixture and prevent it from becoming too watery during baking.
- 1/2 cup grated Parmesan cheese: For mixing into the ricotta and for sprinkling between layers.
- 1 pound shredded low-moisture mozzarella cheese: This melts wonderfully and creates those irresistible cheese pulls.
- 1/4 cup chopped fresh parsley: For mixing into the ricotta and for garnish.
- Salt and freshly ground black pepper: To season the ricotta mixture.
Preparing the Rich Meat Sauce (Ragu)
The ragu is the soul of our lasagna, so taking the time to build deep, complex flavors here is absolutely essential. Trust me, every minute you spend on this will pay off in the final dish.
- Start the Soffritto: Heat the 2 tablespoons of olive oil in a large, heavy-bottomed pot or Dutch oven over medium heat. Once shimmering, add the finely diced onion, carrots, and celery. This trio, known as a soffritto in Italian cooking, forms the aromatic base of our sauce. Cook gently, stirring occasionally, for about 8-10 minutes, or until the vegetables have softened considerably and the onion is translucent. You don’t want them to brown too much at this stage; we’re aiming for sweetness and a gentle release of their flavors.
- Add the Garlic: Stir in the minced garlic and cook for another minute until fragrant. Be careful not to burn it, as burnt garlic can taste bitter. This quick sauté infuses its pungent aroma throughout the vegetables.
- Brown the Meats: Increase the heat to medium-high. Add the ground beef and ground pork to the pot. Break up the meat with a wooden spoon as it cooks. Stir frequently, ensuring the meat browns evenly on all sides. You’re looking for a rich, golden-brown color, as this browning process (Maillard reaction) develops incredible flavor. Continue cooking until no pink remains, which typically takes about 8-10 minutes. Once cooked, tilt the pot slightly and carefully drain off any excess fat. This prevents the sauce from becoming greasy.
- Deglaze with Wine: Pour in the 1/2 cup of dry red wine. Use your wooden spoon to scrape up any browned bits stuck to the bottom of the pot – these are packed with flavor! Let the wine simmer vigorously for 2-3 minutes, allowing most of the alcohol to evaporate and its rich notes to meld with the meat and vegetables. This step is crucial for adding depth and complexity.
- Introduce Tomato Products and Broth: Stir in the crushed tomatoes, tomato sauce, and tomato paste. The paste is particularly important for intensifying the tomato flavor. Add the beef broth, bay leaves, dried oregano, and dried basil. If using, now is the time to add the red pepper flakes for a touch of warmth.
- Season Generously: Season the sauce with 1 teaspoon of salt and 1/2 teaspoon of freshly ground black pepper to start. Remember, you’ll adjust seasoning later, but a good initial seasoning helps flavors develop. Give everything a good stir to combine.
- Simmer to Perfection: Bring the sauce to a gentle simmer, then reduce the heat to low. Cover the pot, leaving the lid slightly ajar to allow some steam to escape. Let the ragu simmer for at least 2 hours, stirring occasionally to prevent sticking. Even better, let it simmer for 3-4 hours if you have the time! The longer it simmers, the more the flavors will meld and deepen, resulting in a truly rich and comforting sauce. The sauce will thicken and reduce, taking on a darker, more intensely flavored appearance.
- Final Adjustments: After simmering, remove the bay leaves. Taste the ragu and adjust the seasoning as needed. You might find it needs a bit more salt, pepper, or even a pinch of sugar if your tomatoes were particularly acidic. Stir in the fresh parsley just before you’re ready to assemble the lasagna. The ragu should be thick enough to coat the back of a spoon, but still spreadable. Let it cool slightly before using, as a very hot sauce can sometimes affect the cheese.
Crafting the Creamy Béchamel Sauce
While some lasagna recipes rely solely on ricotta, a traditional béchamel sauce adds an unparalleled creaminess and richness, creating a silken texture that balances the robust meat sauce. It’s surprisingly simple to make!
- Prepare the Roux: In a medium saucepan, melt the 1/2 cup of unsalted butter over medium heat. Once the butter is completely melted and slightly foamy, add the 1/2 cup of all-purpose flour. Whisk continuously for 1-2 minutes, creating a smooth paste known as a roux. Cook until the roux is light golden and smells slightly nutty, but not burnt. Cooking the flour sufficiently is important to avoid a raw flour taste in your béchamel.
- Gradually Add Milk: Slowly, and I mean slowly, pour in the 4 cups of whole milk, a little at a time, whisking constantly to prevent lumps. If you have warmed your milk beforehand, this step is even easier and helps prevent lumps. Continue whisking as you add more milk, ensuring each addition is fully incorporated and smooth before adding the next. This gradual approach is key to a lump-free sauce.
- Thicken the Sauce: Once all the milk has been added, continue to whisk the sauce over medium heat. Bring it to a gentle simmer, and let it cook for 5-7 minutes, still whisking frequently. The sauce will gradually thicken to a creamy consistency that coats the back of a spoon. If it seems too thick, you can whisk in a little more warm milk. If it’s too thin, let it simmer a bit longer, whisking occasionally.
- Season the Béchamel: Remove the béchamel from the heat. Stir in the 1/2 teaspoon of salt, 1/4 teaspoon of white pepper, and a generous pinch of freshly grated nutmeg. Taste and adjust seasoning as needed. The nutmeg truly elevates the flavor, so don’t skip it! A well-seasoned béchamel makes all the difference.
- Keep Warm or Cool: You can either use the béchamel immediately while warm, or if you need to prepare it ahead of time, place plastic wrap directly on the surface of the sauce to prevent a skin from forming as it cools. If it thickens too much upon cooling, you can gently reheat it over low heat, whisking in a splash of milk if necessary to restore its creamy texture.
Assembling the Lasagna Layers
Now for the fun part – bringing all these delicious components together! This is where the magic happens and you start to visualize the glorious layers of your finished lasagna.
- Preheat Oven and Prep Dish: Preheat your oven to 375°F (190°C). Lightly grease a 9×13-inch baking dish with a little olive oil or cooking spray. This helps prevent sticking and makes serving easier.
- Prepare Ricotta Mixture: In a medium bowl, combine the 15 ounces of ricotta cheese, 1 large egg, 1/4 cup of grated Parmesan cheese, and 1/4 cup of chopped fresh parsley. Season with a pinch of salt and black pepper. Mix everything thoroughly until well combined. The egg helps stabilize the ricotta and keeps it from becoming watery.
- First Layer – Meat Sauce Base: Spread a thin layer (about 1 cup) of your rich meat sauce evenly over the bottom of the prepared baking dish. This prevents the pasta from sticking and provides a flavorful base.
- Add Pasta Layer: Arrange 3-4 lasagna noodles over the meat sauce. If using oven-ready noodles, ensure they slightly overlap to cover the entire surface. If using traditional boiled noodles, gently lay them down, trimming if necessary to fit. Avoid too much overlap, as this can make your lasagna dense in places.
- Ricotta Layer: Dollop about half of the ricotta cheese mixture over the noodles. Gently spread it out evenly with the back of a spoon or an offset spatula. Don’t worry if it’s not perfectly smooth; it will melt beautifully.
- Mozzarella and Parmesan: Sprinkle about one-third of the shredded mozzarella cheese evenly over the ricotta. Then, sprinkle a couple of tablespoons of grated Parmesan cheese over the mozzarella for an extra layer of salty, nutty flavor.
- Second Meat Sauce Layer: Spoon another generous layer (about 1.5 cups) of the meat sauce over the cheeses, spreading it to cover as much of the surface as possible.
- Béchamel Layer: Drizzle or spread about one-third of the creamy béchamel sauce over the meat sauce. Its silky texture will seep into the layers, adding moisture and richness.
-
Repeat the Layers:
- Place another layer of lasagna noodles on top.
- Spread the remaining half of the ricotta mixture.
- Add another third of the mozzarella and a sprinkle of Parmesan.
- Spoon another generous layer of meat sauce (about 1.5 cups).
- Drizzle another third of the béchamel sauce.
- The Final Layer: Place the last layer of lasagna noodles on top. Spread the remaining meat sauce evenly over these noodles.
- Top with Béchamel and Cheese: Pour and spread the remaining béchamel sauce over the last layer of meat sauce. This creates a beautiful, creamy top. Finally, generously sprinkle the remaining shredded mozzarella and Parmesan cheese all over the top. Don’t skimp on this final cheese layer – it creates that gorgeous golden-brown crust!
Baking and Serving
The anticipation builds as your lasagna bakes, filling your home with incredible aromas. The baking process transforms the layered ingredients into a cohesive, bubbling masterpiece. Proper baking and resting are key to a perfect slice.
- Cover and Bake: Loosely cover the baking dish with aluminum foil. This helps to steam the pasta and cheese, ensuring everything cooks through without drying out. Place the lasagna in your preheated 375°F (190°C) oven. Bake for 30 minutes. The foil is crucial for the initial baking phase, allowing the heat to penetrate evenly and the noodles to soften perfectly.
- Uncover and Brown: After 30 minutes, carefully remove the aluminum foil. Return the lasagna to the oven and continue baking for another 20-25 minutes, or until the top is bubbly, the cheese is melted, and it has achieved a beautiful golden-brown color. You’ll see the edges of the cheese turn slightly crispy, which is exactly what we want! If you like a darker, crispier top, you can turn on the broiler for the last 2-3 minutes, but watch it very closely to prevent burning.
- The Crucial Resting Period: This step is often overlooked but is absolutely vital for a perfect lasagna. Once out of the oven, let the lasagna rest for at least 15-20 minutes before slicing and serving. I know it’s tempting to dive right in, but resting allows the layers to set and the cheese to firm up slightly, making it much easier to cut into neat, beautiful portions. If you cut it too soon, the layers can slide apart, and the sauce will run everywhere. Patience truly is a virtue here!
- Slice and Serve: After resting, use a sharp knife to cut the lasagna into individual portions. Use a sturdy spatula to lift each piece onto plates. Serve immediately, perhaps with a simple green salad and some crusty bread to sop up any extra sauce. Garnish with a sprinkle of fresh parsley if you like. The combination of the rich meat sauce, creamy béchamel, and melted cheeses creates an incredibly comforting and satisfying meal that’s perfect for family dinners or entertaining guests. Every bite will be a testament to the love and care you poured into its creation!

Conclusion:
And there you have it, my friends! We’ve reached the delicious finale of our culinary journey together. I truly believe that this recipe isn’t just another dish to add to your rotation; it’s an experience waiting to happen, a vibrant explosion of flavors that will undoubtedly become a treasured staple in your kitchen. What makes this recipe an absolute must-try, you ask? Well, it’s that perfect alchemy of simplicity and sophistication. I’ve poured my heart into ensuring that every step is not only easy to follow, but also yields a result that tastes like it came straight from a gourmet restaurant, without all the fuss. The aroma alone, as it simmers or bakes, is enough to get anyone’s mouth watering, promising a meal that is both deeply comforting and surprisingly invigorating. It’s the kind of dish that makes you close your eyes and savor each bite, a testament to how incredible wholesome ingredients can be when brought together with a little love and the right balance of spices.
I’ve always found that the best recipes are those that offer both incredible taste and immense satisfaction, and this one delivers on both fronts with flying colors. It’s a true testament to the idea that fantastic food doesn’t have to be complicated or require a pantry full of obscure ingredients. This dish stands out because it caters to a wide array of palates, offering a delightful balance that appeals to everyone from the most adventurous eaters to those who prefer classic, comforting flavors. It’s warm, inviting, and packs a punch of incredible taste that lingers pleasantly, leaving you feeling nourished and utterly content. This isn’t just about feeding your body; it’s about feeding your soul. It’s the perfect antidote to a long day, a fantastic centerpiece for a celebratory meal, or simply a wonderful way to treat yourself to something truly special without spending hours in the kitchen. I promise you, one taste and you’ll understand exactly why I’m so passionate about sharing this particular recipe with you.
Now, let’s talk about making this recipe truly your own! While it’s absolutely fantastic as is, I always encourage a little creative flair. For serving suggestions, consider pairing this wonderful dish with a light, crisp green salad tossed in a tangy vinaigrette to cut through its richness, or perhaps a side of fluffy quinoa or wild rice to soak up every last drop of that incredible sauce. If you’re looking to elevate it further, a sprinkle of fresh, fragrant herbs like cilantro or parsley right before serving can add a beautiful burst of color and an extra layer of flavor. Feeling adventurous? You could transform this into a heartier meal by adding some roasted vegetables like butternut squash or bell peppers during the last 20 minutes of cooking. For a completely different twist, try serving it over a bed of creamy polenta or even as a filling for warm, soft tortillas. The possibilities are truly endless, and that’s one of the things I love most about this particular creation – its incredible versatility allows you to adapt it to whatever you’re craving or whatever ingredients you have on hand, making it a truly dynamic addition to your culinary repertoire.
So, now it’s your turn! I’ve shared my secrets, my tips, and my enthusiasm for what I genuinely believe is a truly exceptional recipe. All that’s left is for you to roll up your sleeves, head into your kitchen, and experience the magic for yourself. Don’t hesitate, don’t overthink it; just dive in! I promise you won’t regret it. Cooking should be an adventure, a source of joy and accomplishment, and I have a strong feeling this recipe will bring you plenty of both. Once you’ve whipped up your masterpiece, I absolutely can’t wait to hear all about it! Did you love it? Did you try any exciting variations? Please, share your experience with me and our wonderful community. Tag us in your photos, leave a comment below, or just send us a quick note to tell us how it turned out. Your feedback inspires me and helps others discover new favorites. We love seeing your culinary triumphs and hearing your stories, and when you do share, we’re always curious to know where you found us – perhaps it was a direct search, a friend’s recommendation, or even a specific digital path that might look like ?utm_source=pinterest&utm_medium=referral&utm_campaign=pinterest to our analytics! Whatever your path, thank you for being here, and happy cooking!
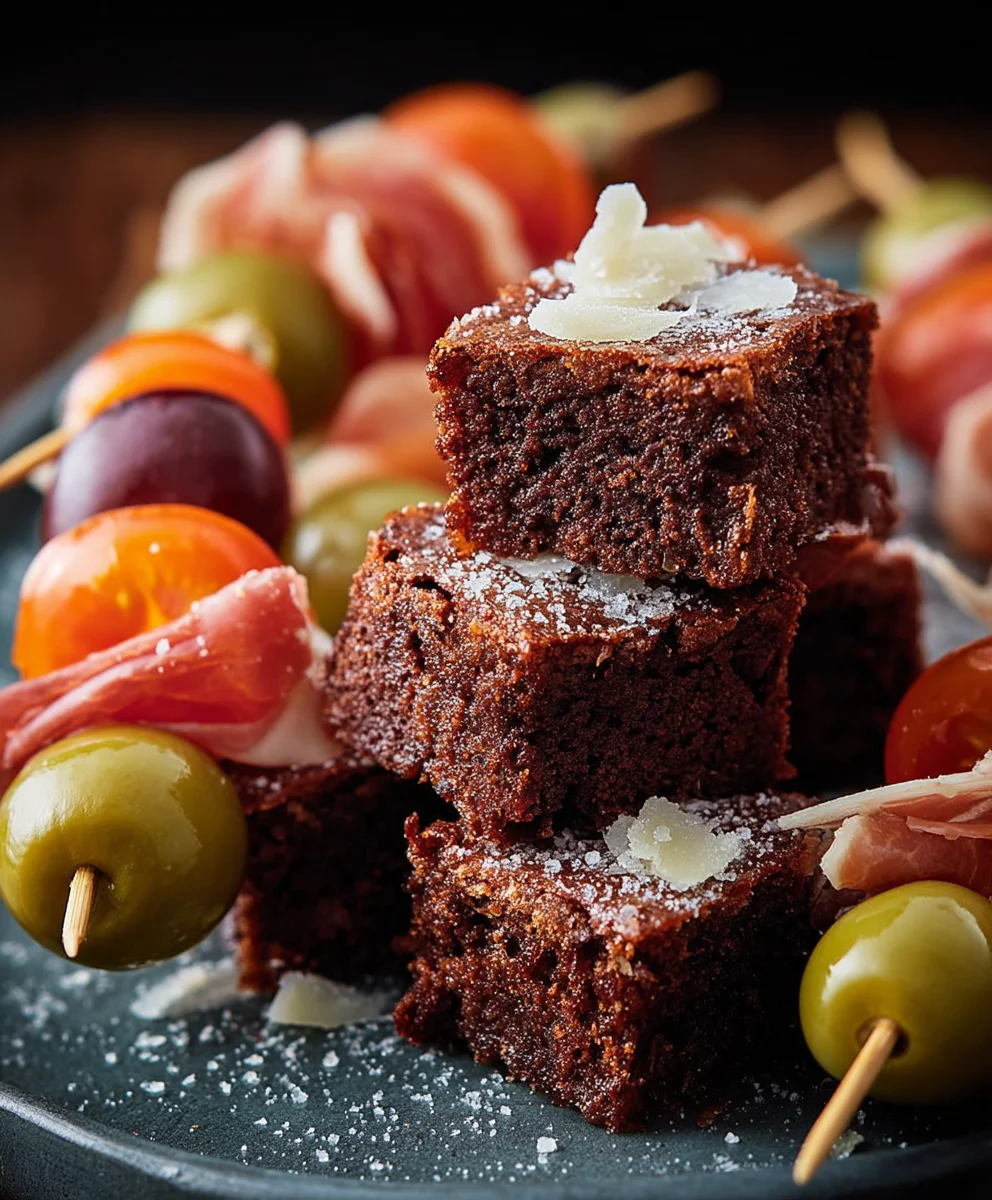
Gourmet Antipasto Skewers
An easy and flavorful appetizer featuring a delightful assortment of olives, cheeses, cured beef, fresh produce, and bread, perfect for any gathering or a quick summer meal.
Ingredients
-
1 cup mixed olives
-
12 marinated mozzarella balls
-
8 oz cubed cheese (e.g., cheddar)
-
3 oz beef prosciutto (or bresaola)
-
3 oz beef salami
-
12 cherry or grape tomatoes
-
Fresh basil leaves
-
3 oz melon balls (e.g., cantaloupe)
-
3 oz grapes
-
12 bite-sized bread pieces
-
Optional drizzle: honey, fig preserves, or balsamic reduction
Instructions
-
Step 1
Gather and prepare all ingredients. Cube the cheese, cut bread into bite-sized pieces, and ensure other items are ready for assembly onto skewers or for arranging on a platter. -
Step 2
For skewers, thread ingredients onto small skewers, alternating items for visual appeal. For a platter, arrange all ingredients attractively in groups or rows. -
Step 3
If desired, drizzle with honey, fig preserves, or balsamic reduction just before serving for an extra touch of flavor. -
Step 4
Serve immediately as a delightful appetizer, snack, or light meal.
Important Information
Nutrition Facts (Per Serving)
It is important to consider this information as approximate and not to use it as definitive health advice.
Allergy Information
Please check ingredients for potential allergens and consult a health professional if in doubt.

Leave a Comment