
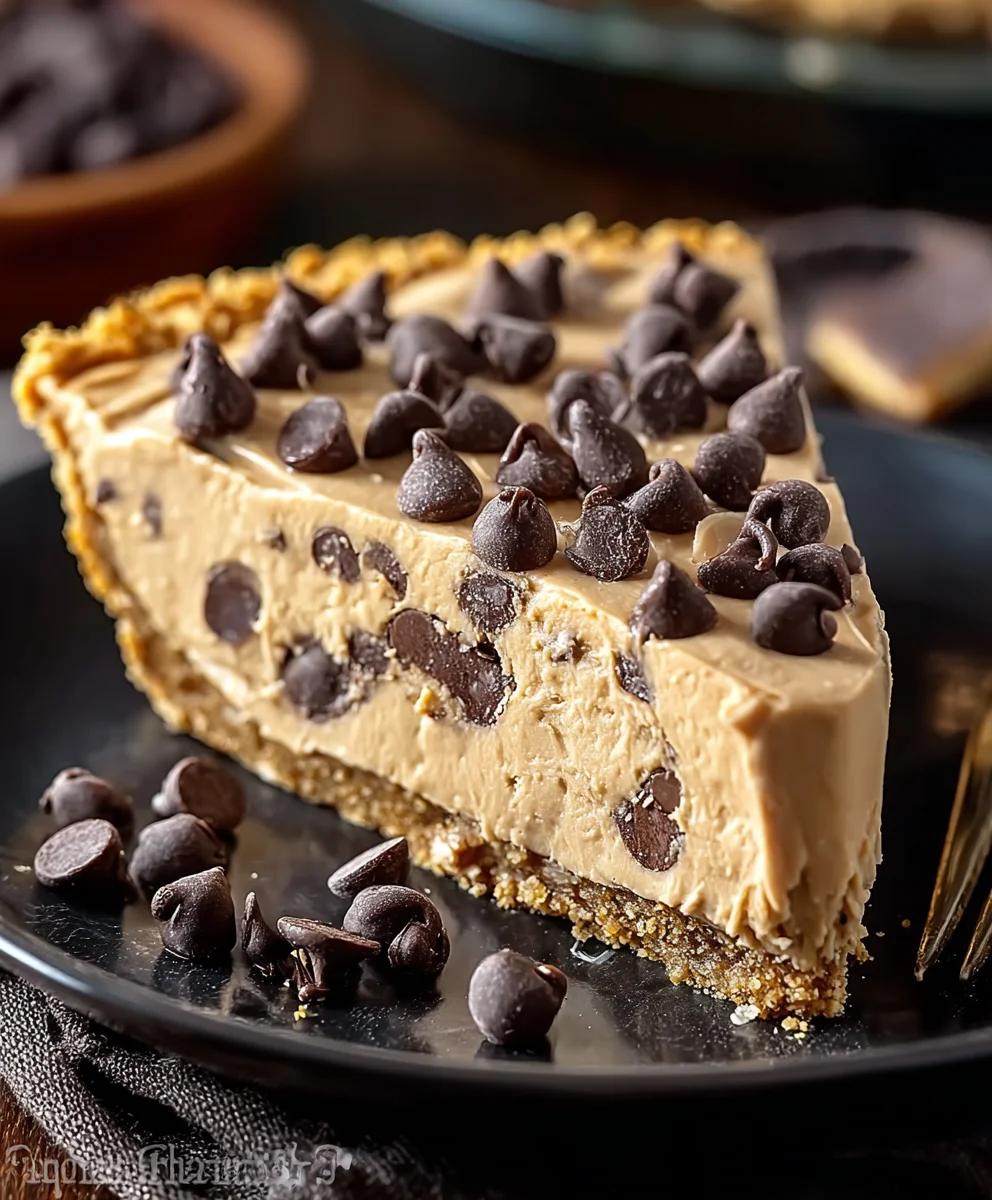
Chocolate Chip Peanut Butter Pie is more than just a dessert; for me, it’s a culinary hug in a slice that perfectly captures comfort and joy. Imagine, if you will, the perfect symphony of creamy, rich peanut butter filling, studded with delightful pockets of chocolate chips, all nestled in a decadent crust. I find this isn’t just a pie; it’s an experience that awakens cherished childhood memories and satisfies the deepest sweet cravings. While the exact origins of combining these two beloved ingredients into a pie might be debated, peanut butter pies themselves have a cherished place in American culinary history, especially in the South. They often evoke images of warm family gatherings, comforting potlucks, and a simpler time. Adding chocolate chips, I believe, elevates this classic to new heights, making it an undeniable crowd-pleaser.
We all adore this dish not only for its incredible taste – the perfect balance of salty and sweet – but also for its wonderfully smooth, often no-bake convenience. The contrasting textures of the velvety filling and the slightly firm chocolate chips, paired with a crisp crust, create a truly unforgettable mouthful. Every slice of this Chocolate Chip Peanut Butter Pie promises pure, unadulterated bliss, and I’m confident you’ll agree once you taste it.

Ingredients:
-
For the Graham Cracker Crust:
- 1 ½ cups (about 10-12 full sheets) graham cracker crumbs
- ½ cup (1 stick) unsalted butter, melted
- ¼ cup granulated sugar
-
For the Creamy Peanut Butter Filling:
- 8 ounces (1 block) cream cheese, softened to room temperature
- 1 cup creamy peanut butter (I recommend a good quality, no-stir variety for the best texture)
- 1 cup powdered sugar (confectioners’ sugar), sifted
- ½ cup (1 stick) unsalted butter, softened to room temperature
- 1 teaspoon pure vanilla extract
- 1 ½ cups heavy cream, very cold
- ½ cup miniature semi-sweet chocolate chips, plus extra for garnish
-
For the Decadent Chocolate Ganache Topping:
- ½ cup heavy cream
- 1 cup semi-sweet chocolate chips (standard size)
- 1 tablespoon unsalted butter, optional (for extra shine and richness)
-
Optional Garnishes:
- Extra mini chocolate chips
- Chopped roasted peanuts
- Drizzled peanut butter
- A light dusting of cocoa powder
Equipment You’ll Need:
Before we dive into creating this spectacular Chocolate Chip Peanut Butter Pie, let’s make sure we have all our kitchen tools ready. Having everything laid out and prepped makes the baking process so much smoother and more enjoyable. You’ll need:
- 9-inch pie plate (a glass or ceramic one works beautifully)
- Large mixing bowls (at least two)
- Electric mixer (either a stand mixer with paddle and whisk attachments or a hand mixer)
- Rubber spatula
- Measuring cups and spoons
- Small saucepan
- Whisk
- Plastic wrap or foil
- Sifter (for powdered sugar, if not already sifted)
- A sturdy flat-bottomed glass or measuring cup for pressing the crust
Preparing the Perfect Graham Cracker Crust:
The foundation of our magnificent Chocolate Chip Peanut Butter Pie begins with a rich and buttery graham cracker crust. This step is crucial for both flavor and structure, providing a delightful textural contrast to the creamy filling. We want a crust that’s firm enough to hold its shape but still yields easily when sliced.
- Prepare your pie plate: First things first, ensure your 9-inch pie plate is clean and ready. There’s no need to grease it, as the butter in our crust mixture will prevent sticking.
- Make the graham cracker crumbs: If you’re starting with whole graham crackers, place them in a food processor and pulse until fine crumbs form. Alternatively, you can put them in a sturdy plastic bag and crush them with a rolling pin. Aim for a consistent, sand-like texture. We’re looking for about 1 ½ cups of crumbs, which usually takes about 10-12 full sheets of graham crackers.
- Combine ingredients for the crust: In a medium-sized mixing bowl, combine the graham cracker crumbs, ¼ cup of granulated sugar, and the ½ cup of melted unsalted butter. Use a fork or a spatula to mix everything together until the crumbs are evenly moistened and resemble wet sand. It’s important that every crumb is coated, as this is what binds the crust together.
- Press the crust into the pie plate: Pour the crumb mixture into your prepared 9-inch pie plate. Using the bottom of a flat-bottomed measuring cup or your fingers, firmly press the mixture evenly over the bottom and up the sides of the pie plate. Pressing firmly is key to a well-structured crust that won’t crumble when you slice your pie. Take your time to ensure it’s compact and uniform.
- Chill or bake the crust (your choice!): For a no-bake pie, you can simply place the pressed crust in the refrigerator for at least 30 minutes to firm up. However, I personally prefer a slightly baked crust for extra crispness and flavor. If baking, preheat your oven to 350°F (175°C). Bake the crust for 8-10 minutes, or until lightly golden brown. This subtle bake enhances the nutty flavor of the graham crackers. Once baked, remove it from the oven and let it cool completely on a wire rack before proceeding to the next step. A completely cool crust is essential; otherwise, it could melt your filling.
Crafting the Irresistible Peanut Butter Filling:
This is where the magic truly happens! The peanut butter filling is the star of our Chocolate Chip Peanut Butter Pie – it’s incredibly rich, smooth, and perfectly balanced. We’re aiming for a light, airy, yet stable consistency that holds its shape beautifully.
- Cream the butter and peanut butter: In a large mixing bowl, using your electric mixer with the paddle attachment (or hand mixer), cream together the softened ½ cup unsalted butter and 1 cup creamy peanut butter on medium speed. Beat until the mixture is light, fluffy, and well combined. This usually takes about 2-3 minutes. Scrape down the sides of the bowl as needed to ensure everything is incorporated.
- Add cream cheese and vanilla: Now, add the 8 ounces of softened cream cheese to the peanut butter mixture. Continue beating on medium speed until the mixture is smooth and lump-free. Then, beat in the 1 teaspoon of pure vanilla extract. It’s crucial that your cream cheese is at room temperature to prevent lumps and ensure a silky-smooth filling. Beat for another 1-2 minutes until everything is perfectly combined.
- Gradually add powdered sugar: With the mixer on low speed, gradually add the 1 cup of sifted powdered sugar to the peanut butter mixture. Start slowly to avoid a powdered sugar cloud! Once most of the sugar is incorporated, increase the speed to medium and beat until the mixture is smooth and creamy. Taste it and adjust sweetness if you like, though this amount is usually just right.
- Whip the heavy cream: In a separate, clean, and very cold mixing bowl (preferably chilled in the freezer for 10-15 minutes), whip the 1 ½ cups of very cold heavy cream. Use the whisk attachment on your electric mixer and beat on high speed until stiff peaks form. This means when you lift the whisk, the cream holds its shape firmly. Be careful not to overbeat, or you’ll end up with butter!
- Gently fold in the whipped cream: This is a critical step for achieving that wonderfully light and airy texture. Take about a third of the whipped cream and gently fold it into the peanut butter mixture using a rubber spatula. Once that’s mostly incorporated, add the remaining whipped cream and continue to fold gently until no streaks of white remain. The key here is gentleness; we don’t want to deflate all that lovely air we just whipped into the cream. This lightness is what makes this Chocolate Chip Peanut Butter Pie so delightful.
- Stir in the chocolate chips: Finally, gently fold in the ½ cup of miniature semi-sweet chocolate chips. These add a delightful burst of chocolate in every bite, complementing the rich peanut butter flavor perfectly. Make sure they are evenly distributed throughout the filling.
Assembling Your Chocolate Chip Peanut Butter Pie:
With our crust ready and our filling perfectly whipped, it’s time to bring it all together. This stage is quick and satisfying, as you see your Chocolate Chip Peanut Butter Pie begin to take its final form.
- Fill the crust: Carefully spoon the entire peanut butter filling mixture into the cooled graham cracker crust.
- Smooth the top: Use your rubber spatula or the back of a spoon to gently spread the filling evenly across the crust, creating a smooth and appealing surface. You want it to look as inviting as it tastes!
- Chill for setting: Cover the pie plate loosely with plastic wrap or foil. Place the pie in the refrigerator to chill for at least 4-6 hours, or ideally, overnight. This chilling time is non-negotiable for the pie to properly set and firm up. It’s essential for clean slices and a stable texture.
Making the Decadent Chocolate Ganache Topping:
No Chocolate Chip Peanut Butter Pie is complete without a glossy, rich chocolate ganache topping. This adds another layer of indulgence and a beautiful finish.
- Heat the cream: In a small saucepan, heat ½ cup of heavy cream over medium heat until it just begins to simmer around the edges. Do not let it boil vigorously.
- Melt the chocolate: Remove the saucepan from the heat. Add 1 cup of semi-sweet chocolate chips and the optional 1 tablespoon of unsalted butter to the hot cream. Let it sit undisturbed for about 5 minutes to allow the chocolate to melt.
- Whisk until smooth: After 5 minutes, whisk the mixture gently but consistently until it is completely smooth, glossy, and uniform. If there are any stubborn lumps, you can return the pan to very low heat for a few seconds, stirring constantly, until smooth.
- Cool slightly: Let the ganache cool for about 10-15 minutes at room temperature. It should still be pourable but not piping hot, as hot ganache can melt your beautiful peanut butter filling. We’re looking for a consistency that will spread nicely without being too thin or too thick.
- Pour over the chilled pie: Once your Chocolate Chip Peanut Butter Pie has chilled sufficiently and the filling is firm, gently pour the slightly cooled ganache over the top. Start from the center and let it spread naturally towards the edges. You can gently tilt the pie plate to help it coat the entire surface evenly.
Final Chilling and Serving Suggestions:
Almost there! A little more patience will be rewarded with perfectly sliceable, utterly delicious Chocolate Chip Peanut Butter Pie.
- Chill again for ganache to set: Return the pie to the refrigerator for at least another 1-2 hours, or until the chocolate ganache has set. It should be firm to the touch, not sticky. This final chill ensures all layers are perfectly set and ready for slicing.
- Garnish and serve: Once fully chilled and set, your Chocolate Chip Peanut Butter Pie is ready to be admired and devoured! Before serving, you can add any optional garnishes you like. I love sprinkling a few extra mini chocolate chips around the edge, or for an extra peanut-y kick, a handful of chopped roasted peanuts works wonderfully. A light drizzle of extra peanut butter or a dusting of cocoa powder can also add a professional touch.
- Slicing tips: For the cleanest slices, use a sharp knife that has been run under hot water and wiped dry between each cut. This helps glide through the ganache and creamy filling without tearing.
- Enjoy! Serve your impressive homemade Chocolate Chip Peanut Butter Pie cold. It’s truly a showstopper and always a crowd-pleaser! Store any leftovers covered in the refrigerator for up to 3-4 days, although I doubt it will last that long!
Conclusion:
Well, my friends, we’ve reached the grand finale of our culinary journey, and what a delightful destination it is! If you’ve followed along, you already know that this isn’t just another dessert recipe; it’s a true masterpiece of flavor and texture, a dish that consistently steals the spotlight at any gathering. I truly believe that once you experience the sheer joy of this confection, you’ll understand exactly why it has become such a beloved staple in my own kitchen and for everyone who tastes it. This isn’t just about combining ingredients; it’s about crafting an edible symphony where every note plays in perfect harmony. The rich, creamy peanut butter layer, so utterly smooth and nutty, dances beautifully with the generous studs of melted chocolate chips, creating pockets of intensely satisfying sweetness that surprise and delight with every single bite. And let’s not forget the sturdy, yet tender, crust that provides the essential foundation, adding that delightful textural contrast we all crave.
What makes this particular pie an absolute must-try, you ask? It’s the exquisite balance. It’s sweet, yes, but never cloyingly so. The natural saltiness of the peanut butter cuts through the sweetness, making each spoonful incredibly moreish. It’s also surprisingly straightforward to prepare, meaning you don’t need to be a pastry chef to achieve show-stopping results. The “wow” factor you get from presenting such a magnificent dessert, especially one you’ve made yourself, is immense. Imagine the smiles and exclamations of delight from your family and friends as they dig into a slice of pure comfort and indulgence. It’s truly a crowd-pleaser that appeals to virtually everyone, from the most discerning dessert connoisseurs to the pickiest eaters. This Chocolate Chip Peanut Butter Pie isn’t just a dessert; it’s an experience, a memory in the making, and a testament to the simple yet profound pleasure that good food brings into our lives.
Elevate Your Slice: Thoughtful Serving Suggestions
While this pie is undeniably spectacular all on its own, there are a few ways you can elevate the experience even further. Think of these as little flourishes to personalize your dessert:
-
A Dollop of Whipped Cream: A cloud of freshly whipped cream, lightly sweetened, adds an ethereal lightness and a beautiful visual contrast. It’s a classic pairing for a reason!
-
A Scoop of Vanilla Bean Ice Cream: The cold, creamy ice cream melting into a warm (or room temperature) slice of pie is pure bliss. The subtle vanilla notes complement both the chocolate and peanut butter beautifully.
-
Chocolate Shavings or Drizzle: For the ultimate chocolate lover, a scattering of dark chocolate shavings or a delicate drizzle of melted chocolate ganache can enhance the cocoa notes already present from the chocolate chips.
-
Chopped Roasted Peanuts: For an extra layer of crunch and intensified nutty flavor, a sprinkle of finely chopped, roasted peanuts on top of each slice adds a lovely textural dimension.
-
A Pinch of Flaky Sea Salt: A tiny sprinkle of high-quality flaky sea salt just before serving can truly make the flavors pop, especially if you have a particularly sweet tooth. It highlights the savory notes of the peanut butter and adds a gourmet touch.
Unleash Your Creativity: Exciting Variations to Explore
One of the things I love most about baking is the opportunity for creativity and personalization. This recipe serves as an excellent canvas, and I wholeheartedly encourage you to experiment and make it your own!
-
Different Crusts: While I adore the classic graham cracker crust, imagine this pie with an Oreo cookie crust for a deeper chocolate flavor, or even a crushed pretzel crust for an incredible salty-sweet dynamic. The possibilities are endless and each one offers a unique spin.
-
Add a Fudge Layer: For an even more decadent treat, consider adding a thin layer of rich, homemade fudge or ganache between the crust and the peanut butter filling. This creates a delightful triple-layered effect that’s utterly irresistible.
-
Nut Butter Swaps: While peanut butter is the star, don’t shy away from experimenting with other nut butters. Almond butter or cashew butter could offer a different, equally delicious flavor profile, especially for those with varying dietary preferences (just ensure they are of a similar consistency to your preferred peanut butter).
-
Mini Pies: Transform this recipe into individual servings by using mini pie shells or even muffin tins lined with parchment. These are perfect for parties, portion control, or just a delightful personal treat.
-
Spice It Up: A tiny pinch of cayenne pepper mixed into the chocolate chips or even a hint of espresso powder can add a sophisticated depth and warmth, creating a more complex flavor experience for adventurous palates.
So, what are you waiting for? This is your invitation, your call to action, to roll up your sleeves and bring this incredible dessert to life in your own kitchen. I promise you, the effort, which is minimal, will be richly rewarded with smiles, satisfied sighs, and requests for the recipe. There’s a profound joy that comes from creating something delicious with your own hands and sharing it with those you care about. It’s a wonderful way to connect, to celebrate, and to simply indulge in life’s sweet moments.
Share Your Masterpiece!
I would absolutely love to hear about your experience baking this pie! Did you stick to the original recipe, or did you venture into some of the variations? What was your favorite part? Did it get rave reviews? Please, don’t hesitate to share your thoughts, your photos, and any creative twists you added in the comments section below. Your feedback and personal stories truly inspire me and the entire community of home bakers. Go ahead, bake this fantastic Chocolate Chip Peanut Butter Pie, savor every delightful mouthful, and then come back and tell me all about it. Happy baking, my friends!

Chocolate Chip Peanut Butter Pie
An irresistible no-bake (or lightly baked) chocolate chip peanut butter pie featuring a graham cracker crust, a creamy peanut butter filling studded with mini chocolate chips, and a decadent chocolate ganache topping. A perfect balance of salty and sweet.
Ingredients
-
1 ½ cups graham cracker crumbs
-
½ cup unsalted butter, melted (for crust)
-
¼ cup granulated sugar
-
8 ounces cream cheese, softened
-
1 cup creamy peanut butter
-
1 cup powdered sugar, sifted
-
½ cup unsalted butter, softened (for filling)
-
1 teaspoon pure vanilla extract
-
1 ½ cups heavy cream, very cold (for filling)
-
½ cup miniature semi-sweet chocolate chips (for filling)
-
½ cup heavy cream (for ganache)
-
1 cup semi-sweet chocolate chips (for ganache)
-
1 tablespoon unsalted butter, optional (for ganache)
-
Extra mini chocolate chips (for garnish)
-
Chopped roasted peanuts (optional garnish)
-
Drizzled peanut butter (optional garnish)
-
Cocoa powder (optional garnish)
Instructions
-
Step 1
Combine 1 ½ cups graham cracker crumbs, ¼ cup granulated sugar, and ½ cup melted unsalted butter. Press mixture firmly into a 9-inch pie plate. -
Step 2
Chill crust for 30 minutes, or bake at 350°F (175°C) for 8-10 minutes until lightly golden. Cool completely before filling. -
Step 3
In a large bowl, cream ½ cup softened unsalted butter and 1 cup creamy peanut butter until light and fluffy. -
Step 4
Add 8 ounces softened cream cheese and 1 teaspoon vanilla extract; beat until smooth. Gradually add 1 cup sifted powdered sugar and beat until creamy. -
Step 5
In a separate, chilled bowl, whip 1 ½ cups very cold heavy cream until stiff peaks form. Gently fold whipped cream into the peanut butter mixture in two additions, then gently fold in ½ cup miniature semi-sweet chocolate chips. -
Step 6
Spoon the entire peanut butter filling into the cooled graham cracker crust and smooth the top. -
Step 7
Cover the pie and chill in the refrigerator for at least 4-6 hours, or ideally overnight, for the filling to properly set. -
Step 8
For the ganache: In a small saucepan, heat ½ cup heavy cream until it just simmers. Remove from heat, add 1 cup semi-sweet chocolate chips and optional 1 tablespoon unsalted butter. Let sit 5 minutes, then whisk until smooth and glossy. -
Step 9
Cool the ganache for 10-15 minutes until pourable but not hot. Gently pour it over the chilled pie, spreading evenly to coat the top. -
Step 10
Return the pie to the refrigerator for another 1-2 hours until the chocolate ganache has set firm to the touch. -
Step 11
Garnish as desired (e.g., extra mini chocolate chips, chopped roasted peanuts, or a dusting of cocoa powder). Serve cold using a sharp, hot knife for clean slices. Store leftovers covered in the refrigerator for up to 3-4 days.
Important Information
Nutrition Facts (Per Serving)
It is important to consider this information as approximate and not to use it as definitive health advice.
Allergy Information
Please check ingredients for potential allergens and consult a health professional if in doubt.

Leave a Comment