
Potsticker Soup Recipe – imagine transforming the beloved savory dumplings into a truly comforting, soul-warming experience. I’ve discovered that there’s something uniquely satisfying about a steaming bowl of homemade soup, especially when it’s brimming with tender, flavor-packed potstickers. This isn’t just any meal; it’s an invitation to a cozy culinary escape, perfect for chilly evenings or when you simply crave something deeply nourishing.
While the origin of traditional potstickers, or guo tie, in Chinese cuisine often tells tales of happy accidents – perhaps a chef trying to salvage overcooked dumplings by pan-frying them – the concept of weaving them into a vibrant soup base is a brilliant adaptation that celebrates both convenience and flavor. It’s a wonderful nod to their rich heritage, presenting them in a new, equally appealing light.
People absolutely adore this dish for its incredible blend of textures and tastes. You get the satisfying chewiness of the dumpling wrapper, the rich, aromatic filling, and all of it enveloped in a light yet flavorful broth that sings with umami notes. It’s remarkably convenient too, making it an ideal choice for a hearty weeknight dinner that comes together with surprising ease. This delightful Potsticker Soup Recipe is designed to bring you maximum comfort with minimal fuss, proving that exceptional flavor doesn’t have to be complicated. I invite you to discover the simple joy of this comforting classic!

Ingredients:
-
For the Potsticker Filling:
- 1 pound (about 450g) ground pork (or ground chicken/turkey for a lighter option)
- 1 cup finely chopped Napa cabbage (about 4-5 large leaves)
- 2 tablespoons fresh ginger, grated
- 4 cloves garlic, minced
- 2 scallions, finely chopped (white and green parts separated)
- 2 tablespoons soy sauce (low sodium preferred)
- 1 tablespoon rice wine vinegar
- 1 tablespoon toasted sesame oil
- 1 teaspoon white sugar
- 1/2 teaspoon white pepper
- 1/4 teaspoon salt (adjust to taste, especially if using regular soy sauce)
-
For the Potsticker Wrappers:
- 1 package (about 50 count) round potsticker or dumpling wrappers (store-bought is perfectly fine and saves a lot of time!)
- Water, for sealing
-
For the Flavorful Soup Broth:
- 8 cups (2 liters) chicken broth (or vegetable broth for a vegetarian option, or a mix of chicken and mushroom broth for depth)
- 1 tablespoon neutral cooking oil (such as canola or grapeseed)
- 1 tablespoon fresh ginger, grated or finely minced
- 2 cloves garlic, minced
- 1 cup sliced fresh shiitake mushrooms (stems removed, caps sliced)
- 1/2 cup sliced carrots (thinly sliced rounds or julienned)
- 2 tablespoons soy sauce (low sodium)
- 1 tablespoon rice wine vinegar
- 1 tablespoon toasted sesame oil
- 1 teaspoon white sugar
- Pinch of white pepper
- 1 head baby bok choy, quartered lengthwise (or 2 cups chopped spinach)
- 1 tablespoon cornstarch mixed with 2 tablespoons cold water (optional, for slight thickening)
-
For Garnish and Serving:
- Reserved green parts of scallions, thinly sliced
- Fresh cilantro, chopped
- Chili oil or Sriracha, for serving (optional)
- Extra soy sauce or rice wine vinegar, for dipping (optional)
Preparing the Potsticker Filling:
- Prepare the Napa Cabbage: My first step for a truly juicy and flavorful potsticker filling is always to prep the cabbage. Take your finely chopped Napa cabbage, place it in a bowl, and sprinkle it with about a quarter teaspoon of salt. Let it sit for about 10-15 minutes. This step is crucial because the salt will draw out excess moisture from the cabbage. After it has rested, gather the cabbage in a clean kitchen towel or a few layers of cheesecloth and squeeze out as much liquid as you possibly can. This prevents your filling from becoming watery and ensures a good texture in the finished potstickers. Trust me, you don’t want soggy potstickers!
- Combine Ingredients for the Filling: In a large mixing bowl, combine your ground pork (or chosen protein), the squeezed Napa cabbage, grated fresh ginger, minced garlic, and the white parts of your chopped scallions.
- Season the Filling: Now for the flavor magic! Add the soy sauce, rice wine vinegar, toasted sesame oil, white sugar, white pepper, and a small pinch of salt to the bowl.
- Mix Thoroughly: This is an important step for the texture of your filling. Using clean hands or a sturdy spoon, mix all the ingredients together vigorously. I always make sure to mix in one direction for several minutes. This technique helps to “develop” the proteins in the meat, creating a cohesive, slightly springy texture that holds together beautifully inside the wrapper. You’ll notice the mixture starts to look a bit pasty and sticky, which is exactly what we want.
- Rest the Filling: Cover the bowl and refrigerate the filling for at least 30 minutes. This allows the flavors to meld together and for the mixture to firm up slightly, making it much easier to work with when it comes time to form your potstickers. This resting period truly enhances the depth of flavor in the finished dish, giving the spices and aromatics time to permeate the meat and vegetables.
Forming the Potstickers:
This is where the fun begins, and while it might seem a little daunting at first, I promise you’ll get the hang of it quickly! Forming potstickers is a wonderfully meditative process once you find your rhythm.
- Set Up Your Workstation: Gather your chilled filling, the package of potsticker wrappers, a small bowl of water, and a baking sheet lined with parchment paper or dusted lightly with flour/cornstarch. This prepped baking sheet will be where you place your finished potstickers to prevent them from sticking. Having everything within reach makes the process much smoother.
- Prepare a Wrapper: Take one potsticker wrapper and place it flat on your palm or a clean surface. Keep the rest of the wrappers covered with a damp cloth to prevent them from drying out, as dried wrappers are prone to cracking.
- Add the Filling: Place about one level tablespoon of the potsticker filling into the center of the wrapper. It’s important not to overfill, especially when you’re first starting out. Too much filling makes it difficult to seal the edges properly, and they might burst during cooking. A good rule of thumb is to ensure there’s at least a half-inch margin around the edge of the wrapper.
- Moisten the Edges: Dip your finger in the small bowl of water and lightly moisten half of the outer edge of the wrapper. This water acts like glue, helping to create a strong seal.
- Fold and Pinch: Now, carefully fold the wrapper in half over the filling, creating a half-moon shape. Pinch the very center of the top edge to seal it.
-
Create the Pleats (The Classic Look): This is the signature potsticker look!
- Starting from one side of the pinched center, use your thumb and index finger to create a small pleat on the top layer of the wrapper.
- Press this pleat firmly against the bottom layer of the wrapper to seal it.
- Repeat this process, creating 2-3 pleats moving towards one end of the potsticker.
- Then, repeat on the other side, creating 2-3 pleats moving towards the opposite end.
- Ensure all pleats are pressed firmly to seal the potsticker completely. A well-sealed potsticker prevents the filling from escaping into your delicious soup.
- If you’re feeling less ambitious, a simple crimp with a fork along the sealed edge works too, but the pleats add to the authenticity and visual appeal!
- Place on Baking Sheet: Carefully transfer the formed potsticker to your prepared baking sheet. Ensure there’s a little space between each potsticker so they don’t stick together.
- Repeat and Store: Continue this process until all the filling or wrappers are used. If you’re not cooking all of them immediately, you can freeze them. Place the potstickers on the baking sheet in the freezer until solid (about 1-2 hours), then transfer them to a freezer-safe bag or container. They can be cooked directly from frozen, usually requiring a few extra minutes.
Cooking the Potstickers for the Soup:
To get that irresistible crispy bottom on your potstickers, even when they’re destined for soup, we’ll pan-fry and then steam them briefly. This method gives them texture and robustness that holds up well in the broth.
- Heat the Pan: Heat 1 tablespoon of neutral cooking oil in a large, non-stick skillet or a heavy-bottomed pan over medium-high heat. You want the oil to be shimmering, but not smoking.
- Sear the Potstickers: Carefully arrange a single layer of your formed potstickers in the hot pan, ensuring they aren’t touching each other. Work in batches if necessary to avoid overcrowding, which can lead to steaming rather than searing. Let them cook undisturbed for 2-3 minutes, or until their bottoms are beautifully golden brown and crispy. This golden crust is what defines a true potsticker!
- Steam the Potstickers: Once the bottoms are golden, carefully pour about 1/2 cup of water or chicken broth into the pan. Be prepared for it to sizzle and steam immediately! Quickly cover the pan with a tight-fitting lid. This traps the steam, allowing the potstickers to cook through and become tender.
- Cook Until Water Evaporates: Reduce the heat to medium and let the potstickers steam for 8-10 minutes, or until most of the water has evaporated and the wrappers are translucent and the filling is cooked through. If cooking from frozen, this steaming step might take a few minutes longer (around 10-12 minutes).
- Finish and Set Aside: Remove the lid and let any remaining water evaporate completely, allowing the bottoms to crisp up again slightly if they’ve softened. Remove the cooked potstickers from the pan and set them aside on a plate. Repeat the process with any remaining uncooked potstickers. These delicious beauties are now ready to join your soup!
Preparing the Flavorful Soup Broth:
The broth is the heart of our Potsticker Soup Recipe, and building it with layers of flavor is key to a truly satisfying experience.
- Sauté Aromatics: In a large soup pot or Dutch oven, heat 1 tablespoon of neutral cooking oil over medium heat. Add the minced ginger and garlic for the soup broth, and sauté for about 1 minute until fragrant. Be careful not to burn the garlic, as it can turn bitter. That wonderful aroma means we’re off to a great start!
- Add Vegetables: Stir in the sliced shiitake mushrooms and carrots. Sauté for another 3-4 minutes, allowing the mushrooms to soften slightly and release their earthy flavors, and the carrots to begin tenderizing. The mushrooms will contribute a fantastic umami depth to our broth.
- Pour in Broth: Carefully pour in the 8 cups of chicken (or vegetable) broth. Give everything a good stir to ensure nothing is sticking to the bottom of the pot.
- Season the Broth: Add the soy sauce, rice wine vinegar, toasted sesame oil, white sugar, and white pepper to the broth. Stir well to combine all the seasonings. I always taste a small spoonful at this stage to check the balance of flavors. Remember, you can always add more, but you can’t take away!
- Simmer and Develop Flavors: Bring the soup to a gentle simmer. Reduce the heat to low, cover the pot, and let it simmer for at least 15-20 minutes. This simmering time is crucial for allowing all the flavors to meld together and deepen, creating a rich and aromatic base for your potsticker soup.
- Add Bok Choy (or Spinach): Once the broth has simmered, add the quartered baby bok choy (or chopped spinach) to the pot. Cook for just 2-3 minutes, until the bok choy is tender-crisp and bright green, or the spinach has just wilted. We want these vegetables to retain a bit of their freshness and texture.
- Thicken (Optional): If you prefer a slightly thicker broth, whisk together the cornstarch and cold water in a small bowl to create a slurry. Gradually stir this slurry into the simmering soup. Continue to stir gently for 1-2 minutes until the broth thickens to your desired consistency. This step provides a lovely mouthfeel to the soup without making it heavy.
Assembling and Serving Your Potsticker Soup:
The grand finale! Bringing all the wonderful components together to create a truly comforting and satisfying bowl of Potsticker Soup.
- Add Cooked Potstickers: Gently add the pan-fried and steamed potstickers into the simmering soup broth. Allow them to heat through for about 2-3 minutes. You don’t want to overcook them, as they are already fully cooked, but just enough to warm them through and let them absorb some of that delicious broth.
- Final Taste and Adjust Seasoning: Before serving, always taste the soup one last time. This is your chance to really make it perfect for your palate. Does it need a little more soy sauce for saltiness? A dash more rice wine vinegar for brightness? Perhaps another pinch of white pepper for a subtle kick? Adjust as needed until you’re happy with the balance.
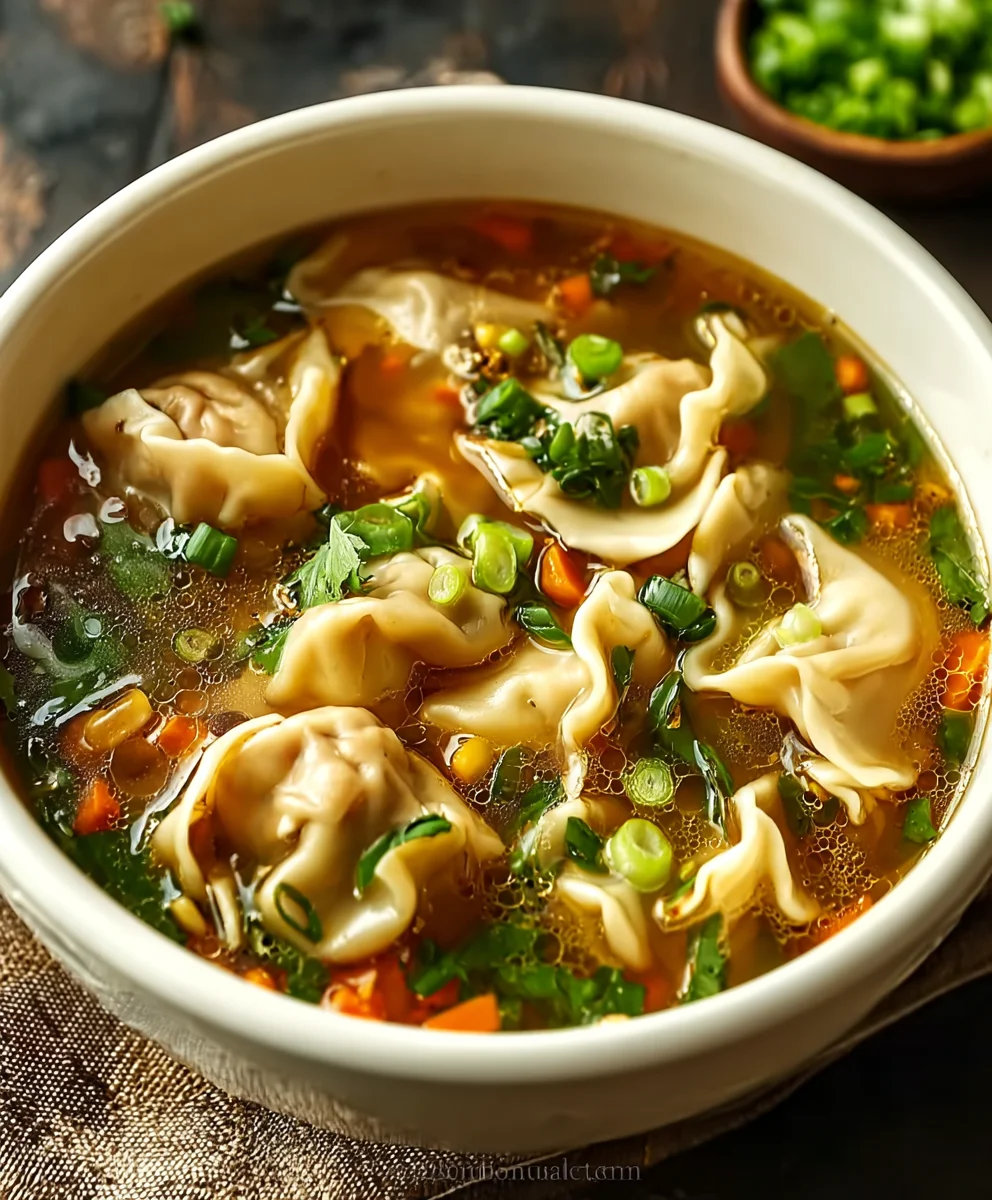
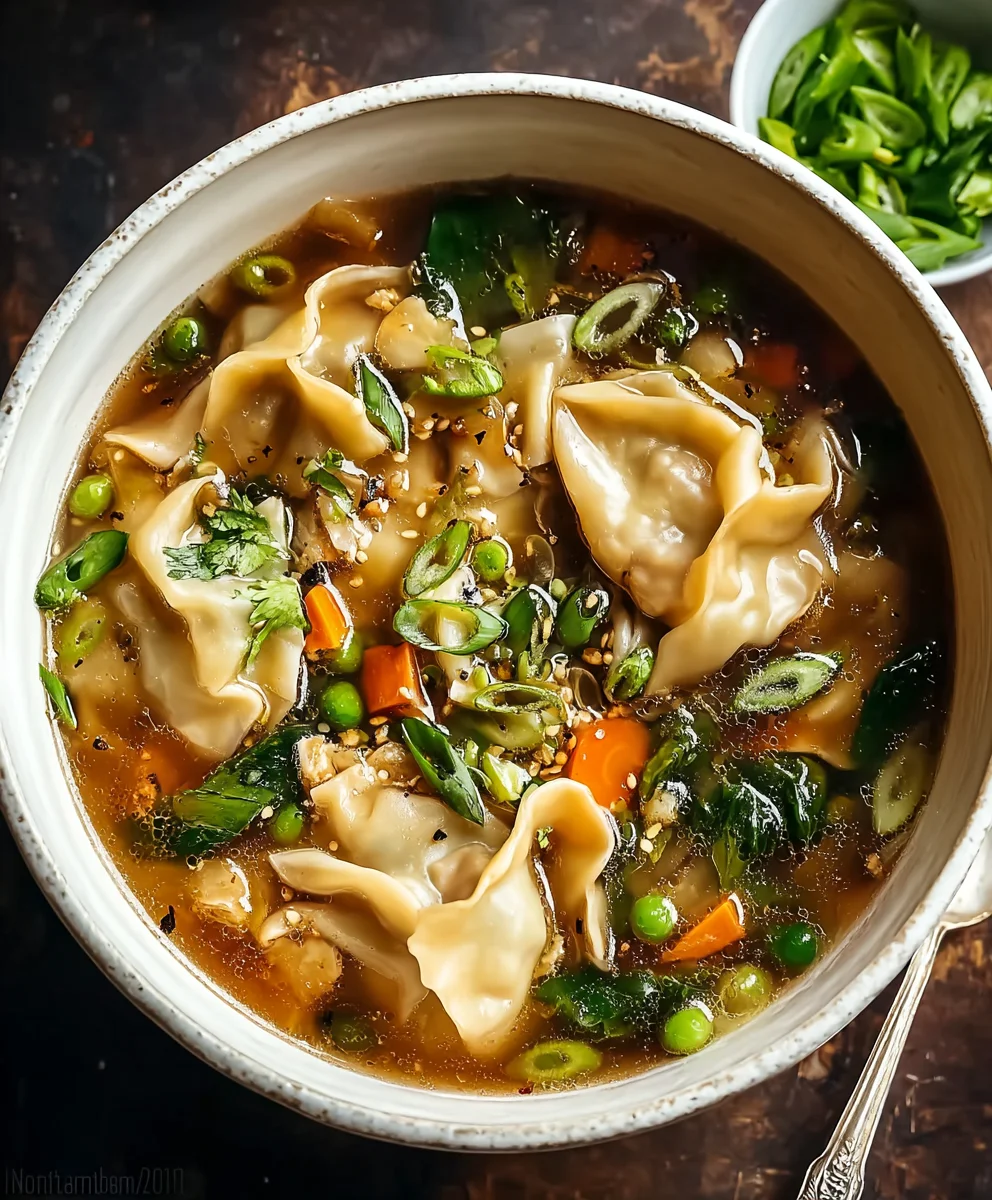
- Ladle and Garnish: Carefully ladle generous portions of the hot Potsticker Soup, including several potstickers and plenty of vegetables, into individual serving bowls.
- Finish with Freshness: Finish each bowl with a sprinkle of the reserved thinly sliced green parts of the scallions and a generous handful of fresh chopped cilantro. These fresh herbs add a vibrant color and an essential aromatic finish.
- Serve with Optional Extras: For those who love a bit of heat, offer chili oil or Sriracha on the side. A small dish of extra soy sauce or rice wine vinegar can also be a nice accompaniment for dipping the potstickers as you eat.
And there you have it – a hearty, flavorful, and incredibly satisfying Potsticker Soup recipe! This dish is perfect for a cozy evening, a comforting lunch, or anytime you crave something warm and delicious. Enjoy the process of making it, and savor every spoonful of this delightful creation.
And there you have it, my friends! We’ve journeyed through the simple steps to create a truly remarkable dish, and I sincerely hope you’re as excited to make this as I am to share it with you. This isn’t just another meal; it’s an experience, a delightful fusion of comforting warmth and vibrant flavors that promises to become a firm favorite in your culinary repertoire. The beauty of this recipe lies not only in its incredible taste but also in its surprising ease and speed. Imagine, a dish that tastes like it took hours of meticulous preparation, yet comes together in a fraction of the time, perfect for those bustling weeknights or when you simply crave something soul-satisfying without the fuss.
I truly believe this particular Potsticker Soup Recipe stands out from the crowd. It marries the beloved convenience of store-bought potstickers with a homemade broth that sings with nuanced flavors, creating a harmony that is both deeply comforting and refreshingly light. Every spoonful is a testament to the idea that delicious, wholesome food doesn’t have to be complicated. It’s the kind of meal that wraps you in a warm hug, chasing away the chill of a cold evening or simply bringing a sense of joy and contentment to your dining table. The aromatic broth, the tender potstickers bursting with savory filling, and the crisp, fresh garnishes all come together to create a symphony of textures and tastes that will leave you feeling nourished and utterly satisfied.
Elevate Your Bowl: Serving Suggestions and Creative Variations
One of the aspects I adore most about this recipe is its incredible versatility, allowing you to tailor it perfectly to your preferences or whatever ingredients you have on hand. For a simple, yet impactful garnish, I always recommend a generous sprinkle of freshly chopped green onions and cilantro. Their vibrant green color and fresh, herbaceous notes not only enhance the visual appeal but also add a wonderful brightness to each bite. A drizzle of toasted sesame oil just before serving can deepen the nutty aroma, while a dash of chili oil or a dollop of chili garlic sauce will provide a delightful kick for those who appreciate a bit of heat. Don’t be shy about experimenting with these; they can truly transform the flavor profile!
But why stop there? Let your culinary imagination soar! If you’re looking to boost the protein content, consider adding some thinly sliced cooked chicken, tender shrimp, or even some pan-fried tofu cubes directly into the simmering broth during the last few minutes of cooking. For an extra dose of vegetables, which I always encourage, feel free to toss in some baby bok choy, spinach, sliced shiitake mushrooms, or shredded carrots. They cook quickly and absorb the delicious broth beautifully, making your soup even more wholesome and hearty. You could also experiment with different types of potstickers – from classic pork and cabbage to chicken, vegetable, or even shrimp varieties – each bringing its unique flair to the overall flavor. For a truly unique twist, consider making it a noodle soup by adding some cooked ramen noodles or vermicelli right into the bowl. The possibilities are genuinely endless, and each variation offers a chance to make this wonderful soup uniquely yours.
Your Turn to Create Culinary Magic!
Now, it’s over to you! I genuinely hope you’ll give this incredible Potsticker Soup Recipe a try in your own kitchen. It’s more than just a recipe; it’s an invitation to create something truly delicious and comforting for yourself, your family, or your friends. Don’t be intimidated; the steps are straightforward, and the reward is immense. You’ll be amazed at how quickly you can whip up a restaurant-quality meal that tastes infinitely better because it was made with your own hands and, of course, your own love.
I absolutely thrive on hearing about your cooking adventures, so please, once you’ve made this delightful soup, come back and share your experience. Did you add any unique ingredients? What was your favorite part? Did it become an instant family favorite? I’m genuinely curious to know how it turned out for you. Your feedback and stories inspire not only me but also countless other home cooks who are looking for new and exciting dishes to try. Don’t hesitate to share photos of your beautiful creations; seeing them always brings a huge smile to my face! Thank you for joining me on this delicious journey, and happy cooking!
Potsticker Soup Recipe: Easy, Hearty & Flavorful!
Potsticker Soup is a delightful and cozy dish perfect for chilly evenings. This easy-to-make soup features fresh potstickers simmered in a fragrant garlic and ginger-infused chicken broth. The addition of shiitake mushrooms and bok choy provides texture and earthy flavors, while toasted sesame oil adds a nutty finish. Garnished with fresh scallions and optional chili crisp for a bit of heat, this comforting meal offers a warm escape in every bite. It’s a versatile dish that can be adapted with different vegetables and levels of spice.
Ingredients
-
1 pound (450g) ground beef
-
1 cup finely chopped Napa cabbage, squeezed dry
-
2 tablespoons fresh ginger, grated
-
4 cloves garlic, minced
-
2 scallions, finely chopped (white parts)
-
2 tablespoons soy sauce
-
1 tablespoon rice vinegar
-
1 tablespoon toasted sesame oil
-
1 teaspoon white sugar
-
1/2 teaspoon white pepper
-
1/4 teaspoon salt
-
1 package (50 count) round potsticker wrappers
-
Water, for sealing
-
8 cups (2 liters) chicken broth
-
1 tablespoon neutral cooking oil
-
1 tablespoon fresh ginger, grated
-
2 cloves garlic, minced
-
1 cup sliced fresh shiitake mushrooms
-
1/2 cup sliced carrots
-
2 tablespoons soy sauce
-
1 tablespoon rice vinegar
-
1 tablespoon toasted sesame oil
-
1 teaspoon white sugar
-
Pinch of white pepper
-
1 head baby bok choy, quartered
-
1 tablespoon cornstarch mixed with 2 tablespoons cold water (optional slurry)
-
Reserved green parts of scallions, sliced
-
Fresh cilantro, chopped
-
Chili oil or Sriracha (optional)
-
Extra soy sauce or rice vinegar (optional)
Instructions
-
Step 1
Prepare Napa Cabbage: Finely chop 1 cup Napa cabbage, sprinkle with 1/4 tsp salt, let sit 10-15 mins. Squeeze out excess liquid using a clean kitchen towel. -
Step 2
Combine Filling: In a large bowl, mix ground beef, squeezed cabbage, 2 tbsp grated ginger, 4 minced garlic cloves, and white parts of 2 scallions. -
Step 3
Season Filling: Add 2 tbsp soy sauce, 1 tbsp rice vinegar, 1 tbsp toasted sesame oil, 1 tsp white sugar, 1/2 tsp white pepper, and 1/4 tsp salt. Mix vigorously in one direction for several minutes until cohesive. -
Step 4
Rest Filling: Cover and refrigerate the filling for at least 30 minutes to firm up flavors. -
Step 5
Set Up Workstation: Gather chilled filling, potsticker wrappers, a small bowl of water, and a parchment-lined baking sheet. -
Step 6
Fill Wrapper: Place 1 tbsp filling in the center of a wrapper. Moisten half of the outer edge with water. -
Step 7
Fold and Seal: Fold the wrapper in half to create a half-moon. Pinch the very center of the top edge to seal. -
Step 8
Create Pleats: Starting from the center, create 2-3 small pleats on the top layer towards one end, pressing firmly against the bottom layer. Repeat on the other side. Ensure a complete seal. Place formed potsticker on the baking sheet. -
Step 9
Repeat & Store: Continue until all filling/wrappers are used. Freeze potstickers on a baking sheet until solid, then transfer to a freezer-safe bag if not cooking immediately. -
Step 10
Sear Potstickers: Heat 1 tbsp neutral oil in a large non-stick skillet over medium-high heat. Arrange potstickers in a single layer and sear for 2-3 minutes until bottoms are golden brown and crispy. Work in batches. -
Step 11
Steam Potstickers: Carefully pour 1/2 cup water/broth into the pan. Quickly cover with a tight-fitting lid. Reduce heat to medium and steam for 8-10 minutes (10-12 mins for frozen potstickers) until water evaporates and wrappers are translucent. -
Step 12
Finish Potstickers: Remove lid, let any remaining water evaporate completely, and re-crisp bottoms if softened. Remove cooked potstickers and set aside. Repeat for remaining. -
Step 13
Sauté Aromatics: In a large soup pot, heat 1 tbsp neutral cooking oil over medium heat. Sauté 1 tbsp grated ginger and 2 minced garlic cloves for 1 minute until fragrant. -
Step 14
Add Vegetables & Broth: Stir in 1 cup sliced shiitake mushrooms and 1/2 cup sliced carrots. Sauté for 3-4 minutes. Pour in 8 cups chicken broth. -
Step 15
Season Broth: Add 2 tbsp soy sauce, 1 tbsp rice vinegar, 1 tbsp toasted sesame oil, 1 tsp white sugar, and a pinch of white pepper. Stir well. -
Step 16
Simmer Broth: Bring the soup to a gentle simmer. Reduce heat to low, cover, and simmer for 15-20 minutes to meld flavors. -
Step 17
Add Greens: Stir in 1 head quartered baby bok choy. Cook for 2-3 minutes until tender-crisp (or 2 cups spinach until wilted). -
Step 18
Thicken (Optional): For a slightly thicker broth, whisk 1 tbsp cornstarch with 2 tbsp cold water to create a slurry. Stir gradually into the simmering soup and cook 1-2 minutes until desired consistency. -
Step 19
Assemble Soup: Gently add the cooked potstickers into the simmering soup broth. Heat through for 2-3 minutes. -
Step 20
Adjust Seasoning: Taste the soup and adjust seasonings (soy sauce, rice vinegar, pepper) as desired. -
Step 21
Serve & Garnish: Ladle generous portions into serving bowls. Garnish with sliced green scallions and fresh chopped cilantro. Serve with chili oil/Sriracha or extra soy sauce/rice vinegar on the side if desired.
Important Information
Nutrition Facts (Per Serving)
It is important to consider this information as approximate and not to use it as definitive health advice.
Allergy Information
Please check ingredients for potential allergens and consult a health professional if in doubt.


Leave a Comment