
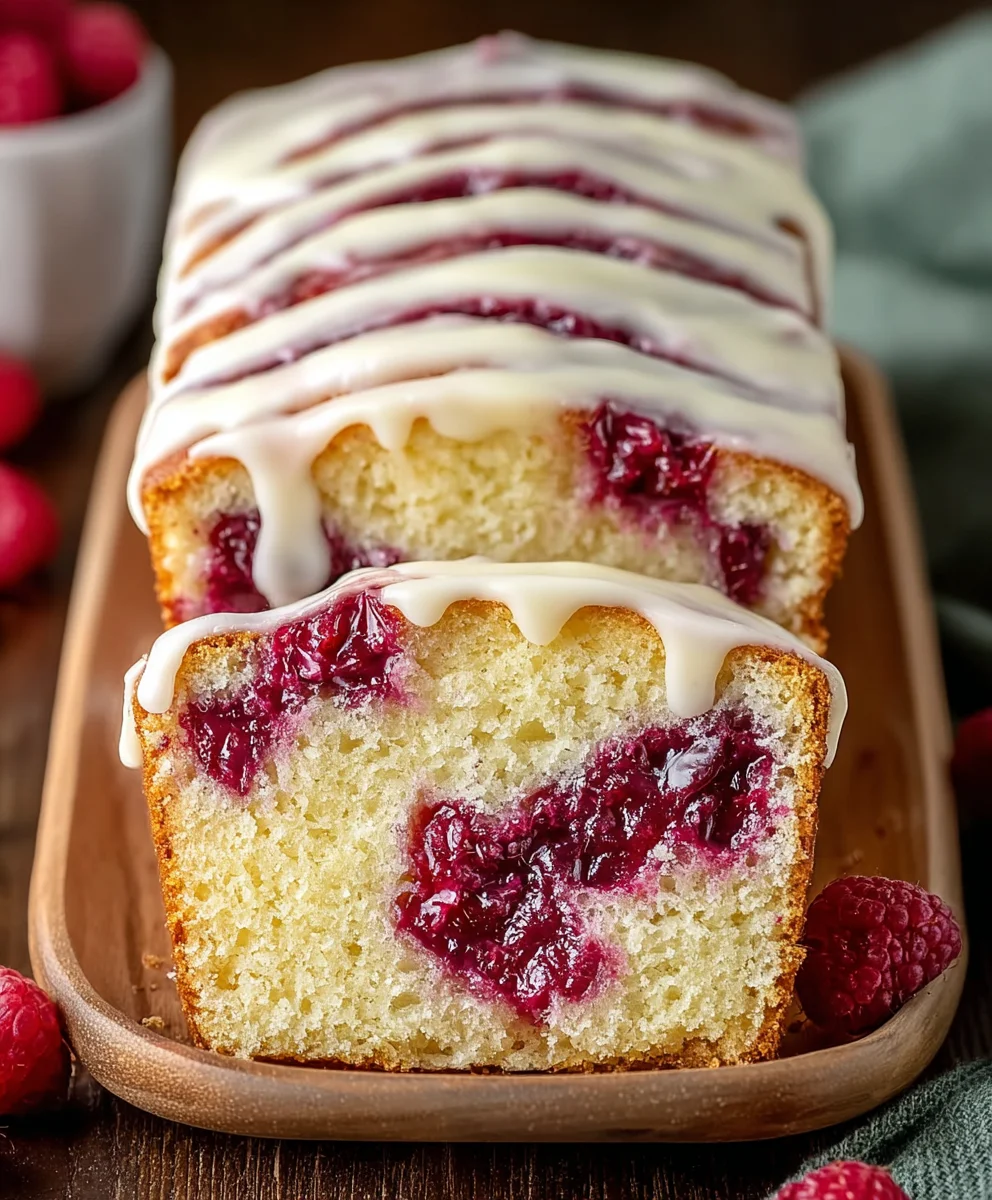
White Chocolate and Raspberry Loaf Cake is truly a bake sale star and an afternoon tea essential, promising a delightful escape with every single slice. Have you ever craved a dessert that feels both utterly luxurious and wonderfully comforting? This recipe perfectly encapsulates that sweet spot, offering a harmonious blend of creamy white chocolate and the vibrant tang of fresh raspberries baked into a beautifully moist loaf. It’s the kind of treat that brings a smile to everyone’s face, whether served warm from the oven or enjoyed later with a hot cup of tea.
Why This White Chocolate and Raspberry Loaf Cake Will Be Your New Favorite
The humble loaf cake has long been a staple in kitchens worldwide, cherished for its simplicity and versatility, making it a go-to for home bakers. While the specific combination of white chocolate and raspberry might be a more recent culinary darling, it has quickly captured hearts due to its irresistible contrast. People absolutely adore this particular White Chocolate and Raspberry Loaf Cake because it delivers on so many fronts: the rich, buttery crumb, the delightful bursts of juicy fruit, and the sweet, almost caramel-like notes of melted white chocolate chips. It’s an effortless masterpiece, perfect for sharing with loved ones, enjoying with a cup of coffee, or simply treating yourself to a moment of pure bliss. I promise, once you try this recipe, it will become a cherished favourite in your baking repertoire!

Ingredients:
Crafting this delightful White Chocolate and Raspberry Loaf Cake is an absolute joy, and it all starts with gathering your ingredients. I always find that having everything measured out and ready (a concept known as “mise en place”) makes the baking process so much smoother and more enjoyable. Here’s what you’ll need to create this moist, flavorful loaf that I just adore:
- 175g (3/4 cup) unsalted butter, softened: This is a non-negotiable for a tender crumb. Make sure it’s truly at room temperature – soft enough to leave an indent when you press it, but not melted. I usually take mine out of the fridge at least an hour before I plan to bake. Plus a little extra for generously greasing your loaf pan.
- 200g (1 cup) granulated sugar: For that perfect level of sweetness that complements the tart raspberries and rich white chocolate. It also helps with the cake’s structure and moisture.
- 3 large eggs, room temperature: Just like the butter, room temperature eggs are crucial. They emulsify much better with the butter and sugar, creating a smoother, more uniform batter and a lighter, fluffier cake texture. If you forget to take them out, a quick trick is to place them in a bowl of warm water for 5-10 minutes.
- 1 teaspoon pure vanilla extract: A classic flavor enhancer that beautifully rounds out and complements the star flavors of white chocolate and raspberries. I always opt for pure vanilla for the best taste.
- 250g (2 cups) all-purpose flour: The structural backbone of our loaf cake. For accuracy, especially in baking, I highly recommend weighing your flour with a kitchen scale. If you’re using cups, be sure to spoon the flour into the measuring cup and level it off, rather than scooping directly, which can compact the flour and lead to a denser cake.
- 2 teaspoons baking powder: Our primary leavening agent, ensuring a lovely rise and an airy texture for the loaf. Always check the expiration date on your baking powder; old powder won’t give your cake the lift it deserves.
- 1/2 teaspoon fine sea salt: To balance the sweetness of the sugar and white chocolate, and to enhance all the other flavors. Trust me, a little salt goes a long way in bringing out the best in sweet treats!
- 80ml (1/3 cup) whole milk, room temperature: Adds essential moisture and richness without making the cake too dense. Again, room temperature milk ensures it blends seamlessly into the batter without seizing the butter.
- 150g (1 cup) good quality white chocolate, chopped: The choice of white chocolate truly makes a difference here. I prefer to chop a bar of good quality white chocolate into small pieces (about 0.5-1 cm) because it melts more smoothly and distributes flavor better. However, good quality white chocolate chips work just as well and are very convenient.
- 150g (1 cup) fresh raspberries: These are the vibrant, juicy stars of our show! Their tartness is the perfect counterpoint to the sweet white chocolate. If fresh raspberries aren’t in season or available, you can absolutely use frozen raspberries. Just be sure not to thaw them first; use them directly from frozen to prevent them from bleeding too much color into the batter. You’ll also need about 1 tablespoon of flour for dusting the raspberries (we’ll get to why in the instructions!).
- For the Optional Glaze: If you love a little extra sweetness and a beautiful finish, I highly recommend this simple glaze.
- 100g (3/4 cup) powdered sugar (confectioners’ sugar): Sifted, to ensure a super smooth, lump-free glaze.
- 2-3 tablespoons milk or lemon juice: The liquid base for your glaze. Milk will give you a classic sweet glaze, while lemon juice adds a wonderful tangy brightness that I personally adore, especially with raspberries. You can adjust the amount for your desired consistency.
Equipment You’ll Need:
Having the right tools ready before you start baking can make the whole process so much more enjoyable and efficient. Here’s a list of the essential equipment I use when I’m making my White Chocolate and Raspberry Loaf Cake:
- 9×5 inch (23×13 cm) loaf pan: This is the standard size for most loaf cakes and will give you a beautifully proportioned bake. A metal pan is usually preferred for even heat distribution.
- Parchment paper: Absolutely essential for easy removal of your loaf cake. I always line my pan with it, leaving an overhang on the sides to act as “handles.”
- Large mixing bowls (2-3): You’ll need at least one large bowl for your wet ingredients and another for your dry ingredients. A third small bowl is handy for dusting your raspberries.
- Electric mixer (stand or hand-held): While you can do this by hand, an electric mixer makes creaming the butter and sugar so much easier and more effective, ensuring a light and airy batter.
- Whisk: For thoroughly combining your dry ingredients and for making your glaze.
- Rubber spatula: Indispensable for scraping down the sides of your mixing bowl, folding in ingredients gently, and ensuring no delicious batter goes to waste.
- Measuring cups and spoons (or a kitchen scale): As I mentioned earlier, a kitchen scale is my preferred method for accuracy, especially with flour. However, good quality measuring cups and spoons are perfectly fine for this recipe if used correctly.
- Wire cooling rack: Crucial for allowing your cake to cool properly and prevent the bottom from getting soggy. Airflow is key!
- Small saucepan or microwave-safe bowl: If you need to gently melt your white chocolate (though we’re chopping it here, it’s good to have this option for other recipes or if you prefer melted chocolate swirls).
- Sifter: For sifting flour and baking powder to prevent lumps, and especially for achieving a smooth, lump-free powdered sugar glaze.
- Toothpick or cake tester: Your go-to tool for checking if the cake is fully baked through.
- Sharp serrated knife: For slicing your beautiful loaf cake cleanly without squishing it.
Preparation Steps:
Now that we have all our wonderful ingredients and equipment ready, it’s time to bring this gorgeous White Chocolate and Raspberry Loaf Cake to life! Follow these steps carefully, and you’ll be rewarded with a truly delightful bake.
Setting the Stage: Prepping Your Oven and Pan
- First things first, let’s get our oven ready. I always preheat my oven to 180°C (350°F), or 160°C (325°F) for a fan/convection oven. This allows the oven to reach and stabilize at the correct temperature before the cake goes in, which is vital for even baking and a good rise.
- Next, prepare your 9×5 inch (23×13 cm) loaf pan. I like to grease it lightly with a little extra softened butter. Then, line it with parchment paper, allowing an overhang on the longer sides. This creates convenient “slings” that will make lifting the cooled cake out of the pan incredibly easy. The parchment paper also helps prevent the cake from sticking and ensures a clean, professional-looking loaf. Set this prepared pan aside.
The Dry Mix: Whisking Together the Essentials
- In a medium-sized bowl, combine your 250g (2 cups) all-purpose flour, 2 teaspoons baking powder, and 1/2 teaspoon fine sea salt. I always give these a good whisk for about 30 seconds to a minute. This isn’t just about mixing them; it’s about aerating the flour and ensuring the baking powder and salt are evenly distributed throughout. This helps prevent pockets of unmixed ingredients and ensures a consistent rise and flavor in every slice. Set this bowl aside for now.
The Creaming Method: Building the Flavor Base
- Now for the magic of the creaming method! In a large mixing bowl (the bowl of your stand mixer, or a large bowl if using a hand-held mixer), add your 175g (3/4 cup) softened unsalted butter and 200g (1 cup) granulated sugar.
- Beat these together on medium speed for about 3 to 5 minutes. What you’re looking for is a mixture that becomes noticeably lighter in color, pale yellow, and incredibly fluffy and airy in texture. This process incorporates air into the butter and sugar, which contributes significantly to the cake’s light crumb. Be sure to stop your mixer occasionally and use your rubber spatula to scrape down the sides and bottom of the bowl, ensuring everything is thoroughly combined.
- Once your butter and sugar are perfectly light and fluffy, it’s time to add the eggs. Add your 3 large room-temperature eggs one at a time. After each egg, beat well until it’s fully incorporated into the mixture before adding the next. This ensures that the emulsion stays stable and the batter remains smooth. If you add them all at once, the mixture might curdle. Don’t worry if it looks a little curdled after the first egg; it should come together as you add the others.
- Finally, beat in the 1 teaspoon pure vanilla extract until just combined. The batter should now look wonderfully creamy and inviting.
Alternating Liquids and Dry: Creating the Batter
- With your wet ingredients beautifully creamed, it’s time to bring in the dry mix and the milk. We’ll add these in alternating additions to maintain the batter’s emulsion and texture. I like to start and end with the dry ingredients.
- Add about one-third of your dry ingredient mixture (flour, baking powder, salt) to the butter-sugar-egg mixture. Mix on low speed, or by hand with your spatula, just until streaks of flour almost disappear. Be careful not to overmix at this stage!
- Next, pour in half of your 80ml (1/3 cup) room-temperature whole milk. Mix on low speed until just combined.
- Repeat this process: add another third of the dry ingredients, mix until just combined, then add the remaining milk, mix until just combined.
- Finish by adding the last third of your dry ingredients. Mix on the lowest speed possible, or fold gently by hand with your rubber spatula, until the flour is just incorporated and no dry streaks remain. Seriously, stop mixing as soon as it’s combined. Overmixing at this stage develops the gluten in the flour too much, which can lead to a tough, dry cake – and we definitely don’t want that! A few tiny lumps are far better than an overmixed batter.
Adding the Stars: White Chocolate and Raspberries
- Now for the star additions! In a separate small bowl, gently toss your 150g (1 cup) fresh raspberries (or frozen, if using) with about 1 tablespoon of the all-purpose flour you measured earlier. This light dusting of flour is my secret trick! It helps prevent the raspberries from sinking to the bottom of the cake during baking, ensuring they are beautifully distributed throughout the loaf.
- Add the floured raspberries and your 150g (1 cup) chopped white chocolate (or white chocolate chips) to the cake batter.
- Using your rubber spatula, very gently fold the white chocolate and raspberries into the batter. Do this with a light hand, folding just until they are evenly distributed. Overmixing here can crush the delicate raspberries and cause their juices to bleed excessively into the batter, potentially turning your cake an unappealing color. A few gentle folds are all it takes.
Into the Pan and Bake: The Moment of Truth
- Carefully spoon the beautiful, vibrant batter into your prepared loaf pan.
- Use your spatula to gently smooth the top of the batter. I often create a slight “trough” down the center of the batter, making it a little lower in the middle than on the sides. This helps encourage the cake to rise more evenly and prevents a huge dome that might crack too much in the center, ensuring a prettier loaf.
- Place the loaf pan in your preheated oven.
- Bake for approximately 50 to 65 minutes. Baking times can vary quite a bit depending on your specific oven, so it’s important to pay attention. After about 45-50 minutes, I start checking for doneness.
- You’ll know your cake is ready when the top is beautifully golden brown, and a wooden skewer or toothpick inserted into the center of the cake comes out clean or with just a few moist crumbs attached. If it’s looking too dark on top but isn’t quite done, you can loosely tent it with a piece of aluminum foil for the remaining baking time.
Cooling Down: Patience is a Virtue
- Once baked, carefully remove the loaf pan from the oven.
- Let the cake cool in the pan on a wire rack for about 10-15 minutes. This initial cooling period allows the cake to set and firm up, making it less likely to break when you remove it.
- After 10-15 minutes, use the parchment paper overhangs to carefully lift the cake out of the pan. Place it directly onto the wire cooling rack to cool completely. This can take anywhere from 1 to 2 hours. Resist the urge to slice into it while it’s warm; a fully cooled cake will have a much better texture and will be easier to slice cleanly.
The Grand Finale: Crafting the Optional Glaze
- If you’re making the optional glaze (and I highly recommend it for that extra touch of elegance and sweetness!), wait until your loaf cake is completely cool.
- In a small bowl, sift your 100g (3/4 cup) powdered sugar. Sifting is important here to remove any lumps and ensure a silky smooth glaze.
- Gradually add 1 tablespoon of milk or lemon juice to the sifted powdered sugar. Whisk vigorously until you have a smooth, pourable consistency. I usually start with 1 tablespoon and add more, half a teaspoon at a time, until it’s just right. You want it thick enough to coat the back of a spoon but thin enough to drizzle. If it’s too thick, add a tiny bit more liquid; if too thin, add a tiny bit more sifted powdered sugar.
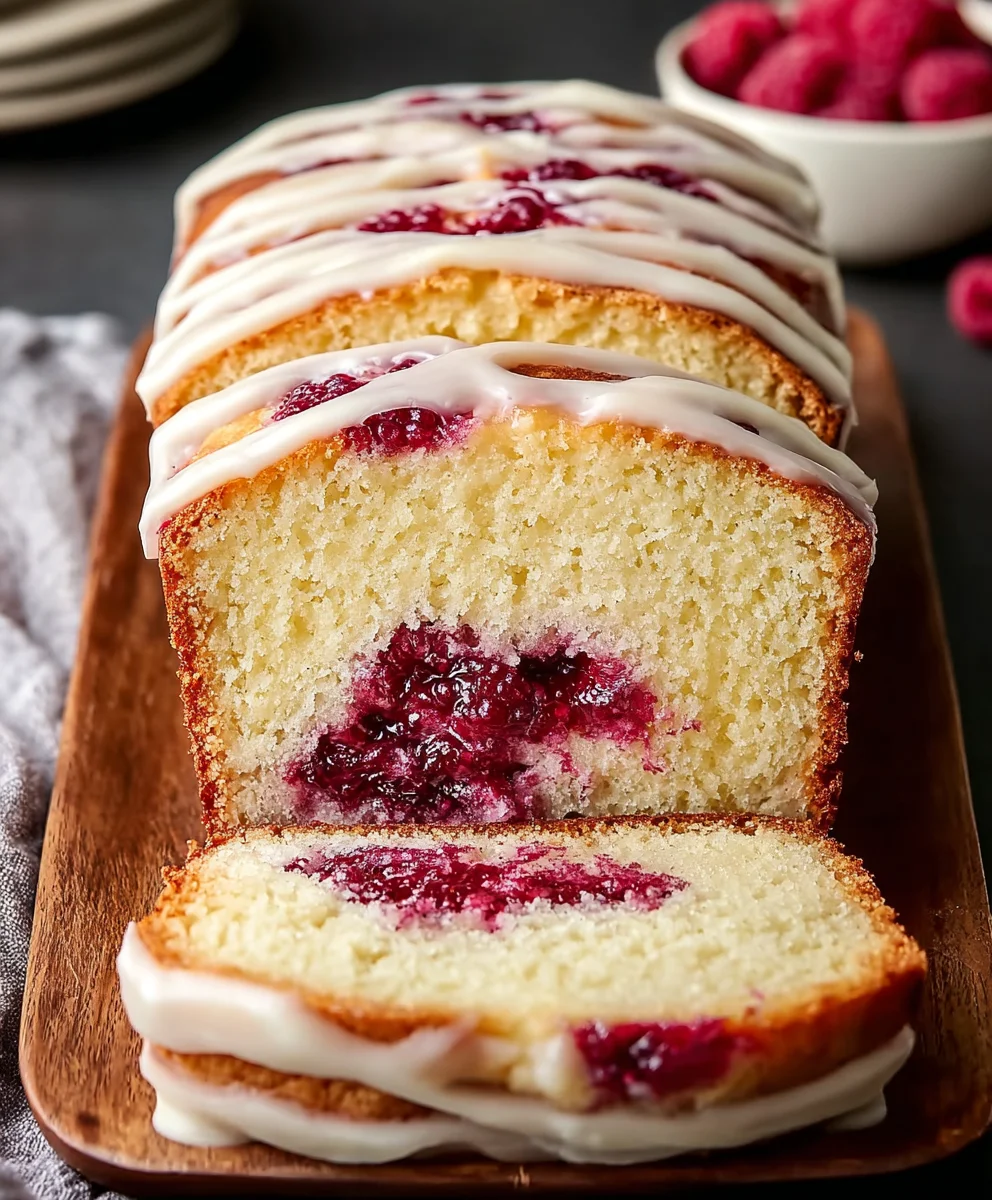
- Once your cake is cool, drizzle the glaze evenly over the top, letting it drip artfully down the sides.
- Allow the glaze to set for about 15-20 minutes before slicing and serving. This ensures the glaze hardens slightly and doesn’t get sticky.
Tips for Success for Your White Chocolate and Raspberry Loaf Cake:
Baking, for me, is a delightful blend of art and science. While this recipe is straightforward, a few key tips can elevate your White Chocolate and Raspberry Loaf Cake from good to absolutely phenomenal. I’ve learned these through plenty of baking adventures (and a few mishaps!), and I’m happy to share my insights with you:
- Embrace Room Temperature Ingredients: I cannot stress this enough! Butter, eggs, and milk at room temperature blend together seamlessly, creating a smooth, emulsified batter. This leads to a finer, more tender crumb in your finished cake. Cold ingredients can cause the butter to seize, resulting in a lumpy batter and a denser cake. Plan ahead and take them out of the fridge at least an hour before you start baking.
- Do Not Overmix the Batter: This is a cardinal rule in cake baking. Once you add the flour, mix only until the dry ingredients are just incorporated. Overmixing develops the gluten in the flour, making your cake tough and chewy instead of tender and moist. A few small lumps are perfectly fine and preferable to an overmixed batter. Use a gentle hand and a rubber spatula for the final folds.
- Weigh Your Ingredients for Accuracy: While cup measurements are common, they can be imprecise, especially for flour. A kitchen scale provides consistent and accurate measurements, which is crucial for successful baking. If you’re serious about baking, investing in a good digital scale is one of the best things you can do!
- The Flour Dusting Trick for Raspberries: That tablespoon of flour you toss with your raspberries isn’t just for show! It helps to create a protective barrier around the fruit, which significantly reduces the chances of them sinking to the bottom of your loaf during baking. This ensures a beautiful, even distribution of those vibrant berries throughout every slice.
- Know Your Oven: Every oven is a little different. Baking times are always estimates. An oven thermometer can be a valuable tool to ensure your oven is actually at the temperature you set it to. If your cake is browning too quickly on top, loosely tent it with foil. If it’s taking longer to bake, trust the toothpick test!
- Good Quality White Chocolate Makes a Difference: Since white chocolate is a key flavor in this cake, using a good quality brand will truly elevate the taste. I look for white chocolate with a high cocoa butter content for a richer, creamier flavor and better melt. Avoid those “white baking chips” that are mostly sugar and palm oil, as they won’t deliver the same delicious results.
- Don’t Be Afraid of Cracks: It’s perfectly normal for loaf cakes, especially those with fruit, to develop a crack down the middle. This is a sign of a good rise and a well-baked cake, so embrace it! That’s where the glaze often settles so beautifully too.
- Patience During Cooling: I know how tempting it is to slice into a warm cake, but allowing your loaf to cool completely on a wire rack is essential. This allows the internal structure of the cake to set properly and the flavors to fully develop. Slicing it too early can result in a crumbly cake and a less-than-ideal texture.
Storage and Serving Suggestions:
This White Chocolate and Raspberry Loaf Cake is incredibly versatile and stores beautifully, so you can enjoy it for days or even save some for later. Here are my favorite ways to keep it fresh and how I love to serve it:
Storage:
- At Room Temperature: Once the cake is completely cool (and the glaze has set, if you used it), I store it in an airtight container at room temperature. It will stay wonderfully fresh and moist for 3 to 4 days. The airtight container is crucial to prevent it from drying out.
- In the Refrigerator: While not strictly necessary for such a short period, if your kitchen is particularly warm or humid, or if you want to extend its freshness, you can store the loaf cake in an airtight container in the refrigerator for up to a week. Just be aware that refrigeration can sometimes slightly alter the texture of cakes, making them a little firmer. I usually let it come to room temperature for about 30 minutes before serving if it’s been refrigerated.
- Freezing for Longer: This loaf cake freezes beautifully! Once completely cooled (and without the glaze, if possible, as it can get a bit watery upon thawing), wrap the entire loaf or individual slices tightly in plastic wrap, then again in aluminum foil. Place it in a freezer-safe bag or container. It will keep well in the freezer for up to 3 months. To thaw, simply unwrap the cake (or slices) and let it come to room temperature on a wire rack for a few hours. You can add the glaze fresh after thawing if you wish!
Serving Suggestions:
This cake truly shines at various occasions, and I find its versatility makes it one of my go-to recipes. Sometimes I’ll serve it with extra fresh raspberries on the side, or if I’m feeling fancy, a dollop of whipped cream.
- For Brunch or Coffee Breaks: My absolute favorite way to enjoy a slice of this White Chocolate and Raspberry Loaf Cake is alongside a warm cup of coffee or a comforting mug of tea. The sweetness of the cake with the slight bitterness of coffee is a match made in heaven. It’s also a fantastic centerpiece for a brunch spread, offering a lovely homemade touch.
- As a Simple Dessert: Elevate this humble loaf cake into a delightful dessert by serving it warm with a generous scoop of good quality vanilla bean ice cream. The melting ice cream against the tender cake and tart raspberries is just divine. A light dusting of powdered sugar just before serving adds an elegant touch.
- With Fresh Berries and Cream: For a truly elegant presentation, I often serve slices with a handful of extra fresh raspberries, perhaps a few blueberries, and a dollop of freshly whipped cream. The additional freshness and creaminess add another layer of indulgence that everyone adores.
- A Mid-Afternoon Treat: Sometimes, I just crave something sweet and satisfying in the afternoon. A simple slice of this loaf cake, perhaps warmed slightly in the microwave for 10-15 seconds to bring out the gooey white chocolate, is the perfect pick-me-up.
- Gifting: This loaf cake also makes a wonderful homemade gift for friends, family, or neighbors. Wrap it beautifully in parchment paper and twine, and it’s sure to bring a smile to anyone’s face.
No matter how you choose to enjoy it, I am confident that this White Chocolate and Raspberry Loaf Cake will become a cherished recipe in your kitchen, just as it has in mine. Happy baking!
Conclusion:
And there you have it, friends! We’ve reached the end of our delightful journey, but the real adventure begins in your kitchen. If there’s one recipe I genuinely urge you to add to your baking repertoire, it’s this incredible White Chocolate and Raspberry Loaf Cake. It’s not just a cake; it’s an experience. Imagine sinking your teeth into a slice, where every bite offers that perfect symphony of sweet, creamy white chocolate melting on your tongue, beautifully contrasted by the tart burst of fresh raspberries. The crumb is incredibly moist, tender, and just utterly irresistible. I’ve made countless loaf cakes in my time, but this particular combination stands out, consistently earning rave reviews from everyone who tries it. It’s the kind of bake that makes you look like a seasoned pro, even if it’s your very first attempt at a loaf cake. The simple elegance of its appearance, dotted with vibrant red and creamy white, hides a depth of flavor that is truly remarkable and surprisingly easy to achieve.
This isn’t merely a dessert; it’s a versatile star for any occasion. Picture it as the perfect accompaniment to your morning coffee, a sophisticated afternoon tea treat, or a comforting late-night indulgence. I often find myself enjoying a slice for breakfast (don’t tell anyone!), as the fruit and the not-too-sweet cake batter make it feel perfectly acceptable. For an extra touch of decadence, try serving a warm slice with a generous scoop of vanilla bean ice cream, allowing the heat of the cake to slightly melt the ice cream into a luscious sauce. A light dusting of powdered sugar is always a classic finish, adding a delicate sweetness and a touch of visual charm. You could also drizzle a simple white chocolate ganache or a tart raspberry glaze over the top once it’s cooled for an even more impressive presentation and an extra layer of flavor. Fresh raspberries scattered around the plate always elevate the experience, making each serving feel like a special treat.
Elevate Your Loaf Cake Experience:
While the classic White Chocolate and Raspberry Loaf Cake is truly perfect as is, don’t hesitate to get creative! If you’re feeling adventurous, you could experiment with different berries; blueberries or blackberries would also be fantastic. A sprinkle of chopped nuts like pecans or macadamias folded into the batter could add a wonderful textural contrast. For a more intense chocolate flavor, consider using dark chocolate chips alongside the white chocolate, creating a striking visual and taste profile. You could also infuse the milk in the recipe with a hint of vanilla bean or a dash of almond extract for an added aromatic dimension. The beauty of this recipe lies in its adaptability, so feel free to make it your own. You might even discover your next favorite variation!
So, what are you waiting for? Clear your schedule, preheat your oven, and prepare to fill your home with the most heavenly aroma imaginable. Trust me, the joy of pulling this golden-brown, beautifully baked loaf from the oven is unparalleled. It’s a moment of pure baking triumph! I absolutely cannot wait for you to try this recipe. Once you do, please, please, please come back and share your experience with me! Did you love it as much as I do? Did you make any exciting variations? Tag me in your photos online, leave a comment below, or just tell your friends all about it. Your feedback and baking adventures truly inspire me. Happy baking, everyone!
Frequently Asked Questions (FAQs)
Can I use frozen raspberries instead of fresh?
Yes, you absolutely can! If using frozen raspberries, I recommend tossing them lightly in a tablespoon of flour before adding them to the batter. This helps prevent them from sinking to the bottom of the loaf and also absorbs some of their excess moisture, which can make the cake too wet. Do not thaw them before adding them to the batter.
How should I store the White Chocolate and Raspberry Loaf Cake?
Once completely cooled, store the loaf cake in an airtight container at room temperature for up to 3-4 days. For longer storage, you can keep it in the refrigerator for up to a week. To enjoy it at its best after refrigeration, let it come to room temperature or warm a slice slightly in the microwave for a few seconds.
Can I freeze this loaf cake?
Yes, this loaf cake freezes beautifully! Once it’s completely cooled, wrap the entire loaf or individual slices tightly in plastic wrap, then an additional layer of aluminum foil. It can be stored in the freezer for up to 2-3 months. To thaw, simply unwrap and let it sit at room temperature for a few hours, or overnight in the refrigerator.
My loaf cake is sinking in the middle, what went wrong?
There are a few common reasons for a cake sinking in the middle. It could be due to opening the oven door too early during baking, which lets out heat and can cause the cake to collapse. It might also be underbaked, meaning the center isn’t fully set. Ensure your oven temperature is accurate (an oven thermometer can help!) and always bake until a wooden skewer inserted into the center comes out clean. Overmixing the batter can also incorporate too much air, which then collapses during baking, so mix just until combined.
Can I make this recipe as muffins or cupcakes?
Yes, you can! The batter is very versatile. To make muffins or cupcakes, line a muffin tin with paper liners and fill them about two-thirds full. The baking time will be significantly shorter, likely around 20-25 minutes, but keep an eye on them and test for doneness with a skewer. You’ll get a lovely batch of treats!
Moist White Chocolate Raspberry Loaf Cake – Irresistible!
An irresistible, moist white chocolate and raspberry loaf cake perfect for brunch, coffee breaks, or dessert. Features tart raspberries balanced with sweet white chocolate, and a tender crumb.
Ingredients
-
175g unsalted butter
-
200g granulated sugar
-
3 large eggs
-
1 tsp pure vanilla extract
-
250g all-purpose flour
-
2 tsp baking powder
-
1/2 tsp fine sea salt
-
80ml whole milk
-
150g white chocolate, chopped
-
150g fresh raspberries
-
1 tbsp all-purpose flour (for dusting raspberries)
-
For the Optional Glaze:
-
100g powdered sugar
-
2-3 tbsp milk or lemon juice
Instructions
-
Step 1
Preheat oven to 180°C (350°F) or 160°C (325°F) for convection oven. Lightly grease a 9×5 inch (23×13 cm) loaf pan, then line with parchment paper, leaving an overhang. -
Step 2
In a medium bowl, whisk together 250g all-purpose flour, 2 teaspoons baking powder, and 1/2 teaspoon fine sea salt. -
Step 3
In a large mixing bowl, beat 175g softened unsalted butter and 200g granulated sugar on medium speed for 3-5 minutes until light and fluffy. Scrape down bowl sides as needed. -
Step 4
Add 3 large room-temperature eggs one at a time, beating well after each. Beat in 1 teaspoon pure vanilla extract until just combined. -
Step 5
Alternately add the dry mixture and 80ml room-temperature whole milk to the wet ingredients, starting and ending with dry. Mix on low speed, or fold by hand, until just combined; do not overmix. -
Step 6
Toss 150g fresh raspberries with 1 tablespoon of all-purpose flour in a small bowl. Gently fold the floured raspberries and 150g chopped white chocolate into the batter with a rubber spatula until evenly distributed. -
Step 7
Spoon batter into the prepared loaf pan and smooth the top. Bake for 50-65 minutes, or until golden brown and a toothpick inserted into the center comes out clean. Tent with foil if browning too quickly. -
Step 8
Cool cake in pan for 10-15 minutes. Lift out onto a wire rack to cool completely (1-2 hours) before slicing. -
Step 9
(Optional) Once cool, sift 100g powdered sugar into a small bowl. Gradually whisk in 2-3 tablespoons milk or lemon juice until smooth and pourable. Drizzle over cooled cake and let set for 15-20 minutes before slicing.
Important Information
Nutrition Facts (Per Serving)
It is important to consider this information as approximate and not to use it as definitive health advice.
Allergy Information
Please check ingredients for potential allergens and consult a health professional if in doubt.

Leave a Comment