
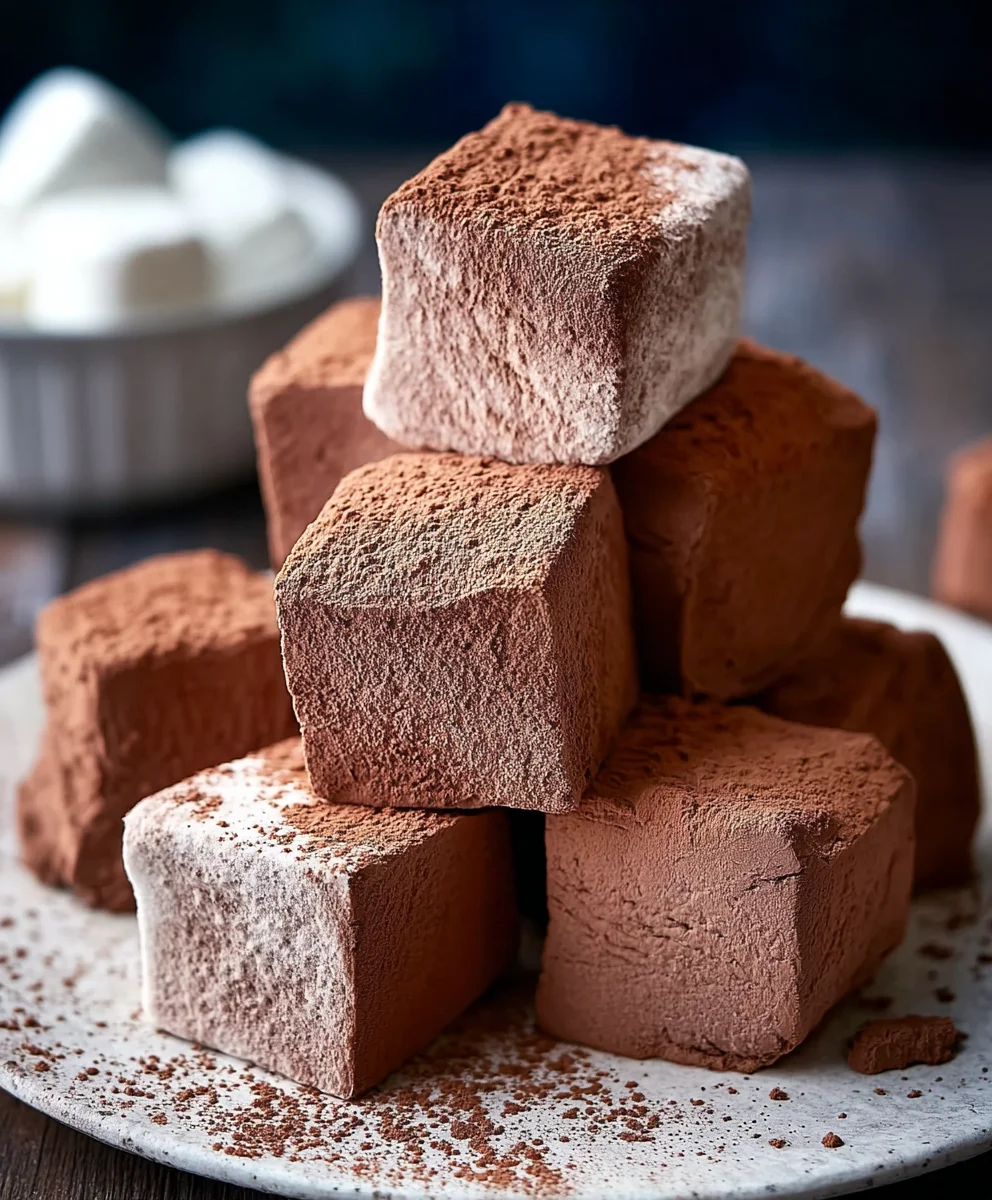
Chocolate Marshmallows are more than just a sweet treat; they’re a nostalgic hug in confectionary form. Who can resist the pillowy softness of a perfectly made marshmallow, especially when it’s infused with rich, decadent chocolate? I certainly can’t! This recipe taps into that universal love for comforting flavors and textures, transforming simple ingredients into something truly magical. What makes these homemade chocolate marshmallows so special? It’s the unparalleled freshness, the customizable chocolate intensity, and the sheer joy of creating them yourself. Forget the store-bought versions that often lack that authentic, melt-in-your-mouth quality. These are the chocolate marshmallows you’ve been dreaming of, perfect for dipping, s’mores, or simply enjoying on their own as a little moment of pure bliss.

Ingredients:
- 1/4 cup confectioner’s sugar
- 1/4 cup unsweetened cocoa powder
- 27g gelatin powder (approximately 9 teaspoons)
- 1/2 cup water, for blooming gelatin
- 1/3 cup Dutch-process cocoa powder
- 1/3 cup boiling water
- 1 tablespoon vanilla extract
- 1/2 teaspoon instant coffee granules
- 2 1/4 cups granulated white sugar
- 1/3 cup light corn syrup
- 1/4 cup water, for sugar syrup
- 1/4 teaspoon sea salt
Preparing the Marshmallow Base
The first crucial step to achieving perfectly fluffy and delicious Chocolate Marshmallows is to properly bloom your gelatin. In a medium-sized bowl, combine the 27g of gelatin powder with 1/2 cup of cool water. Whisk gently until no dry clumps of gelatin remain. Allow this mixture to sit undisturbed for about 5-10 minutes. You’ll notice it transform into a thick, jelly-like substance. This blooming process is essential for activating the gelatin’s gelling properties, which will give our marshmallows their signature chew.
While the gelatin is blooming, it’s time to prepare the flavorful chocolate base. In a separate small bowl, whisk together the 1/3 cup of Dutch-process cocoa powder and the 1/3 cup of boiling water. This step, often called “blooming” the cocoa, helps to intensify its rich chocolate flavor and dissolve any stubborn cocoa powder lumps. Stir until you have a smooth, thick paste. This concentrated chocolate mixture will infuse our marshmallows with a deep, satisfying cocoa taste. Next, stir in the 1 tablespoon of vanilla extract and the 1/2 teaspoon of instant coffee granules. The coffee, while not making the marshmallows taste distinctly like coffee, acts as a flavor enhancer, further deepening the chocolate notes. Set this chocolate mixture aside.
Cooking the Sugar Syrup
Now, let’s get to the heart of the marshmallow-making process: cooking the sugar syrup. In a medium saucepan, combine the 2 1/4 cups of granulated white sugar, the 1/3 cup of light corn syrup, and the 1/4 cup of water. Add the 1/4 teaspoon of sea salt to the mixture as well. The salt helps to balance the sweetness and adds a subtle complexity to the flavor profile.
Place the saucepan over medium heat. Stir the ingredients constantly until the sugar has completely dissolved. Once the sugar is dissolved, stop stirring. Insert a candy thermometer into the saucepan, ensuring it doesn’t touch the bottom. Continue to cook the syrup, without stirring, until it reaches 240°F (115°C) on the candy thermometer. This is the soft-ball stage, and it’s critical for achieving the right texture in your marshmallows. This process can take anywhere from 8 to 12 minutes, so be patient and keep a close eye on the thermometer.
Combining and Whipping
Once the sugar syrup has reached 240°F (115°C), carefully remove the saucepan from the heat. It’s time to incorporate our bloomed gelatin and chocolate mixture into this hot syrup. Gently pour the bloomed gelatin into the bowl of your stand mixer. Then, slowly and carefully, stream the hot sugar syrup into the bowl with the gelatin, making sure to avoid splashing the hot liquid.
Next, add the prepared chocolate mixture to the bowl. Now, attach the whisk attachment to your stand mixer. Begin whipping the mixture on low speed, gradually increasing the speed to high. Continue whipping for approximately 10-15 minutes. You’ll see the mixture transform from a thin liquid into a thick, glossy, and incredibly fluffy marshmallow cream. The mixture will become white and significantly increase in volume. It should hold stiff peaks when the whisk is lifted. This extended whipping time is what incorporates air and creates that characteristic light and airy texture of homemade marshmallows.
Setting and Cutting
Prepare your pan for the marshmallows. Lightly grease a 9×13 inch baking pan with a neutral oil or cooking spray. Then, dust the bottom and sides generously with a mixture of the 1/4 cup confectioner’s sugar and the 1/4 cup unsweetened cocoa powder. This coating will prevent sticking and add an extra layer of chocolatey goodness.
Carefully pour the whipped marshmallow mixture into the prepared pan. Use an offset spatula, lightly greased or dipped in water, to spread the mixture evenly into the corners of the pan. Be quick, as the marshmallow will start to set relatively fast. Once evenly spread, dust the top generously with more of the confectioner’s sugar and cocoa powder mixture. This second dusting is essential for easy handling and cutting later on. Let the marshmallows set undisturbed at room temperature for at least 4 hours, or preferably overnight, to firm up completely. Once fully set, gently invert the pan onto a clean surface that has also been dusted with the sugar-cocoa mixture. Cut the marshmallows into your desired shapes using a sharp knife or pizza cutter that has been lightly greased or dusted. You can create classic squares, or get creative with cookie cutters for fun shapes. Dust the cut sides with more of the sugar-cocoa mixture to prevent them from sticking together.

Conclusion:
And there you have it – a delightful journey into creating your very own perfect Chocolate Marshmallows! This recipe has been designed to be both achievable for beginners and satisfying for seasoned bakers. The rich, fudgy texture of the chocolate combined with the airy, sweet marshmallow is truly a match made in heaven. I encourage you to try this recipe and experience the joy of homemade treats that are miles beyond anything store-bought.
These Chocolate Marshmallows are incredibly versatile. They’re fantastic dipped in more melted chocolate for an extra decadent touch, or simply enjoyed as they are. For serving suggestions, consider them as a star player in a gourmet s’more, a luxurious topping for hot cocoa, or a sweet bite alongside your morning coffee. Don’t be afraid to get creative with variations! You could swirl in some caramel before they set, add a pinch of sea salt to enhance the chocolate flavor, or even incorporate a hint of espresso powder for a mocha twist. Enjoy every delicious bite!
Frequently Asked Questions:
Can I make these Chocolate Marshmallows ahead of time?
Absolutely! Chocolate Marshmallows can be made a day or two in advance and stored at room temperature in an airtight container. This makes them perfect for parties or as make-ahead gifts.
What’s the best way to cut the marshmallows cleanly?
For the cleanest cuts, lightly grease a sharp knife with a neutral oil (like vegetable or canola) or spray it with cooking spray. Wipe the knife clean between cuts to prevent sticking.
Are there any gluten-free options for this recipe?
Yes, the base marshmallow recipe is naturally gluten-free! As long as you use gluten-free chocolate for dipping or incorporating, these Chocolate Marshmallows can easily be made to suit a gluten-free diet. Always check the labels of your ingredients to be sure.
Delicious Homemade Chocolate Marshmallows
A delightful recipe for making fluffy and rich homemade chocolate marshmallows from scratch. These marshmallows are perfect for snacking, hot chocolate, or s’mores.
Ingredients
-
1/4 cup confectioner’s sugar
-
1/4 cup unsweetened cocoa powder
-
27g gelatin powder (approximately 9 teaspoons)
-
1/2 cup water, for blooming gelatin
-
1/3 cup Dutch-process cocoa powder
-
1/3 cup boiling water
-
1 tablespoon vanilla extract
-
1/2 teaspoon instant coffee granules
-
2 1/4 cups granulated white sugar
-
1/3 cup light corn syrup
-
1/4 cup water, for sugar syrup
-
1/4 teaspoon sea salt
Instructions
-
Step 1
Bloom the gelatin by combining 27g of gelatin powder with 1/2 cup of cool water in a medium bowl. Whisk until smooth and let sit for 5-10 minutes until thick and jelly-like. -
Step 2
Prepare the chocolate base by whisking 1/3 cup of Dutch-process cocoa powder with 1/3 cup of boiling water until a smooth paste forms. Stir in 1 tablespoon of vanilla extract and 1/2 teaspoon of instant coffee granules. Set aside. -
Step 3
Cook the sugar syrup by combining 2 1/4 cups granulated white sugar, 1/3 cup light corn syrup, 1/4 cup water, and 1/4 teaspoon sea salt in a medium saucepan. Stir over medium heat until sugar dissolves, then stop stirring. Insert a candy thermometer and cook without stirring until the syrup reaches 240°F (115°C). -
Step 4
Combine the mixtures: Pour the bloomed gelatin into a stand mixer bowl. Slowly stream the hot sugar syrup into the gelatin while the mixer is off. Add the prepared chocolate mixture. -
Step 5
Whip the mixture: Attach the whisk attachment to the stand mixer. Start on low speed, gradually increasing to high. Whip for 10-15 minutes until the mixture is thick, glossy, fluffy, and holds stiff peaks. -
Step 6
Set and cut: Lightly grease and dust a 9×13 inch baking pan with a mixture of 1/4 cup confectioner’s sugar and 1/4 cup unsweetened cocoa powder. Pour the marshmallow mixture into the pan and spread evenly. Dust the top generously with more of the sugar-cocoa mixture. Let set at room temperature for at least 4 hours or overnight. Invert onto a dusted surface and cut into desired shapes using a greased or dusted knife or pizza cutter. Dust cut sides to prevent sticking.
Important Information
Nutrition Facts (Per Serving)
It is important to consider this information as approximate and not to use it as definitive health advice.
Allergy Information
Please check ingredients for potential allergens and consult a health professional if in doubt.

Leave a Comment