
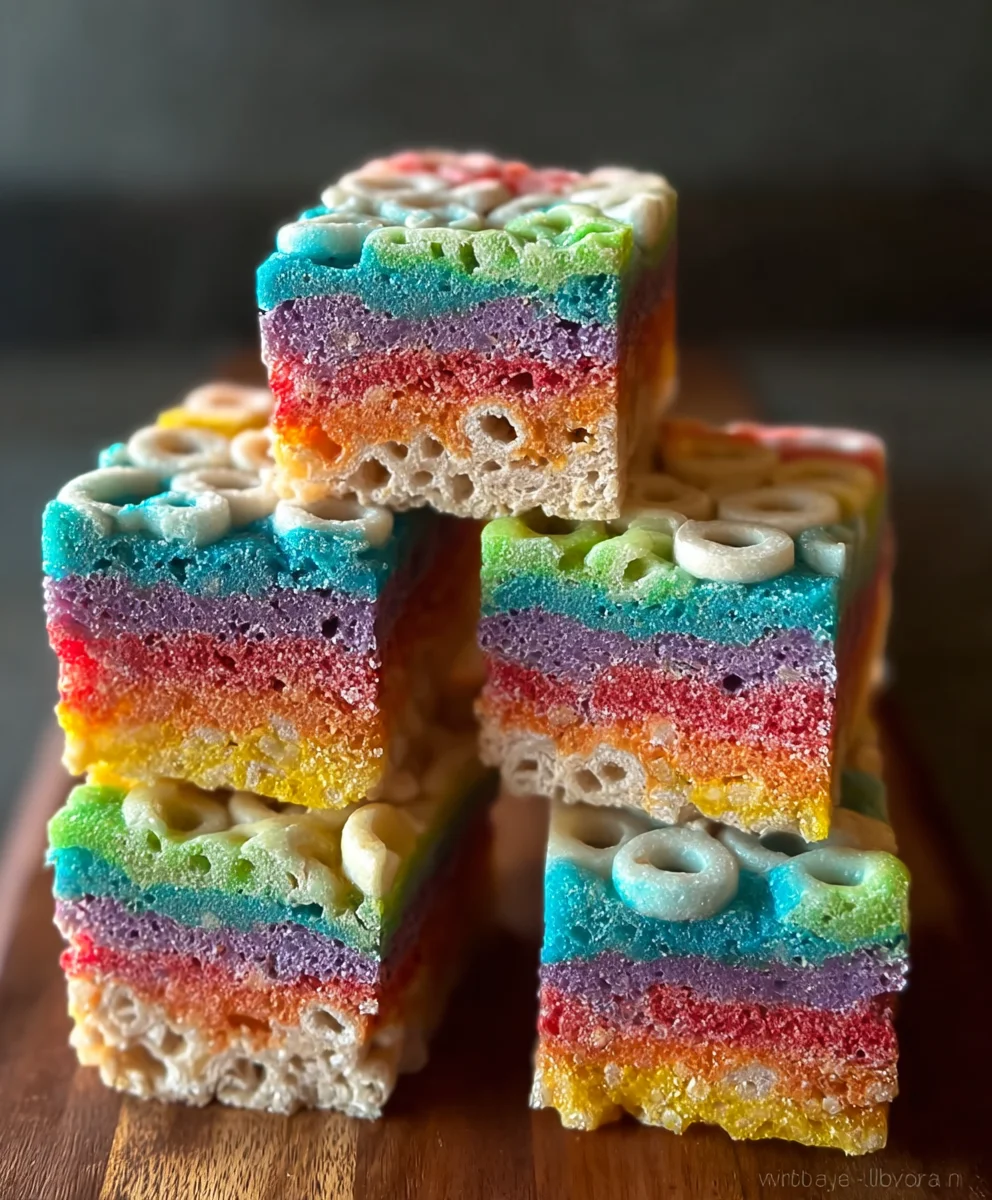
Rainbow Bars are the ultimate treat that brings a burst of color and joy to any occasion. Whether you’re celebrating a birthday, looking for a fun bake sale item, or simply craving something utterly delightful, these vibrant bars deliver. What is it about Rainbow Bars that captures our hearts and taste buds? It’s the incredible combination of a chewy, buttery shortbread base, a lusciously sweet and slightly tart fruit filling that shines in every hue, and a sprinkle of magic that makes them undeniably addictive. Each bite is a playful explosion of flavors and textures, transforming an ordinary moment into something extraordinary. These aren’t just any dessert; they’re edible art, a celebration in bar form. Get ready to discover how easy it is to create your own dazzling batch of Rainbow Bars that are guaranteed to impress everyone who gets to experience them!

Ingredients:
- 6 tablespoons margarine
- 16 oz mini marshmallows
- 12 cups Fruit Loops cereal
Preparing the Rainbow Bars
The magic of these Rainbow Bars lies in their vibrant colors and satisfyingly chewy texture. It’s a simple, no-bake treat that’s perfect for parties, after-school snacks, or just a fun weekend activity with the kids. Gather your few, but mighty, ingredients and let’s get started on creating this delightful confection.
The foundation of our Rainbow Bars is a sweet, gooey binder that holds all those colorful cereal pieces together. We’ll be working with melted margarine and marshmallows to create this sticky embrace. It’s important to have everything measured out and ready to go before you begin, as this process moves relatively quickly once the marshmallows start melting.
Step-by-Step Instructions
Step 1: Greasing Your Pan
Before we even think about melting anything, the very first crucial step is to prepare your baking pan. You’ll need a 9×13 inch baking pan for this recipe. Take a generous amount of non-stick cooking spray or some softened butter and thoroughly grease the entire inside of the pan. Make sure to get into all the corners and up the sides. This step is absolutely vital to prevent your delicious Rainbow Bars from sticking to the pan, which would make for a very frustrating removal process. You want those bars to slide out cleanly! Some people even like to line the pan with parchment paper, leaving an overhang on the sides to create “handles” for lifting the whole block out later. If you choose to do this, still grease the pan lightly before placing the parchment paper, as sometimes the paper can stick too.
Step 2: Melting the Binder
Now, let’s create the delicious glue for our Rainbow Bars. In a large, microwave-safe bowl, combine the 6 tablespoons of margarine and the entire 16 oz bag of mini marshmallows. Place this bowl in the microwave. Heat on high power in 30-second intervals, stirring well after each interval. Continue this process until the marshmallows are completely melted and the mixture is smooth and creamy. Be careful not to overheat, as marshmallows can scorch easily. You want a smooth, flowing consistency, not a bubbly, burnt mess. Alternatively, you can do this on the stovetop in a large saucepan over low heat, stirring constantly until melted and smooth. Low and slow is the key here to avoid any burning.
Step 3: Combining Cereal and Marshmallow Mixture
Once your marshmallow mixture is perfectly melted and smooth, it’s time to introduce the star of the show: the Fruit Loops cereal! Immediately pour the 12 cups of Fruit Loops cereal into the bowl with the melted marshmallow mixture. Working quickly, use a sturdy spatula or a large wooden spoon to gently fold and stir the cereal into the marshmallow mixture. You want to coat every single piece of cereal evenly with the sticky, sweet binder. This is where you need to be a little bit forceful but also careful not to crush the cereal too much. The goal is to get a good coating, not to turn your colorful loops into dust. Make sure to scrape the sides and bottom of the bowl to incorporate all the cereal. The mixture will start to thicken as it cools slightly.
Step 4: Pressing the Rainbow Bars into the Pan
Now, carefully transfer the cereal and marshmallow mixture into your prepared 9×13 inch baking pan. Don’t just dump it in and expect it to spread evenly. You’ll need to gently press the mixture down into the pan to create a compact, even layer. The best way to do this is by lightly greasing your hands with a little cooking spray or butter, or by using the back of a greased spatula or spoon. Press down firmly but not so hard that you smash the cereal. You want to create a cohesive block that will hold its shape when cut. Take your time with this step to ensure a nice, flat surface. This makes for much neater cuts later on. If you find the mixture is sticking to your hands or spatula, just re-grease them as needed.
Step 5: Setting and Cutting the Bars
Once the mixture is evenly pressed into the pan, allow the Rainbow Bars to cool and set at room temperature for at least 1 hour, or until firm to the touch. You can speed up this process by placing the pan in the refrigerator for about 30-45 minutes. Once the bars are firm, it’s time to cut them! If you lined your pan with parchment paper, use the overhangs to carefully lift the entire block of Rainbow Bars out of the pan and onto a clean cutting board. Use a sharp knife to cut the bars into your desired size and shape. Squares are traditional, but you can also cut them into rectangles. For the neatest cuts, you can dip your knife in hot water and dry it before each cut, which helps to prevent sticking. Allow them to sit for a few more minutes if they seem a little soft, and then enjoy your vibrant Rainbow Bars!
Conclusion:
And there you have it – your guide to creating the most delightful and vibrant Rainbow Bars! We’ve walked through each step, from preparing the buttery crust to layering those glorious colors, and finishing with that irresistible sweet topping. These treats are not only a feast for the eyes but a party for your taste buds. Their festive appearance makes them perfect for birthdays, holidays, or simply to brighten any ordinary day.
When it comes to serving, these Rainbow Bars are wonderfully versatile. They’re fantastic on their own, but also pair beautifully with a scoop of vanilla ice cream or a dollop of whipped cream. For variations, don’t be afraid to experiment! You could try adding a sprinkle of white chocolate chips to the crust, or swirl in a bit of fruit puree for an extra burst of flavor and color. Most importantly, have fun with it! The joy is in the creation as much as the consumption.
Frequently Asked Questions:
Q1: Can I make the Rainbow Bars ahead of time?
Absolutely! These Rainbow Bars are ideal for making ahead. In fact, they often taste even better after the flavors have had a chance to meld. Store them in an airtight container at room temperature for up to 3 days, or in the refrigerator for up to a week. Just be sure to let them come to room temperature slightly before serving for the best texture.
Q2: How can I achieve sharper color lines in my Rainbow Bars?
To get those distinct, sharp color lines, it’s important to work methodically. Ensure each layer is spread as evenly as possible. For cleaner lines, you can gently run a spatula or offset knife around the edges of each colored layer before adding the next. Chilling the bars briefly between some of the more vibrant color layers can also help prevent them from bleeding into each other.
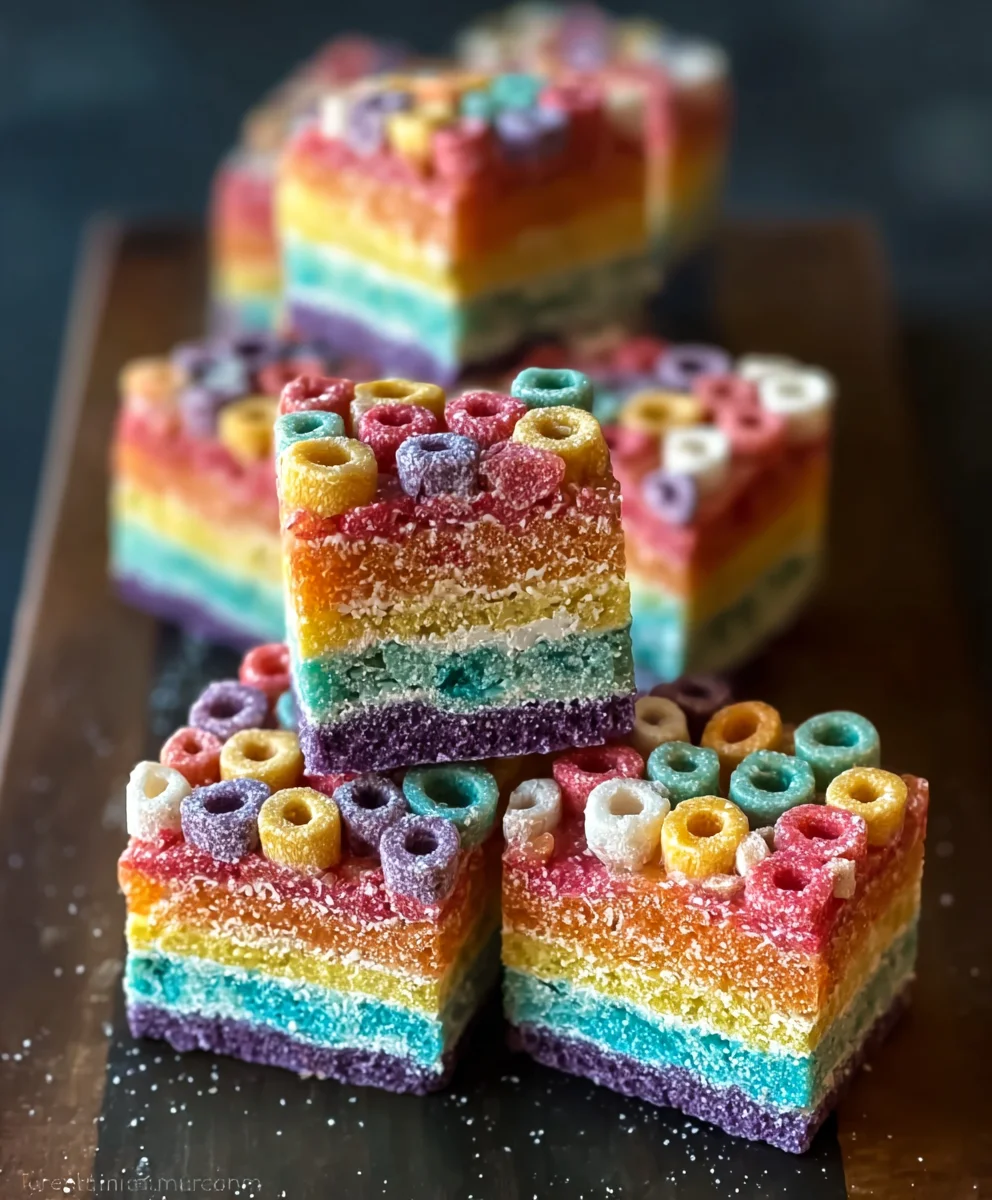
Vibrant Rainbow Bars
Easy, no-bake, vibrantly colored, and chewy dessert bars made with Fruit Loops cereal, margarine, and marshmallows. Perfect for parties or a fun family activity.
Ingredients
-
6 tablespoons margarine
-
16 oz mini marshmallows
-
12 cups Fruit Loops cereal
-
Non-stick cooking spray or softened butter (for greasing pan)
-
Parchment paper (optional, for lining pan)
Instructions
-
Step 1
Grease a 9×13 inch baking pan thoroughly with non-stick cooking spray or softened butter. Ensure corners and sides are well-coated to prevent sticking. Optionally, line the pan with parchment paper, leaving an overhang. -
Step 2
In a large, microwave-safe bowl, combine the margarine and mini marshmallows. Microwave on high in 30-second intervals, stirring well after each, until completely melted, smooth, and creamy. Avoid overheating. -
Step 3
Immediately add the Fruit Loops cereal to the melted marshmallow mixture. Quickly fold and stir with a sturdy spatula or wooden spoon until every cereal piece is evenly coated. Work quickly as the mixture will begin to thicken. -
Step 4
Transfer the cereal and marshmallow mixture into the prepared baking pan. Gently press the mixture down into an even layer using lightly greased hands or a greased spatula. Ensure a cohesive, flat surface. -
Step 5
Allow the bars to cool and set at room temperature for at least 1 hour, or until firm. Alternatively, refrigerate for 30-45 minutes. Once firm, lift the block out of the pan (if using parchment paper) and cut into desired shapes with a sharp knife. For cleaner cuts, dip the knife in hot water and dry it between cuts.
Important Information
Nutrition Facts (Per Serving)
It is important to consider this information as approximate and not to use it as definitive health advice.
Allergy Information
Please check ingredients for potential allergens and consult a health professional if in doubt.

Leave a Comment